Product Documentation
This document is a guide specifically for the OpenOTP SmartCard Provider for Windows. The SmartCard Provider is included in the OpenOTP Credential Provider for Windows and in the OpenOTP Authentication Package. As a first step of the installation, you are invited to install the SmartCard component. The installation of this package is not covered in this guide. Please refer to the Credential Provider for Windows documentation for installation instructions.
The installation or configuration of WebADM is also not covered here. For detailed installation and usage guides for WebADM, please refer to the RCDevs WebADM Installation Guide and the RCDevs WebADM Administrator Guide, available through the RCDevs documentation.
Product Overview
The OpenOTP SmartCard Provider for Windows integrates SmartCard authentication with the OpenOTP authentication server into the Windows login process. SmartCard-based authentication is supported by Windows for all login types involving Credential Providers.
A key feature of the OpenOTP SmartCard Provider is the ability to add multifactor authentication after SmartCard login. In this scenario, two authentication requests are sent to the OpenOTP Authentication Server:
- One request validates the user certificate presented by the SmartCard.
- The second request performs the second-factor authentication.
The second factor can be a push notification via the OpenOTP Token application, any OTP-based authenticator supported by the OpenOTP Server, FIDO keys, Magic Links, and more.
Note: Offline mode is supported for SmartCard-based authentication.
The OpenOTP SmartCard Provider allows you to set up a passwordless authentication system. Instead of requesting the user account password, the system will prompt for a PIN to unlock the SmartCard and access the certificate stored on it.
The OpenOTP SmartCard Provider for Windows offers two options for issuing certificates on the SmartCard:
- Issuing user certificates through Windows PKI services.
- Issuing user certificates via WebADM Internal PKI.
This documentation will cover both scenarios in detail.
For OpenOTP to validate the certificate presented by the SmartCard, the certificate must be available in the user's account under the UserCertificate attribute. For a certificate not issued by WebADM CA, the SubjectAltName of the certificate must contain the UserPrincipalName (UPN) of the user to whom the certificate was issued.
In this documentation, we use the PIV slot of a YubiKey 5C. To inject and use the certificate on the SmartCard via Remote Desktop Protocol, the YubiKey Mini Driver must be installed on the remote machine. Refer to your SmartCard provider to determine whether a driver needs to be installed for proper functionality.
On your Remote Desktop client, SmartCard transport/redirection must be enabled.
Configuration for Certificate issued by Microsoft Certificate Authorithy
Create a SmartCard certificate template
To open the Certificate Template in Active Directory, follow these steps:
- Press
Win + R, type mmc.exe, and press Enter to open the Microsoft Management Console (MMC). - Click File > Add/Remove Snap-in.
- Select Certificate Templates, click Add, then OK.
You should now see the list of available certificate templates.
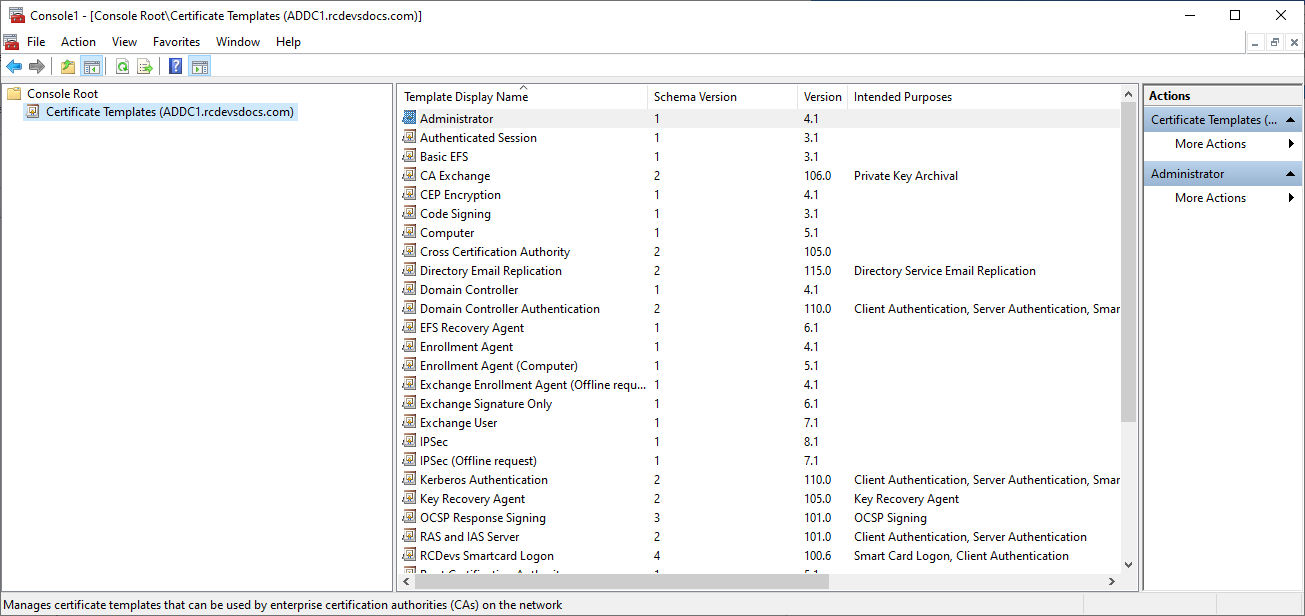
Right-click on the SmartCard User template, then select Duplicate. You will be prompted to configure the new template.
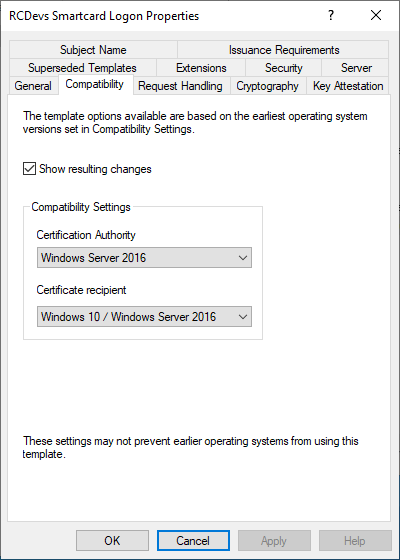
On the first page, update the compatibility settings as follows:
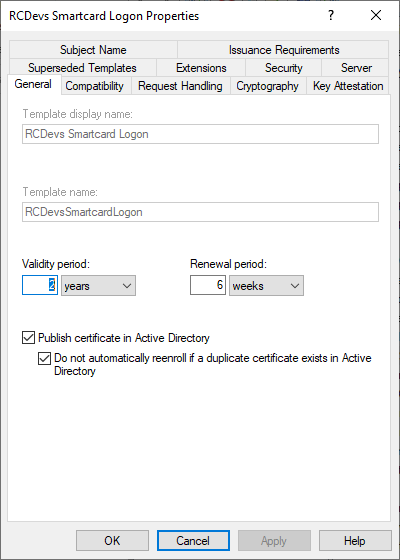
Switch to the General tab and assign a user-friendly name to your template.
In the Request Handling tab, check the following options:

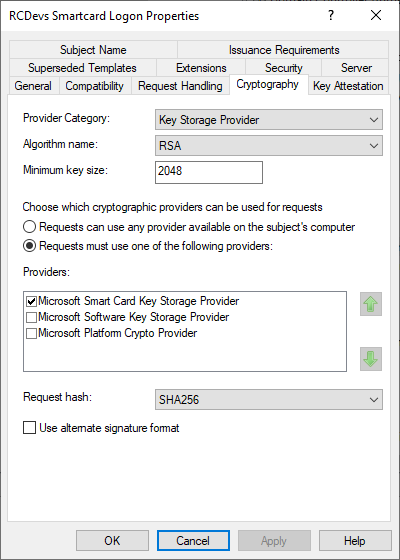
Access the Cryptography tab and configure as follow:
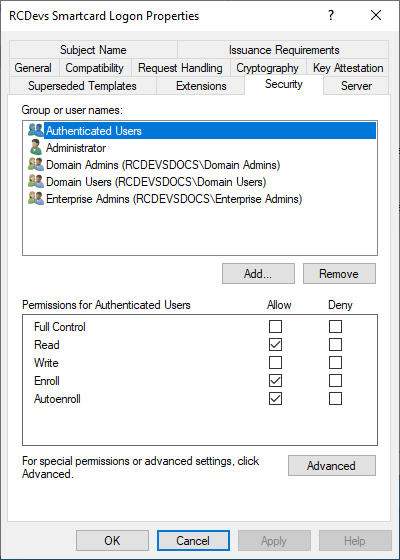
Access the Security tab and configure the following permissions for Domain Users:
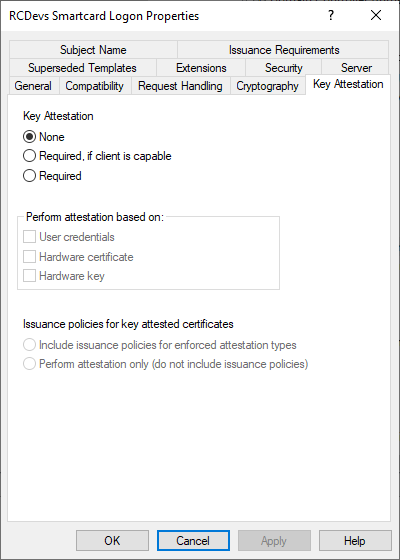
Access the Key Attestation tab and configure as follow:
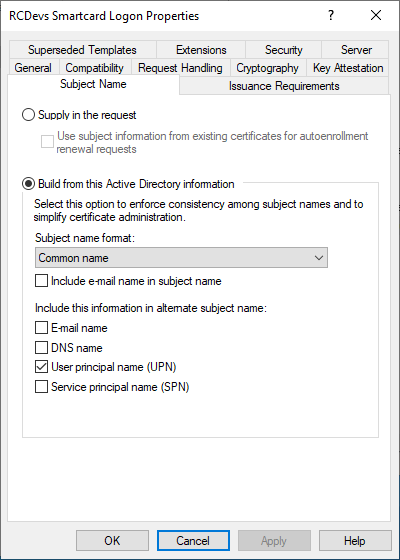
Access the Subject Name tab and configure the following parameters:
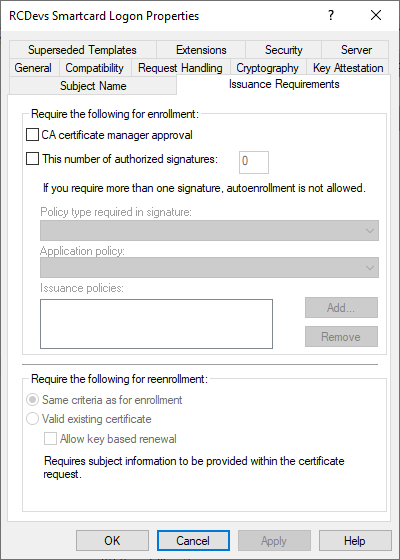
Finally, access the Issuance Requirements and configure as below:
The template configuration is now finished.
Publish the Certificate Template
Press Win + R, type certsrv.msc, and press Enter.
In the Certification Authority console, expand your CA server.
In the Certification Authority console, right-click Certificate Templates and select New > Certificate Template to Issue.
Select your freshly created template from the list and click OK.
Open the Certificates MMC (certmgr.msc) on a client machine. Attempt to request a new certificate to ensure the published template appears.
Now, your certificate template is published and ready for users or devices to request certificates.
Issue a certificate on the SmartCard
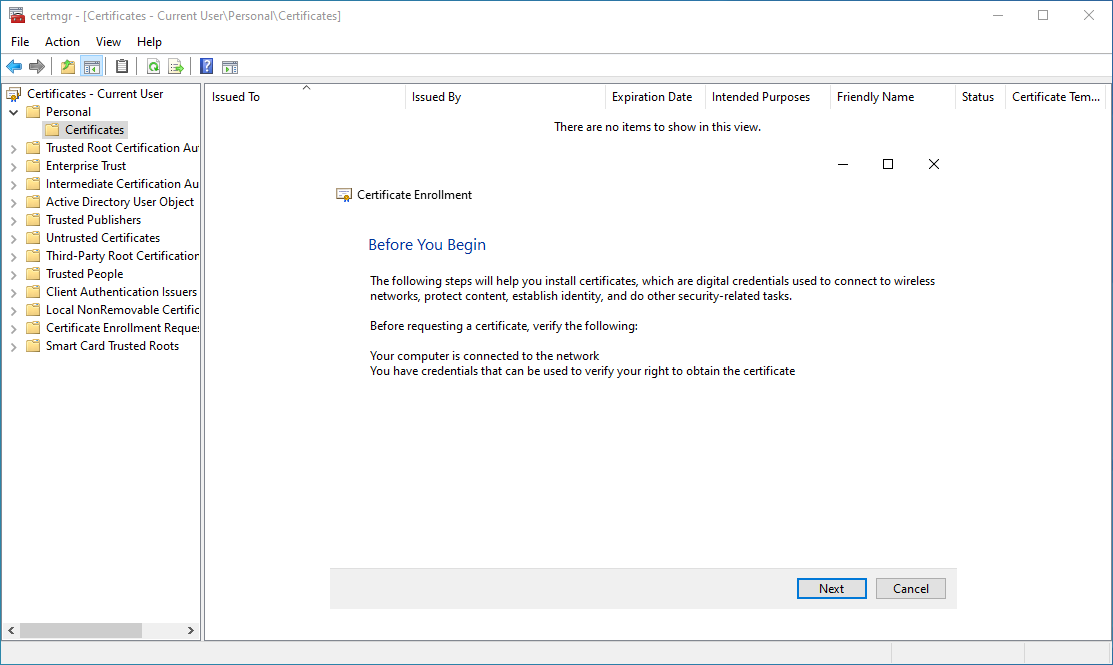
Open the certmgr.msc on a client machine. For the current user, under Personal, right click on Certificates store and navigate to All Tasks and click on Request New Certificate.
Click on Next.
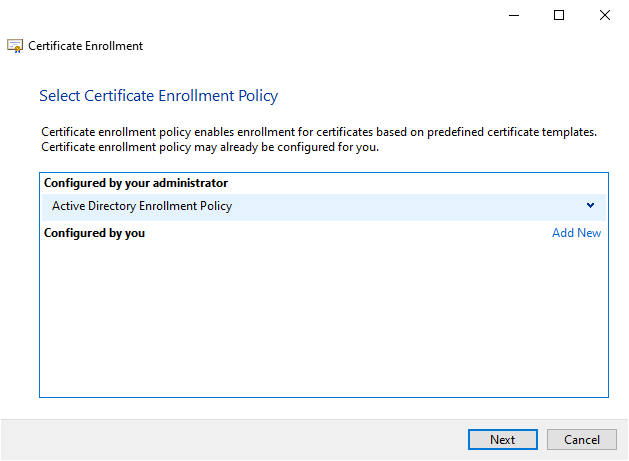
Choose the Active Directory Enrollment Policy and click next:
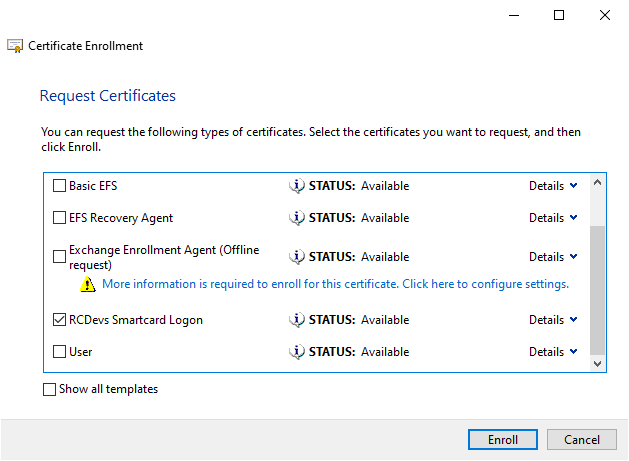
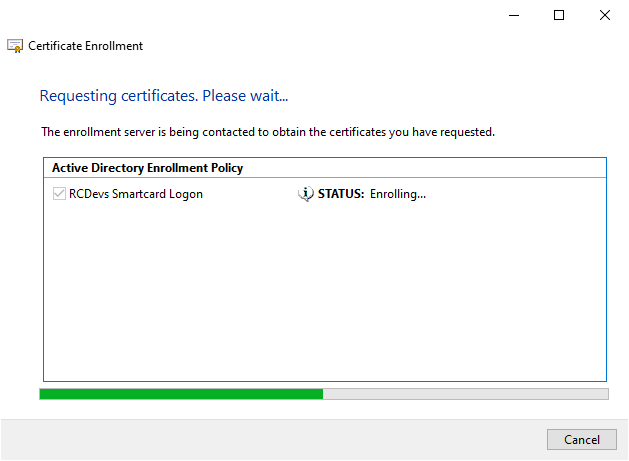
On the next page, select the SmartCard template you previously created. Before clicking Enroll, ensure that the SmartCard is plugged in. The certificate will be automatically injected into the SmartCard during the creation process.
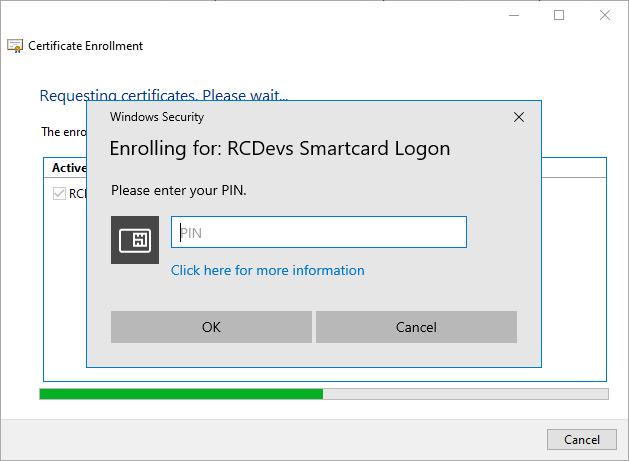
You are invited to provide the PIN which is protecting the SmartCard. Provide it and the process will continu.
Then a success message should appears once the enrollment is done:
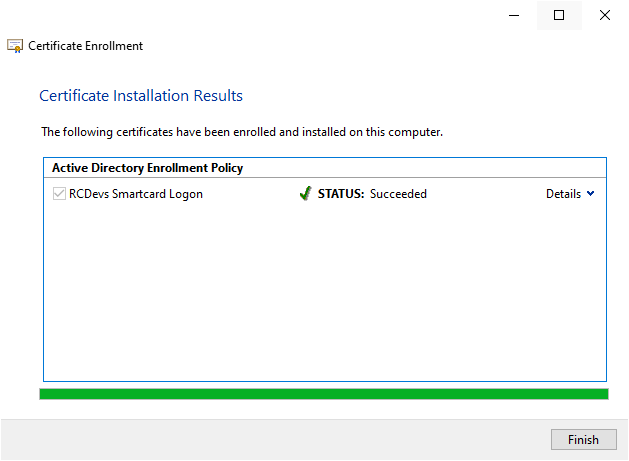
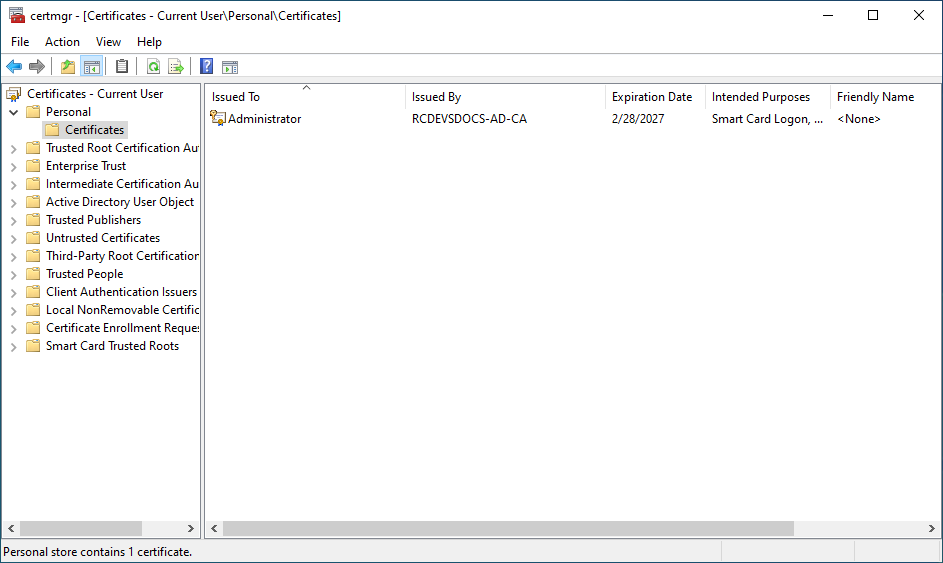
Click on Finish button. On the Certificate Management page, you should see the certificate freshly enrolled.
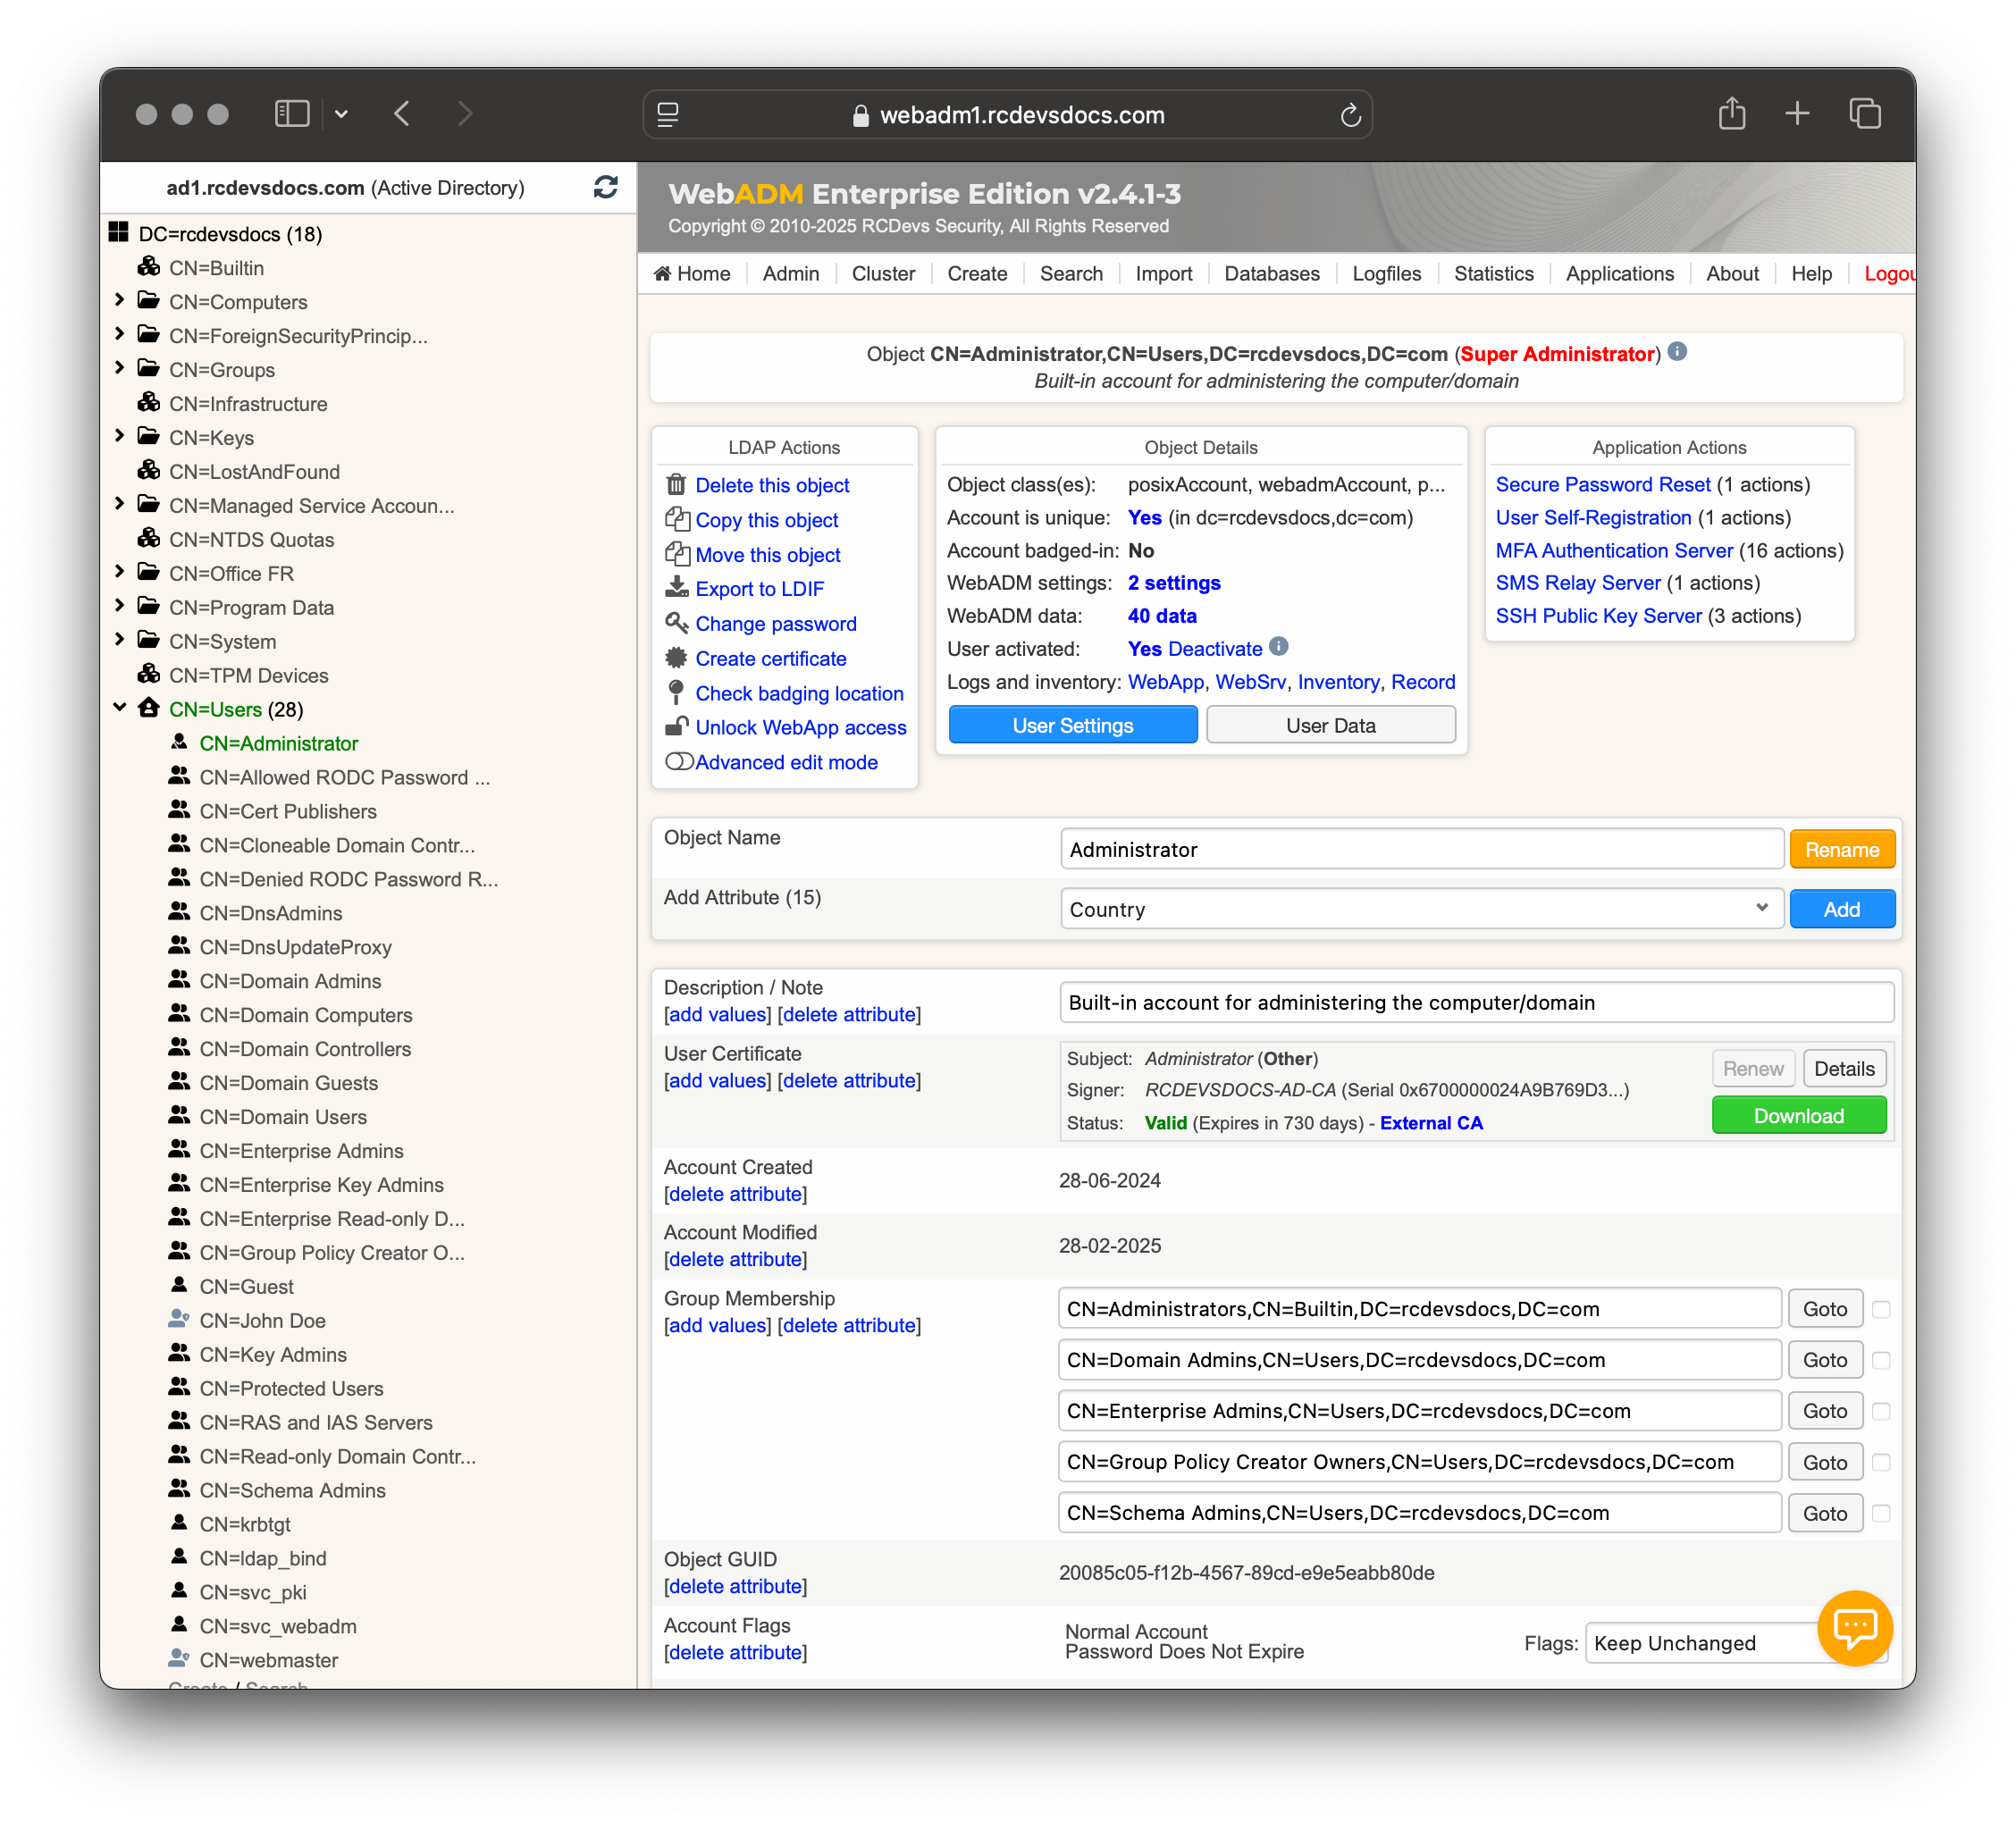
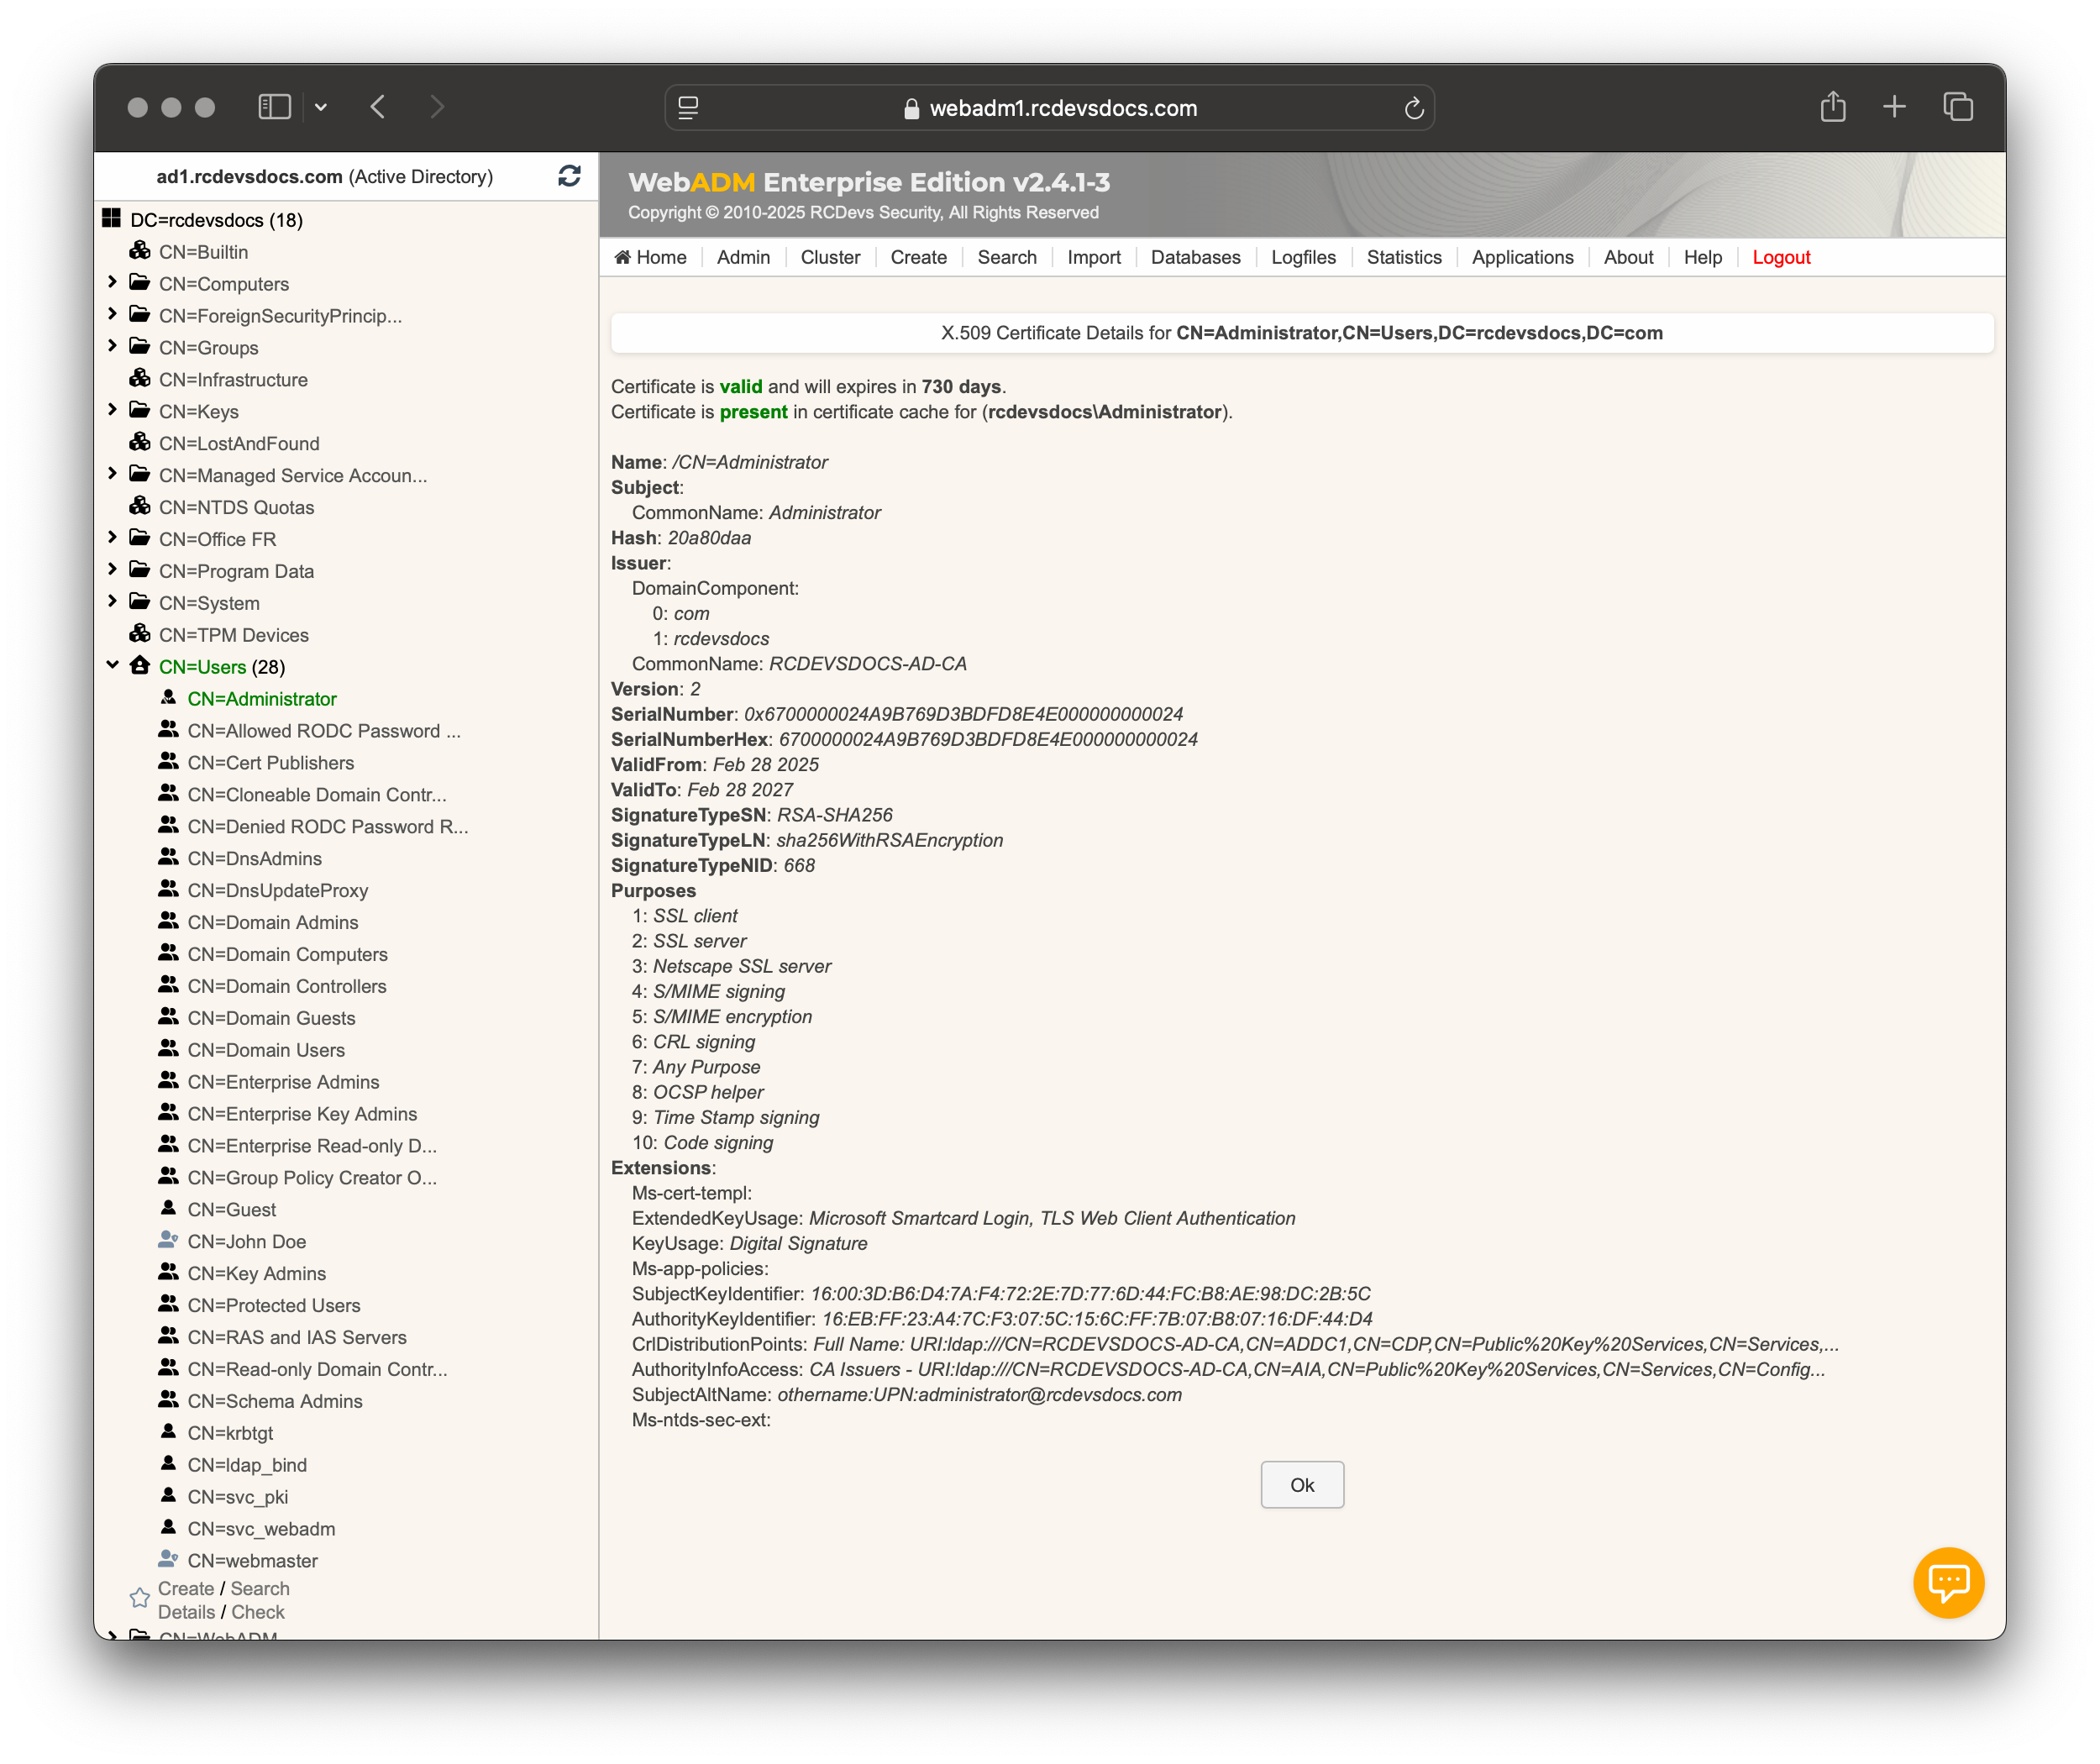
From WebADM Administrator Portal or from self-services, you should see the certificate available on the user account.
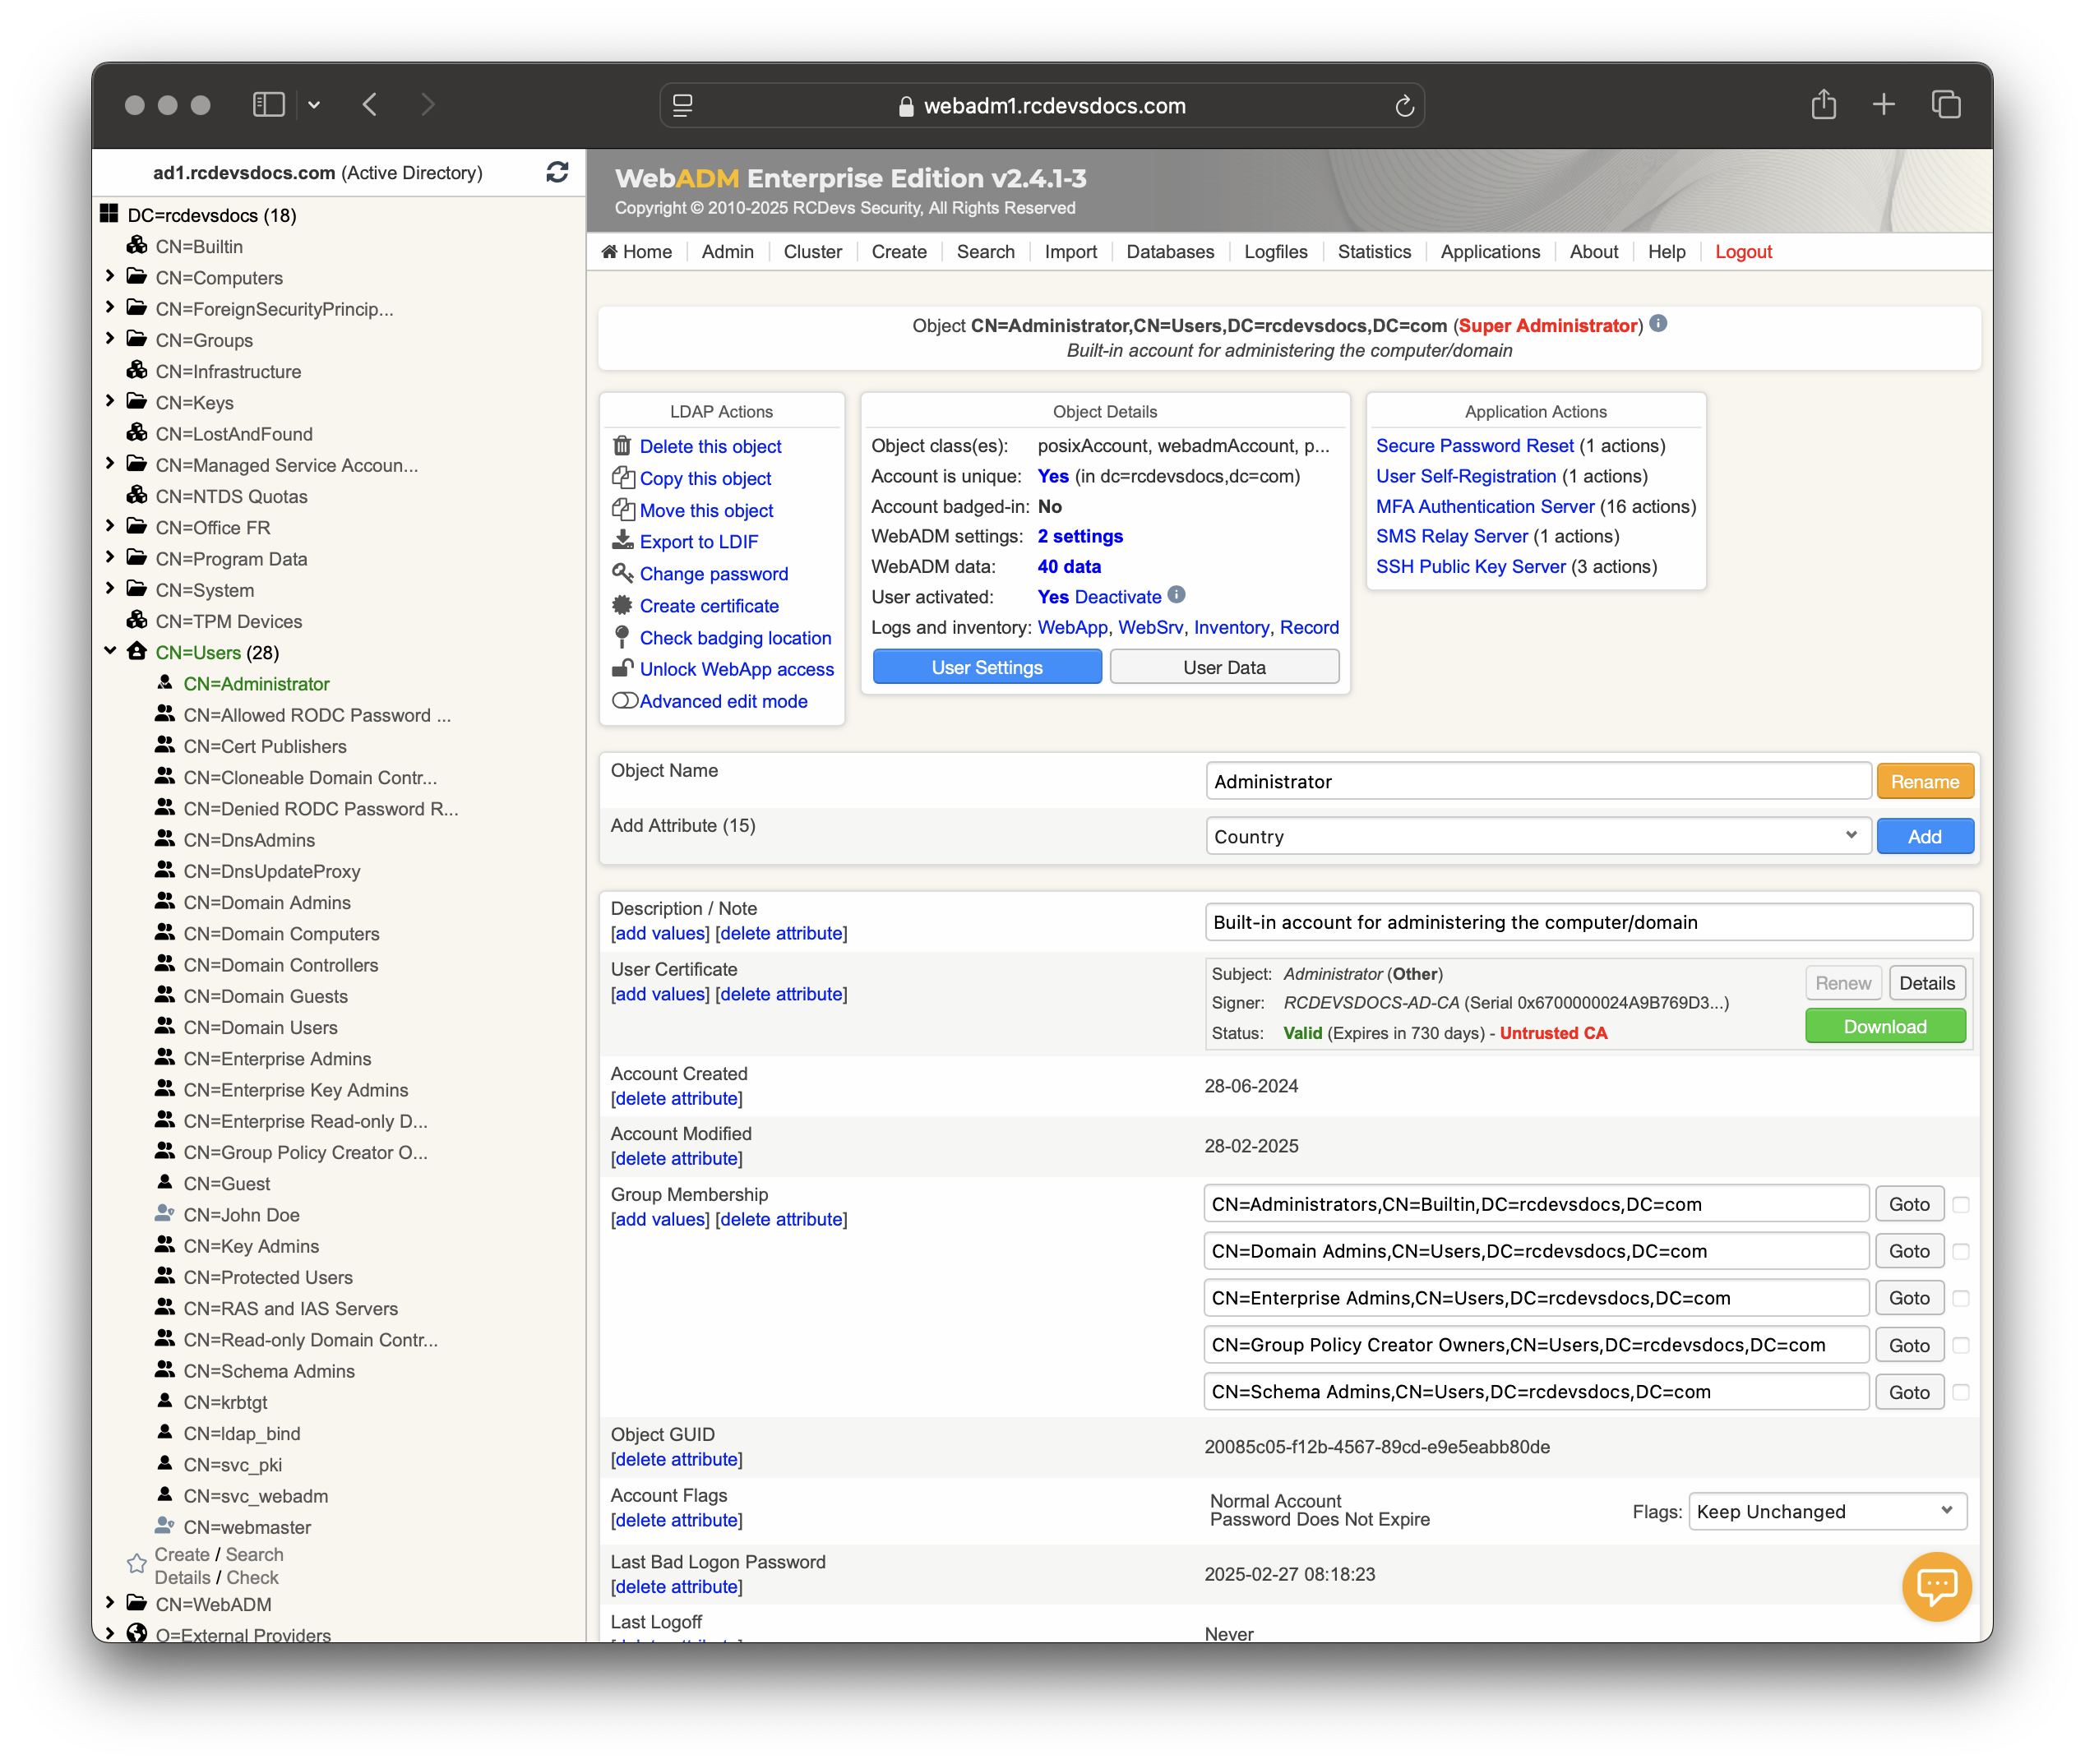
You may notice that the certificate is marked with a red message indicating Untrusted CA. This meesage appears because the Microsoft CA has not been trusted yet in WebADM. This will be done on the next step.
Trust relationship of your Microsoft CA in WebADM
To use the certificates issued by Microsoft CA with your WebADM Framework, WebADM must trust the Microsoft CA. To do this, you need to import the CA certificate into WebADM.
Download your Microsoft CA certificate in PEM format for import into WebADM.
To export the Microsoft CA certificate in PEM format, follow these steps:
Open the Certification Authority Console
- Press
Win + R, type certsrv.msc, and press Enter. - In the Certification Authority console, right-click your CA server name.
- Select Properties.
Export the CA Certificate
- In the General tab, click View Certificate.
- In the Certificate window, go to the Details tab.
- Click Copy to File to open the Certificate Export Wizard.
- Click Next, then select Base-64 encoded X.509 (.CER).
- Click Next, choose a file location (e.g.,
C:\CA_Certificate.cer), and click Finish.
Now, you have successfully exported the Microsoft CA certificate in PEM format.
Log in to WebADM with an administrator account, then click on the Admin tab. In Licensing and Configurations, click on Trusted CA Certificates, and then click the Import CA Certificate button.
Choose your preferred import method and click the corresponding Import Certificate Data button.
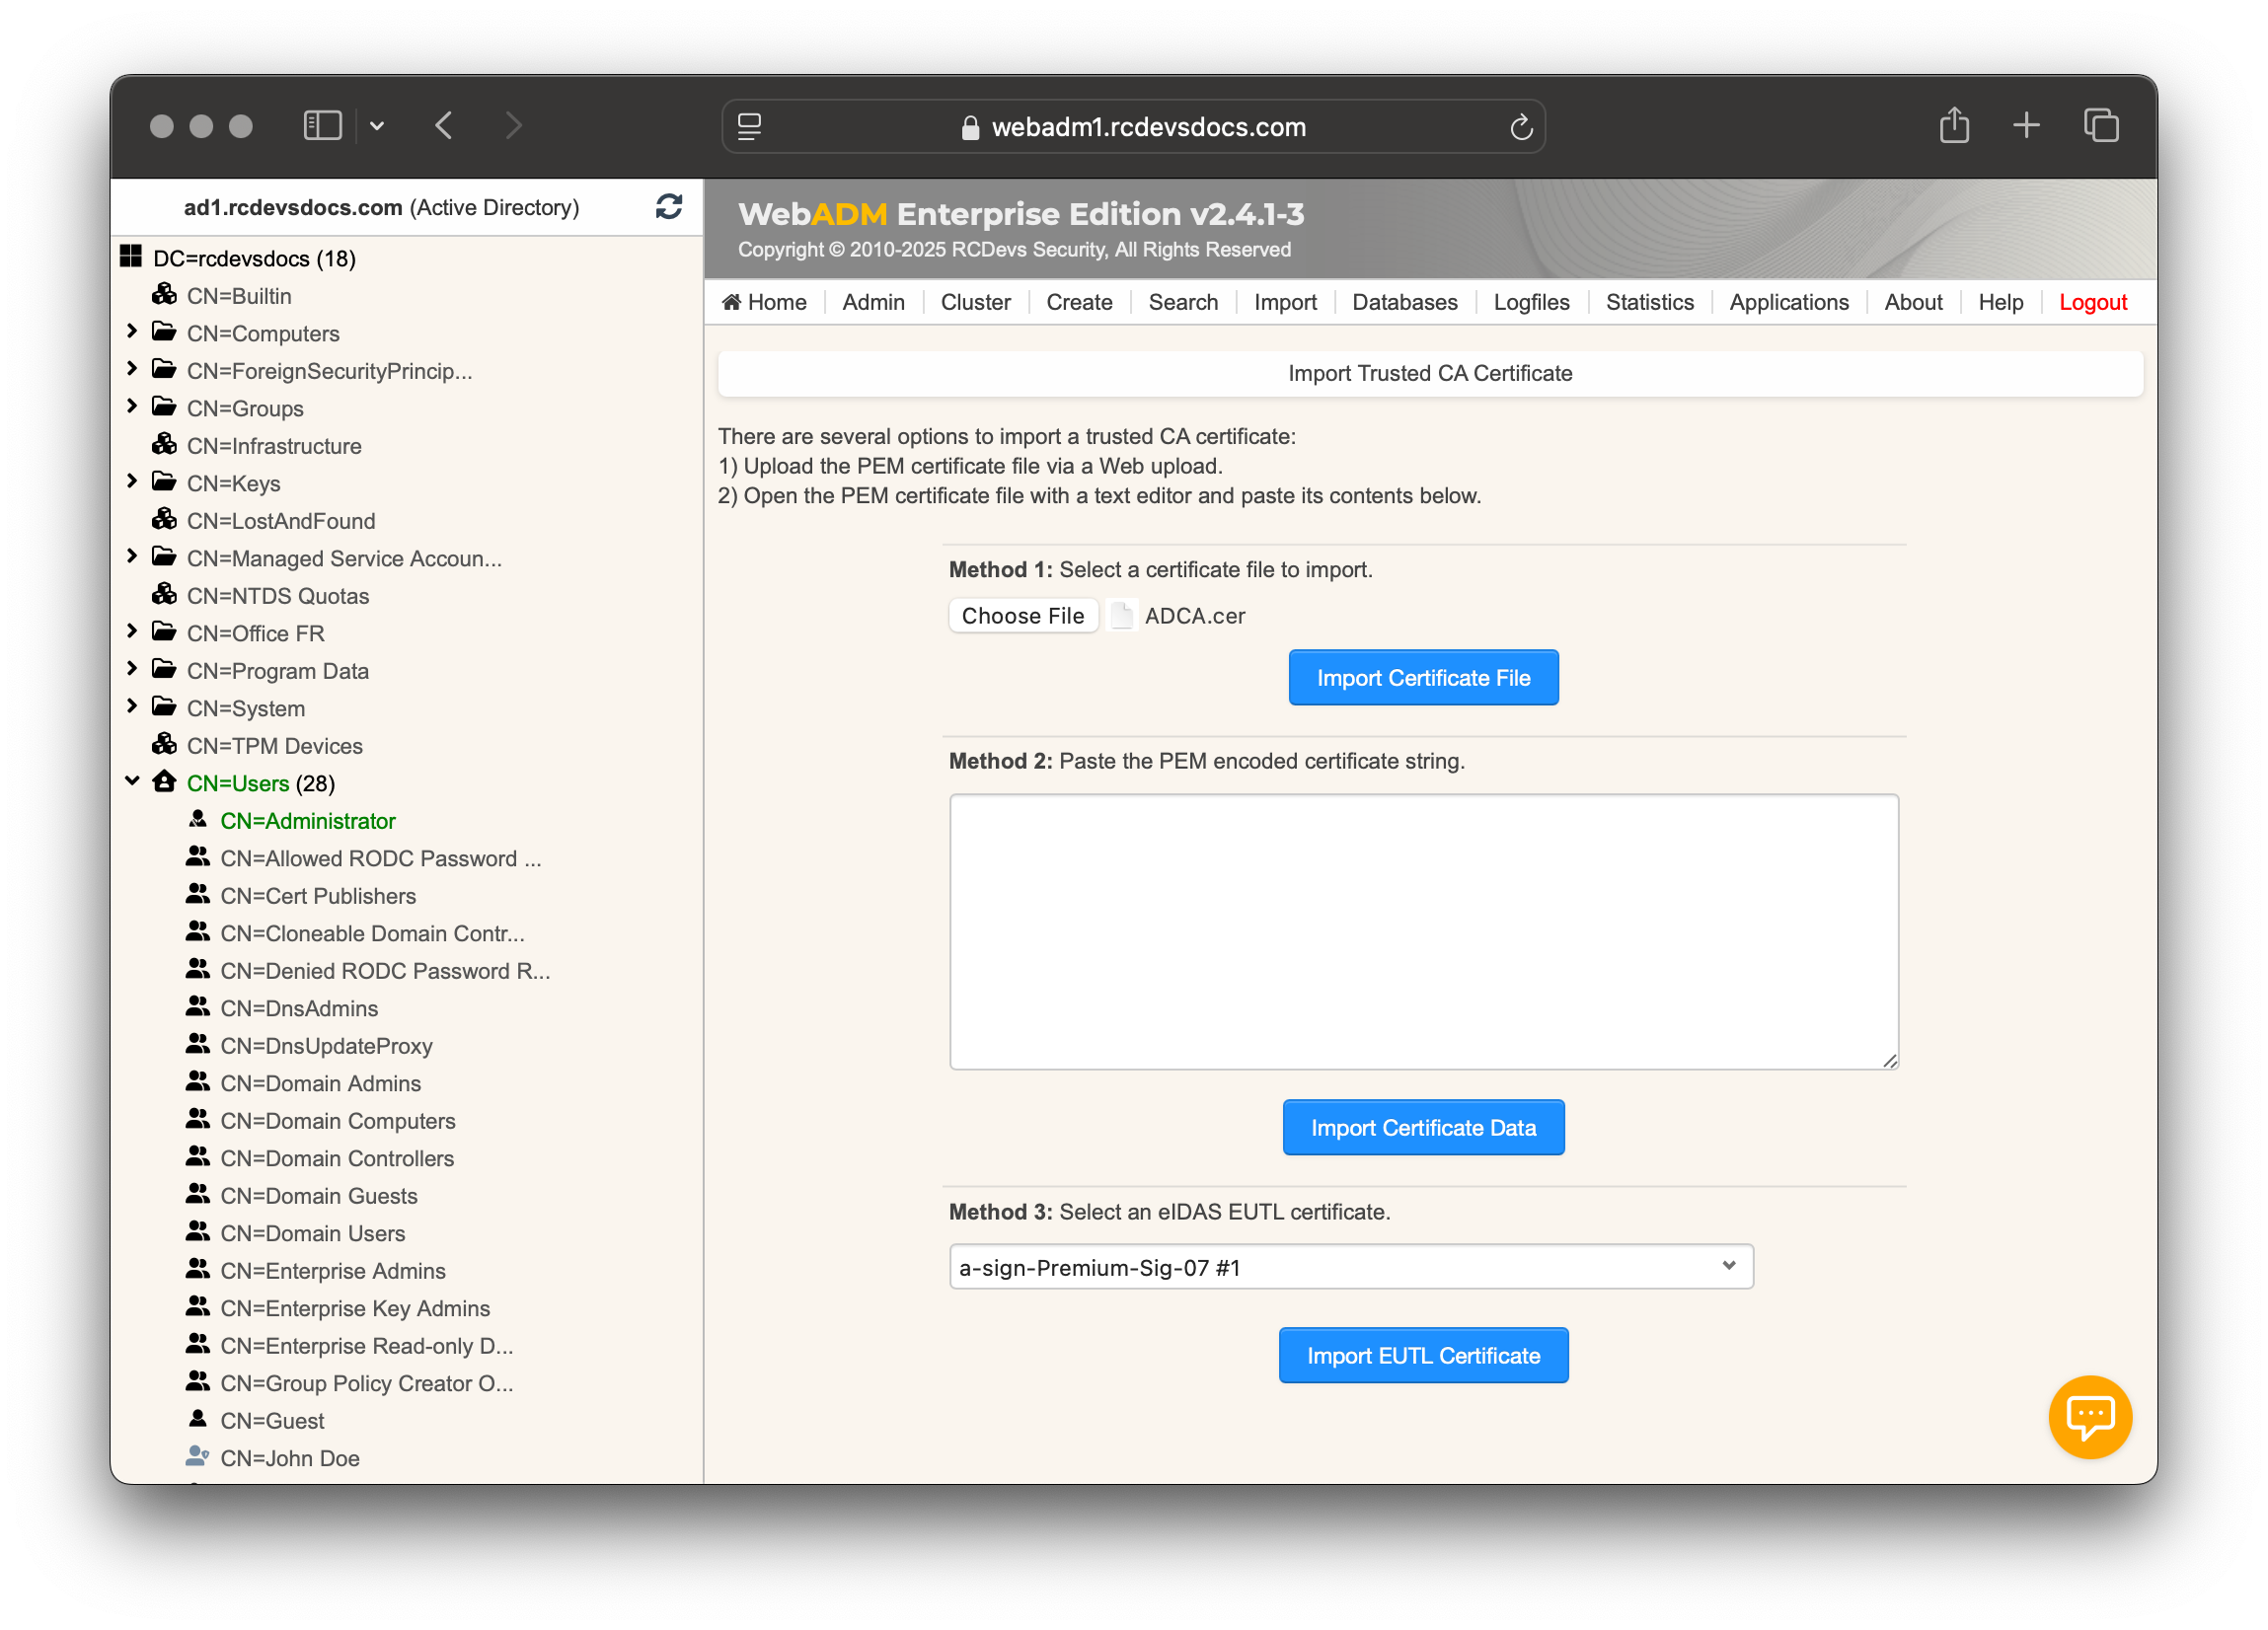
Once imported, you should see your Microsoft Certificate Authority listed:
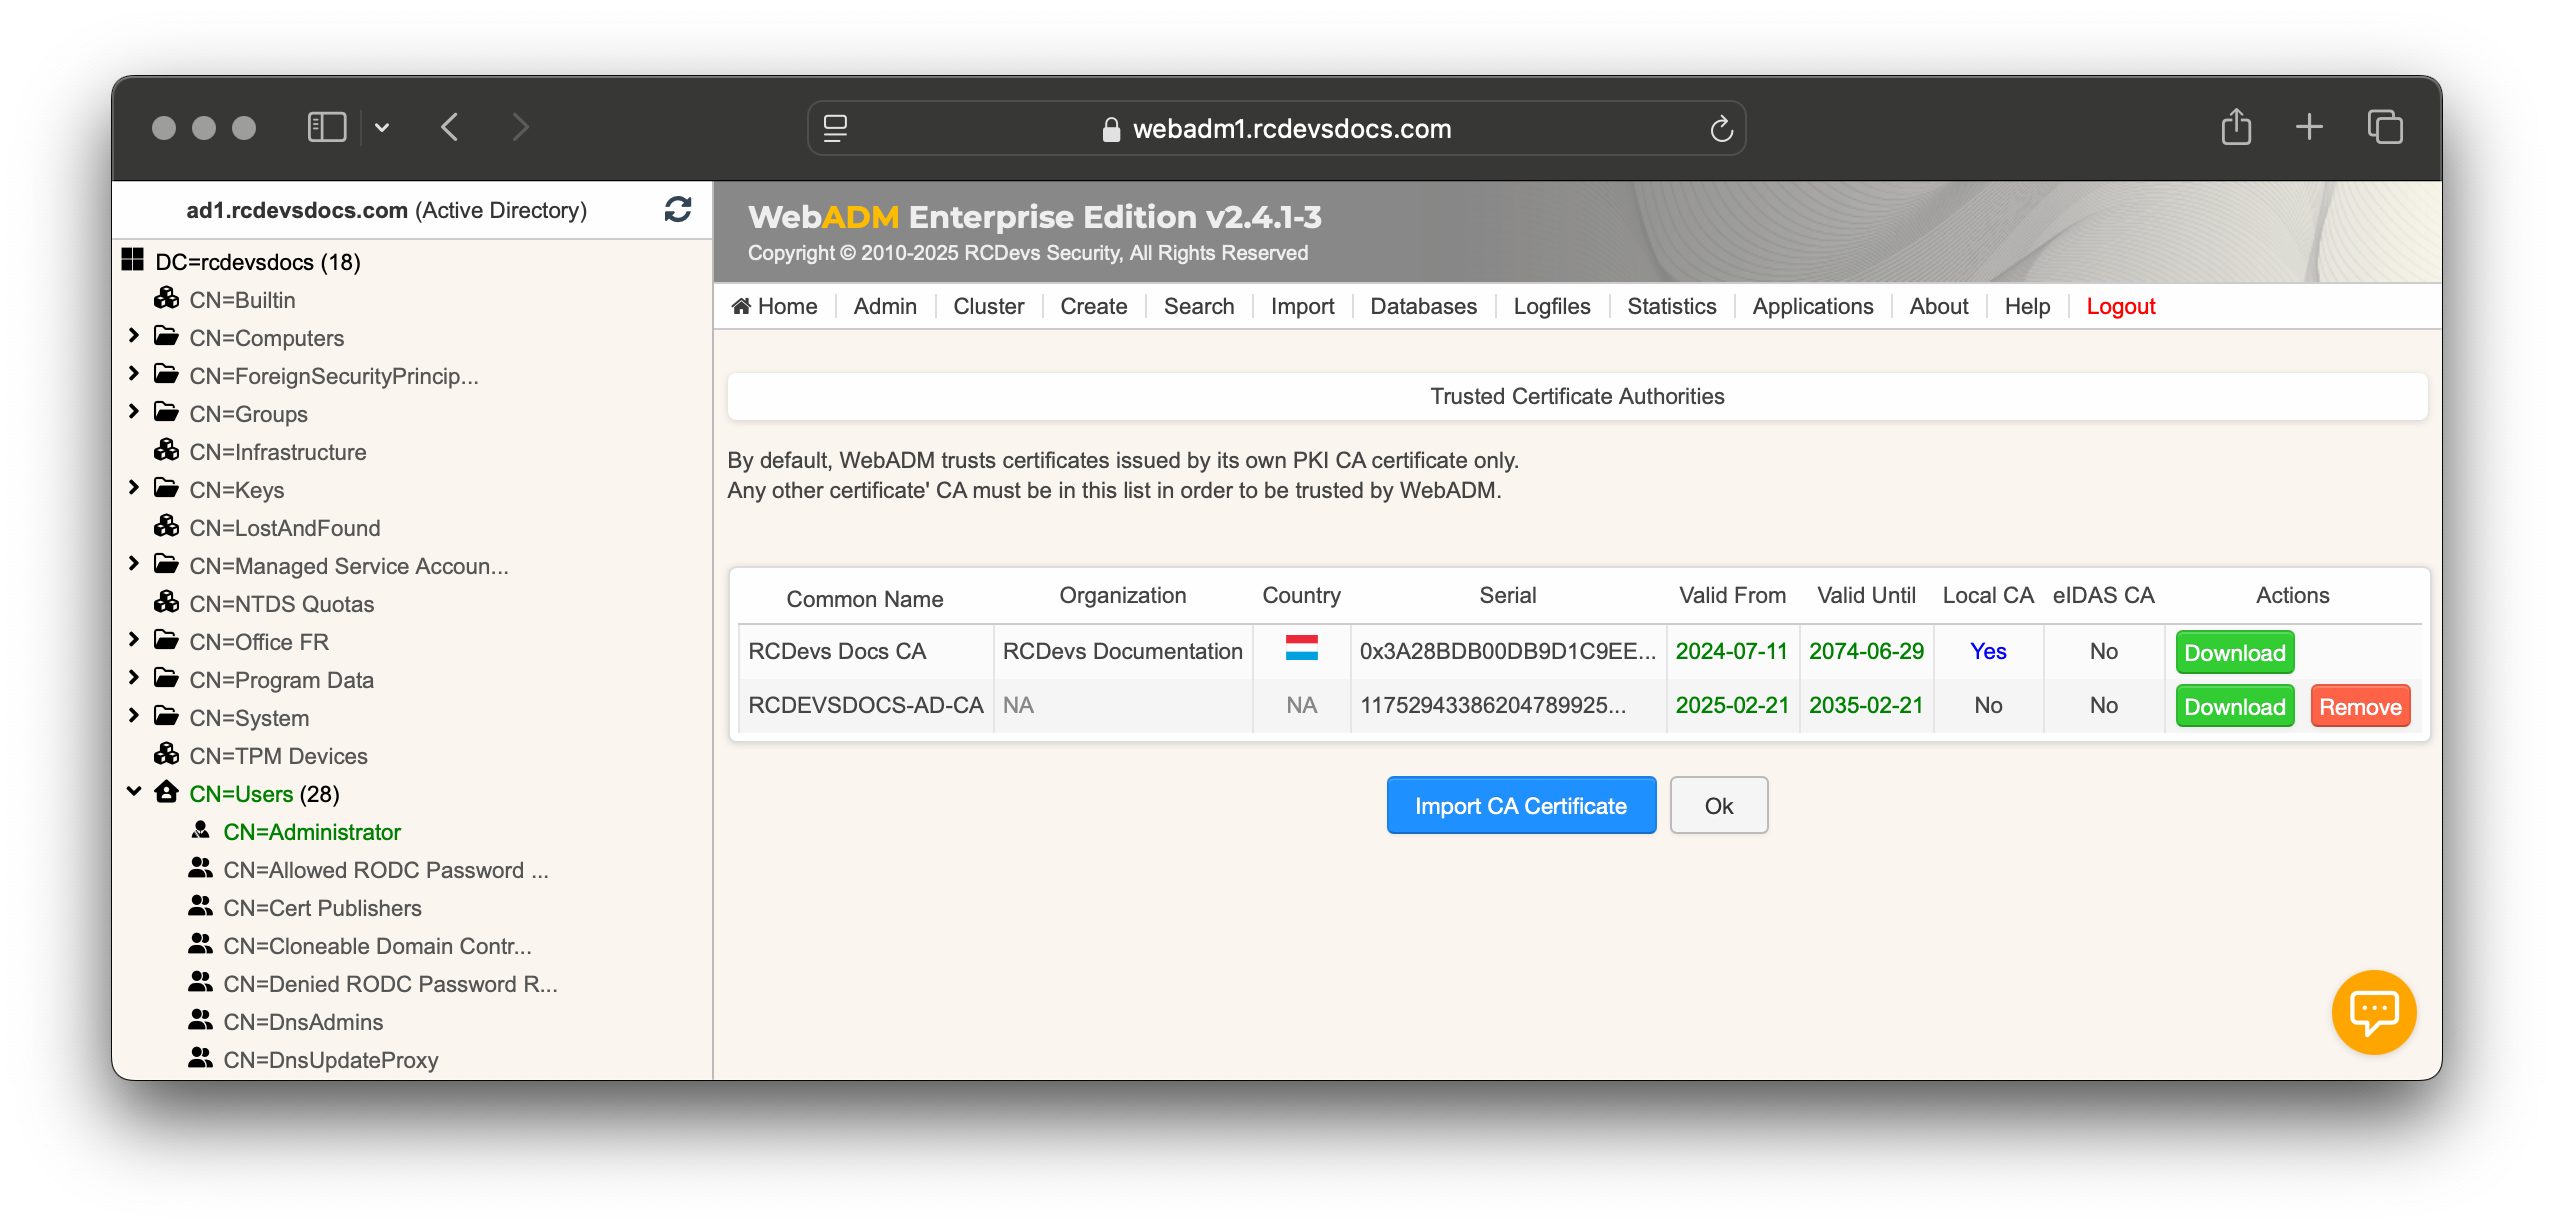
If you navigate now again to the user account you issued the certificate, you will see that the red masssage disapears and now External CA in blue appears.
If you click the Detail button on the certificate, you will see a red message saying, Certificate missing from certificate cache (check duplicates)!
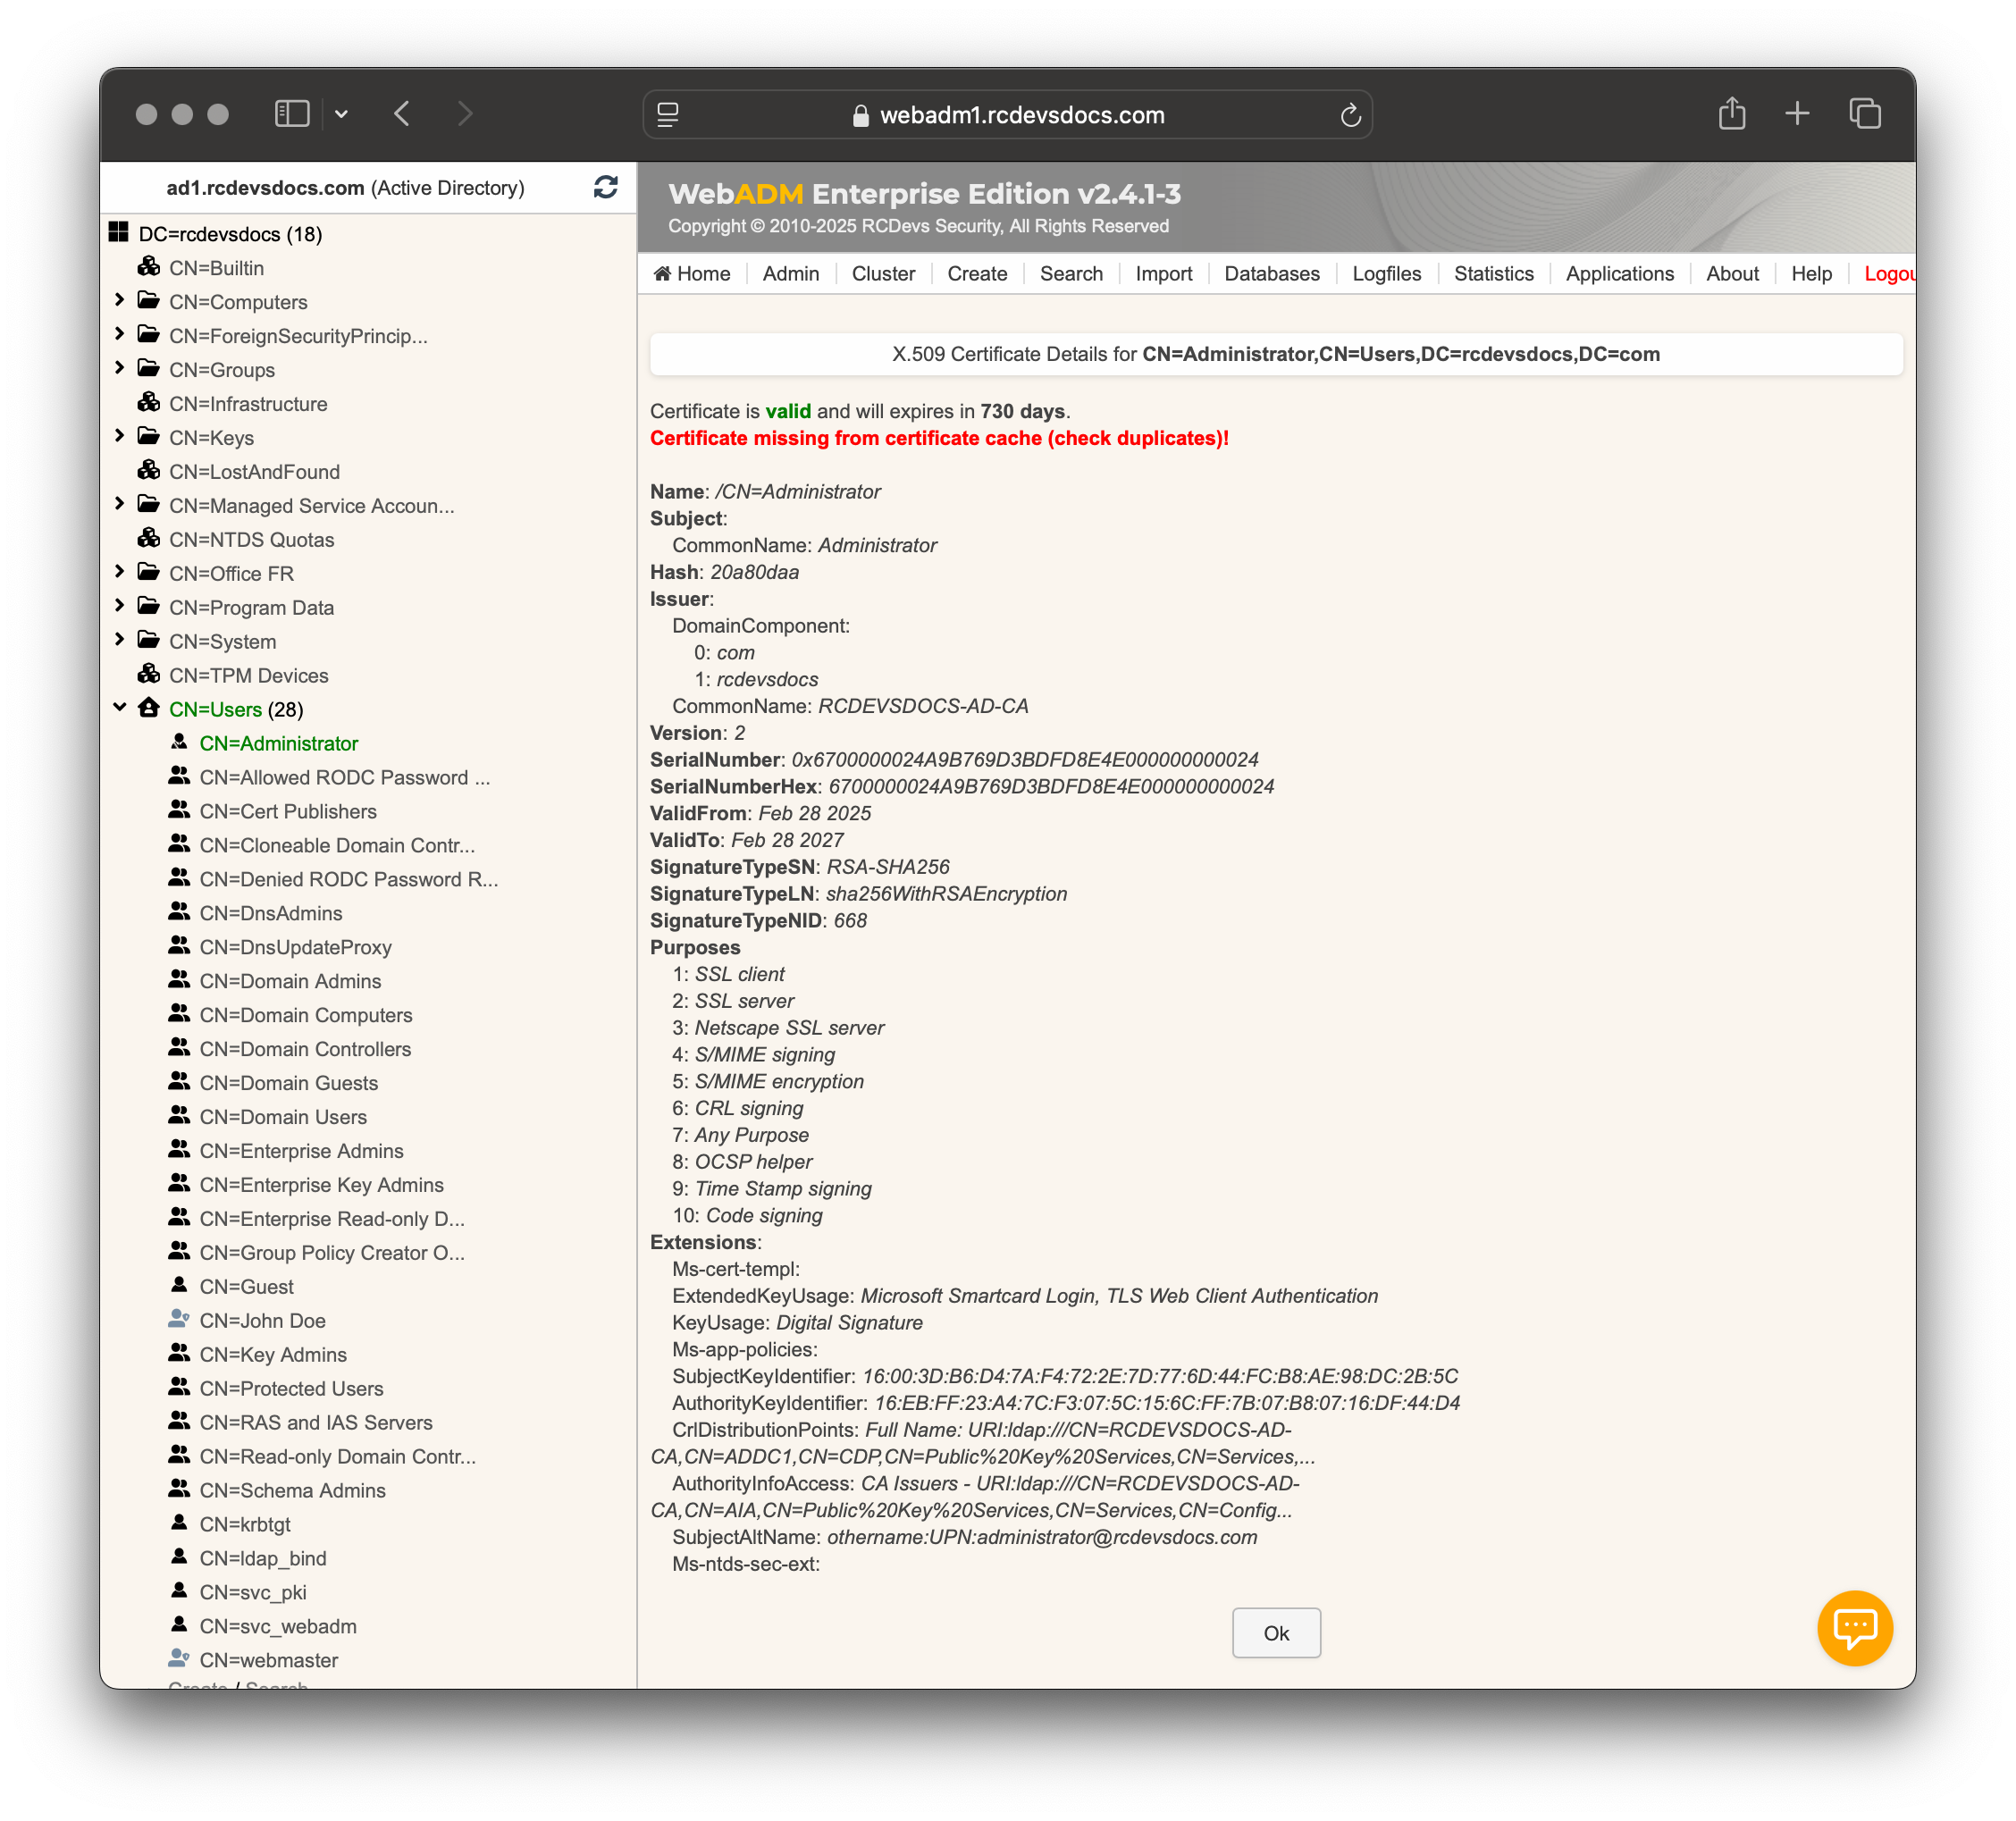
This is normal and occurs because the certificate has not been added to the WebADM certificate cache yet. You can either wait for the automatic cache update or manually run the background jobs to update it from the Admin tab by selecting Start scheduled background tasks. Once the cache is updated, the certificate will be available for use with OpenOTP.
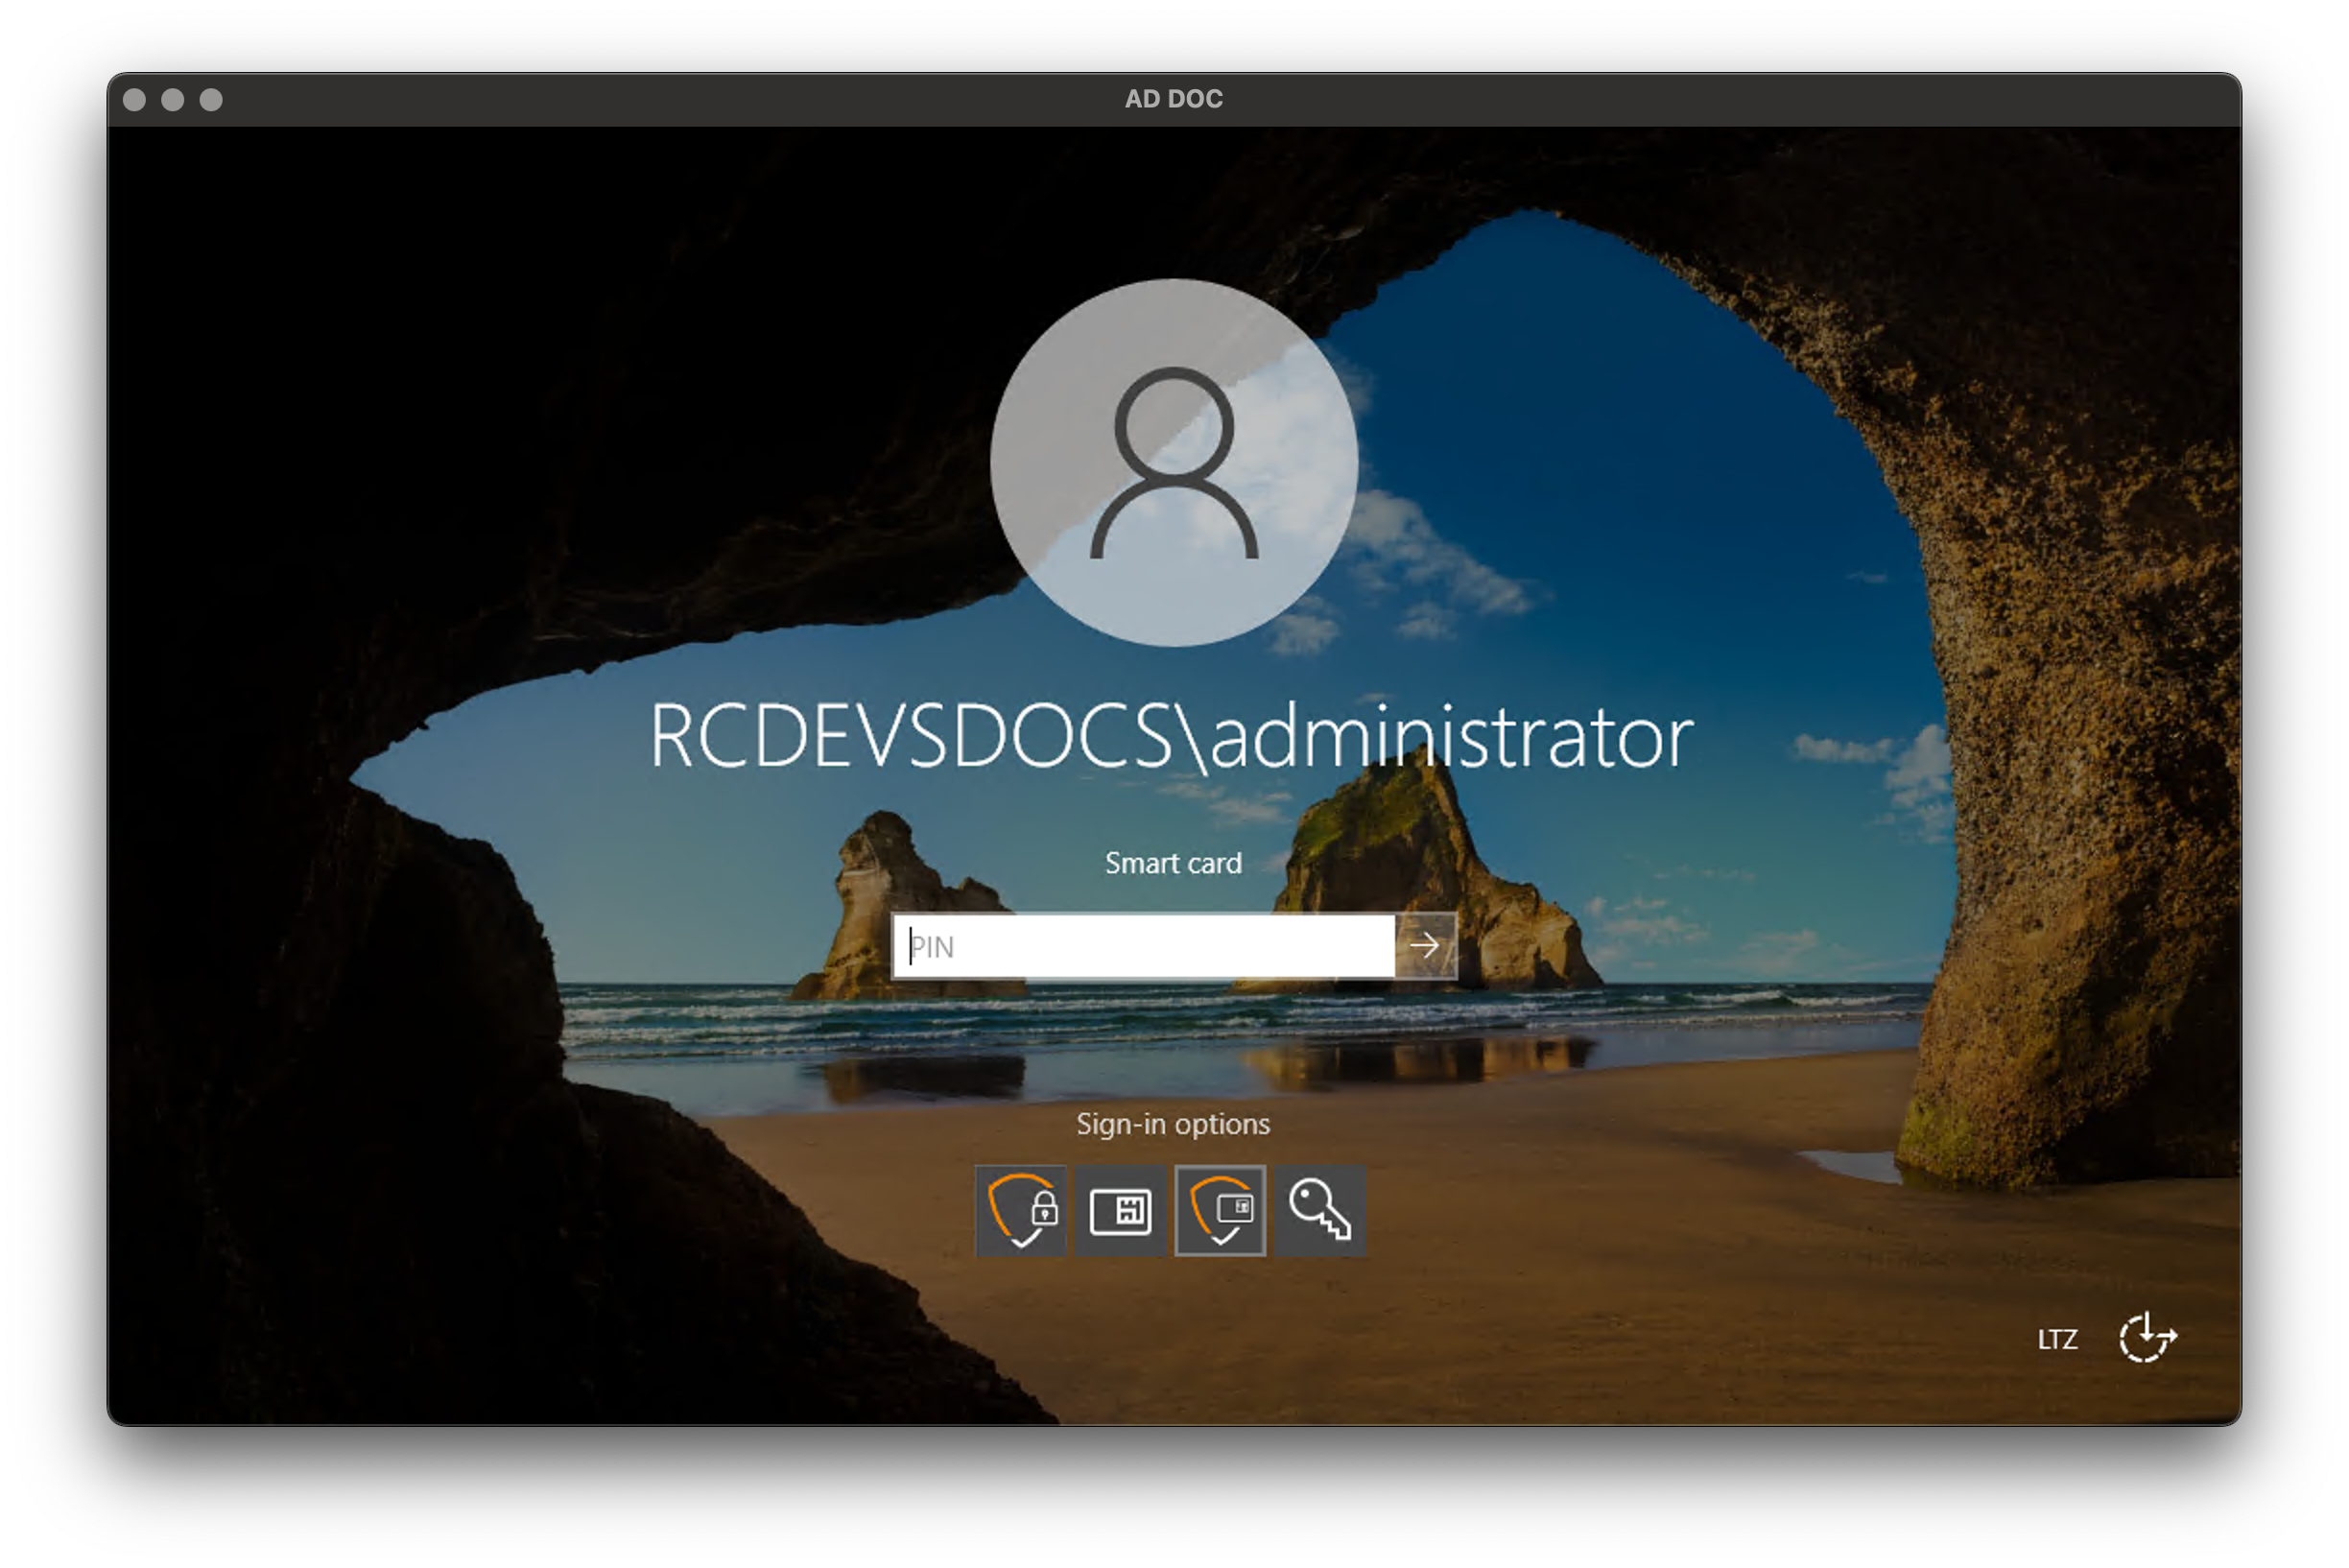
Login attempt
During the installation of the SmartCard Provider, I enabled the additional MFA authentication after the smartcard authentication. I received a push notification once the certificate validation was completed.
For the testing phase, I did not enforce the RCDevs Providers as default providers, which is why you see multiple providers on the login screen. For production use, the Credential Provider filter must be installed during the installation of the OpenOTP CP for Windows.
From the login screen, I choose the RCDevs SmartCard provider. I am invited to provide the PIN which is protecting the smartcard:
Once submitted, the login process begins. At this step, you can see the certificate validation session in the WebADM logs, identified by the openotpPKILogin method used:
[2025-02-28 10:52:30] [192.168.4.163:56580] [OpenOTP:UXDKFCBS] New openotpPKILogin SOAP request
[2025-02-28 10:52:30] [192.168.4.163:56580] [OpenOTP:UXDKFCBS] > Certificate: 2090 Bytes
[2025-02-28 10:52:30] [192.168.4.163:56580] [OpenOTP:UXDKFCBS] > Client ID: Windows
[2025-02-28 10:52:30] [192.168.4.163:56580] [OpenOTP:UXDKFCBS] > Options: NOVOICE
[2025-02-28 10:52:30] [192.168.4.163:56580] [OpenOTP:UXDKFCBS] > Virtual: preferredLanguage=EN
[2025-02-28 10:52:30] [192.168.4.163:56580] [OpenOTP:UXDKFCBS] Enforcing client policy: Windows Login (matched client ID)
[2025-02-28 10:52:30] [192.168.4.163:56580] [OpenOTP:UXDKFCBS] Registered openotpPKILogin request
[2025-02-28 10:52:30] [192.168.4.163:56580] [OpenOTP:UXDKFCBS] Checking OpenOTP license for RCDevs Documentation
[2025-02-28 10:52:30] [192.168.4.163:56580] [OpenOTP:UXDKFCBS] License Ok (21/100 active users)
[2025-02-28 10:52:30] [192.168.4.163:56580] [OpenOTP:UXDKFCBS] Resolved LDAP user: CN=Administrator,CN=Users,DC=rcdevsdocs,DC=com
[2025-02-28 10:52:30] [192.168.4.163:56580] [OpenOTP:UXDKFCBS] Resolved LDAP groups: Group Policy Creator Owners,Domain Admins,Enterprise Admins,Schema Admins,Administrators,Denied RODC Password Replication Group
[2025-02-28 10:52:30] [192.168.4.163:56580] [OpenOTP:UXDKFCBS] Started transaction lock for user
[2025-02-28 10:52:30] [192.168.4.163:56580] [OpenOTP:UXDKFCBS] Found user fullname: Administrator
[2025-02-28 10:52:30] [192.168.4.163:56580] [OpenOTP:UXDKFCBS] Found user language: EN
[2025-02-28 10:52:30] [192.168.4.163:56580] [OpenOTP:UXDKFCBS] Found 1 user emails: administrator@rcdevsdocs.com
[2025-02-28 10:52:30] [192.168.4.163:56580] [OpenOTP:UXDKFCBS] Found 11 user settings: EnableLogin=Yes,OfflineExpire=30,ReplyData=[2 Items]
[2025-02-28 10:52:30] [192.168.4.163:56580] [OpenOTP:UXDKFCBS] Updated user data
[2025-02-28 10:52:30] [192.168.4.163:56580] [OpenOTP:UXDKFCBS] Sent login success response
The certificate was validated successfully. Then, since I enabled additional MFA, a second authentication request is processed, sending me a push notification through the OpenOTP Token application.
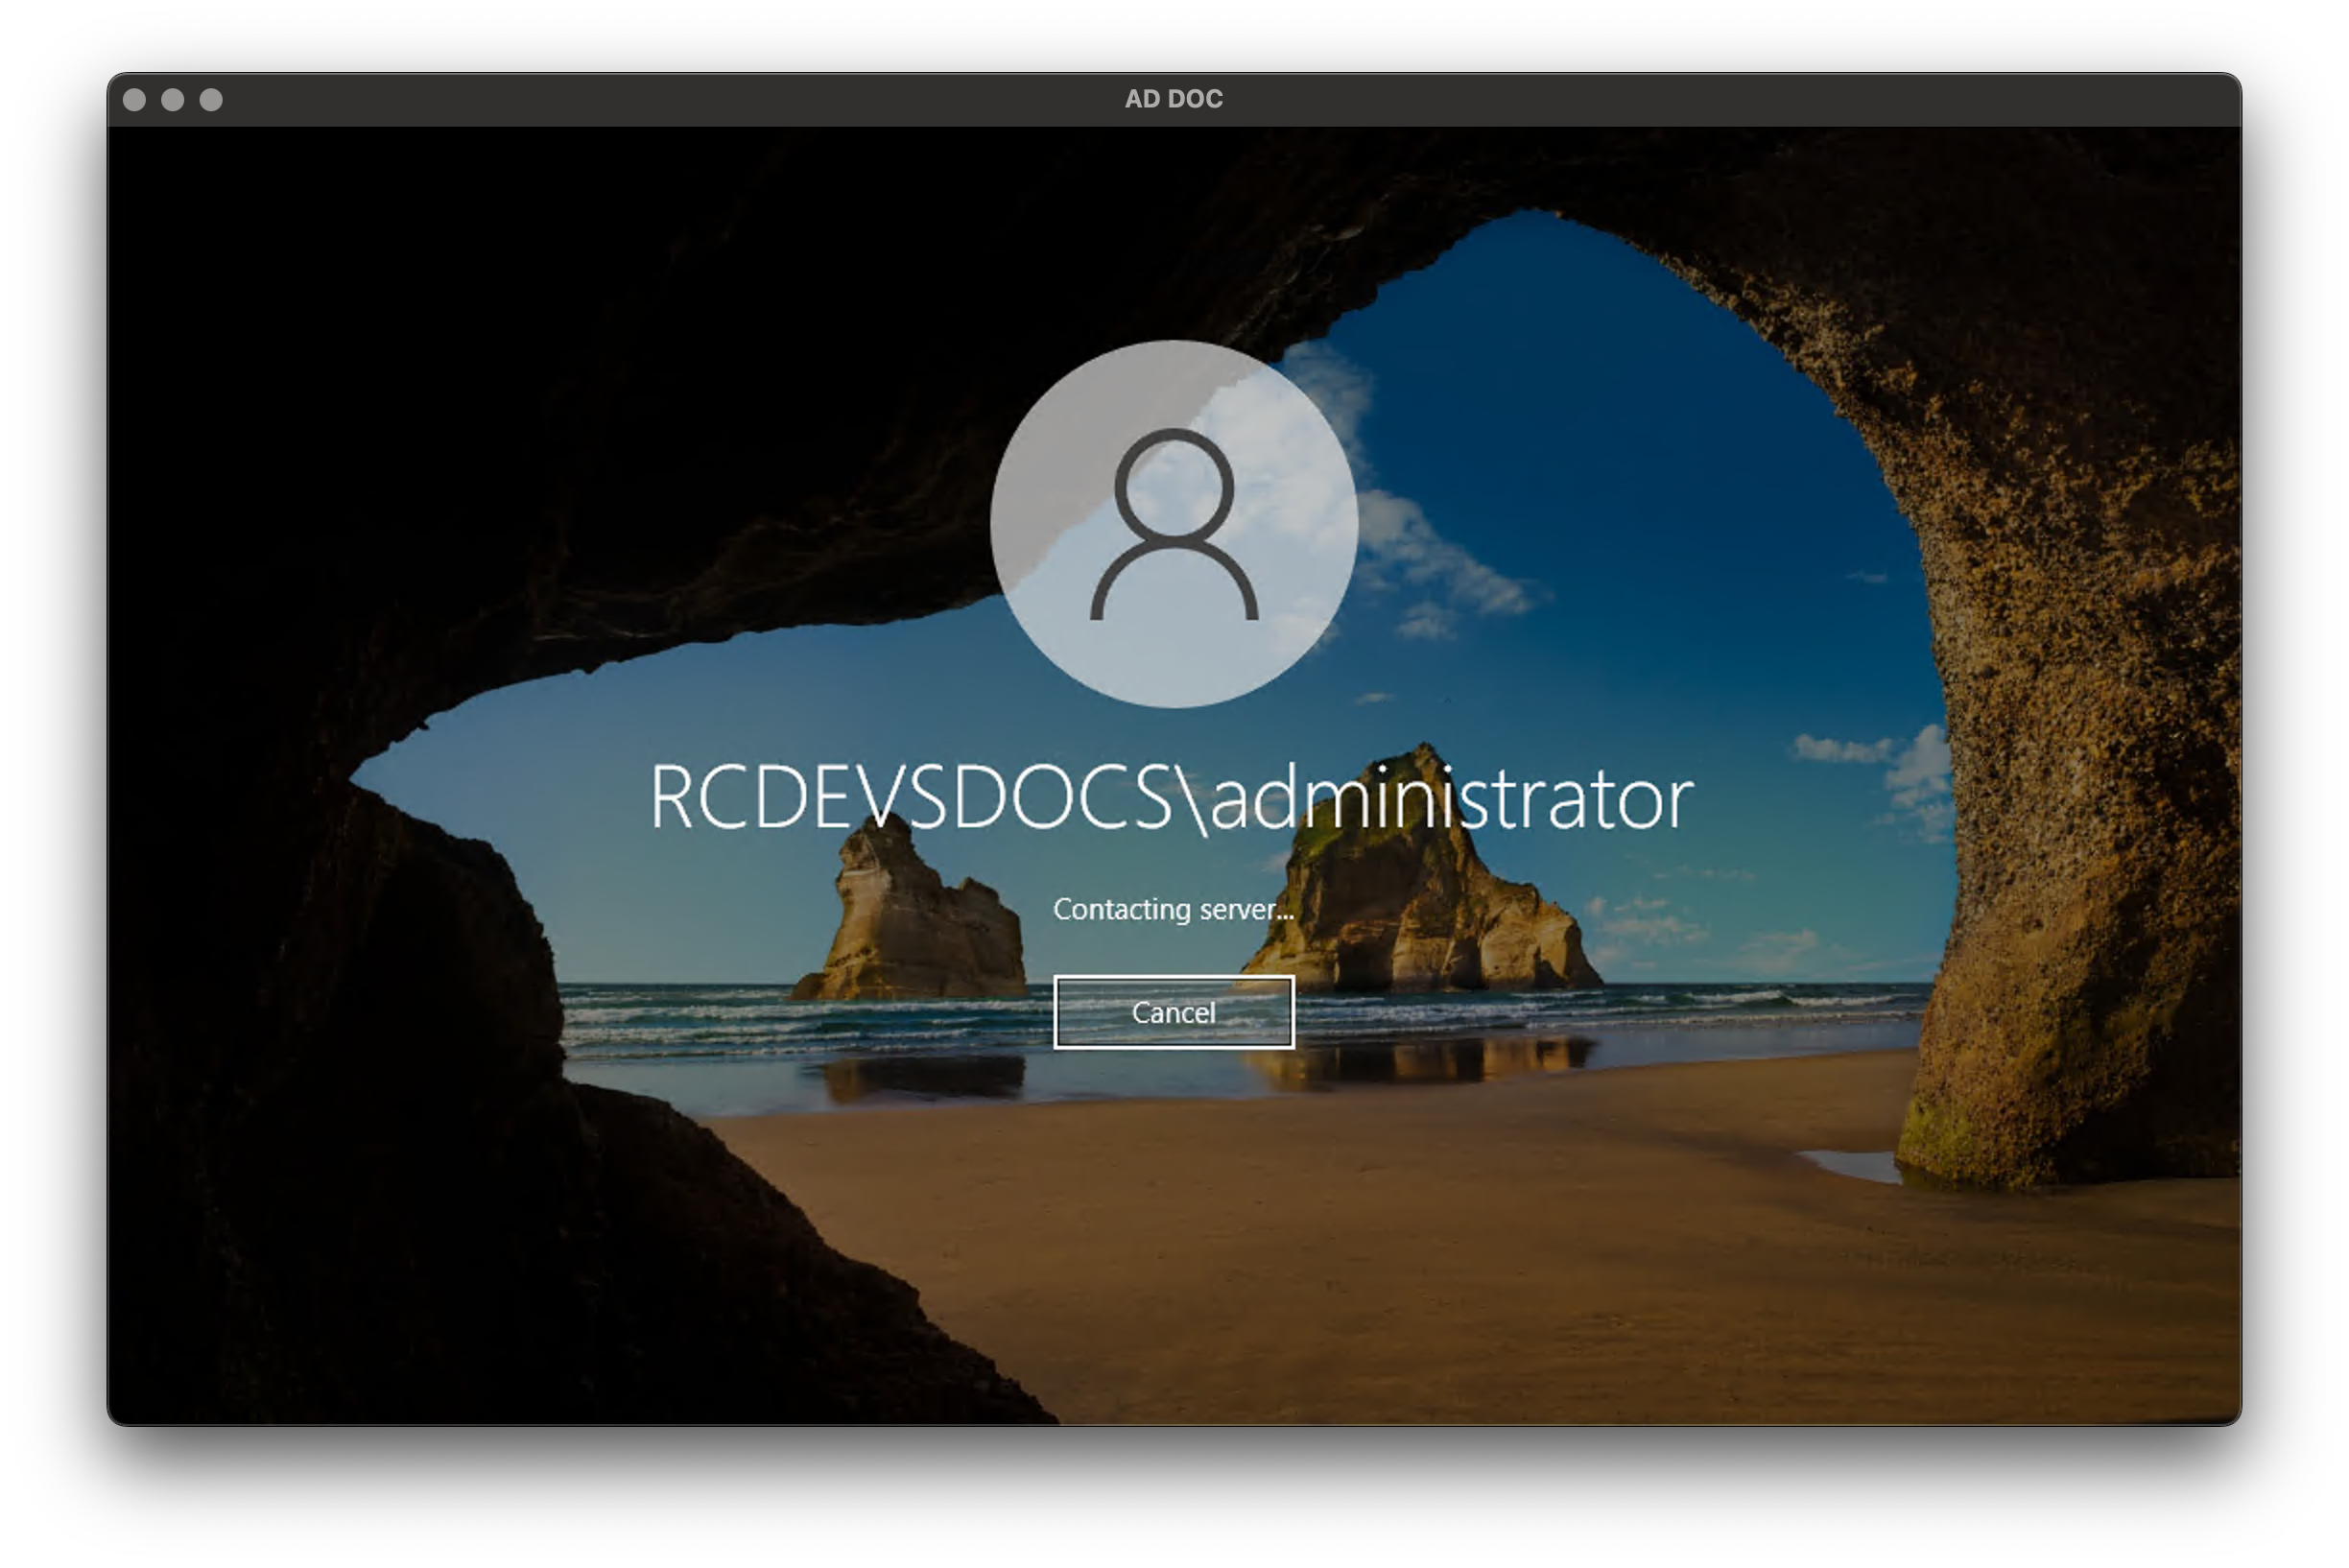
I approve the login from the application. Below are the logs related to the second authentication session:
[2025-02-28 10:52:30] [192.168.4.163:56581] [OpenOTP:2RWNEAQC] New openotpNormalLogin SOAP request
[2025-02-28 10:52:30] [192.168.4.163:56581] [OpenOTP:2RWNEAQC] > Username: Administrator
[2025-02-28 10:52:30] [192.168.4.163:56581] [OpenOTP:2RWNEAQC] > Domain: rcdevsdocs
[2025-02-28 10:52:30] [192.168.4.163:56581] [OpenOTP:2RWNEAQC] > Client ID: Windows
[2025-02-28 10:52:30] [192.168.4.163:56581] [OpenOTP:2RWNEAQC] > Context: rpJI7BJ4XtofcaXRnXrVWfgue2k2AG0I
[2025-02-28 10:52:30] [192.168.4.163:56581] [OpenOTP:2RWNEAQC] > Options: -LDAP,OFFLINE,NOVOICE
[2025-02-28 10:52:30] [192.168.4.163:56581] [OpenOTP:2RWNEAQC] > Virtual: preferredLanguage=EN
[2025-02-28 10:52:30] [192.168.4.163:56581] [OpenOTP:2RWNEAQC] Enforcing client policy: Windows Login (matched client ID)
[2025-02-28 10:52:30] [192.168.4.163:56581] [OpenOTP:2RWNEAQC] Registered openotpNormalLogin request
[2025-02-28 10:52:30] [192.168.4.163:56581] [OpenOTP:2RWNEAQC] Resolved LDAP user: CN=Administrator,CN=Users,DC=rcdevsdocs,DC=com (cached)
[2025-02-28 10:52:30] [192.168.4.163:56581] [OpenOTP:2RWNEAQC] Resolved LDAP groups: Group Policy Creator Owners,Domain Admins,Enterprise Admins,Schema Admins,Administrators,Denied RODC Password Replication Group (cached)
[2025-02-28 10:52:30] [192.168.4.163:56581] [OpenOTP:2RWNEAQC] Started transaction lock for user
[2025-02-28 10:52:30] [192.168.4.163:56581] [OpenOTP:2RWNEAQC] Found user language: EN
[2025-02-28 10:52:30] [192.168.4.163:56581] [OpenOTP:2RWNEAQC] Found 1 user emails: administrator@rcdevsdocs.com
[2025-02-28 10:52:30] [192.168.4.163:56581] [OpenOTP:2RWNEAQC] Found 52 user settings: LoginMode=LDAPMFA,OTPType=TOKEN,PushLogin=Yes,ChallengeMode=Yes,ChallengeTimeout=90,OTPLength=6,OfflineExpire=30,MobileTimeout=30,EnableLogin=Yes,HOTPLookAheadWindow=25,TOTPTimeStep=30,TOTPTimeOffsetWindow=120,OCRASuite=OCRA-1:HOTP-SHA1-6:QN06-T1M,U2FPINMode=Discouraged,SMSType=Normal,SMSMode=Ondemand,ReplyData=[2 Items],MailMode=Ondemand,PrefetchExpire=10,LastOTPTime=300,ListChallengeMode=ShowID
[2025-02-28 10:52:30] [192.168.4.163:56581] [OpenOTP:2RWNEAQC] Found 28 user data: PwnedState,Device1Type,Device1Name,Device1Data,Device1State,Device2Type,Device2Name,Device2Data,Device2State,Device3Type,Device3Name,Device3Data,Device3State,TokenType,TokenKey,TokenState,TokenID,TokenSerial,Token2Type,Token2Key,Token2State,Token2ID,Token2Serial,Token3Type,Token3Key,Token3State,Token3ID,Token3Serial
[2025-02-28 10:52:30] [192.168.4.163:56581] [OpenOTP:2RWNEAQC] Token #2 (TOTP) is disabled
[2025-02-28 10:52:30] [192.168.4.163:56581] [OpenOTP:2RWNEAQC] Found 2 registered OTP tokens (TOTP,YUBIKEY)
[2025-02-28 10:52:30] [192.168.4.163:56581] [OpenOTP:2RWNEAQC] Device #1 (FIDO2) is disabled
[2025-02-28 10:52:30] [192.168.4.163:56581] [OpenOTP:2RWNEAQC] Device #2 (FIDO2) is disabled
[2025-02-28 10:52:30] [192.168.4.163:56581] [OpenOTP:2RWNEAQC] Found 1 registered FIDO device
[2025-02-28 10:52:30] [192.168.4.163:56581] [OpenOTP:2RWNEAQC] Requested login factors: OTP | U2F
[2025-02-28 10:52:30] [192.168.4.163:56581] [OpenOTP:2RWNEAQC] Authentication challenge required
[2025-02-28 10:52:31] [192.168.4.163:56581] [OpenOTP:2RWNEAQC] Sent push notification for token #1 (session kfIBks1555lZsw1n)
[2025-02-28 10:52:31] [192.168.4.163:56581] [OpenOTP:2RWNEAQC] Waiting 27 seconds for mobile response
[2025-02-28 10:52:49] [192.168.3.210:55023] [OpenOTP:2RWNEAQC] Received mobile login response from 192.168.3.210
[2025-02-28 10:52:49] [192.168.3.210:55023] [OpenOTP:2RWNEAQC] > Session: kfIBks1555lZsw1n
[2025-02-28 10:52:49] [192.168.3.210:55023] [OpenOTP:2RWNEAQC] > Password: 16 Bytes
[2025-02-28 10:52:49] [192.168.3.210:55023] [OpenOTP:2RWNEAQC] Found authentication session started 2025-02-28 10:52:30
[2025-02-28 10:52:49] [192.168.3.210:55023] [OpenOTP:2RWNEAQC] PUSH password Ok (token #1)
[2025-02-28 10:52:49] [192.168.4.163:56581] [OpenOTP:2RWNEAQC] Updated user data
[2025-02-28 10:52:49] [192.168.4.163:56581] [OpenOTP:2RWNEAQC] Sent login success response
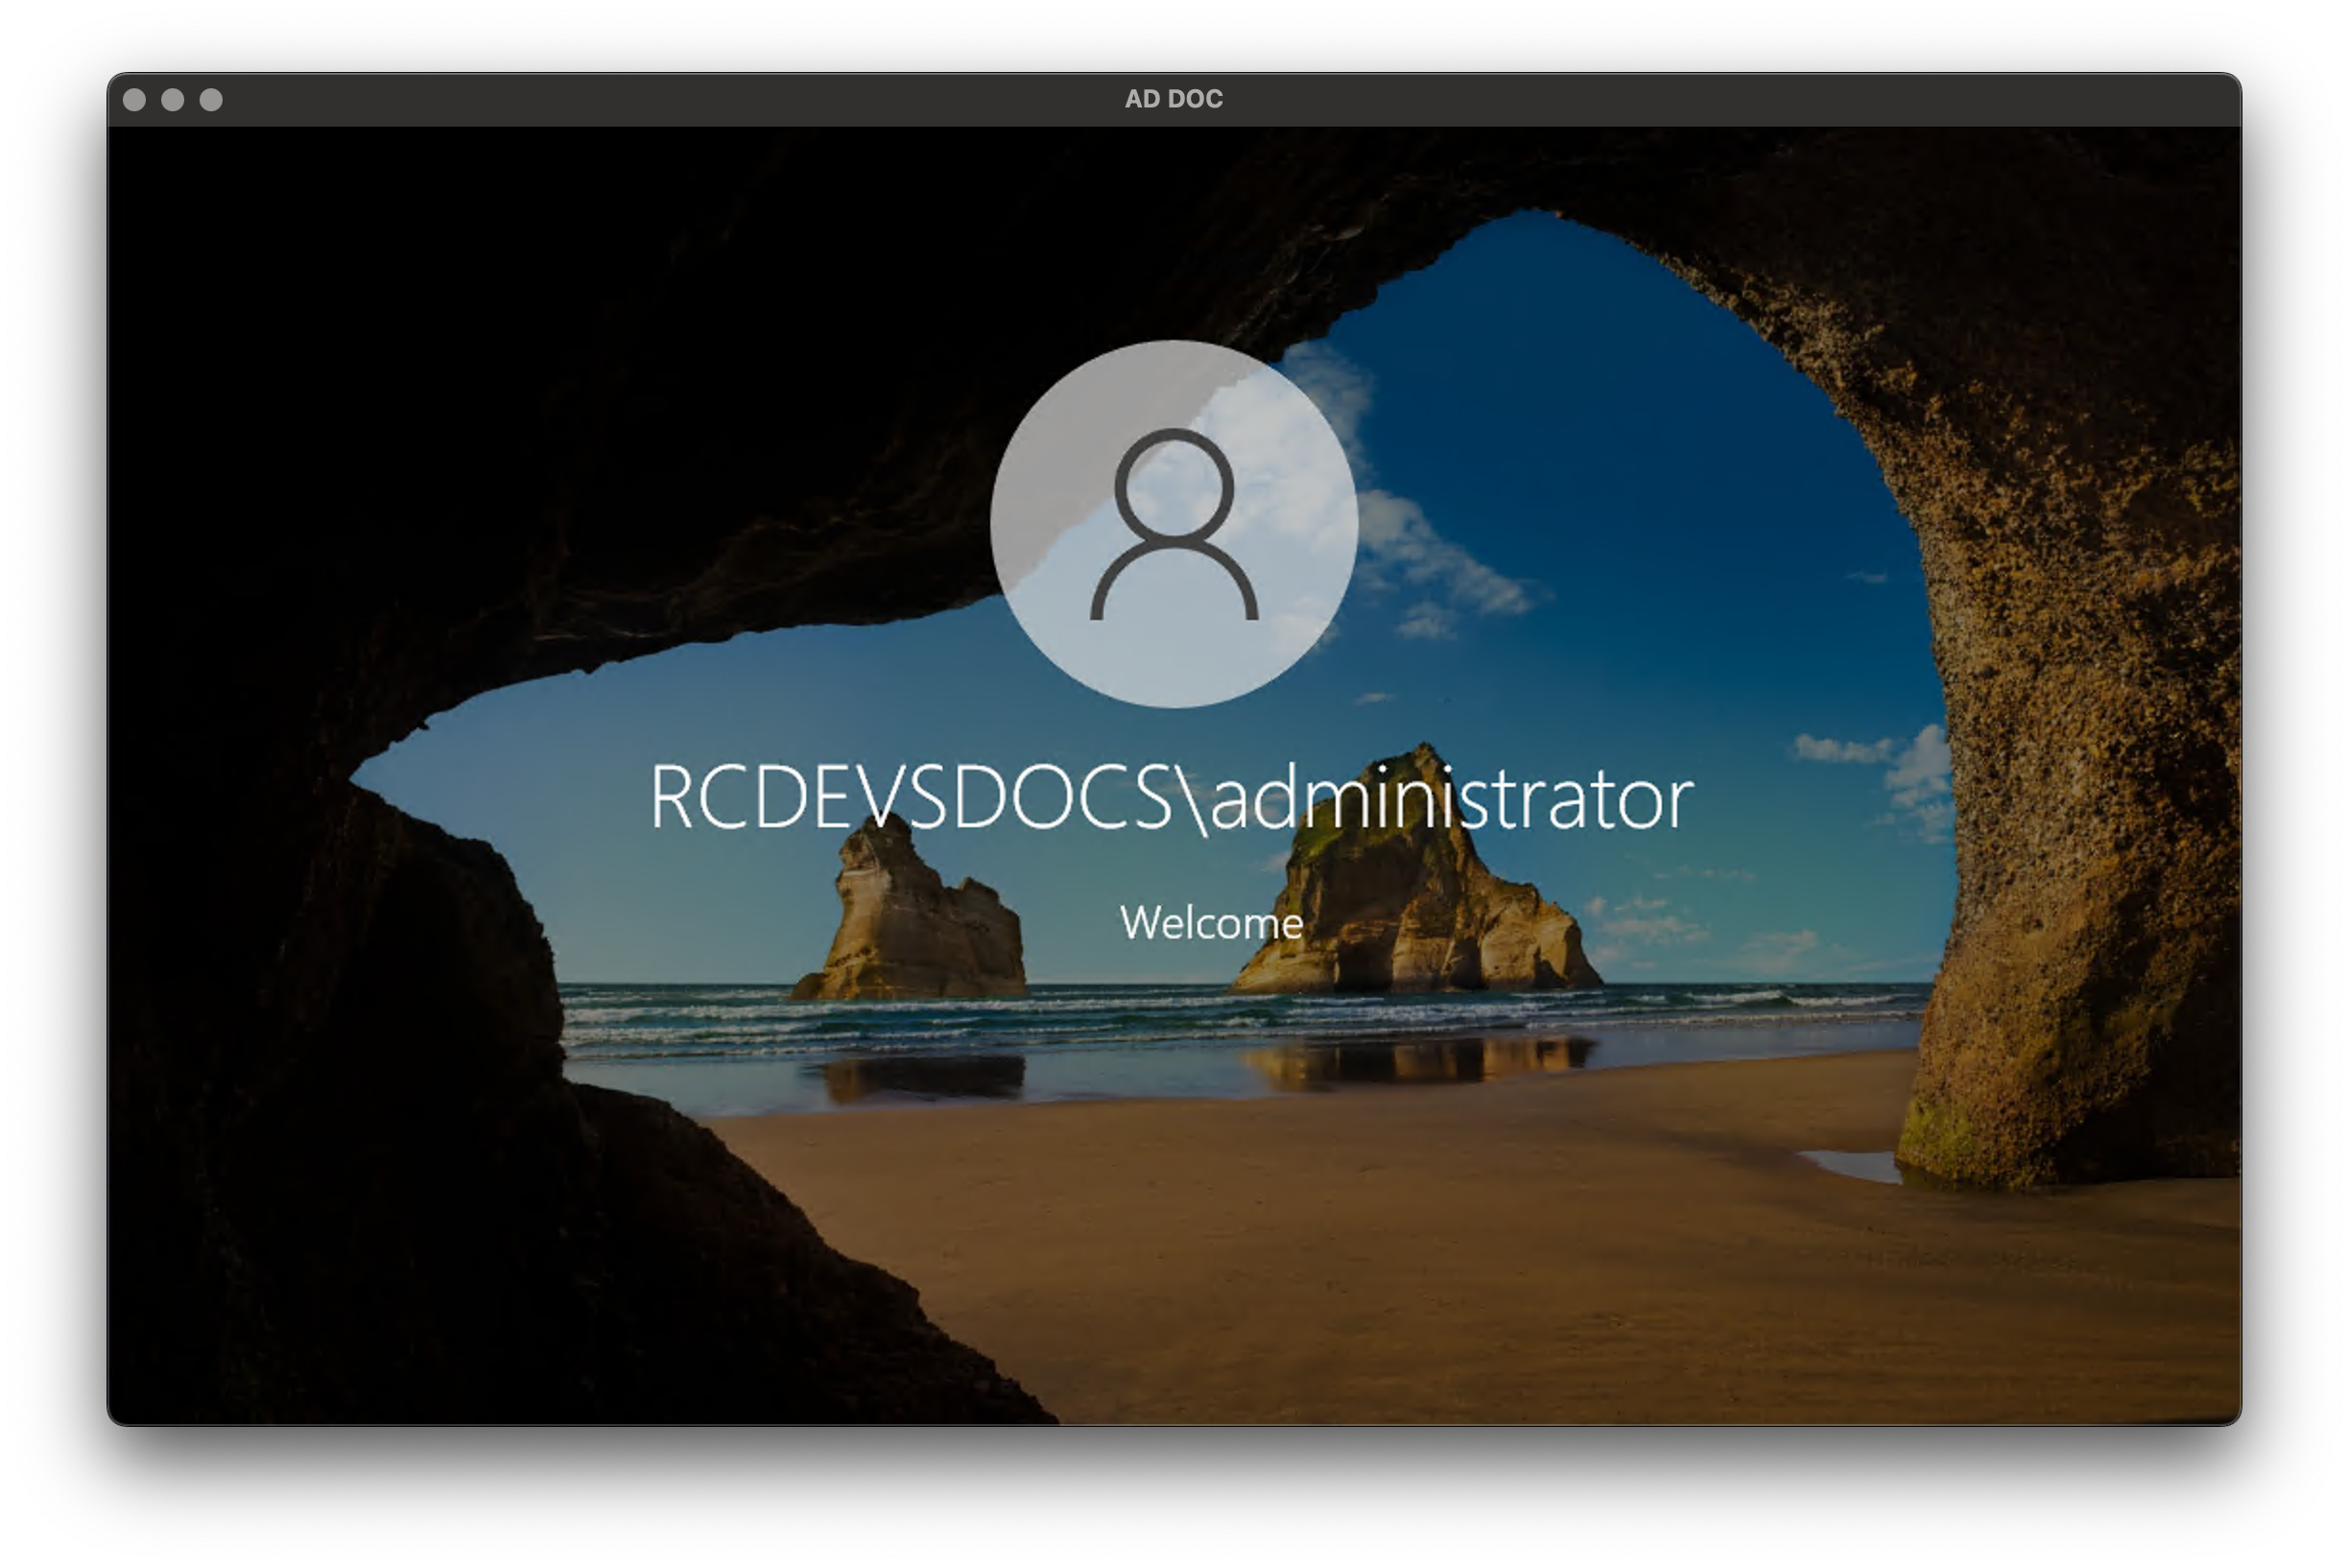
After both authentication requests are completed successfully, the Windows session opens.
Configuration for Certificate issued by WebADM Certificate Authorithy
We are now going to demonstrate how to use the WebADM Certificate Authority for SmartCard certificate issuance. The steps to achieve this are:
- Import the WebADM CA using
certutil.exein your Active Directory environment; - Ensure that the WebADM CA certificate is stored in the NTAuth store on your domain controllers.
- Deploy the WebADM CA certificate through GPO on your Windows hosts;
- Create a user certificate bundle from your WebADM environment;
- Inject the certificate onto the SmartCard using the tool provided by your smartcard vendor. In this documentation, we will use YubiKey Manager.
Smartcard Certificate Validity
By default, unless explicitly configured, issued Smartcard certificates inherit the default validity period of user certificates as configured in /opt/webadm/conf/rsignd.conf.
You can change this value by editing the rsignd.conf file and adding or modifying the smartcard_cert_validity setting:
# Unless specified here, smartcard certificates use the
# user_cert_validity value by default.
smartcard_cert_validity 1095
Set the desired value and restart the WebADM services for the changes to take effect.
Import the WebADM CA in your Active Directory environment
To import the WebADM CA certificate using certutil.exe in your Active Directory environment, follow these steps:
Copy the WebADM CA certificate to a known location
For example: C:\CA\ca.crt. The WebADM CA certificate can be downloaded from the WebADM Administrator Portal > Admin tab > Download Internal CA Certificate or by accessing the url : https://<webadm_server_address>/cacert.
Open Command Prompt as Administrator
Run the following command to add the CA certificate to the NTAuth Store store:
certutil -dspublish -f "C:\CA\ca.crt" NTAuthCA
WHich should return you something similar to:
ldap:///CN=NTAuthCertificates,CN=Public Key Services,CN=Services,CN=Configuration,DC=rcdevsdocs,DC=com?cACertificate

Certificate added to DS store.

CertUtil: -dsPublish command completed successfully.
The contents of the NTAuth store are cached in the following registry location:
HKEY_LOCAL_MACHINE\SOFTWARE\Microsoft\EnterpriseCertificates\NTAuth\Certificates
This registry key should be automatically updated to reflect the certificates that are published to the NTAuth store in the Active Directory configuration container. This behavior occurs when Group Policy settings are updated and when the client-side extension that's responsible for computer auto-enrollment executes. In certain scenarios, such as Active Directory replication latency or when the Do not enroll certificates automatically policy setting is enabled, the registry isn't updated. In such scenarios, run the following command manually to insert the certificate into the registry location:
PS C:\CA> certutil -enterprise -addstore NTAuth ca.crt
NTAuth
Signature matches Public Key
Certificate "RCDevs Docs CA" added to store.
CertUtil: -addstore command completed successfully.
Verify the certificate is published
Run:
certutil -viewstore -enterprise NTAuth
You should see the WebADM CA certificate listed:
Create a GPO to deploy the WebADM CA File on your Windows hosts
To deploy the WebADM CA certificate to the Trusted Root Certification Authorities store on all domain-joined client machines using Group Policy (GPO), follow these steps:
Prepare the Certificate
- Place your WebADM CA certificate in an accessible location, e.g. :
\\domain.local\NETLOGON\ca.crt.
Open Group Policy Management Console
- On a domain controller or admin workstation, run:
gpmc.msc
Create or Edit a GPO
- Right-click your target OU (or domain root) and select Create a GPO in this domain, and Link it here (or edit an existing one).
- Name it something like:
Deploy WebADM CA Certificate.
Edit the GPO
- Right-click the GPO and choose Edit.
Navigate to Certificate Store Settings
Computer Configuration
└── Policies
    └── Windows Settings
        └── Security Settings
            └── Public Key Policies
                └── Trusted Root Certification Authorities
Import the Certificate
- Right-click Trusted Root Certification Authorities and choose Import.
- Follow the wizard to import your
ca.crt.
Close and Apply
- Close the Group Policy Editor.
- Run
gpupdate /forceon a test client to apply the GPO.
Result
The CA certificate will now be trusted by all computers targeted by the GPO, enabling proper validation of certificate chains for smartcard authentication.
Issue a user/admin Certificate
The WebADM infrastructure offers multiple methods for issuing user or admin certificates. Both types work for Windows smartcard authentication; however, admin certificates can only be issued from the WebADM Administrator Portal.
-
Refer to the following documentation to issue the certificate from the WebADM Administrator portal.
-
Refer to the following documentation to issue the certificate from the User Self-Service Desk application.
-
Refer to the following documentation to issue the certificate from the Administrator Helpdesk portal.
Now that you have your .p12 bundle and its password, you are ready to inject the certificate into your smartcard.
Inject the p12 bundle on the SmartCard
We will provide steps to inject the certificate into the YubiKey 5C Smartcard using the YubiKey Manager tool.
If the tool is not installed on your computer, please download and install it. Once installed, open the tool and plug in your YubiKey.
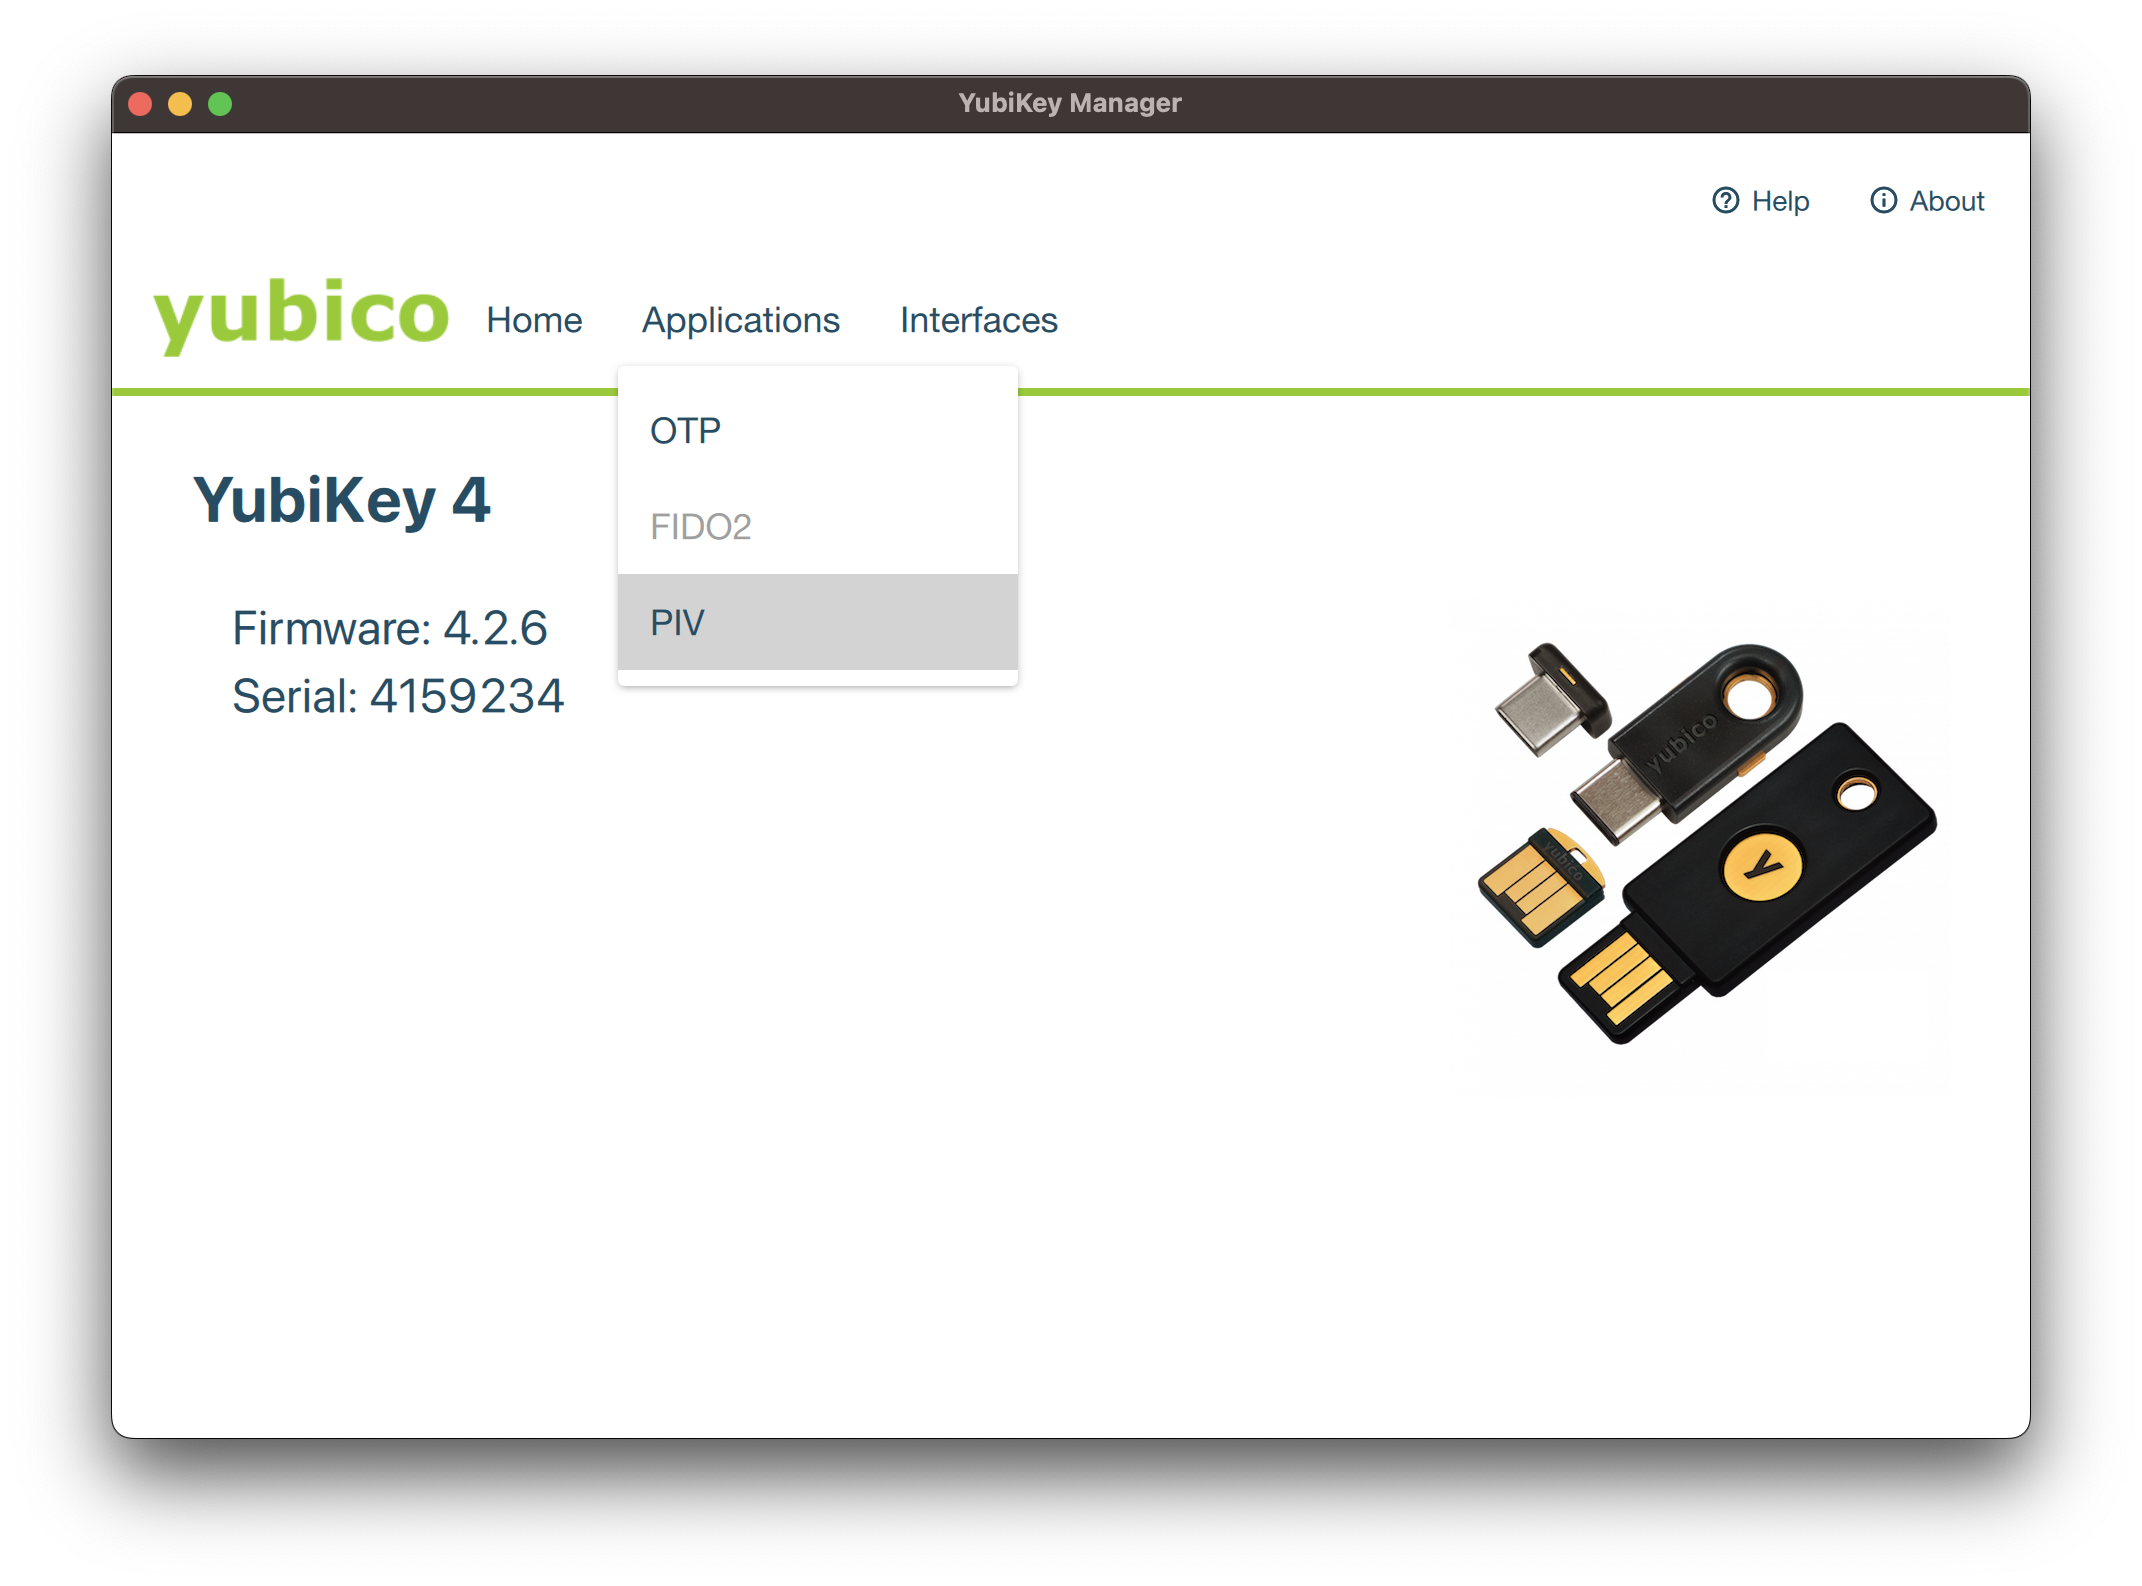
Click on Application Tab and select PIV menu :
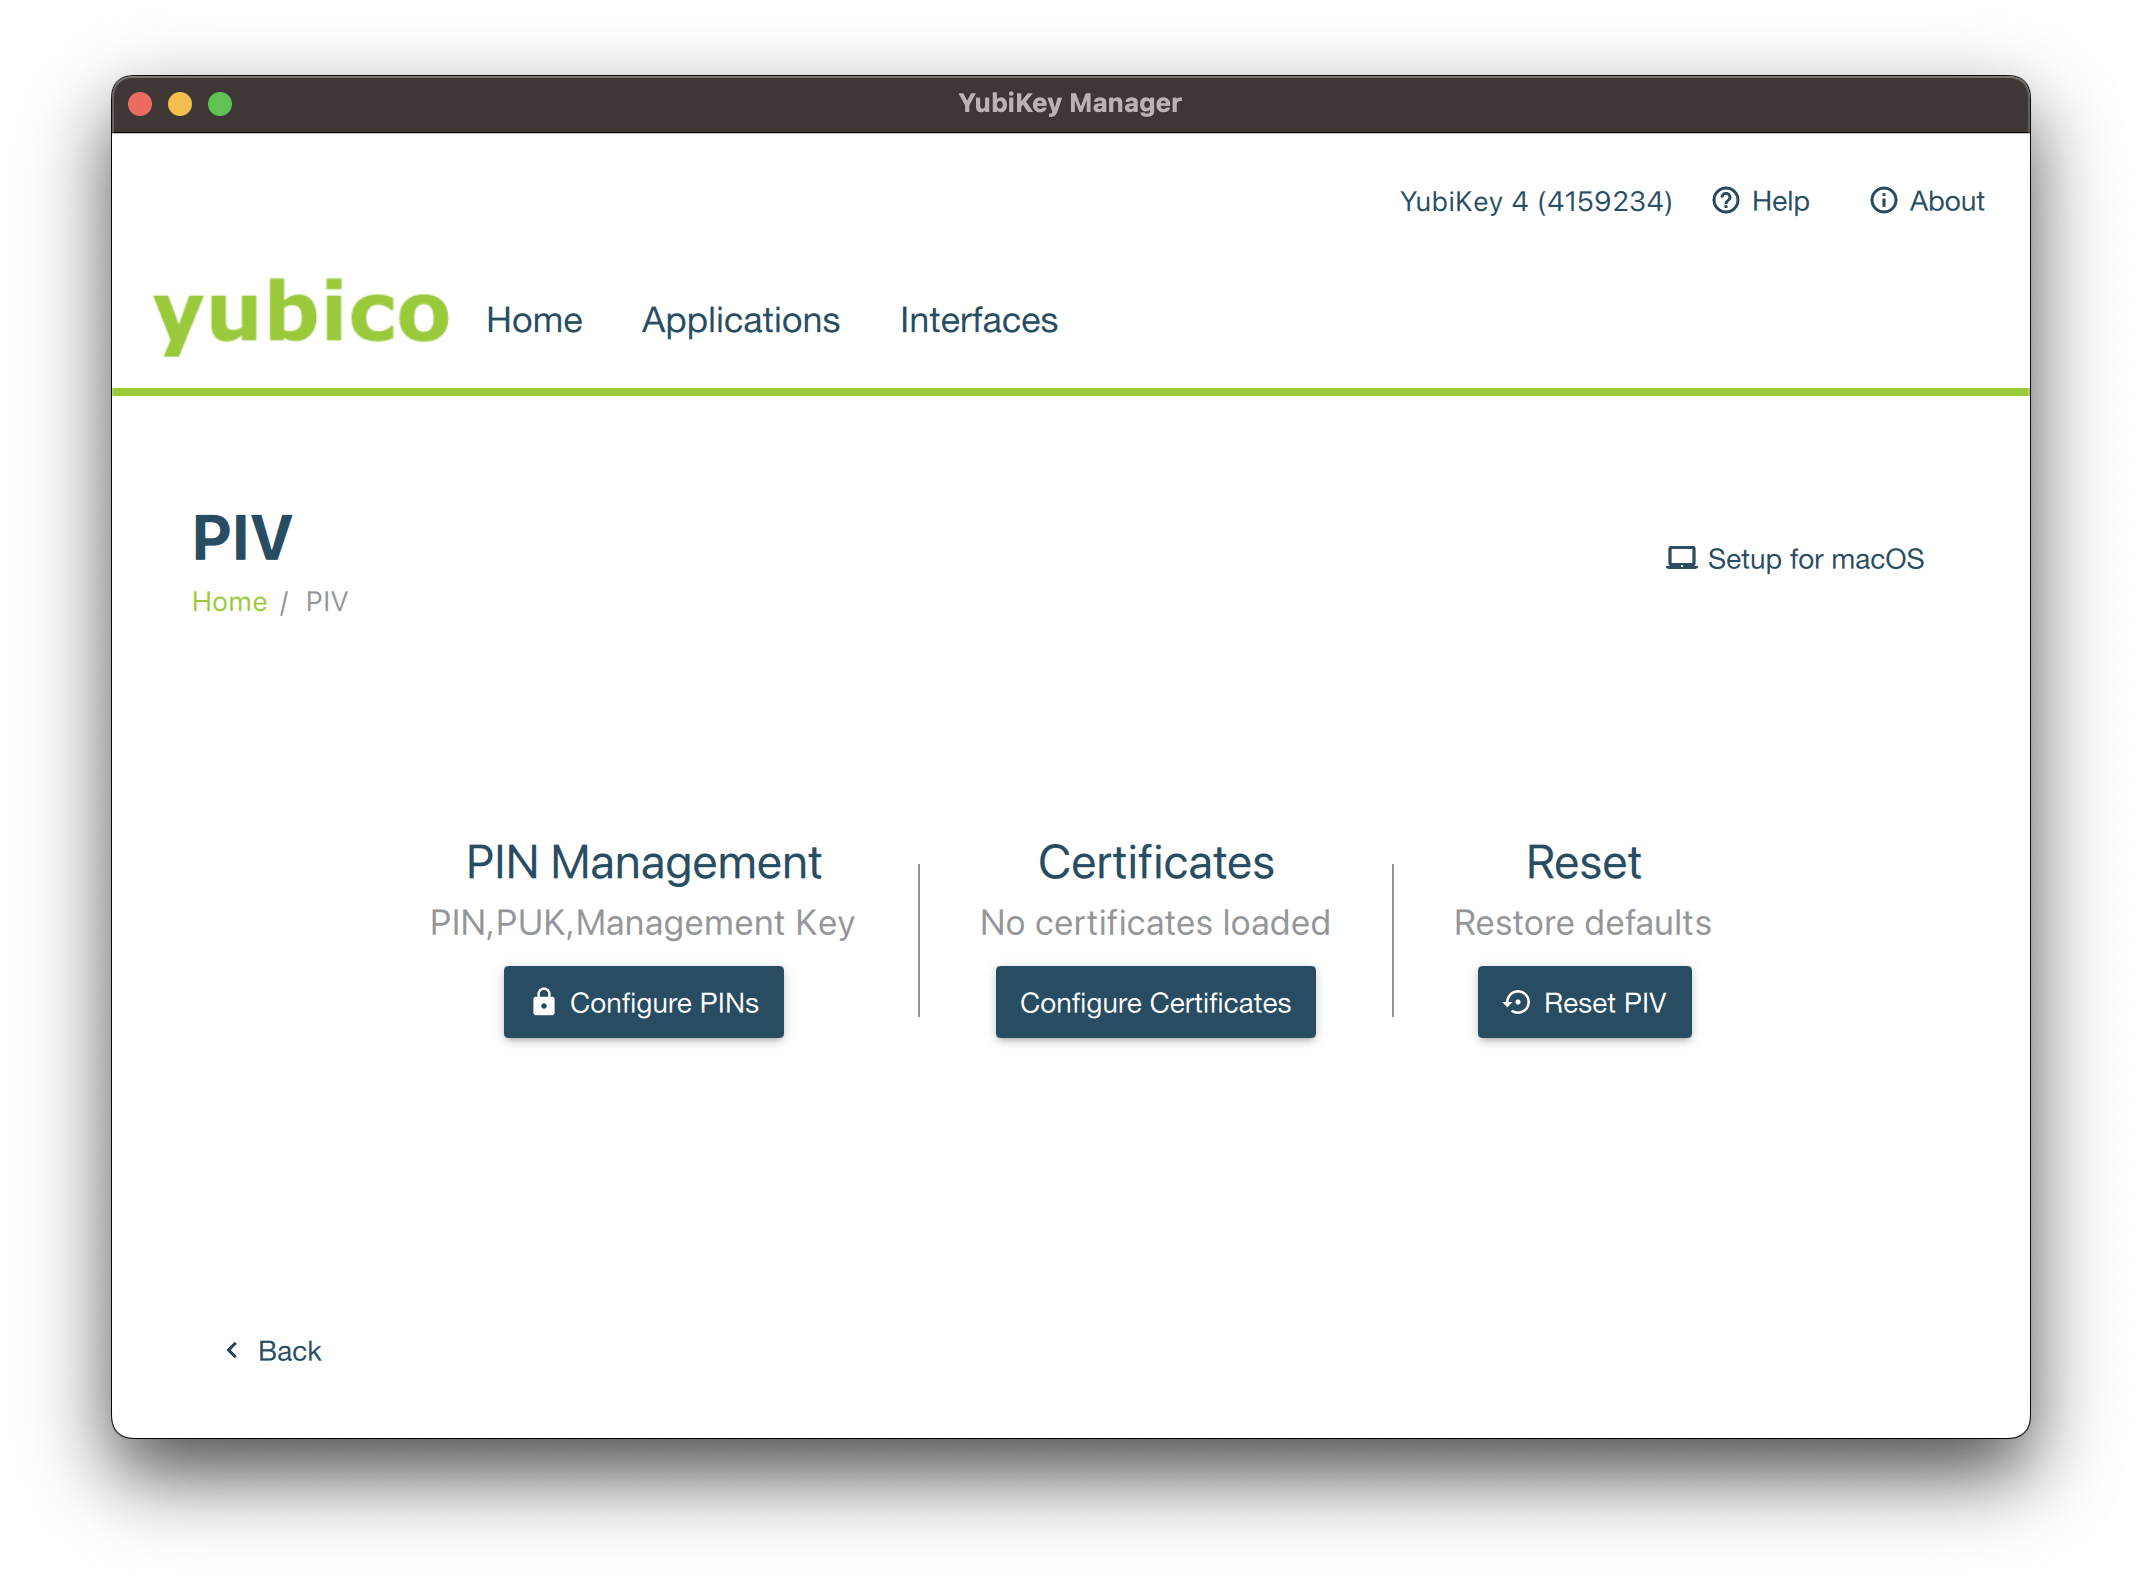
On the the next screen, click on Configure Certificates:
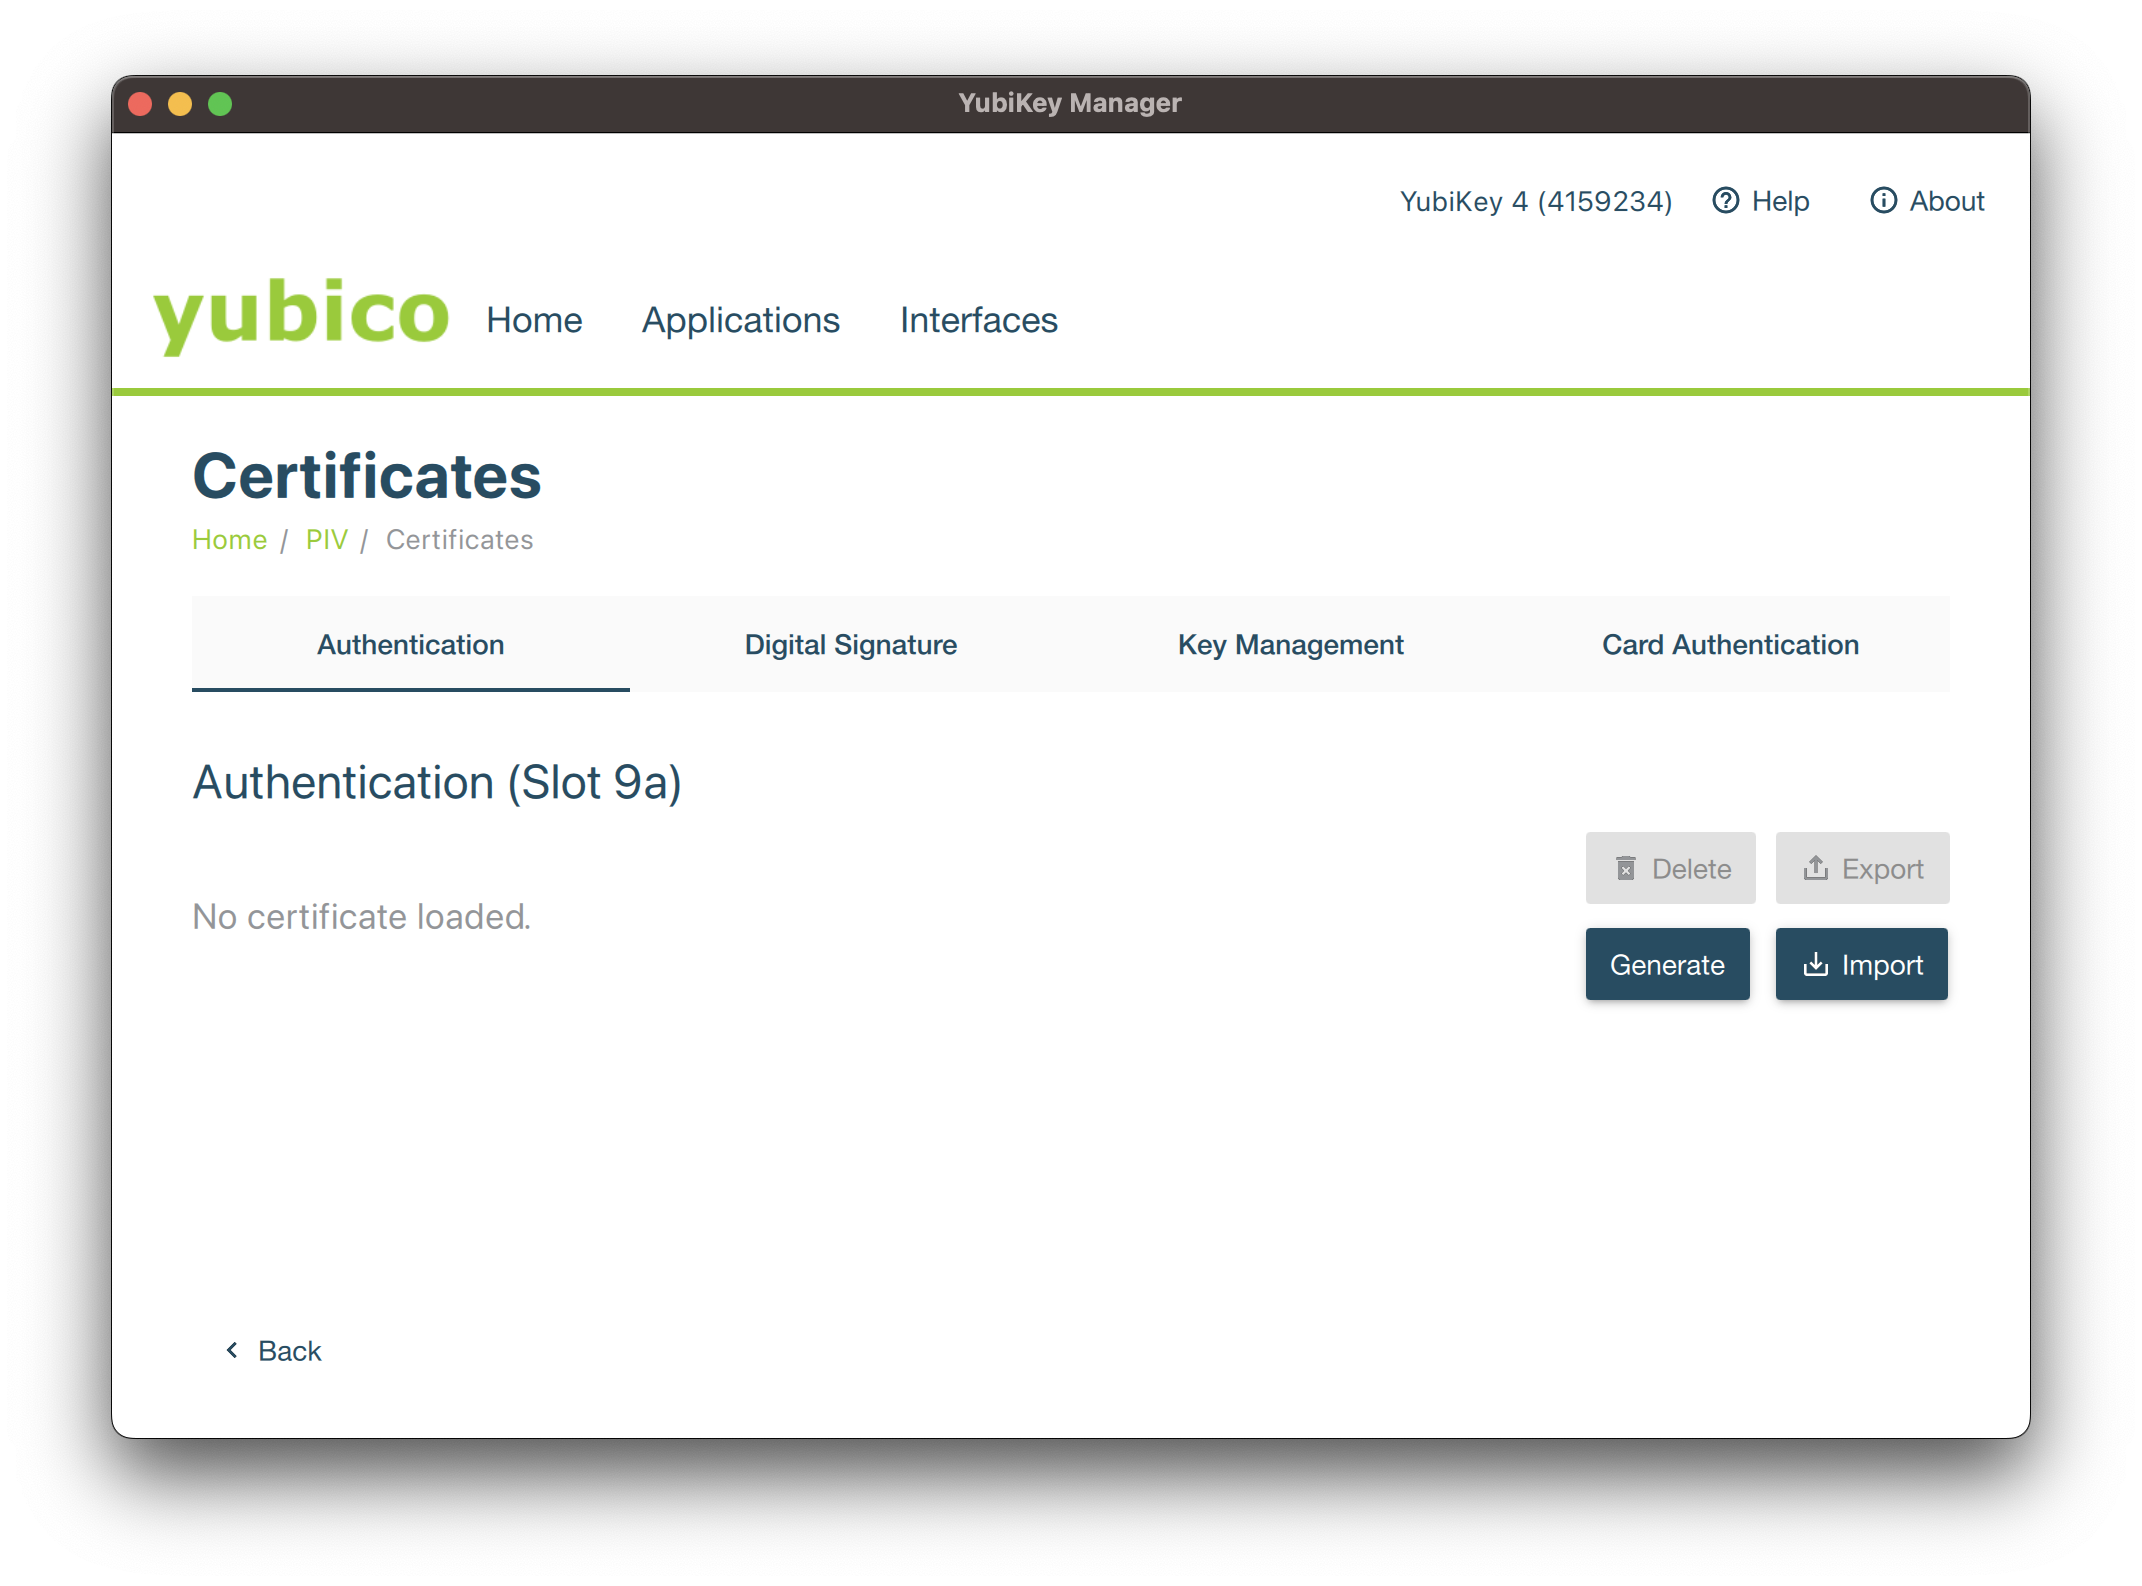
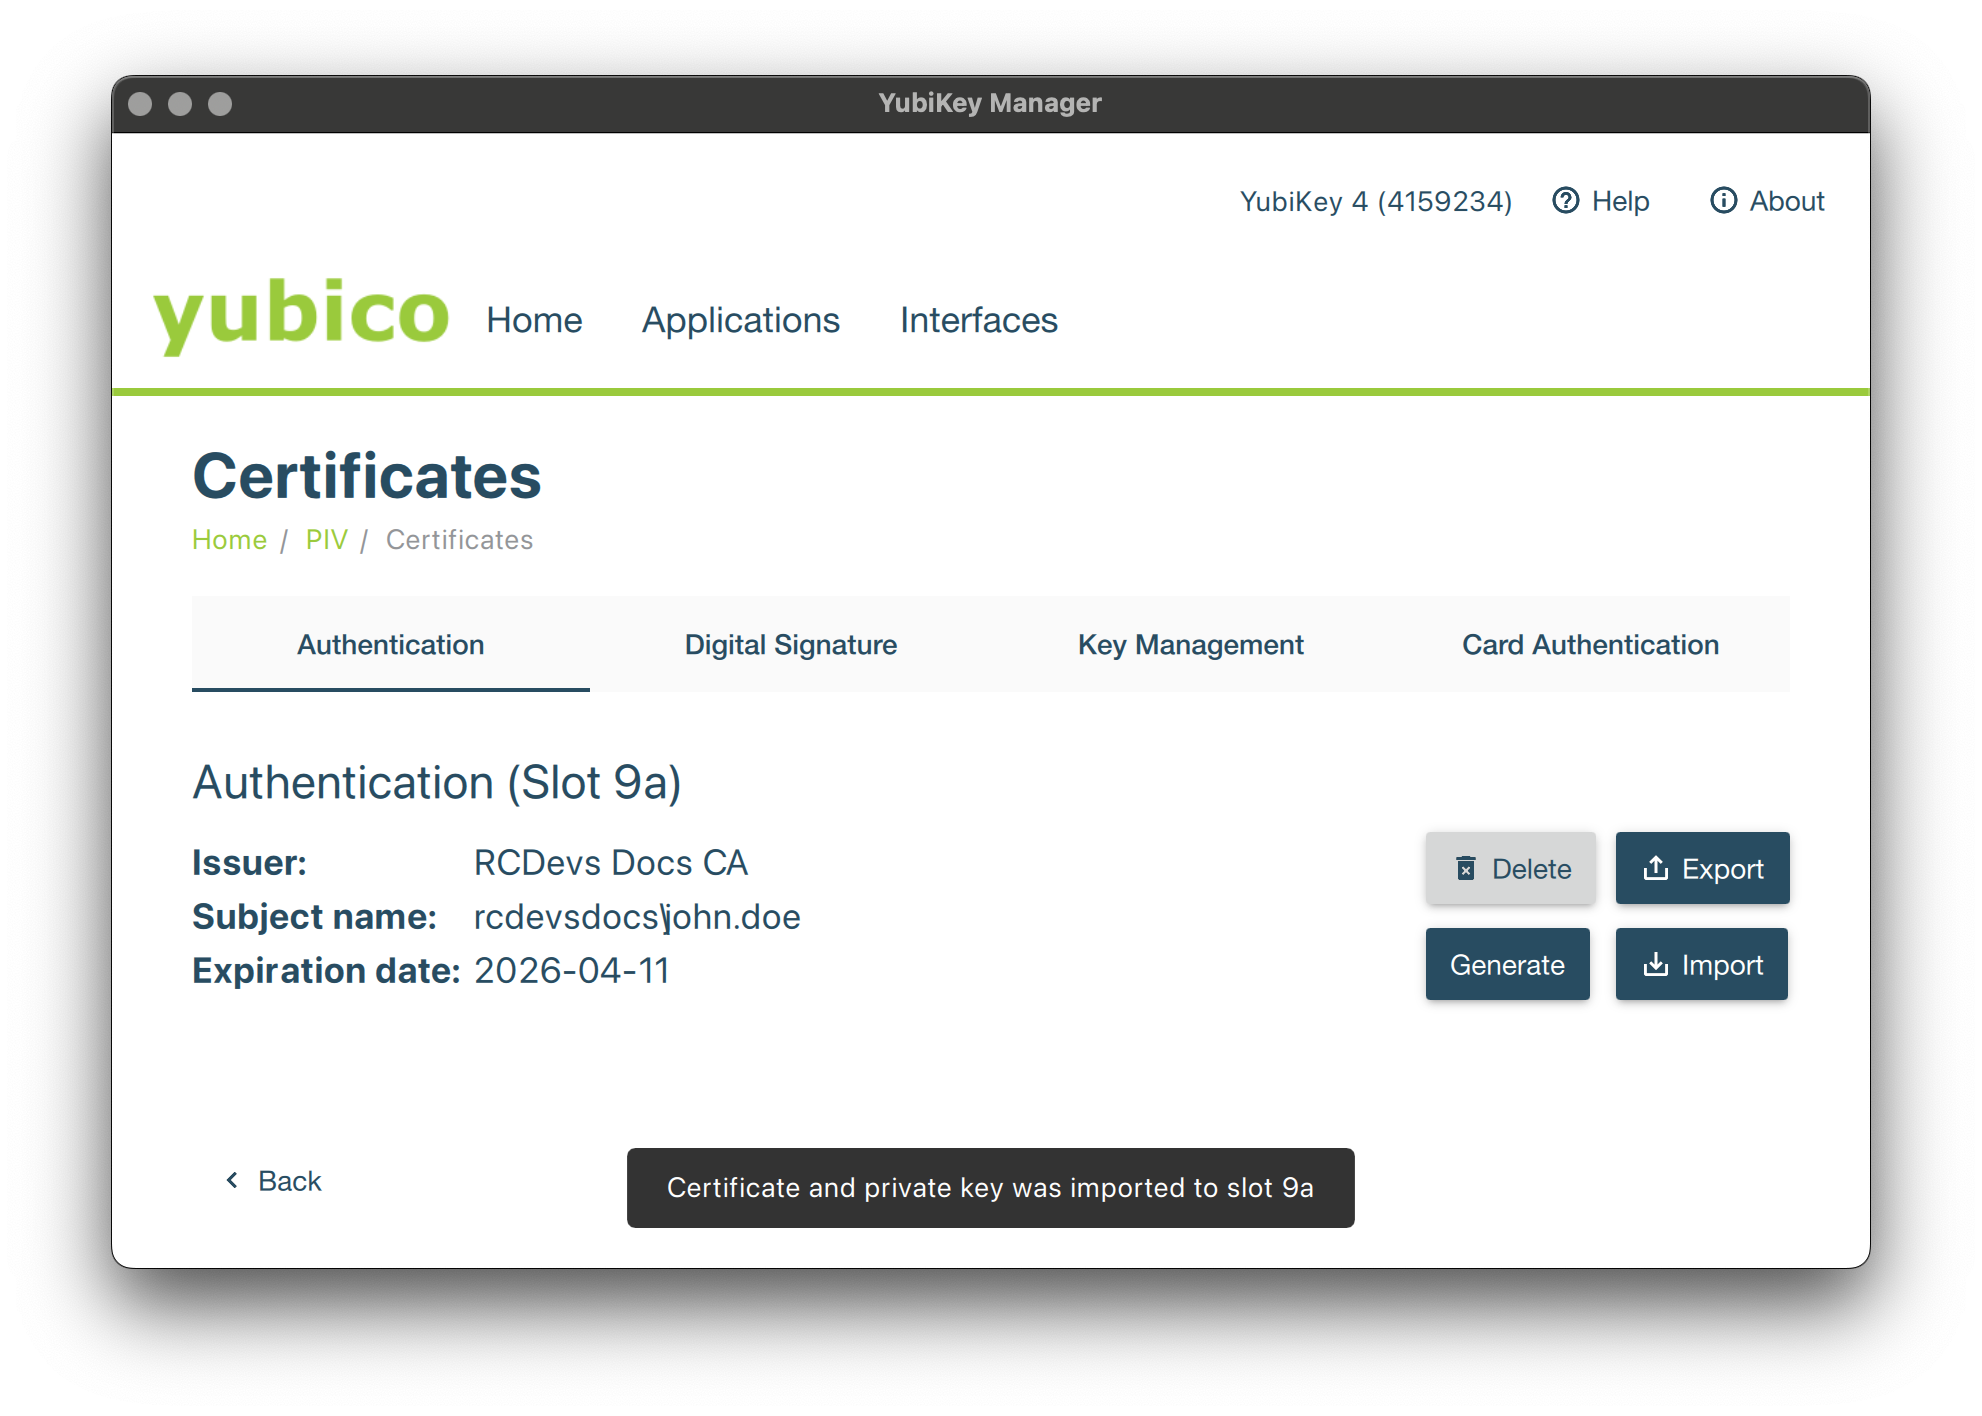
Click now on the Import button and browse the p12 bundle previous generated.
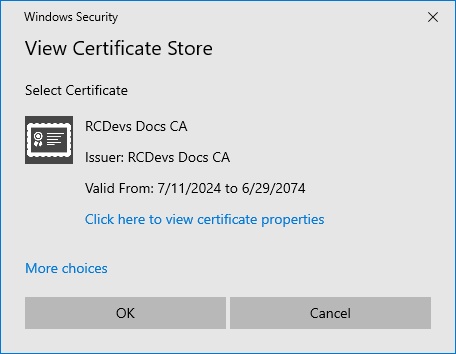
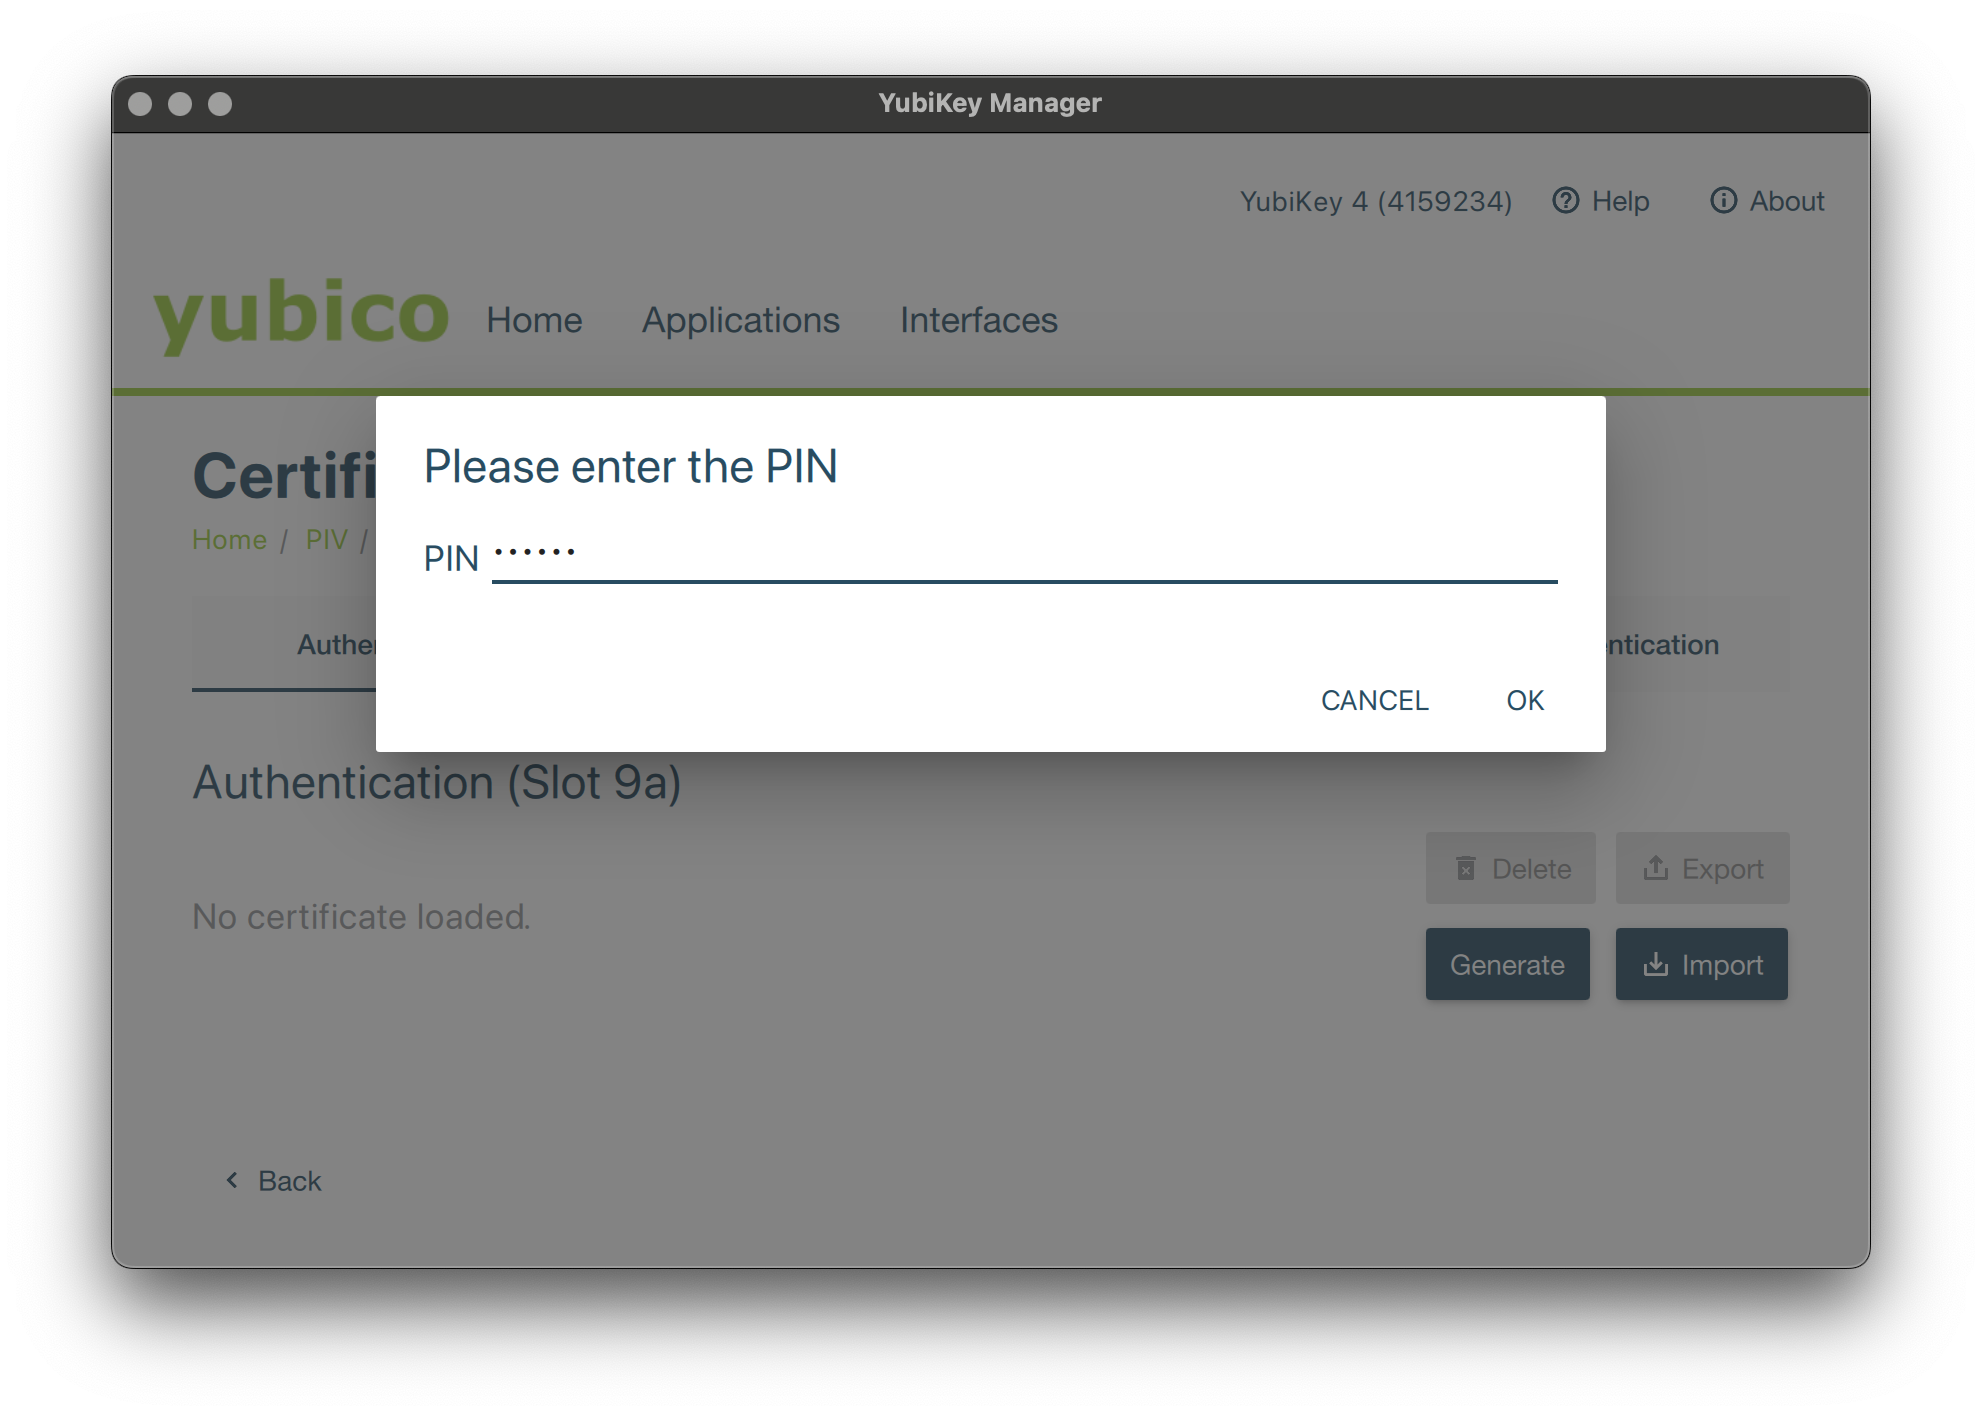
You will then be invited to provide the p12 password, followed by the PIN code of your Smartcard, which will be required to use the certificate.

Then the p12 is imported on your Smarcard and you should be able to see it on the next screen.
Please note that the Smartcard checkbox must be selected in every interface where you issued your certificate. If a certificate has been issued for Smartcard authentication on Windows, it cannot be used for EAP-TLS authentication due to a Microsoft restriction.
Import a .p12 (PKCS#12) or just the certificate file into a user's personal certificate store on Windows
Here are the detailed steps to import a .p12 (PKCS#12) certificate file into a user's personal certificate store on Windows:
-
Launch Certificate Manager
- Press
Win + R, typecertmgr.msc, and pressEnter.
- Press
-
Navigate to Personal Certificates:
- In the Certificate Manager window, expand the Personal folder.
- Click on the Certificates subfolder.
-
Start Certificate Import Wizard:
- Right-click on the Certificates subfolder.
- Select All Tasks → Import.
-
Select your .p12 File:
- In the Import Wizard, click Next.
- Click Browse, and navigate to the
.p12file. - Make sure to select *Personal Information Exchange (*.pfx; .p12) from the file type dropdown.
- Select your file and click Open, then Next.
-
Enter the Password for the Certificate:
- Enter the password associated with your
.p12file. - Optionally select:
- ☑ Mark this key as exportable (if you might export it later).
- ☑ Include all extended properties.
- Click Next.
- Enter the password associated with your
-
Select the Certificate Store:
- Select Place all certificates in the following store.
- Ensure Personal is selected (the default selection).
- Click Next.
-
Finalize the Import:
- Review the settings, and click Finish.
- A confirmation message stating "The import was successful" will appear; click OK.
This completes the import of a .p12 certificate into the user’s personal certificate store.
Configuring Name Mappings in Active Directory
This step is mandatory for Smartcard certificates issued before WebADM version 2.4.4. Starting from WebADM 2.4.4, certificate Name Mapping is no longer necessary because WebADM automatically populates the corresponding attribute on the user account. The AD attribute used is AltSecurityIdentities. The proxy_user must have read/write permissions on this attribute if the certificate is issued from the WebADM Self-Services. If the certificate is issued from the WebADM Administrator Portal, then the super_admins or other_admins must have the necessary permissions on this attribute.
To properly configure Name Mappings for a user account in Active Directory using certificates issued from WebADM, follow these steps:
-
Open Active Directory Users and Computers:
- Launch the Active Directory Users and Computers management console.
-
Select the User Account:
- Locate and right-click on the user account for which you've issued the certificate.
- From the context menu, select Name Mappings.

-
Add the X.509 Certificate:
- In the Security Identity Mapping window, navigate to the X.509 Certificate tab.
- Click on the Add button.
-
Browse and Import the Certificate:
- Browse to the certificate in CRT/PEM format issued from WebADM.
- You can obtain the certificate in PEM format by:
- Using the WebADM Admin GUI:
- Select the user's entry.
- Click Download next to the corresponding entry in the userCertificate attribute.
- Using the Self-Service Portal:
- Allow users to download certificates previously issued.
- Using Windows Certificate Management:
- Open the Certificate Management console (certmgr.msc).
- Export the relevant certificate in PEM or Base64-encoded format.
- Using the WebADM Admin GUI:
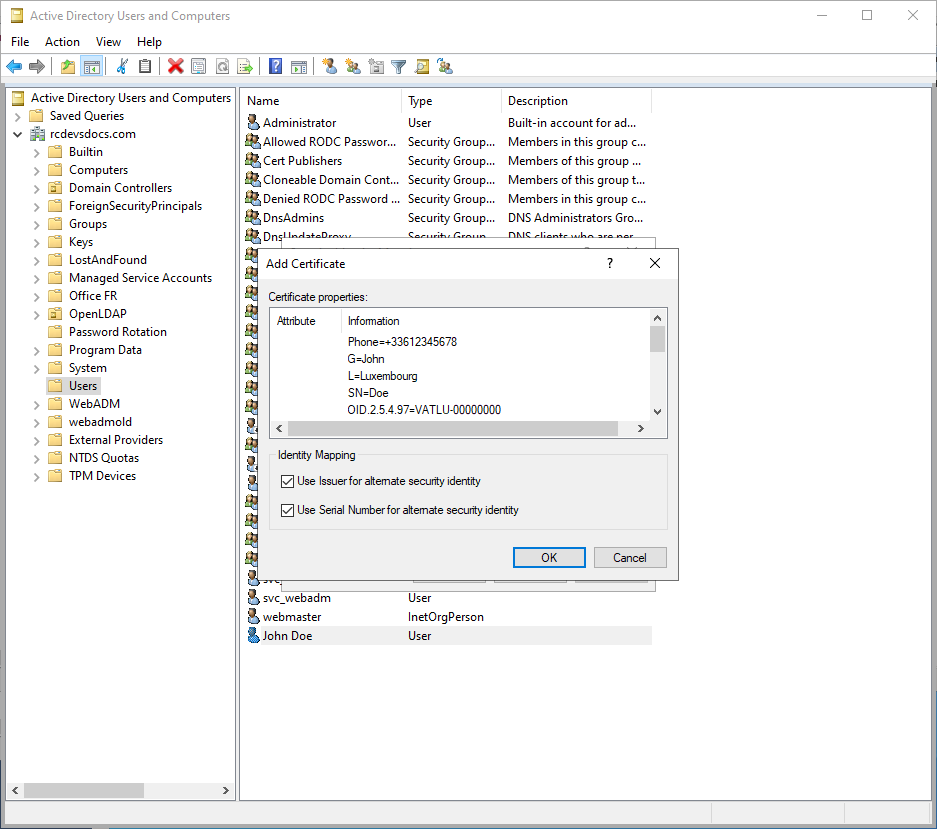
- Finalize and Confirm:
- Confirm and save the mapping.
You can now use your Smartcard for Windows Smartcard-based authentication.
The process of retrieving user certificates in PEM format and configuring the Name Mappings for the corresponding users in Active Directory can be automated using PowerShell or other scripting languages.