Overview
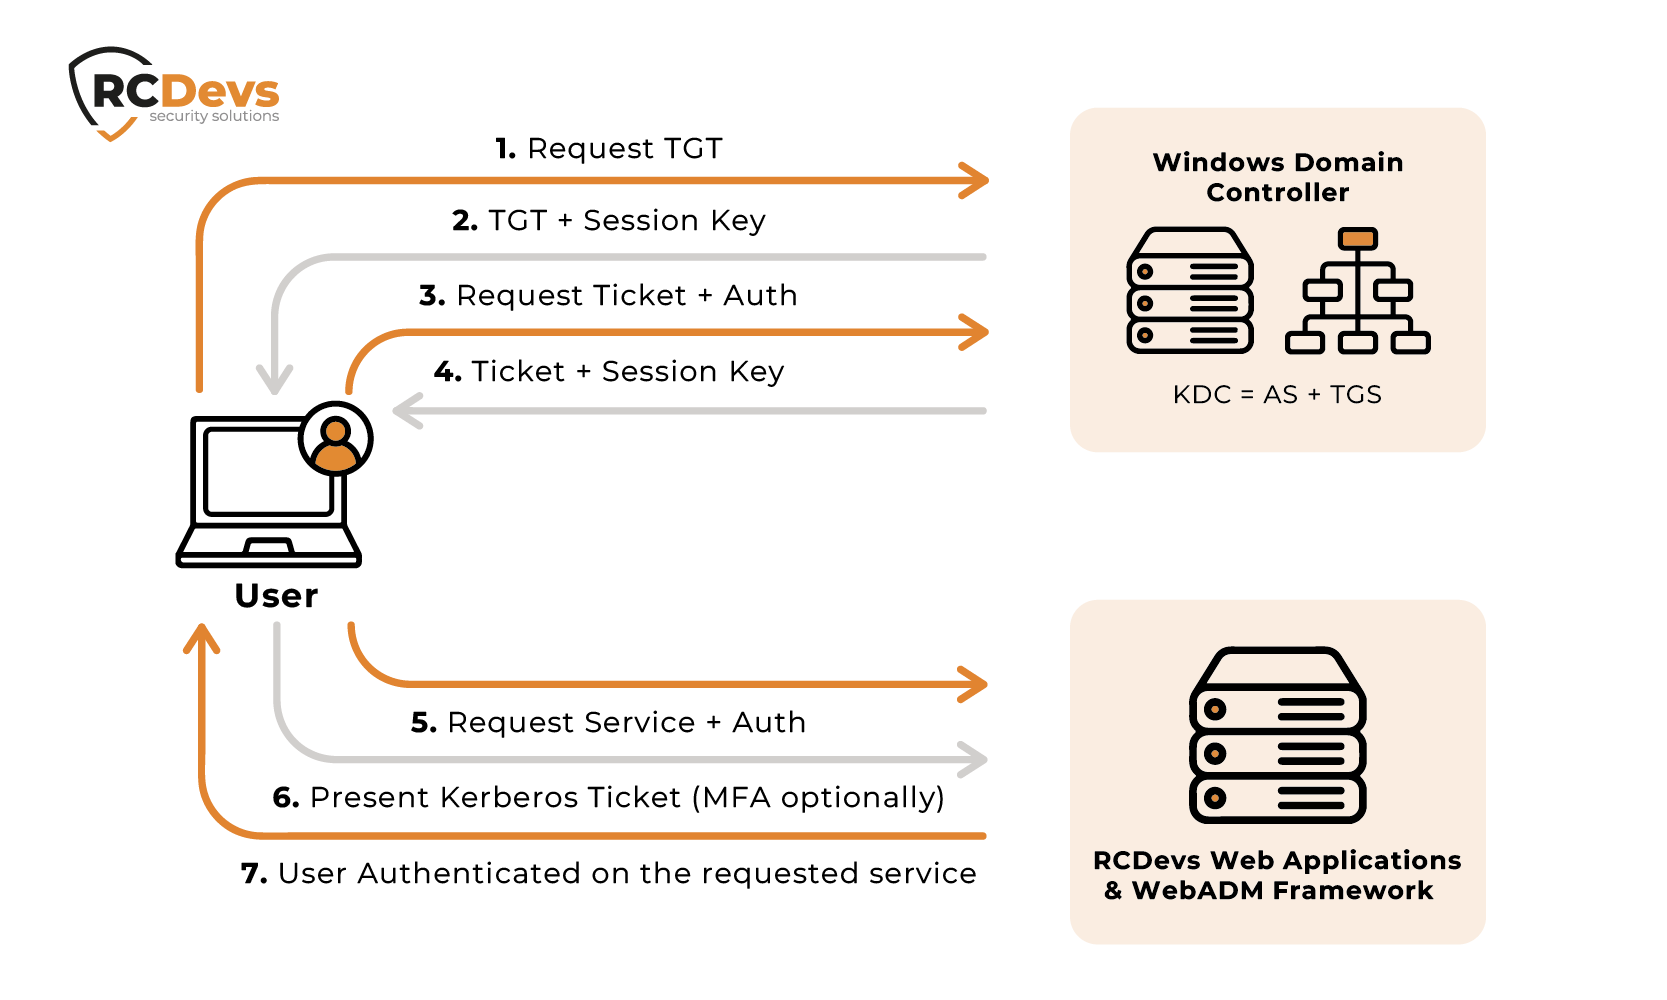
WebADM, starting from version 2.3.25, and its WebApps now support Kerberos authentication. This means users can automatically access its web applications (such as the OpenID Connect/SAML Identity Provider, PwReset, SelfDesk, and HelpDesk) within an Active Directory intranet. The system achieves this by utilizing the information contained in a Kerberos ticket issued when opening a Windows session and presented by the user's browser. This mechanism enables Passwordless authentication or requires only the additional factor(s) (e.g., OTP, FIDO, PIN...) to complete the login process.
Service User
To decrypt Kerberos tickets, each WebADM instance requires an Active Directory user account with an associated Kerberos Service Principal Name (SPN) and a keytab file. The keytab file contains the shared secret between the WebADM instance and the Active Directory Domain Controller (DC).
An existing user account, such as the WebADM service account (proxy_user), can be used for this purpose instead of creating a new account. In this guide, we will achieve this using the proxy_user account, specifically svc_webadm.
To proceed, we need to modify the account properties to enable AES 256-bit encryption.
- Open the Active Directory Users and Computers console.
- Right-click on the
svc_webadmservice account and select Properties. - Navigate to the Account tab, locate the Account Options panel, and enable AES 256-bit encryption.
- Click OK to save the changes.
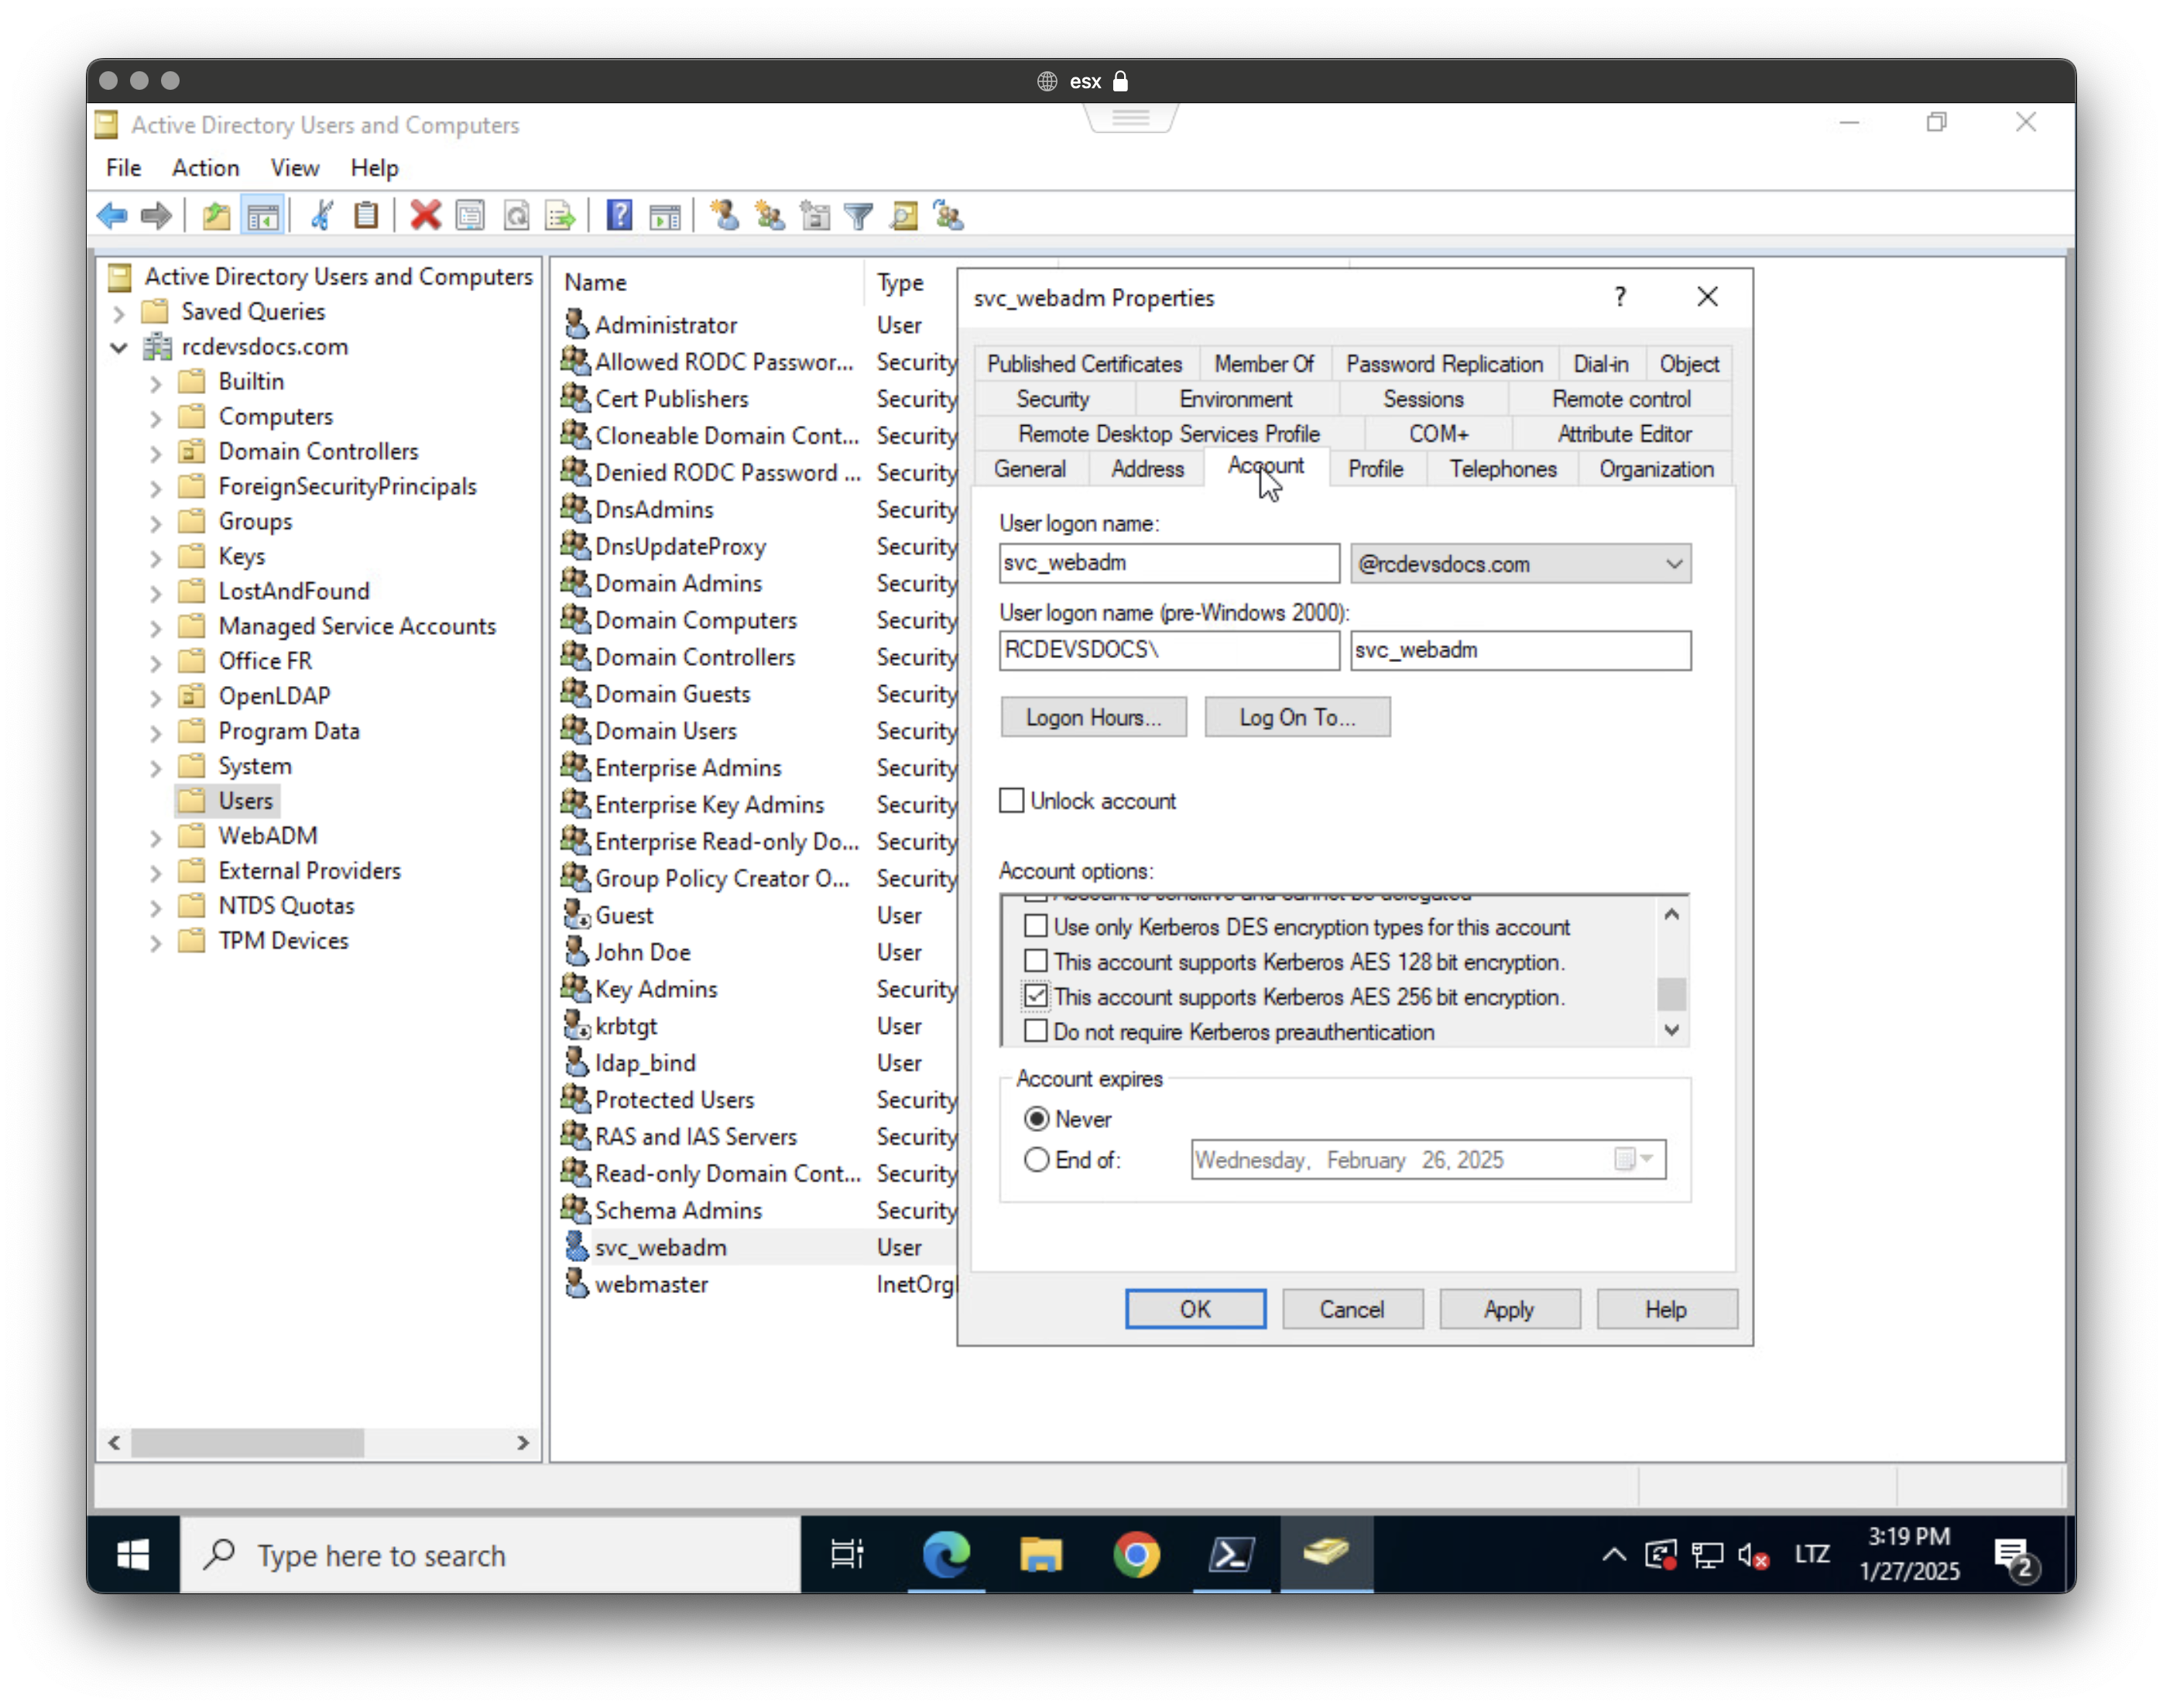
The account is now configured and ready for use.
The crypto AES256-SHA1 option is used here, but ensure it matches the Kerberos environment's encryption policies. Other options like AES128-SHA1 can also be used if necessary.
Keytab creation
We need to create a keytab file for the WebADM web server(s) to use. The Kerberos principal must include the hostnames of the systems for which the Kerberos ticket is intended to be used.
For example, my WebADM server URLs are:
webadm1.rcdevsdocs.comwebadm2.rcdevsdocs.com
These URLs directly target my WebADM servers, while the OpenID/SAML Identity Provider and other WebADM Web Applications are accessible through a reverse proxy behind the following hostname:
sso.rcdevsdocs.com
In this documentation, we will create a unique keytab for all 3 hostnames.
The Kerberos principal must match what the user's browser expects, following the format:
HTTP/<FQDN of the remote web server>@<Kerberos realm>
The Kerberos principal for this infrastructure:
HTTP/sso.rcdevsdocs.com@RCDEVSDOCS.COM
The Kerberos realm is typically the full Active Directory domain name in uppercase letters.
Map SPN to the same service account
Use the setspn command to register the SPN with the IdP hostname under the service account (svc_webadm).
setspn -A HTTP/sso.rcdevsdocs.com svc_webadm
Generate a single keytab with multiple SPNs
You can generate one keytab file containing several HTTP SPNs by creating the first keytab entry, then adding the next SPNs into the existing keytab with -in and a temporary output file.
Do not run each command with only -out krb5.keytab, because each execution may recreate the keytab file and overwrite the previous content.
Generate the initial keytab entry
Start by generating the keytab with the main SSO SPN:
ktpass -princ HTTP/sso.rcdevsdocs.com@RCDEVSDOCS.COM -mapuser svc_webadm@RCDEVSDOCS.COM -pass * -ptype KRB5_NT_PRINCIPAL -crypto AES256-SHA1 -mapop add +dumpsalt -out krb5.keytab
The +dumpsalt option displays the AES salt used to generate the key.
Copy the salt value printed by the command, for example:
Hashing password with salt "RCDEVSDOCS.COMHTTPsso.rcdevsdocs.com"
In the next commands, replace:
<SALT_FROM_FIRST_COMMAND>
with the exact salt value displayed by the first ktpass command.
Add the WebADM server hostnames to the same keytab
To add webadm1.rcdevsdocs.com to the existing keytab:
ktpass -princ HTTP/webadm1.rcdevsdocs.com@RCDEVSDOCS.COM -mapuser svc_webadm@RCDEVSDOCS.COM -pass * -ptype KRB5_NT_PRINCIPAL -crypto AES256-SHA1 -mapop add -in krb5.keytab -out krb5.tmp.keytab -setupn -setpass -rawsalt "<SALT_FROM_FIRST_COMMAND>"
Move-Item -Force krb5.tmp.keytab krb5.keytab
To add webadm2.rcdevsdocs.com to the existing keytab:
ktpass -princ HTTP/webadm2.rcdevsdocs.com@RCDEVSDOCS.COM -mapuser svc_webadm@RCDEVSDOCS.COM -pass * -ptype KRB5_NT_PRINCIPAL -crypto AES256-SHA1 -mapop add -in krb5.keytab -out krb5.tmp.keytab -setupn -setpass -rawsalt "<SALT_FROM_FIRST_COMMAND>"
Move-Item -Force krb5.tmp.keytab krb5.keytab
The final krb5.keytab file should now contain the following principals:
HTTP/sso.rcdevsdocs.com@RCDEVSDOCS.COM
HTTP/webadm1.rcdevsdocs.com@RCDEVSDOCS.COM
HTTP/webadm2.rcdevsdocs.com@RCDEVSDOCS.COM
Notes
The -pass * option prompts you to enter the service account password interactively. Use the same password for each command.
The -in krb5.keytab option reads the existing keytab, and -out krb5.tmp.keytab writes a new keytab containing both the existing entries and the new SPN. The temporary file is then renamed back to krb5.keytab.
The -setupn -setpass options prevent the additional commands from changing the service account UPN or resetting the service account password again.
If the service account password is changed later, the keytab must be regenerated.
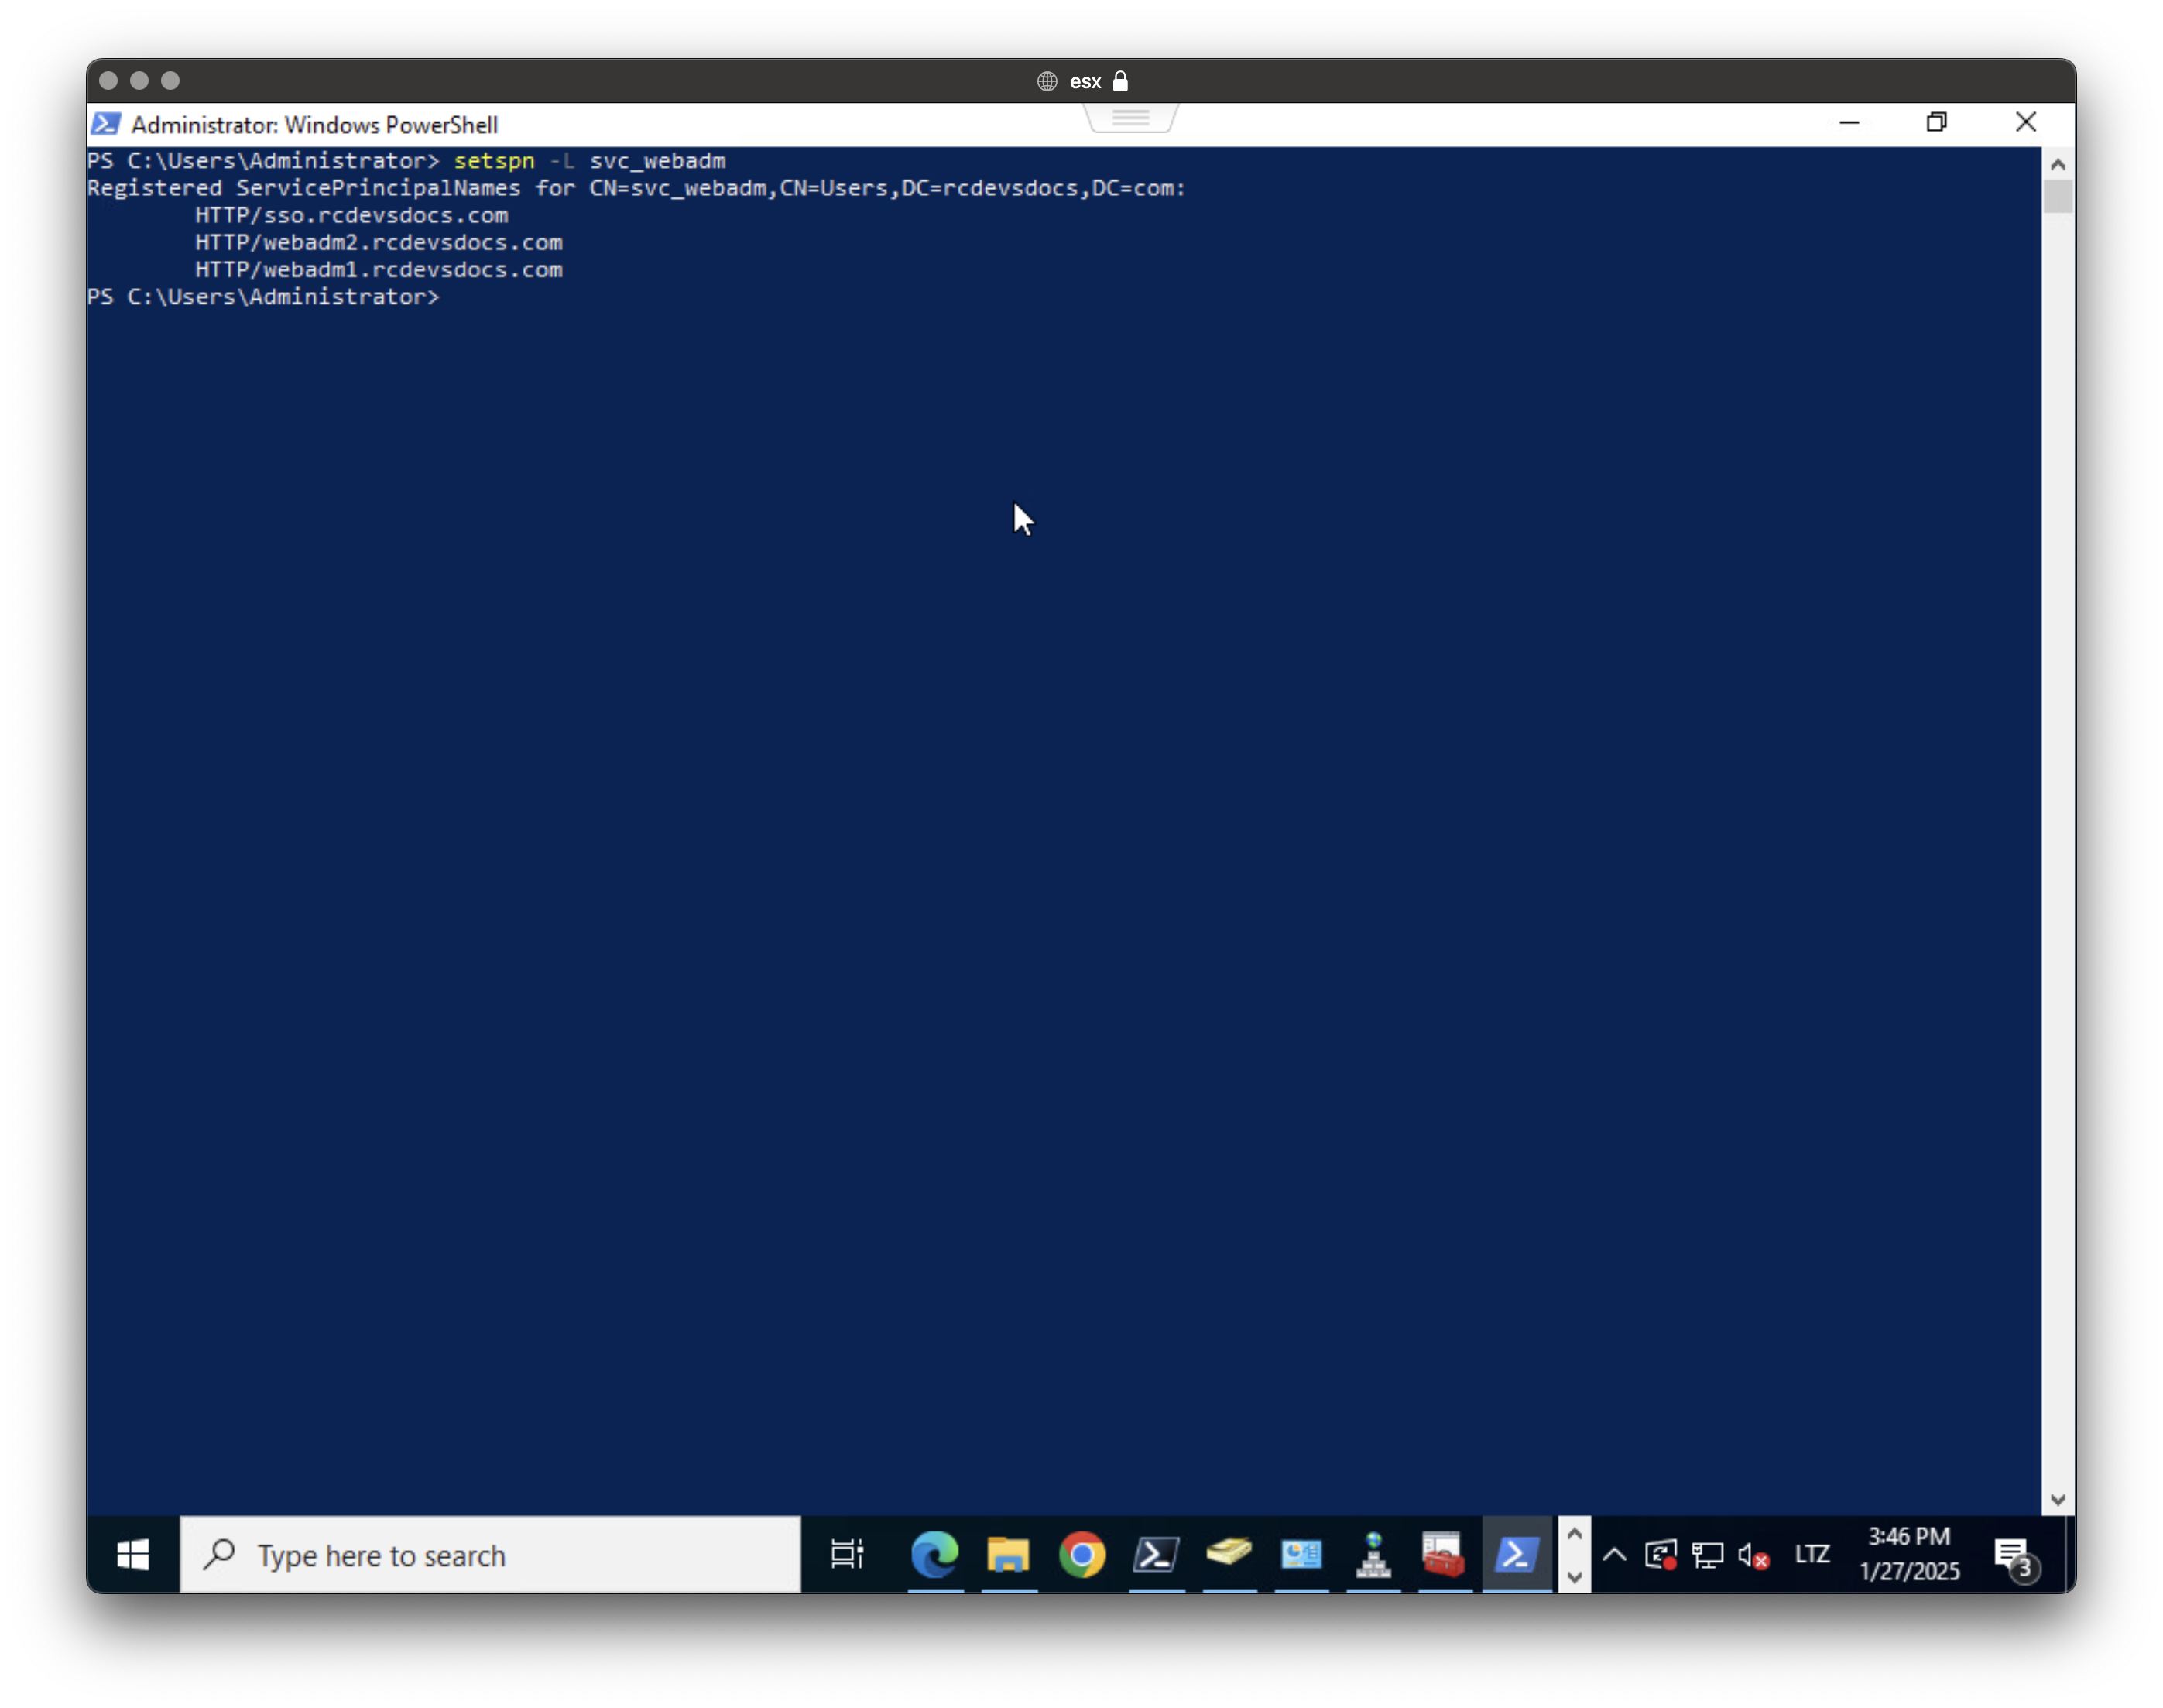
Verify the registered SPNs in Active Directory
To ensure that all SPNs are correctly mapped to the service account, run:
setspn -L svc_webadm
You should see output similar to:
Registered ServicePrincipalNames for CN=svc_webadm,CN=Users,DC=rcdevsdocs,DC=com:
    HTTP/webadm1.rcdevsdocs.com
    HTTP/webadm2.rcdevsdocs.com
    HTTP/sso.rcdevsdocs.com
Verify the Keytab
You can use klist or ktutil to inspect the contents of the generated keytab and confirm that it contains entries for all three principals. Refer to the Microsoft documentation for further details and guidance.
Copy the keytab file on WebADM Servers
Use SCP or SFTP to copy the keytab file previously created on your WebADM servers at the following location:
/opt/webadm/conf/krb5.keytab
Ensure the keytab file is properly secured and readable by the webadm user. Use the following commands:
chmod 600 /opt/webadm/conf/krb5.keytab
chown webadm:webadm /opt/webadm/conf/krb5.keytab
After setting the correct permissions, restart the WebADM services to apply the changes and load the keytab:
systemctl restart webadm
WebADM Domain Configuration
To ensure that Kerberos authentication works correctly, you need to check that the UPN Suffix setting is configured with the Kerberos realm in your WebADM domain object.
There are multiple ways to retrieve this information. In this guide, we will use the klist command and a keytab file that has been copied to your WebADM servers:
[root@webadm1 conf]# klist -k -t krb5.keytab
Keytab name: FILE:krb5.keytab
KVNO Timestamp         Principal
---- ----------------- --------------------------------------------------------
   5 01/01/70 01:00:00 HTTP/sso.rcdevsdocs.com@RCDEVSDOCS.COM
In the example above, the Kerberos realm is RCDEVSDOCS.COM.
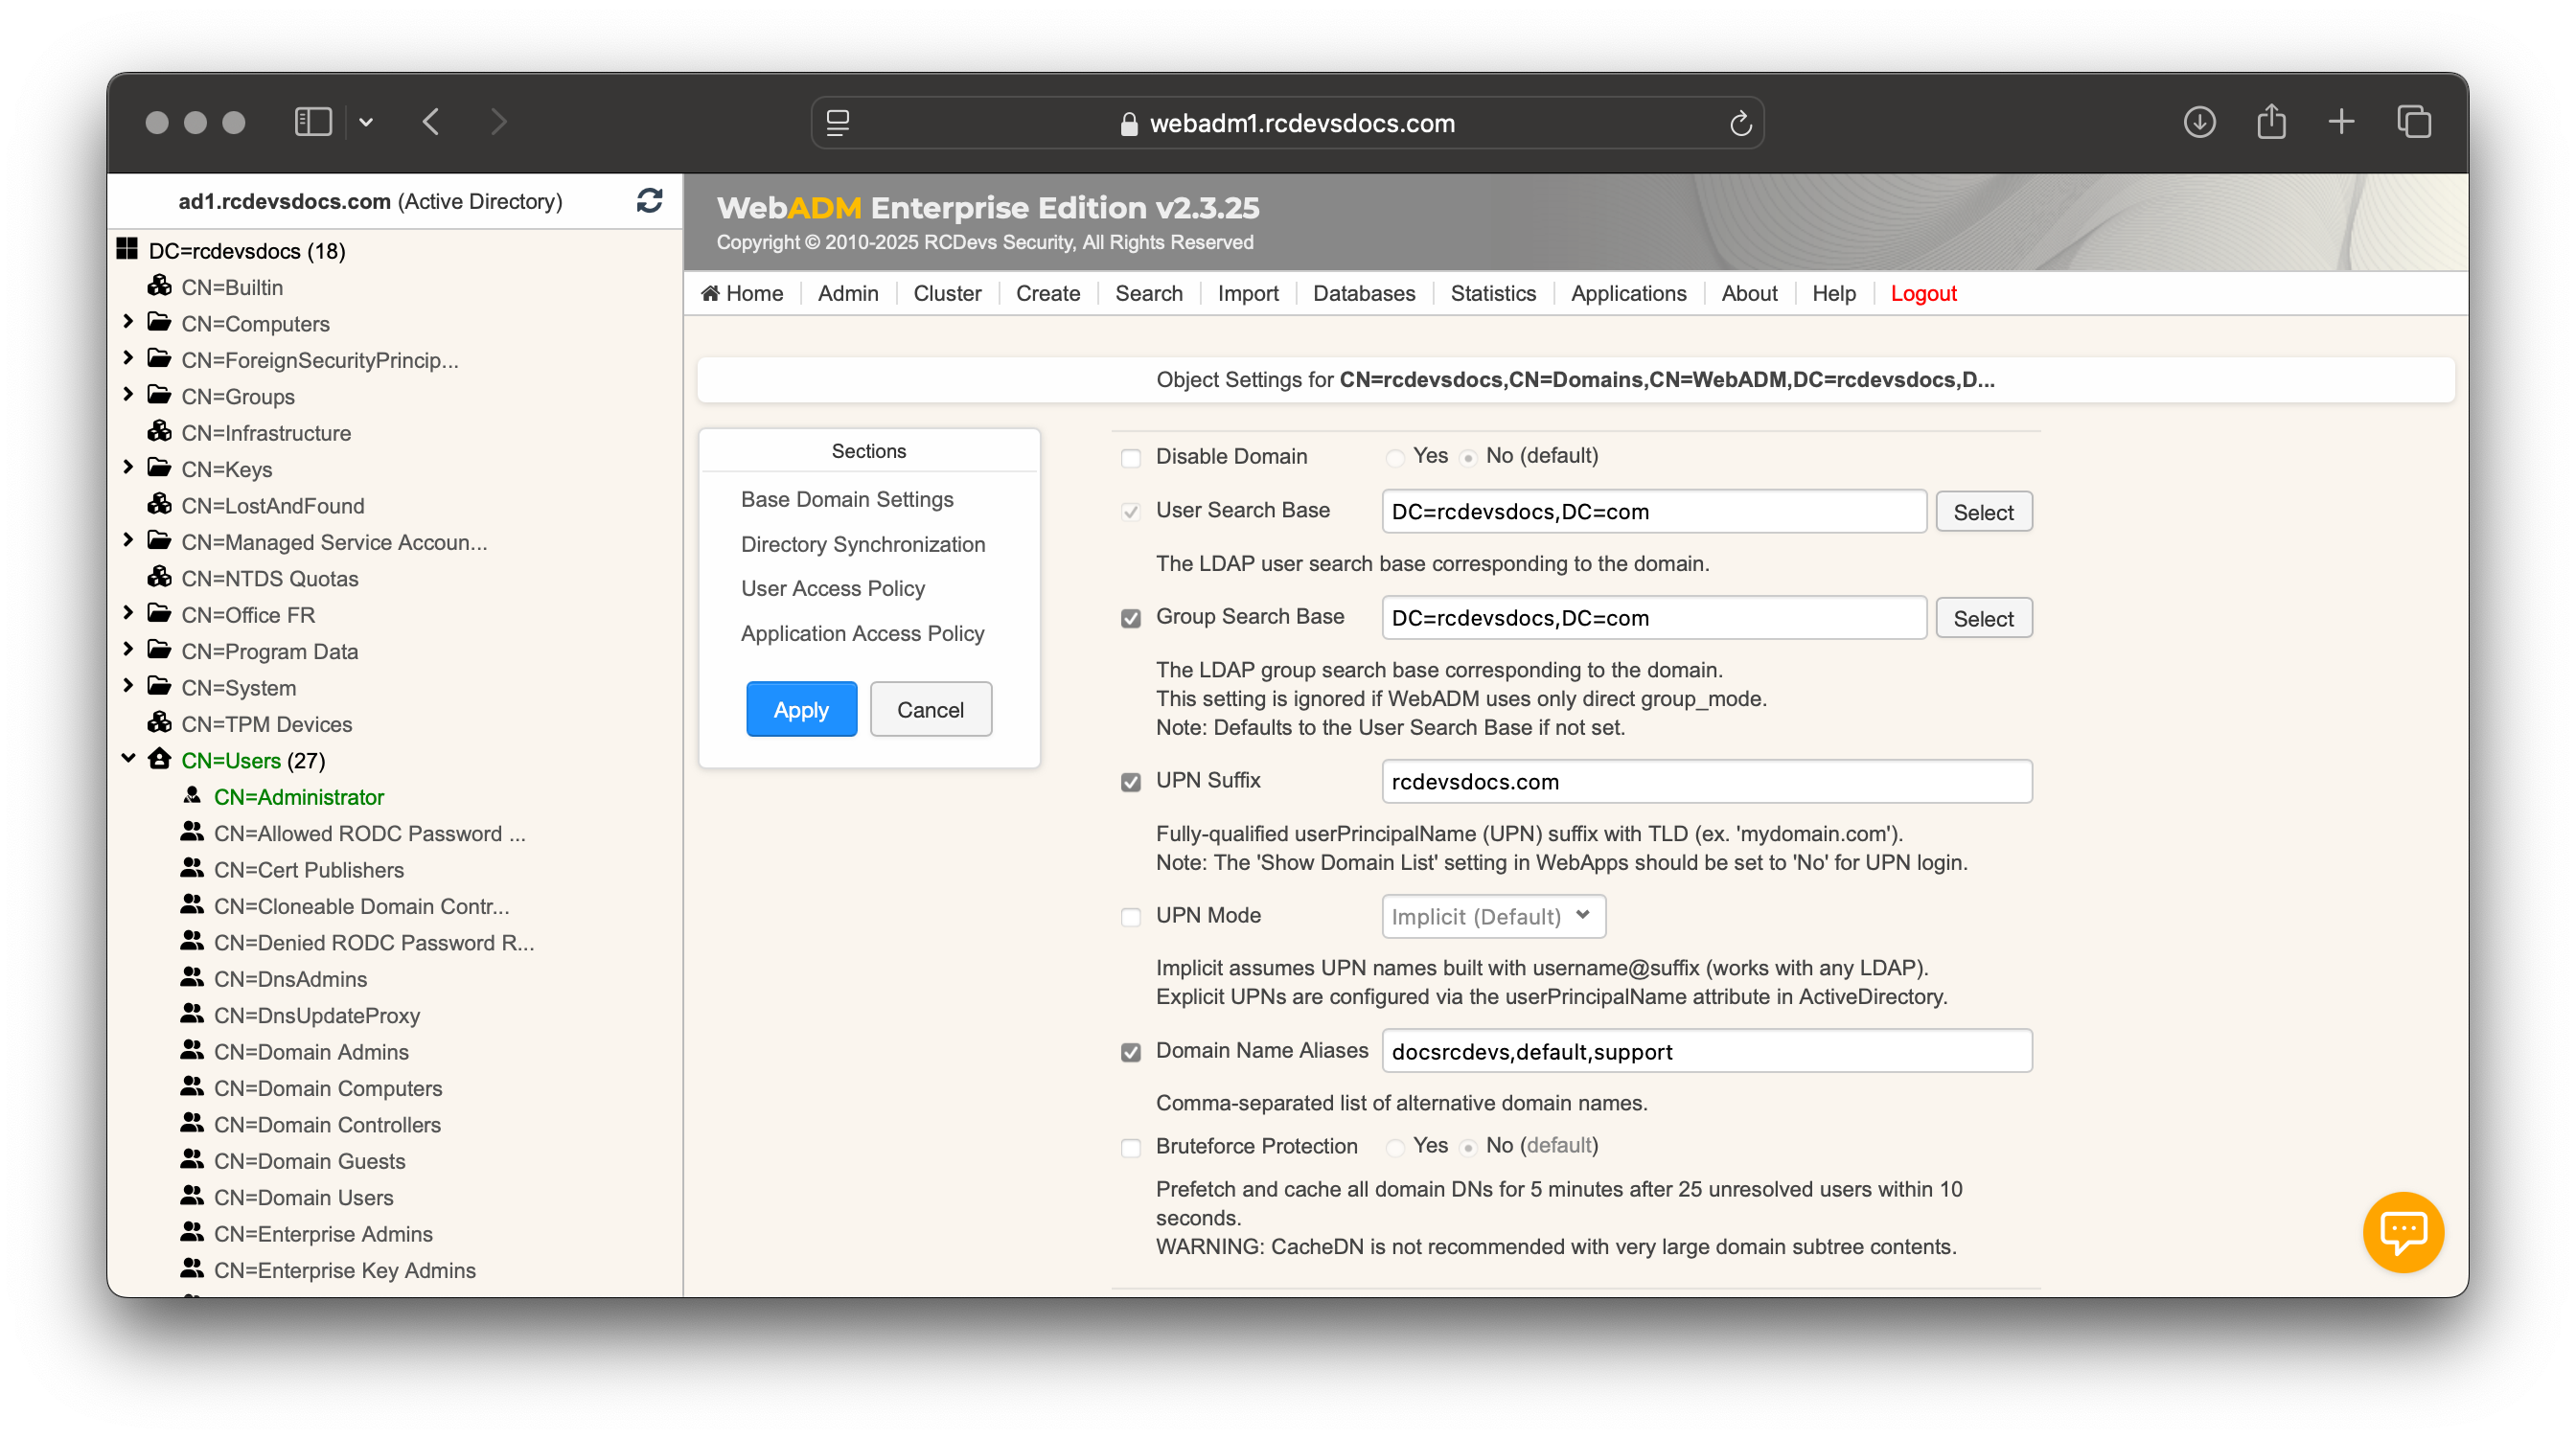
To configure it in WebADM:
- Log in to the WebADM Administrator portal.
- Click on the Admin tab, then navigate to User Domains.
- Locate your domain object and click the CONFIGURE button.
- Enter the realm value in the
UPN Suffixsetting.
Enable Kerberos in your WebADM Web Applications
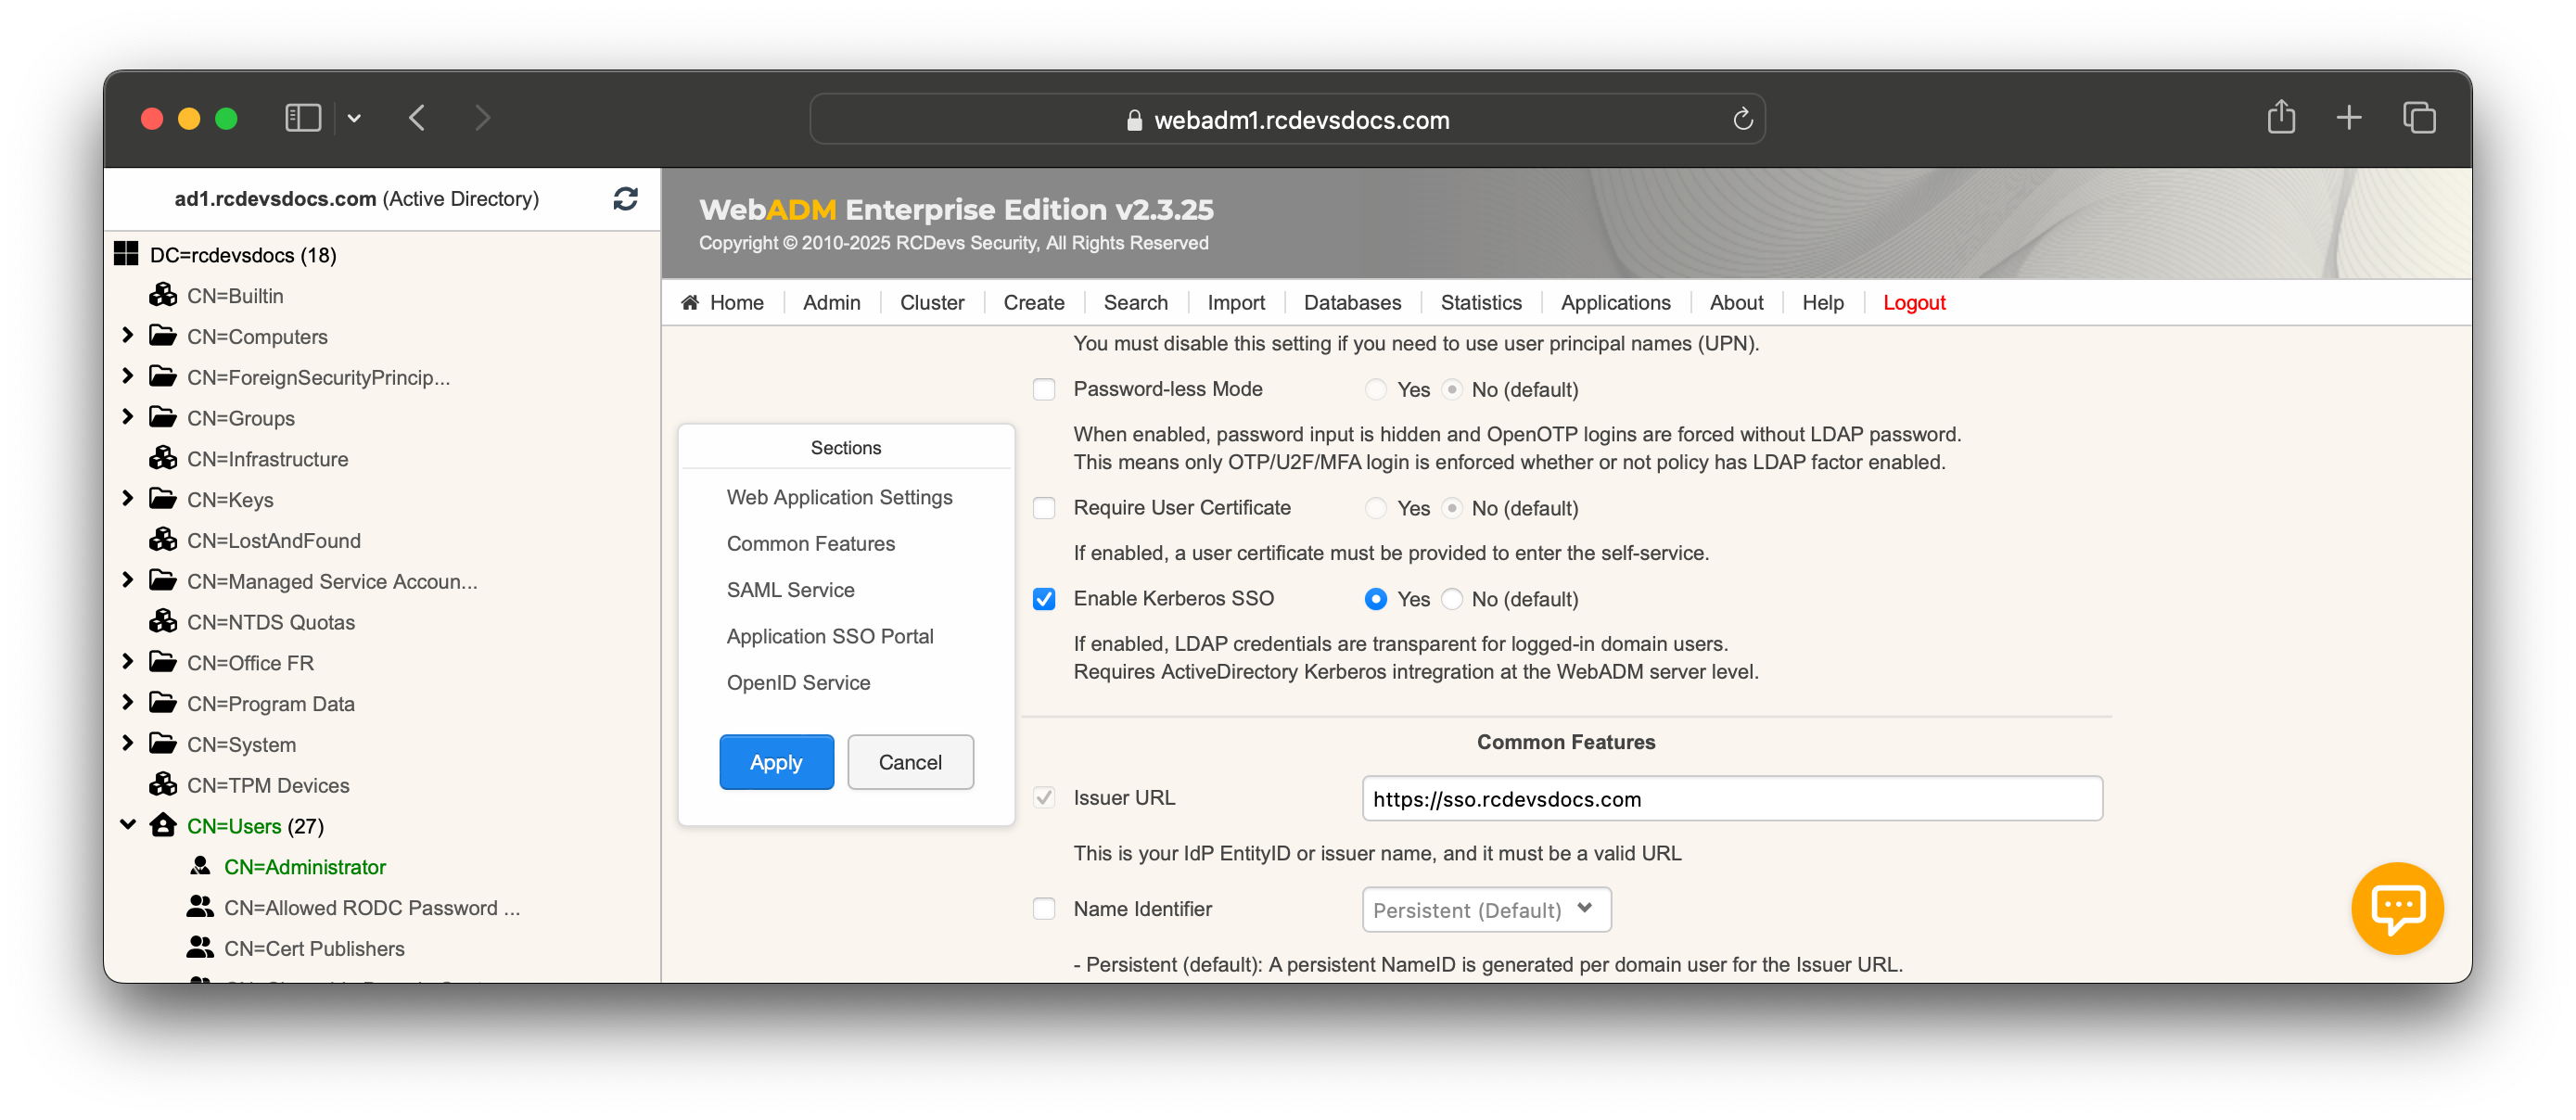
Now that the keytab file has been copied to your WebADM servers, log in to the WebADM Administrator portal to enable Kerberos SSO for the desired application. Click on the Applications tab, select the application you want to enable Kerberos SSO for, and click the Configure button.
In the application's configuration page, locate the Enable Kerberos SSO option, set it to Yes, and click Apply to save your changes.
In this example, we are activating it for the RCDevs Identity Provider.
Enable Kerberos Authentication for Microsoft Edge, Google Chrome and Firefox
Microsoft Edge
In this section, we will use Group Policy to configure the Edge browser to allow Kerberos authentication. Adapt the GPO deployment to suit your specific needs.
To allow Kerberos authentication in Microsoft Edge through Group Policy, follow these steps:
-
Download and Install the Microsoft Edge Group Policy Templates:
- If you haven't already, download the Microsoft Edge Group Policy templates from the official Microsoft Edge enterprise page.
- Extract the files, and you will find
.admxfiles (Group Policy templates) for Edge.
-
Add the ADMX Templates to the Group Policy Central Store:
- Copy the downloaded
.admxfiles to theC:\Windows\PolicyDefinitionsfolder on a domain controller. - Copy the language-specific
.admlfiles (e.g.,en-US\msedge.adml) toC:\Windows\PolicyDefinitions\en-US.
- Copy the downloaded
-
Open the Group Policy Management Console (GPMC):
- Press
Win + R, typegpmc.msc, and hit Enter to open the Group Policy Management Console.
- Press
-
Edit GPO:
- In the Group Policy Management Editor, navigate to
Computer Configuration->Administrative Templates->Microsoft Edge->HTTP Authentication. - Look for the policy: Configure list of allowed authentication servers.
- In the Group Policy Management Editor, navigate to
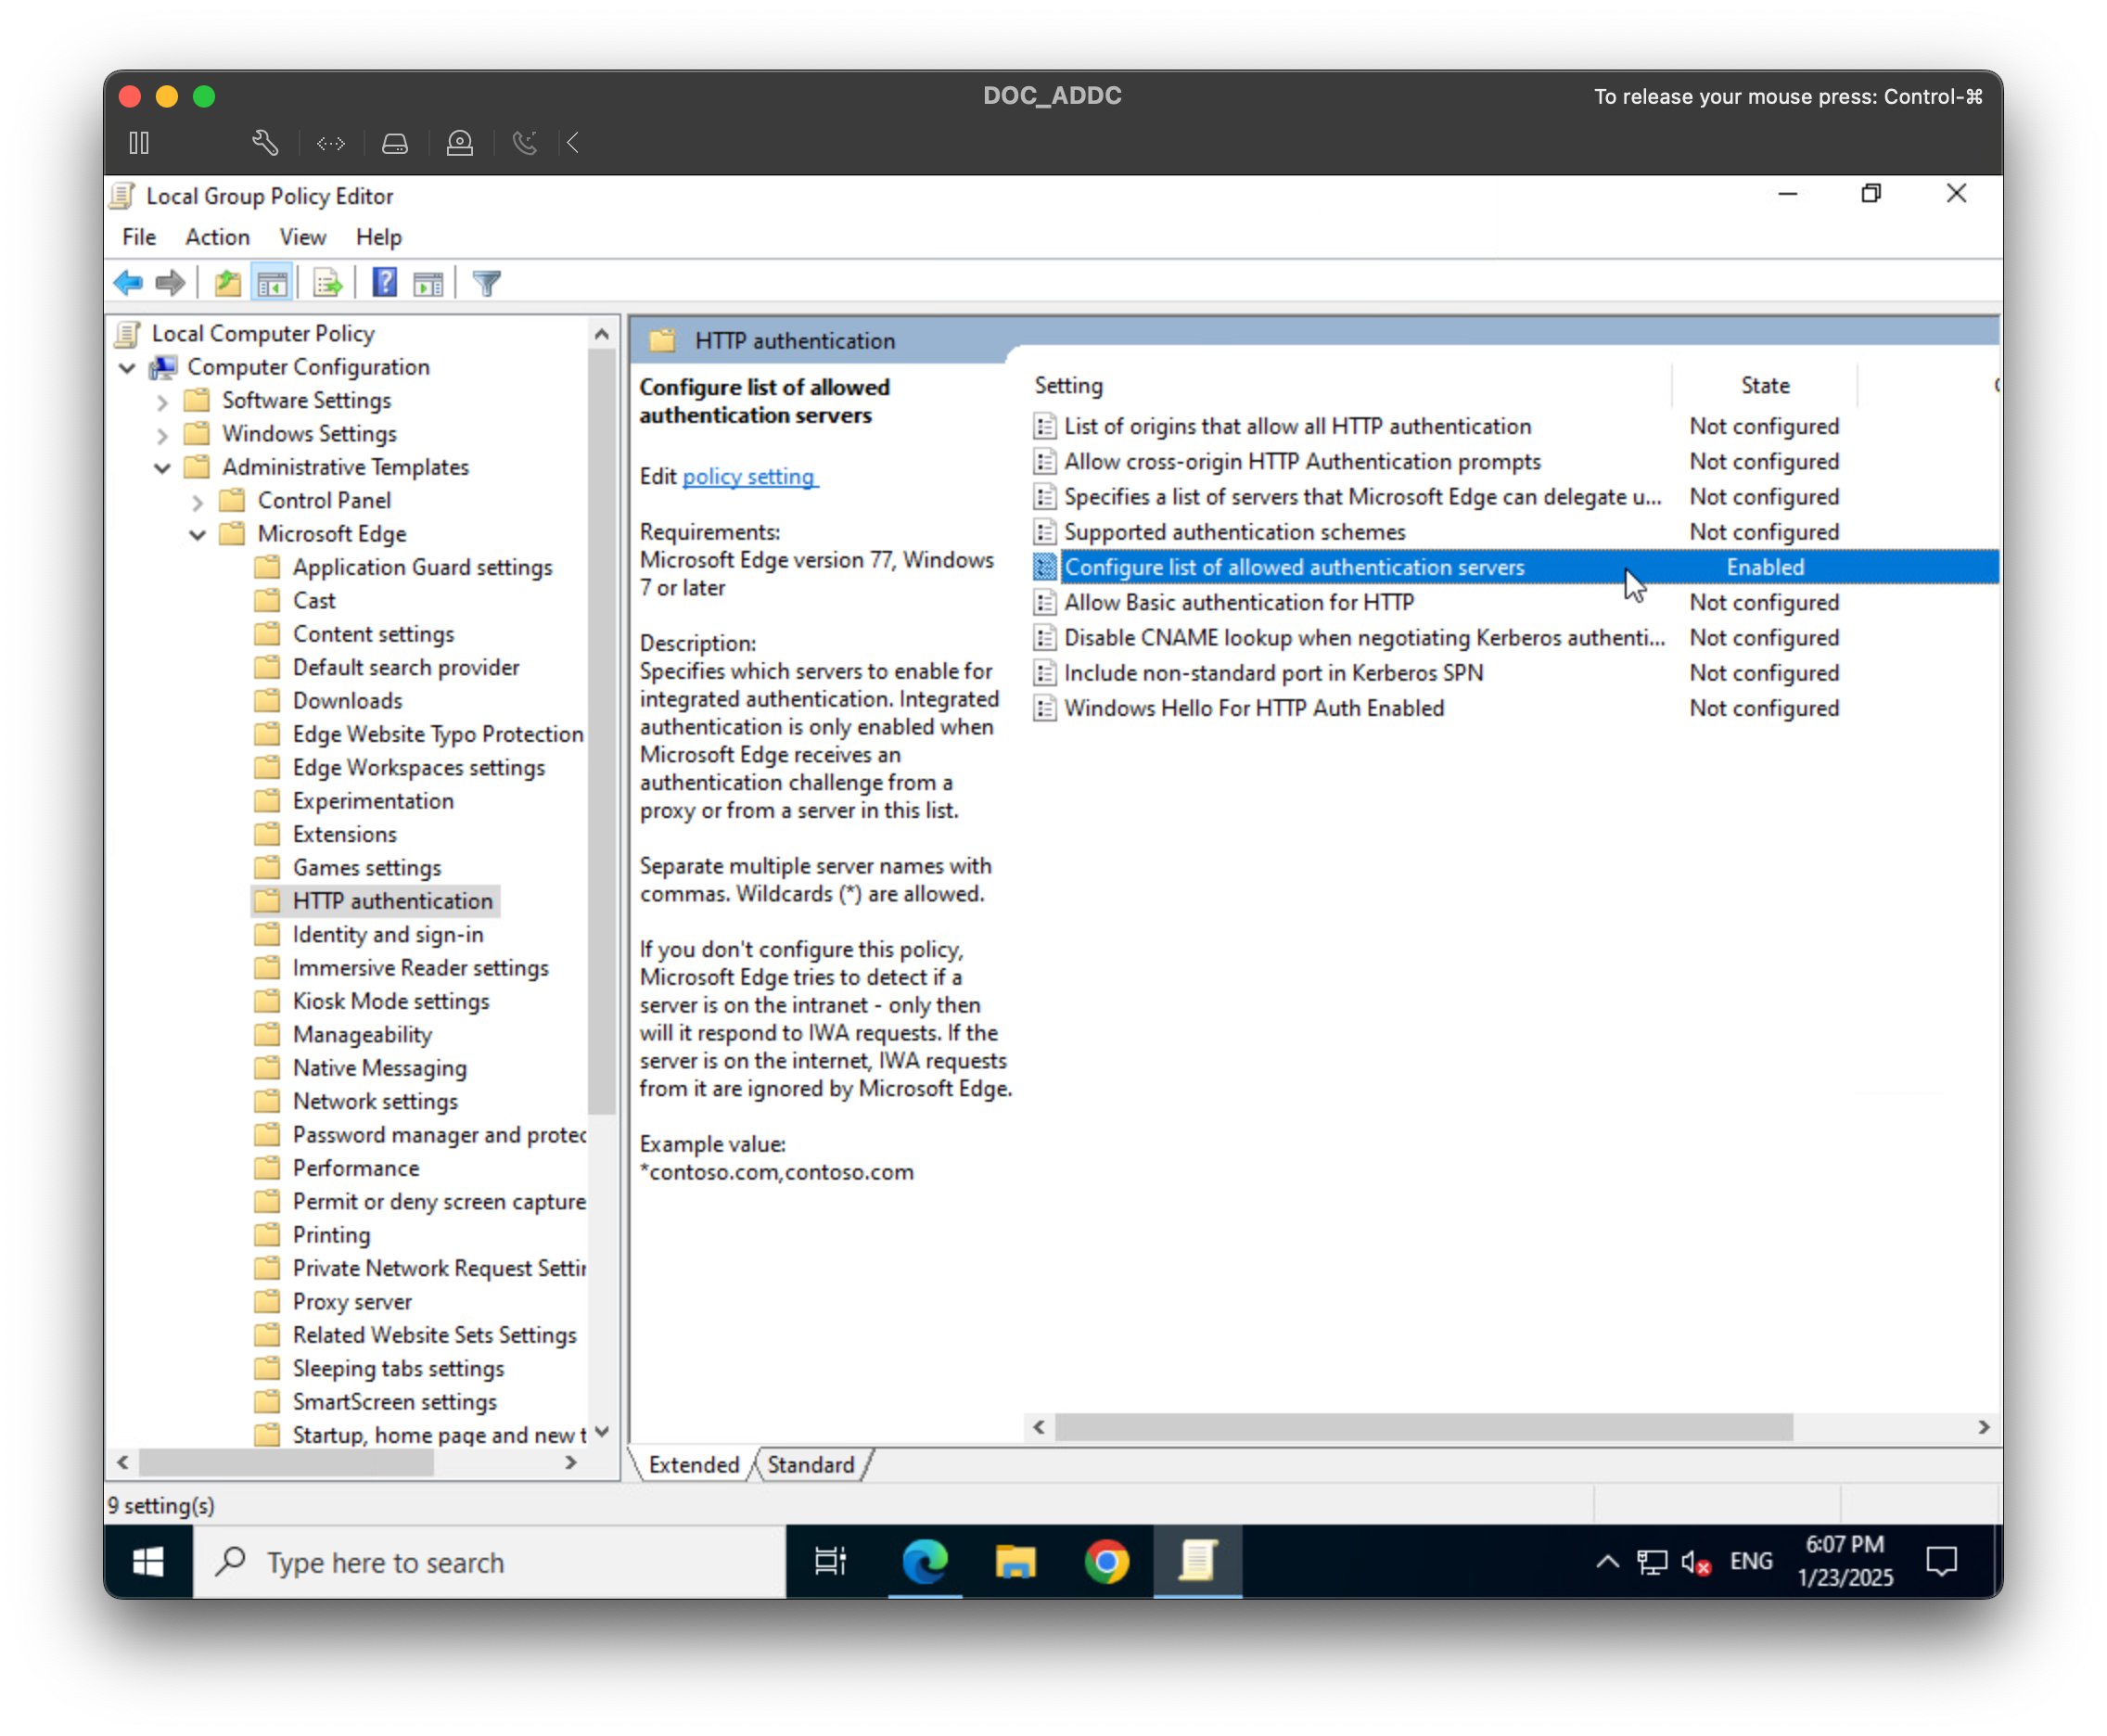
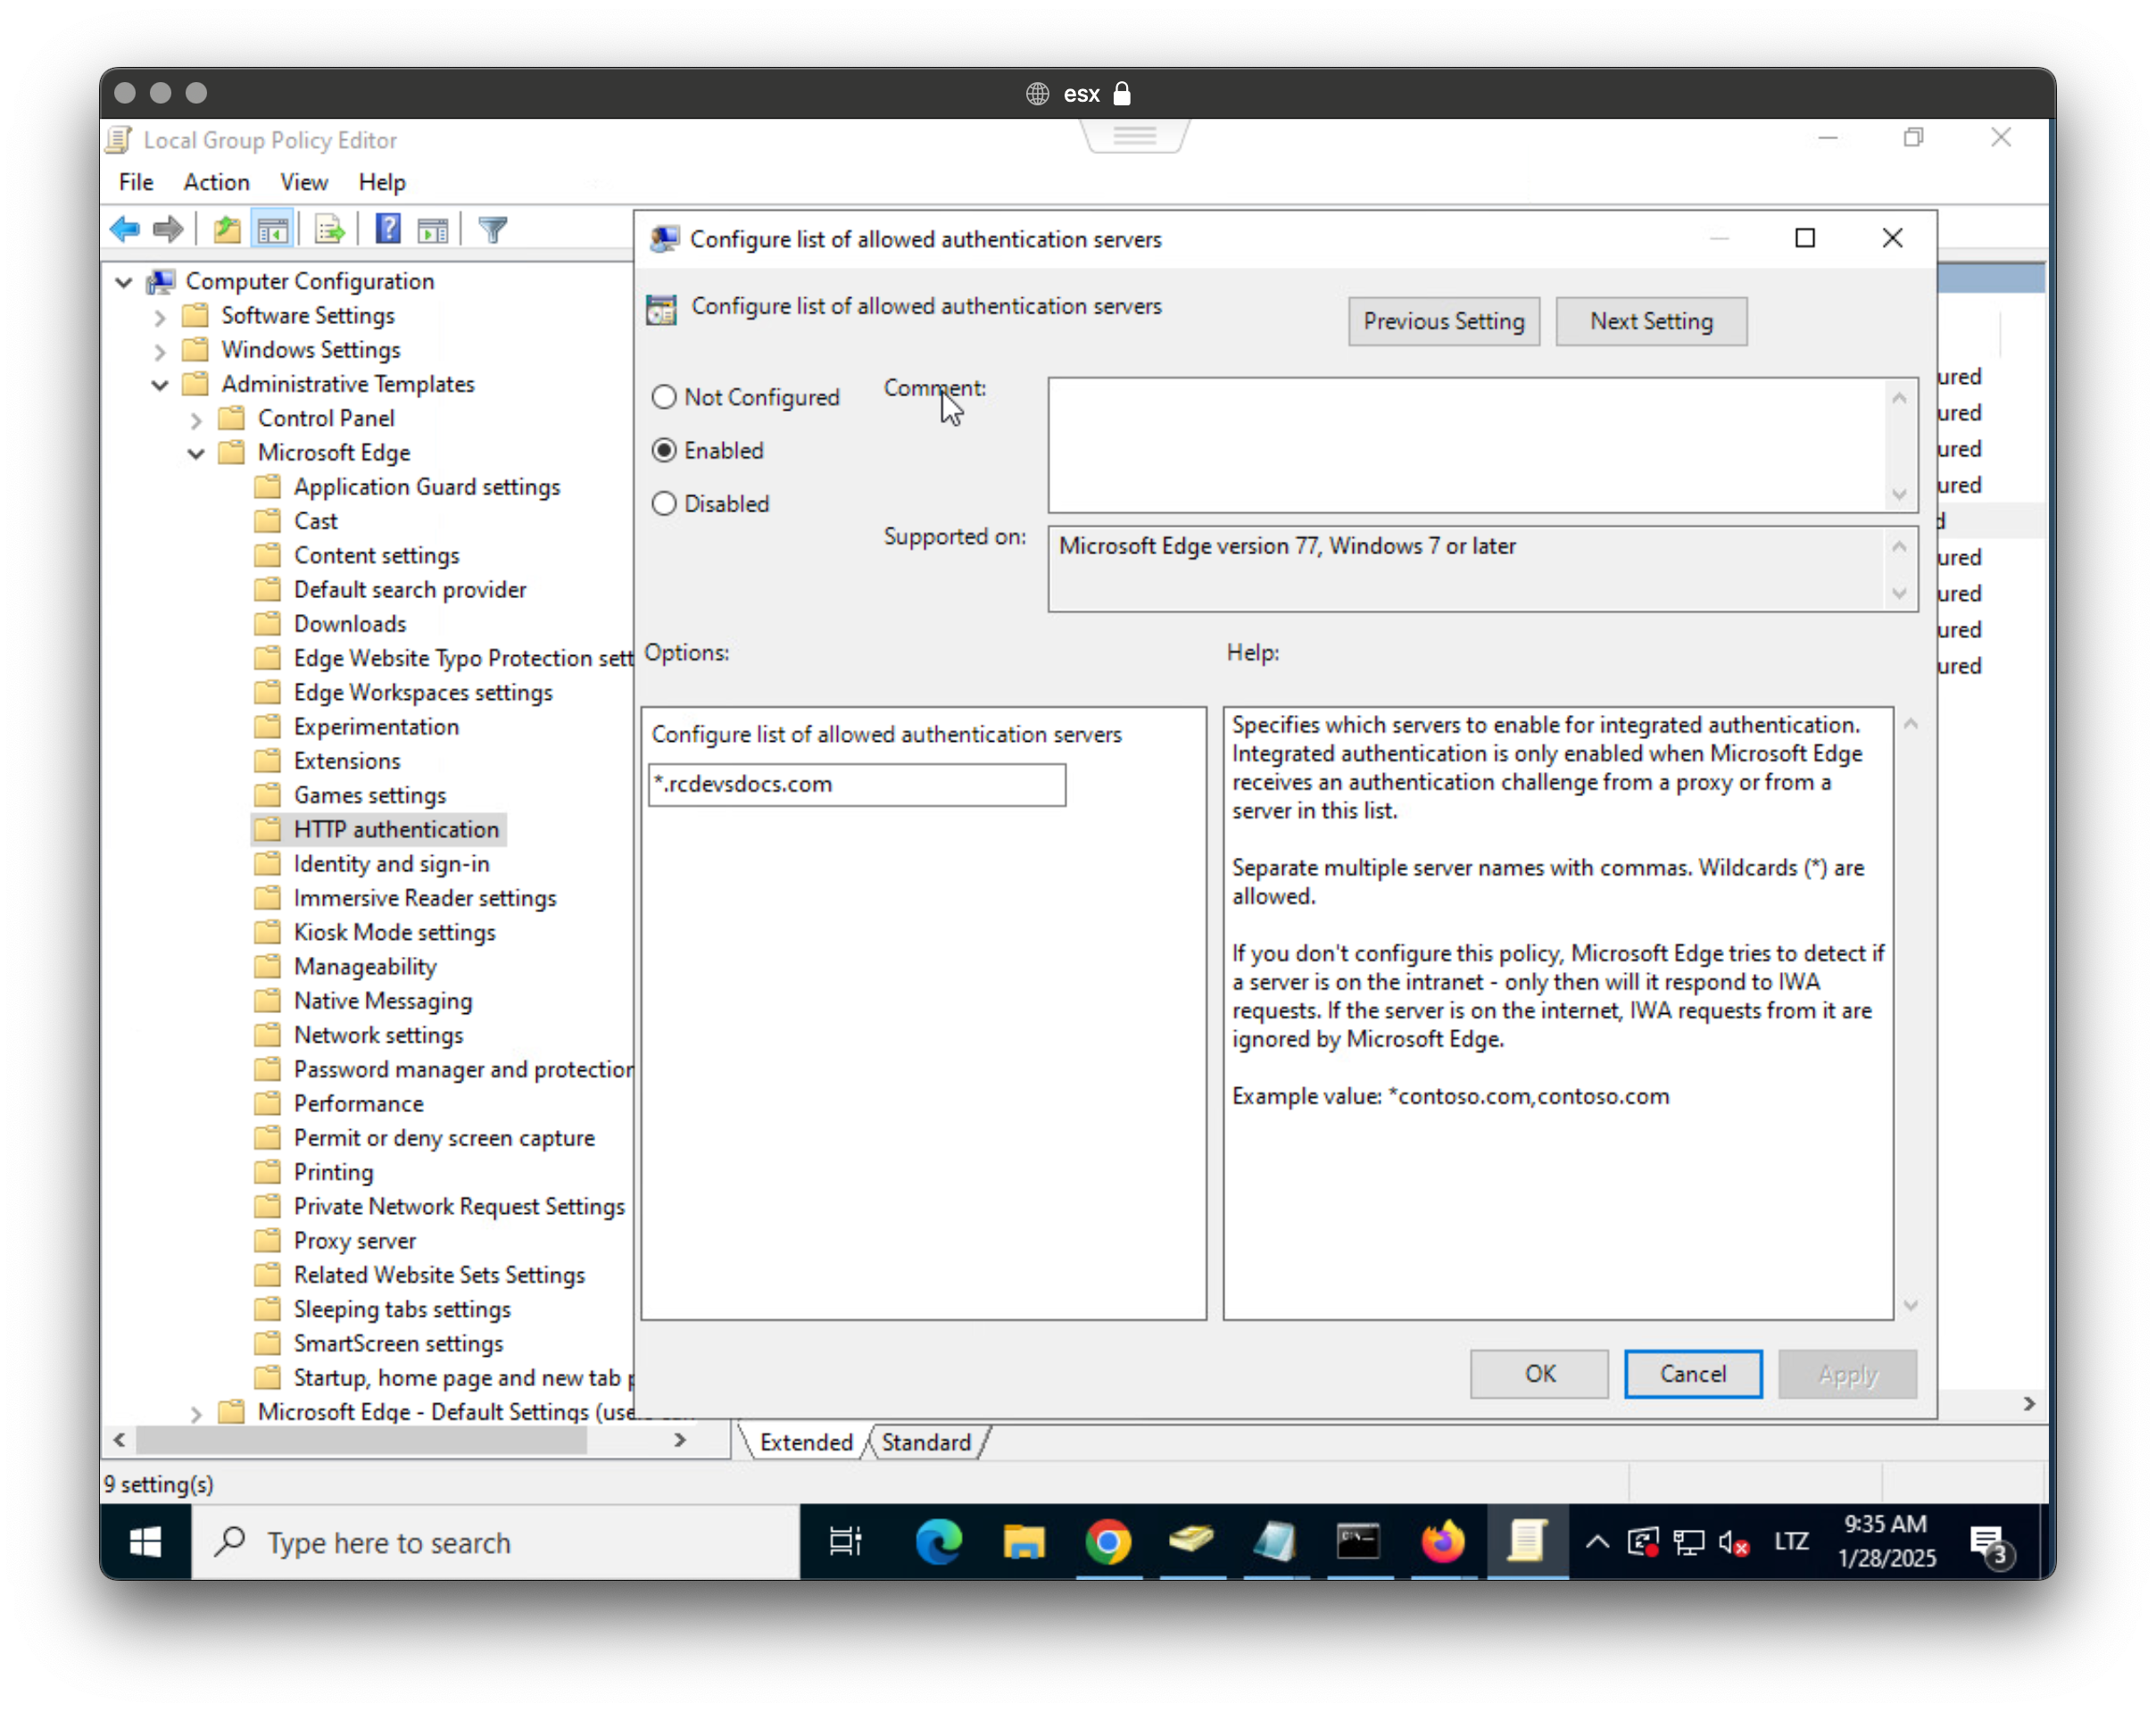
- Double-click on it, set it to Enabled, configure the desired hostames and then click OK.
- Force a Group Policy Update:
- To apply the policy immediately, open Command Prompt and run:
gpupdate /force
- Verify the Setting:
- Once applied, users should be able to use Kerberos authentication when accessing compatible resources through Microsoft Edge.
For this test, we tried to access the Identity Provider throug

Google Chrome
In this section, we will use Group Policy to configure the Google Chrome browser to allow Kerberos authentication. Adapt the GPO deployment to suit your specific needs.
To allow Kerberos authentication in Google Chrome through Group Policy, follow these steps:
1. Download and Install the Google Chrome Group Policy Templates
- If you haven't already, download the Google Chrome Group Policy templates from the official Google Chrome enterprise page.
- Extract the files, and you will find
.admxfiles (Group Policy templates) for Chrome.
2. Add the ADMX Templates to the Group Policy Central Store
- Copy the downloaded
.admxfiles to theC:\Windows\PolicyDefinitionsfolder on a domain controller. - Copy the language-specific
.admlfiles (e.g.,en-US\chrome.adml) toC:\Windows\PolicyDefinitions\en-US.
3. Open the Group Policy Management Console (GPMC)
- Press
Win + R, typegpmc.msc, and hit Enter to open the Group Policy Management Console.
4. Edit GPO
- In the Group Policy Management Editor, navigate to:
Computer Configuration->Administrative Templates->Google->Google Chrome->HTTP Authentication. - Look for the policy: authentication server allowlist.
- Double-click on it, set it to Enabled, configure the desired hostames and then click OK.
5. Force a Group Policy Update
To apply the policy immediately, open Command Prompt and run:
gpupdate /force
6. Verify the Setting
- Once applied, users should be able to use Kerberos authentication when accessing compatible resources through Google Chrome.
Mozilla Firefox
In this section, we will use Group Policy to configure the Firefox browser to allow Kerberos authentication. Adapt the GPO deployment to suit your specific needs.
To allow Kerberos authentication in Mozilla Firefox through Group Policy, follow these steps:
1. Download and Install the Mozilla Firefox Group Policy Templates
- If you haven't already, download the Mozilla Firefox Group Policy templates from the official Mozilla policy templates repository.
- Extract the files, and you will find
.admxfiles (Group Policy templates) for Firefox.
2. Add the ADMX Templates to the Group Policy Central Store
- Copy the downloaded
.admxfiles to theC:\Windows\PolicyDefinitionsfolder on a domain controller. - Copy the language-specific
.admlfiles (e.g.,en-US\firefox.adml) toC:\Windows\PolicyDefinitions\en-US.
3. Open the Group Policy Management Console (GPMC)
- Press
Win + R, typegpmc.msc, and hit Enter to open the Group Policy Management Console.
4. Edit GPO
-
In the Group Policy Management Editor, navigate to:
Computer Configuration->Administrative Templates->Mozilla->Firefox->Authentication. -
Look for the policies: NTLM and SPNEGO.
-
Double-click on it, set it to Enabled, configure the desired hostnames, and then click OK.
5. Force a Group Policy Update
- To apply the policy immediately, open Command Prompt and run:
gpupdate /force
6. Verify the Setting
- Once applied, users should be able to use Kerberos authentication when accessing compatible resources through Mozilla Firefox.
For this test, we tried to access the Identity Provider through Firefox:
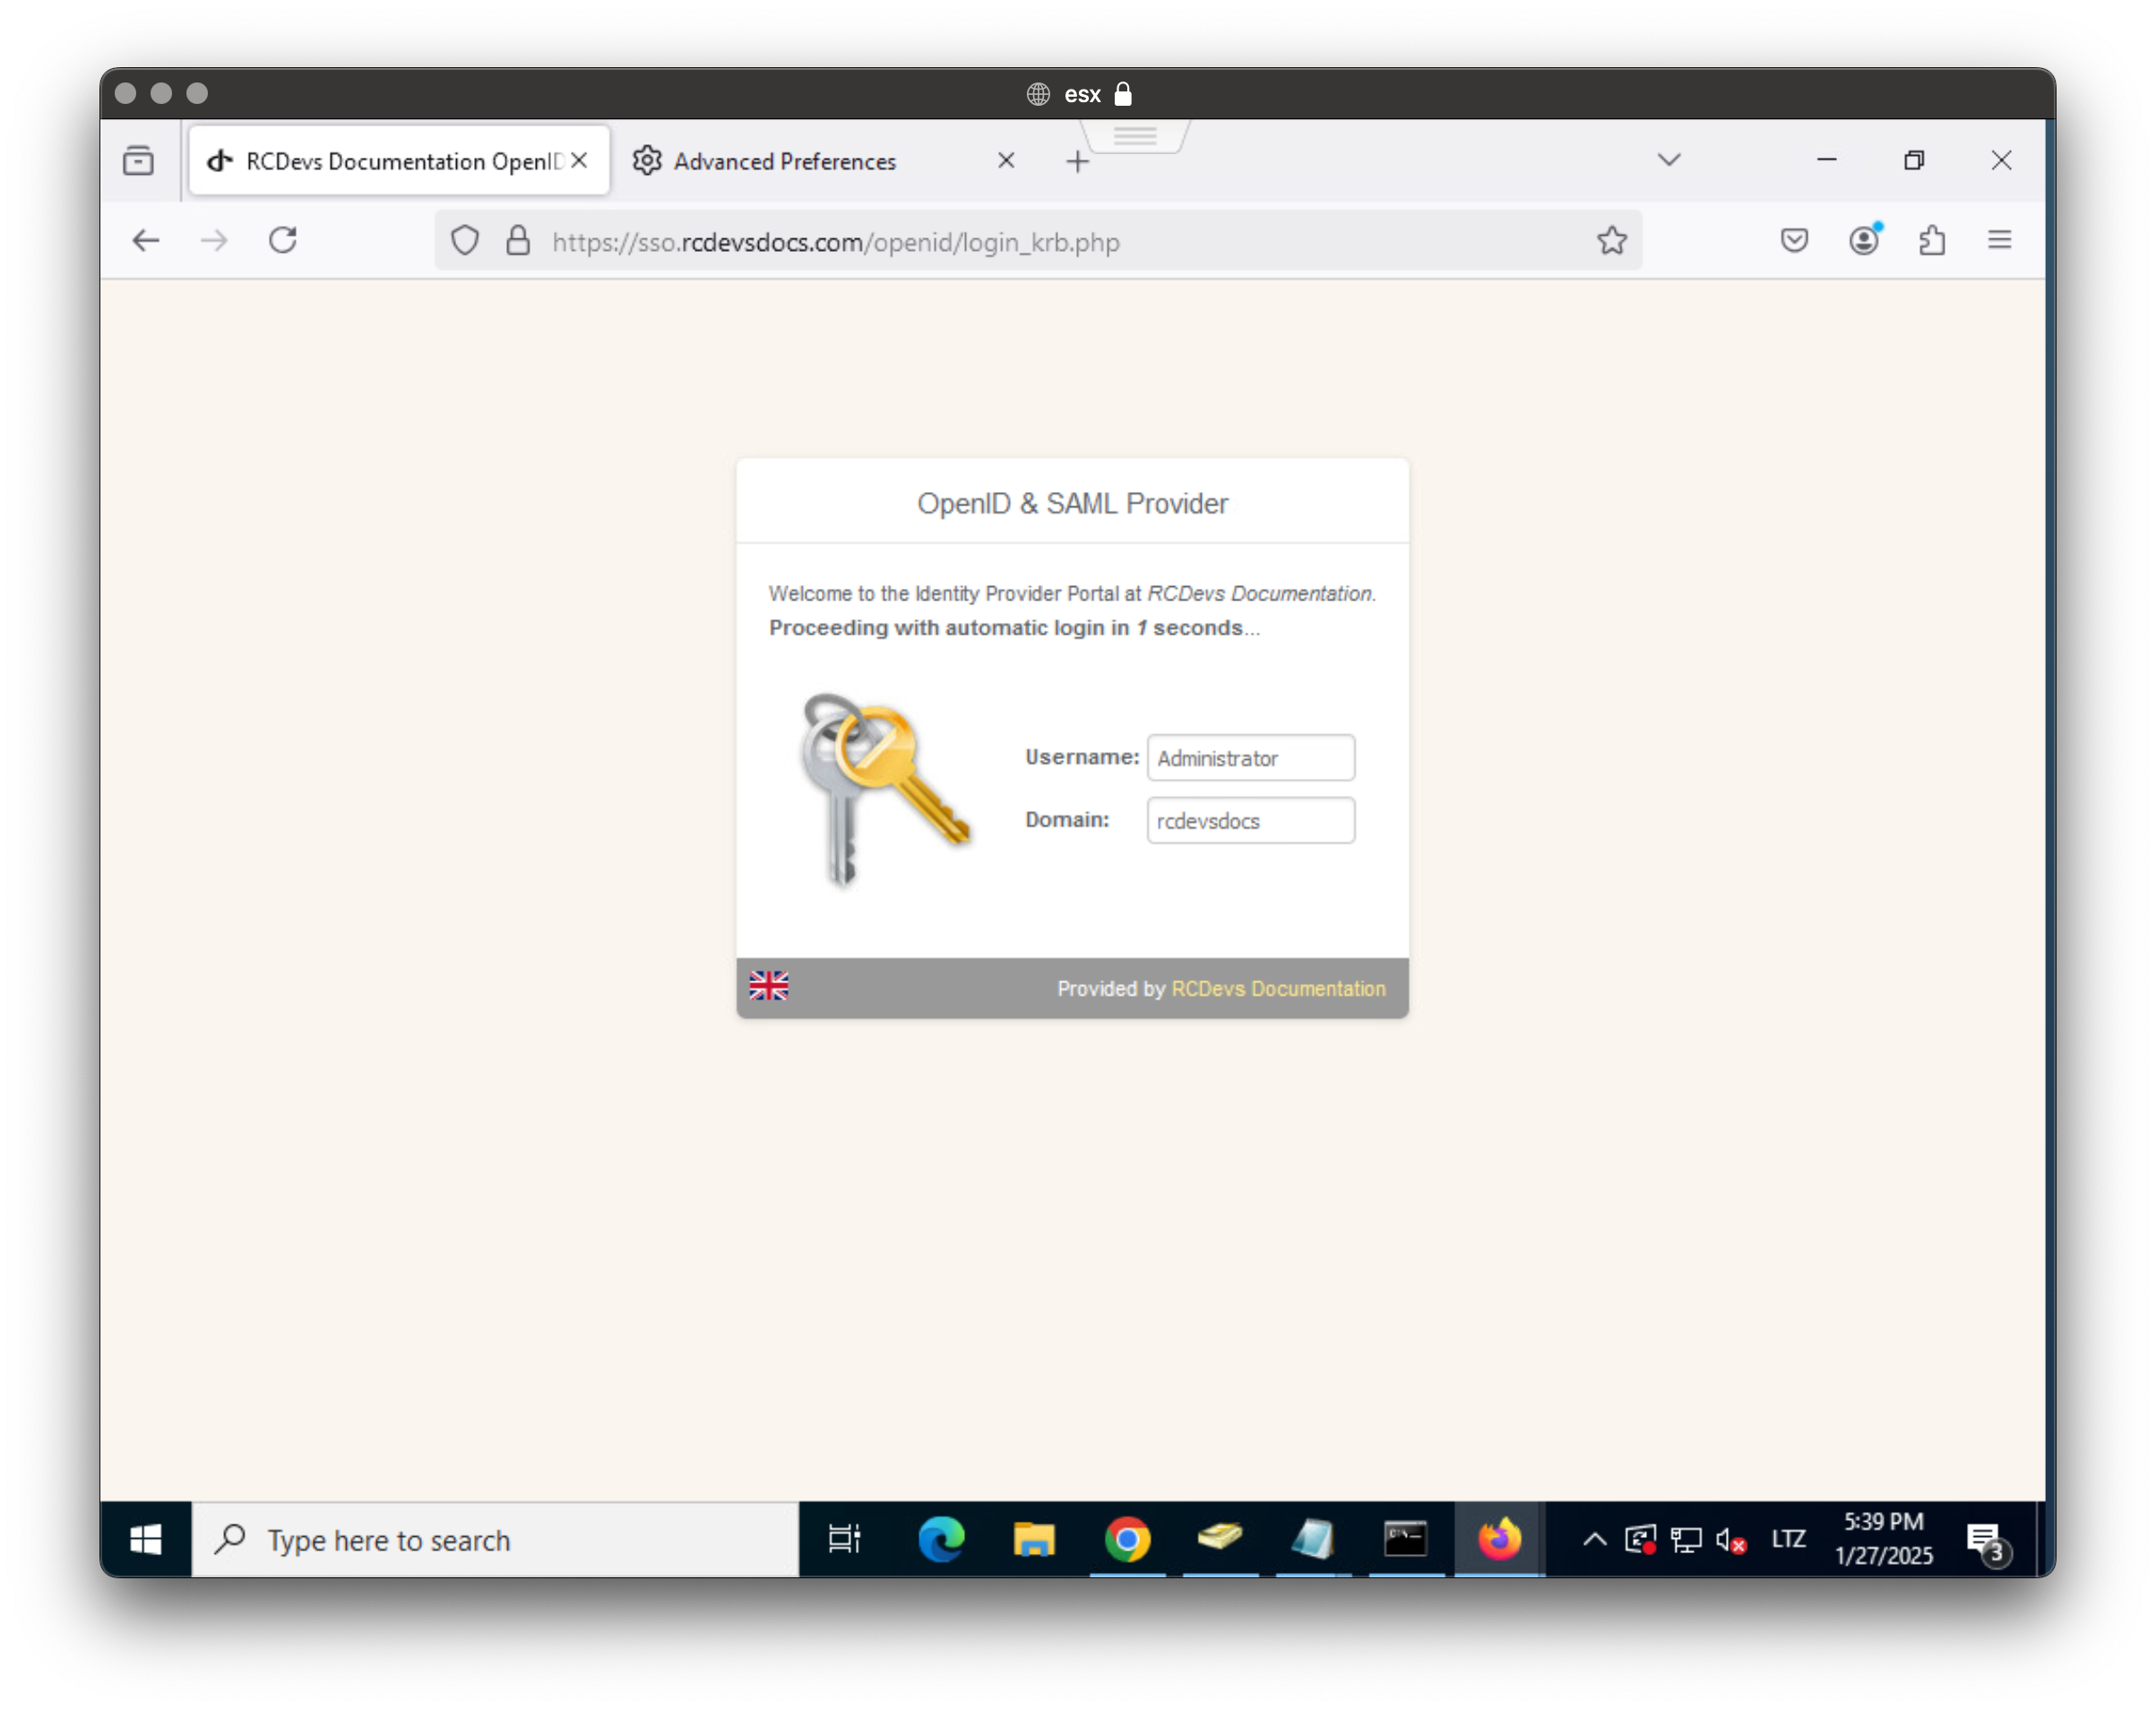
Test the Kerberos authentication by accessing a resource where you enabled the Kerberos SSO setting (here, RCDevs Identity Provider).
Firefox should automatically use the Kerberos ticket issued to your Windows machine to authenticate the session.
You should be redirected to the login_krb version of the login page, which will briefly display your current username before either logging you in automatically or prompting for an additional authentication factor.
In the example below, the OpenOTP authentication policy is configured to use LDAP to log the user in transparently.
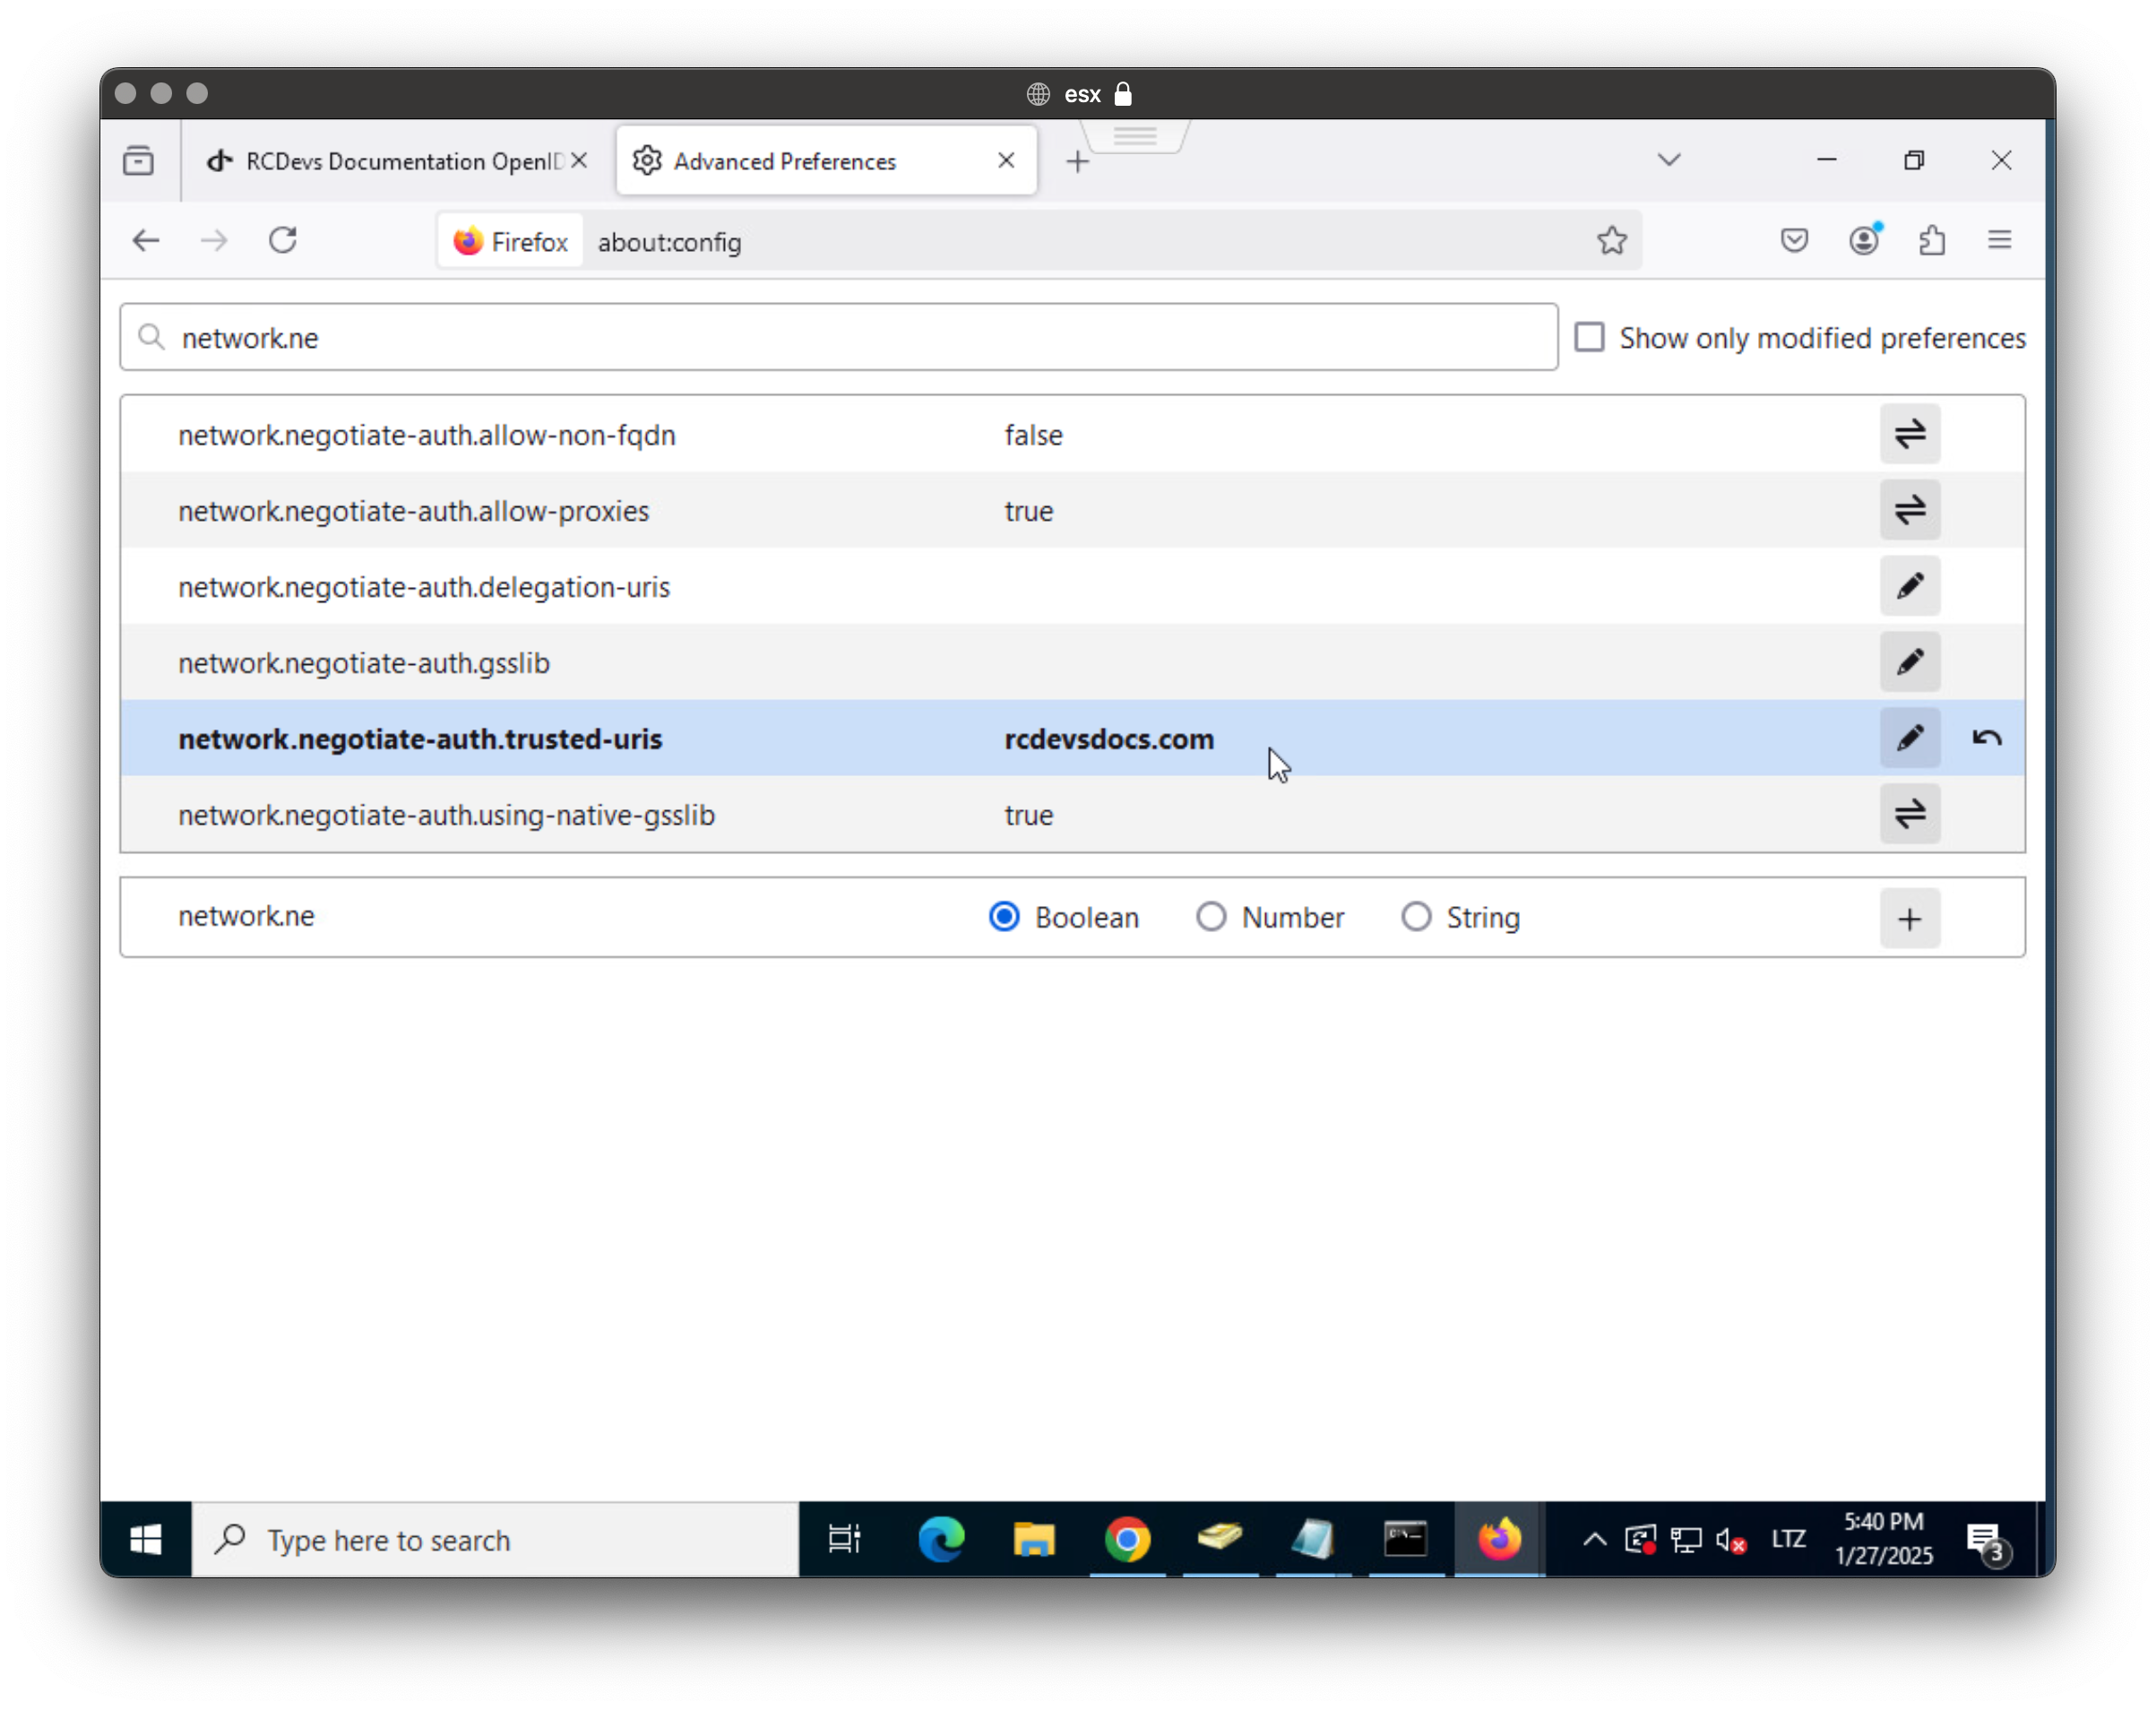
For local configuration (per-user configuration) you can access the about:config of your Firefox and configure the following key:
Enable Kerberos on a Reverse Proxies other than a WAProxy
When an app is published through a reverse proxy, the behavior of Kerberos authentication depends on the reverse proxy's configuration and capabilities. Refer to your reverse proxy vendor's documentation for configuration details. Below is an overview of how it works and what may be required:
-
Default Behavior - Blocking by Reverse Proxy:
- By default, most reverse proxies do not pass Kerberos tickets from the client to the backend because Kerberos authentication relies on direct communication between the client and the server.
- The reverse proxy typically acts as an intermediary and terminates the client's connection, meaning the Kerberos tickets are not forwarded unless explicitly configured.
-
Transparency - Requires Kerberos Constrained Delegation (KCD):
- If the reverse proxy supports Kerberos Constrained Delegation (KCD), it can transparently forward the client's Kerberos authentication to the backend server.
- KCD must be enabled and configured in the reverse proxy for this to work. The proxy essentially impersonates the client and requests tickets on their behalf.
-
Overview of configuration required at the Reverse Proxy:
- Key Requirements:
- The reverse proxy must support Kerberos authentication and KCD (e.g., Microsoft IIS ARR, Azure AD Application Proxy, or F5 BIG-IP APM).
- The reverse proxy needs to be configured with permissions to act as a Kerberos delegate in Active Directory.
- Service Principal Names (SPNs) must be properly set for the reverse proxy and backend application.
- Ensure the reverse proxy can authenticate itself to the Key Distribution Center (KDC) for Kerberos delegation.
- Configure the reverse proxy for Kerberos pass-through or delegation.
- Set up SPNs for the reverse proxy (e.g.,
HTTP/reverseproxy.example.com) in Active Directory. This step has been done previously for our WAProxy and its public hostname. - Enable constrained delegation for the reverse proxy's service account in Active Directory, specifying which backend services it can delegate to.
- Key Requirements:
A reverse proxy can block Kerberos authentication unless it is configured for Kerberos Constrained Delegation or a similar mechanism. Ensure your reverse proxy supports Kerberos and configure it accordingly for transparent authentication.