
Overview
This guide describes how to integrate FortiGate with the RCDevs Identity Provider (IdP) using SAML2 for user authentication on IPSec VPN.
Authentication Flow
- The client initiates an IPSec VPN connection to the FortiGate.
- FortiGate triggers SAML authentication using a configured SAML SSO profile and redirects the client (browser or embedded) to the IdP login or consent page.
- The IdP authenticates the user and optionally performs MFA and group or role checks, then issues a SAML assertion containing user attributes.
- FortiGate receives and validates the SAML assertion, maps the user and group attributes to FortiGate user groups, and grants VPN access.
- The IPSec tunnel is established with user identity and (optionally) group-based policy enforcement.
This integration allows you to centralize authentication, group membership, and policy management within the RCDevs IdP instead of maintaining local FortiGate user accounts. It also enables granular access control based on IdP group attributes.
SAML-based authentication for FortiClient remote access (dial-up IPSec VPN) is supported in FortiOS 7.6.4 and earlier versions (from 7.2+) when using FortiClient version 7.2 or later.
For detailed information, refer to Fortinet’s official documentation.
This integration requires:
- A running WebADM/OpenOTP server environment.
- A configured RCDevs Identity Provider.
Identity Provider and Service Provider configurations on FortiGate
To configure a SAML Identity Provider on FortiGate, follow the official FortiGate SAML SSO configuration guide.
You can obtain the necessary RCDevs IdP information from the SAML metadata page, typically available at:
https://<your-idp-url>/ws/saml
For this documentation, the URL is:
https://sso.rcdevsdocs.com/ws/saml
This page provides an output similar to the following:
<EntityDescriptor xmlns="urn:oasis:names:tc:SAML:2.0:metadata" entityID="https://sso.rcdevsdocs.com">
<IDPSSODescriptor protocolSupportEnumeration="urn:oasis:names:tc:SAML:2.0:protocol">
<KeyDescriptor use="signing">
<KeyInfo xmlns="http://www.w3.org/2000/09/xmldsig#">
<X509Data>
<X509Certificate>
MIIGfzCCBGegAwIBAgIRAM9/TyvDiZAahDgzYkWGRdIwDQYJKoZIhvcNAQELBQAwUjEXMBUGA1UEAwwOUkNEZXZzIERvY3MgQ0ExCzAJBgNVBAsMAkNBMR0wGwYDVQQKDBRSQ0RldnMgRG9jdW1lbnRhdGlvbjELMAkGA1UEBhMCTFUwHhcNMjQwNzE1MTM0OTA3WhcNMzQwNzEzMTM0OTA3WjBgMRswGQYDVQQDDBJXZWJBRE0gQ2VydGlmaWNhdGUxDzANBgNVBA0MBlNFUlZFUjEXMBUGA1UECgwOUkNEZXZzIFN1cHBvcnQxFzAVBgNVBGEMDlZBVExVLTAwMDAwMDAwMIICIjANBgkqhkiG9w0BAQEFAAOCAg8AMIICCgKCAgEA1w3PR1Q+78jdD12g4Di3ljcthoZwvpQuwmuOm/+fBthQjrHR1UIY3HDkulCOYpBRiNNj6ED49eyF9jIeO/zVO5QXnzX4gmasZPd06ZYAD8pkDc7fnnxZD4aSHDKQcF1xwUnHESUCPzWR1Wy3t6ifwl85uRuC+QlskMv4t82LqeMQeSBdeBqNpADm9Hmg8AO5BK4Oz/NNooB46P5RYDEerY1D/qOfLkuzEDr2C2Z1rGvtG7+7EpaS+b9Ipnz/fT71QACPxJym98YWEp/1Fb/clC6QLKQuQ+AzheTVZyyeOhOYFxsoGEu+wDFAERXWWAr5sPnayDJiZdXbH+712ri35y9oFWOxZC1diATOS/MRc05bAzgAbyiQe1PrhDfwRiL4YF0EtLvuZJGBH031DZS3THdYSeONDhsImbNYFYLPpzRqb5iXssN+KBPAdCfYJ2IMfjAV4li0s1WSC40iZ5MAkwovE0HD++DVO2HHBJ9hYl6aqa35lGm/QSjkUYvw2xX3kvc3utPQcqUkYDWzF7tLIMpTzO6FtD1pR/FR6DKkqmx9NhLMdIi9eNGK4MG+MgKwCXhE1I6aJxVoRCbAihb0wgnR+Y38P4bJUYzvDCC4upE3DLc+ct5VJ/rtCo9UDyVQGsLDD9cDoywdr6feM/Pou+LpccVNAHul1FJ9CPKxyVECAwEAAaOCAUAwggE8MAsGA1UdDwQEAwIF4DATBgNVHSUEDDAKBggrBgEFBQcDATCBygYIKwYBBQUHAQEEgb0wgbowJgYIKwYBBQUHMAGGGmh0dHA6Ly8xOTIuMTY4LjQuMTYwL29jc3AvMCYGCCsGAQUFBzABhhpodHRwOi8vMTkyLjE2OC40LjE2MS9vY3NwLzAzBggrBgEFBQcwAoYnaHR0cDovLzE5Mi4xNjguNC4xNjAvY2FjZXJ0Lz9mb3JtYXQ9ZGVyMDMGCCsGAQUFBzAChidodHRwOi8vMTkyLjE2OC40LjE2MS9jYWNlcnQvP2Zvcm1hdD1kZXIwSwYDVR0fBEQwQjAfoB2gG4YZaHR0cDovLzE5Mi4xNjguNC4xNjAvY3JsLzAfoB2gG4YZaHR0cDovLzE5Mi4xNjguNC4xNjEvY3JsLzANBgkqhkiG9w0BAQsFAAOCAgEACy/zl7IPSaOn2wEZ66xQNxm9FW408jMrQS2Y6hFvfzRMNhbOh+ZwNFSgCijUJ4ASZVQeZIiYN8f/quH80Y7AJE3kcTpXvJE2LozDbUMsXe0GpkNuzDojbp3K2ZcgUitL0q/rDHPBXXExl1AEhPgpwN1I7ZyHPfZpU92XxcsoSrUi8AMmzoVwlna30RMkkCDDBsf+an1uxdrdwMQLeQddOFddAUI80NWvh0drnv1epkT34K+RpvEAU514a3suErDMIqp+h7BqTdPrdiRkIhTutgSsPquhGIDzv+WvGBzFGWPAfudQHE5jMn3lPgN3r75HrdNfMkVEv0jclpp3VhiUnwQzNQn2UzVe7LQh8ixjEg1kwtIQ8UuwX6LOZ7a51WuKkRfS1iw1yDCM1UmGNuoMGqI6bxwFbBZ1C3brgJKjXBciEpXrSpcJ+ulhDYYUrCmGnpg6xyJ6veWfT2tVExLcffv4edT0KCJuKsyTztLFtT9A9ihyV/lPBsVUtIipe2CaCXupP84812s0cgo6XkcAr99pvtPNLZg9aBLuVt7GmyJSQeLJ6z+QWlkKnsEh7HlSrV2RC/wsTYlTeTRZFmiNa1RGx4UsNyTf9Igp+EG4Nh/UBhGO1Jkn1dIRZyb/qgcF/DWCSdbwFIKxuaKA12KFJMFS4aMV1e0QLDhLfpZ1/10=
</X509Certificate>
<!--
 Cert Fingerprint (SHA1): 32774463a2e892150f46852b3fdcac7f5be924dc
-->
<!--
 Cert Fingerprint (SHA256): e0bd10584f5c3a554e279b9241619e8fdf9c3bfbe95c90da939f0342546e52ac
-->
<!--
 Cert Fingerprint (MD5): 639ed5b4241047c8382f897fc459a714
-->
</X509Data>
</KeyInfo>
</KeyDescriptor>
<SingleLogoutService Binding="urn:oasis:names:tc:SAML:2.0:bindings:HTTP-Redirect" Location="https://sso.rcdevsdocs.com/openid/index.php"/>
<SingleLogoutService Binding="urn:oasis:names:tc:SAML:2.0:bindings:HTTP-POST" Location="https://sso.rcdevsdocs.com/openid/index.php"/>
<SingleSignOnService Binding="urn:oasis:names:tc:SAML:2.0:bindings:HTTP-Redirect" Location="https://sso.rcdevsdocs.com/openid/index.php"/>
<SingleSignOnService Binding="urn:oasis:names:tc:SAML:2.0:bindings:HTTP-POST" Location="https://sso.rcdevsdocs.com/openid/index.php"/>
</IDPSSODescriptor>
</EntityDescriptor>
On the FortiGate, create a Single Sign-On object under User & Authentication > Single Sign-On, and configure it as follows.
Service Provider Configuration
- Name:
RCDevs SSO - Entity ID:
https://fortigate.rcdevsdocs.com/remote/saml/metadata - Assertion consumer service URL:
https://fortigate.rcdevsdocs.com/remote/saml/login - Single logout service URL:
https://fortigate.rcdevsdocs.com/remote/saml/logout - Certificate : This is the SP signing certificate (FortiGate private key + cert used to sign AuthnRequests). It can be issued by WebADM internal CA or your own CA).
If you can not edit the Service Provider URLs configuration, you must enter in CLI mode and provide the following commands:
config user saml
edit "RCDevs SSO"
   set entity-id https://fortigate.rcdevsdocs.com/remote/saml/metadata/
next
end
You should now be able to configure SP URLs through the GUI.
Identity Provider Configuration
- Type:
Custom - Entity ID:
https://sso.rcdevsdocs.com(Must exactly match the value entityID in your SAML XML metadata) - Assertion consumer service URL:
https://sso.rcdevsdocs.com/openid/index.php(Must exactly match the SingleSignOnService URL value in your SAML XML metadata) - Single logout service URL :
https://sso.rcdevsdocs.com/openid/index.php(Must exactly match the SingleLogoutService URL value in your SAML XML metadata) - SAML Signing Certificate : The RCDevs Identity Provider certificate can be retrieved in PEM format from
WebADM GUI>Applicationstab >Categories>OpenID & SAML Provider>CONFIGURE>Server Certificate. It must be imported in PEM format and selected.
Refer to the following Fortinet resources: 1 and 2
Attribute Mapping
By default, the RCDevs Identity Provider includes in the SAML assertion:
- The
uidattribute, which contains the username; - The
groupsattribute, which contains the list of groups the user belongs to.
Ensure the same attributes are used by FortiGate under User Information section.
CLI configuration summary
Change SAML Provider Port to 443 (Global setting for all VDOMs)
Enter global config mode first if you use VDOMs:
config global
config system global
    set auth-ike-saml-port 443
end
end
Note that you may need to change the default SSL VPN port first to complete this action or disable it.
Change SSL VPN port:
config vdom
edit [VDOM_name]
config vpn ssl settings
    set port 1443
end
end
Disable SSL VPN:
config vdom
edit [VDOM_name]
config vpn ssl settings
    set status disable
end
end
Create new Single-Sign-On in User & Authentication on VDOM
config user saml
edit "OpenID SAML"
   set entity-id https://fortigate.rcdevsdocs.com/remote/saml/metadata/
next
end
config user saml
    edit "RCDevs SSO"
        set cert "FortiGate SP Cert"
        set entity-id https://fortigate.rcdevsdocs.com/remote/saml/metadata/
        set single-sign-on-url https://fortigate.rcdevsdocs.com/remote/saml/login
        set single-logout-url https://fortigate.rcdevsdocs.com/remote/saml/logout
        set idp-entity-id https://sso.rcdevsdocs.com
        set idp-single-sign-on-url https://sso.rcdevsdocs.com/openid/index.php
        set idp-single-logout-url https://sso.rcdevsdocs.com/openid/index.php
        set idp-cert "IDP_Cert"
        set user-name "uid"
        set group-name "groups"
        set digest-method sha1
    next
end
Bind the Single-Sign-On Authentication to the Interface, where the VPN Clients are connecting to
config system interface
    edit <interface_name>
    set ike-saml-server "RCDevs SSO"
    next
end
And bind a trusted certificate to the HTTPS Service under Authentication Settings and optionally disable FTP and TELNET, but not HTTP or HTTPS.
Fortigate Configuration on the IdP
Configuring FortiGate on the RCDevs IdP involves creating a client policy and defining the required Service Provider (SP) parameters.
Additionally, the IdP must return the group attributes expected by FortiGate so that user roles can be correctly mapped after authentication and redirection.
Client Policies
Create a new Client Policy for FortiGate:
- Log in to the WebADM Administrator Portal.
- Go to the Admin tab → Client Policies → click Add Client.
- Enter a Name for the client policy and optionally add a Description.
- Click Proceed, then Create Object to open the policy configurator.
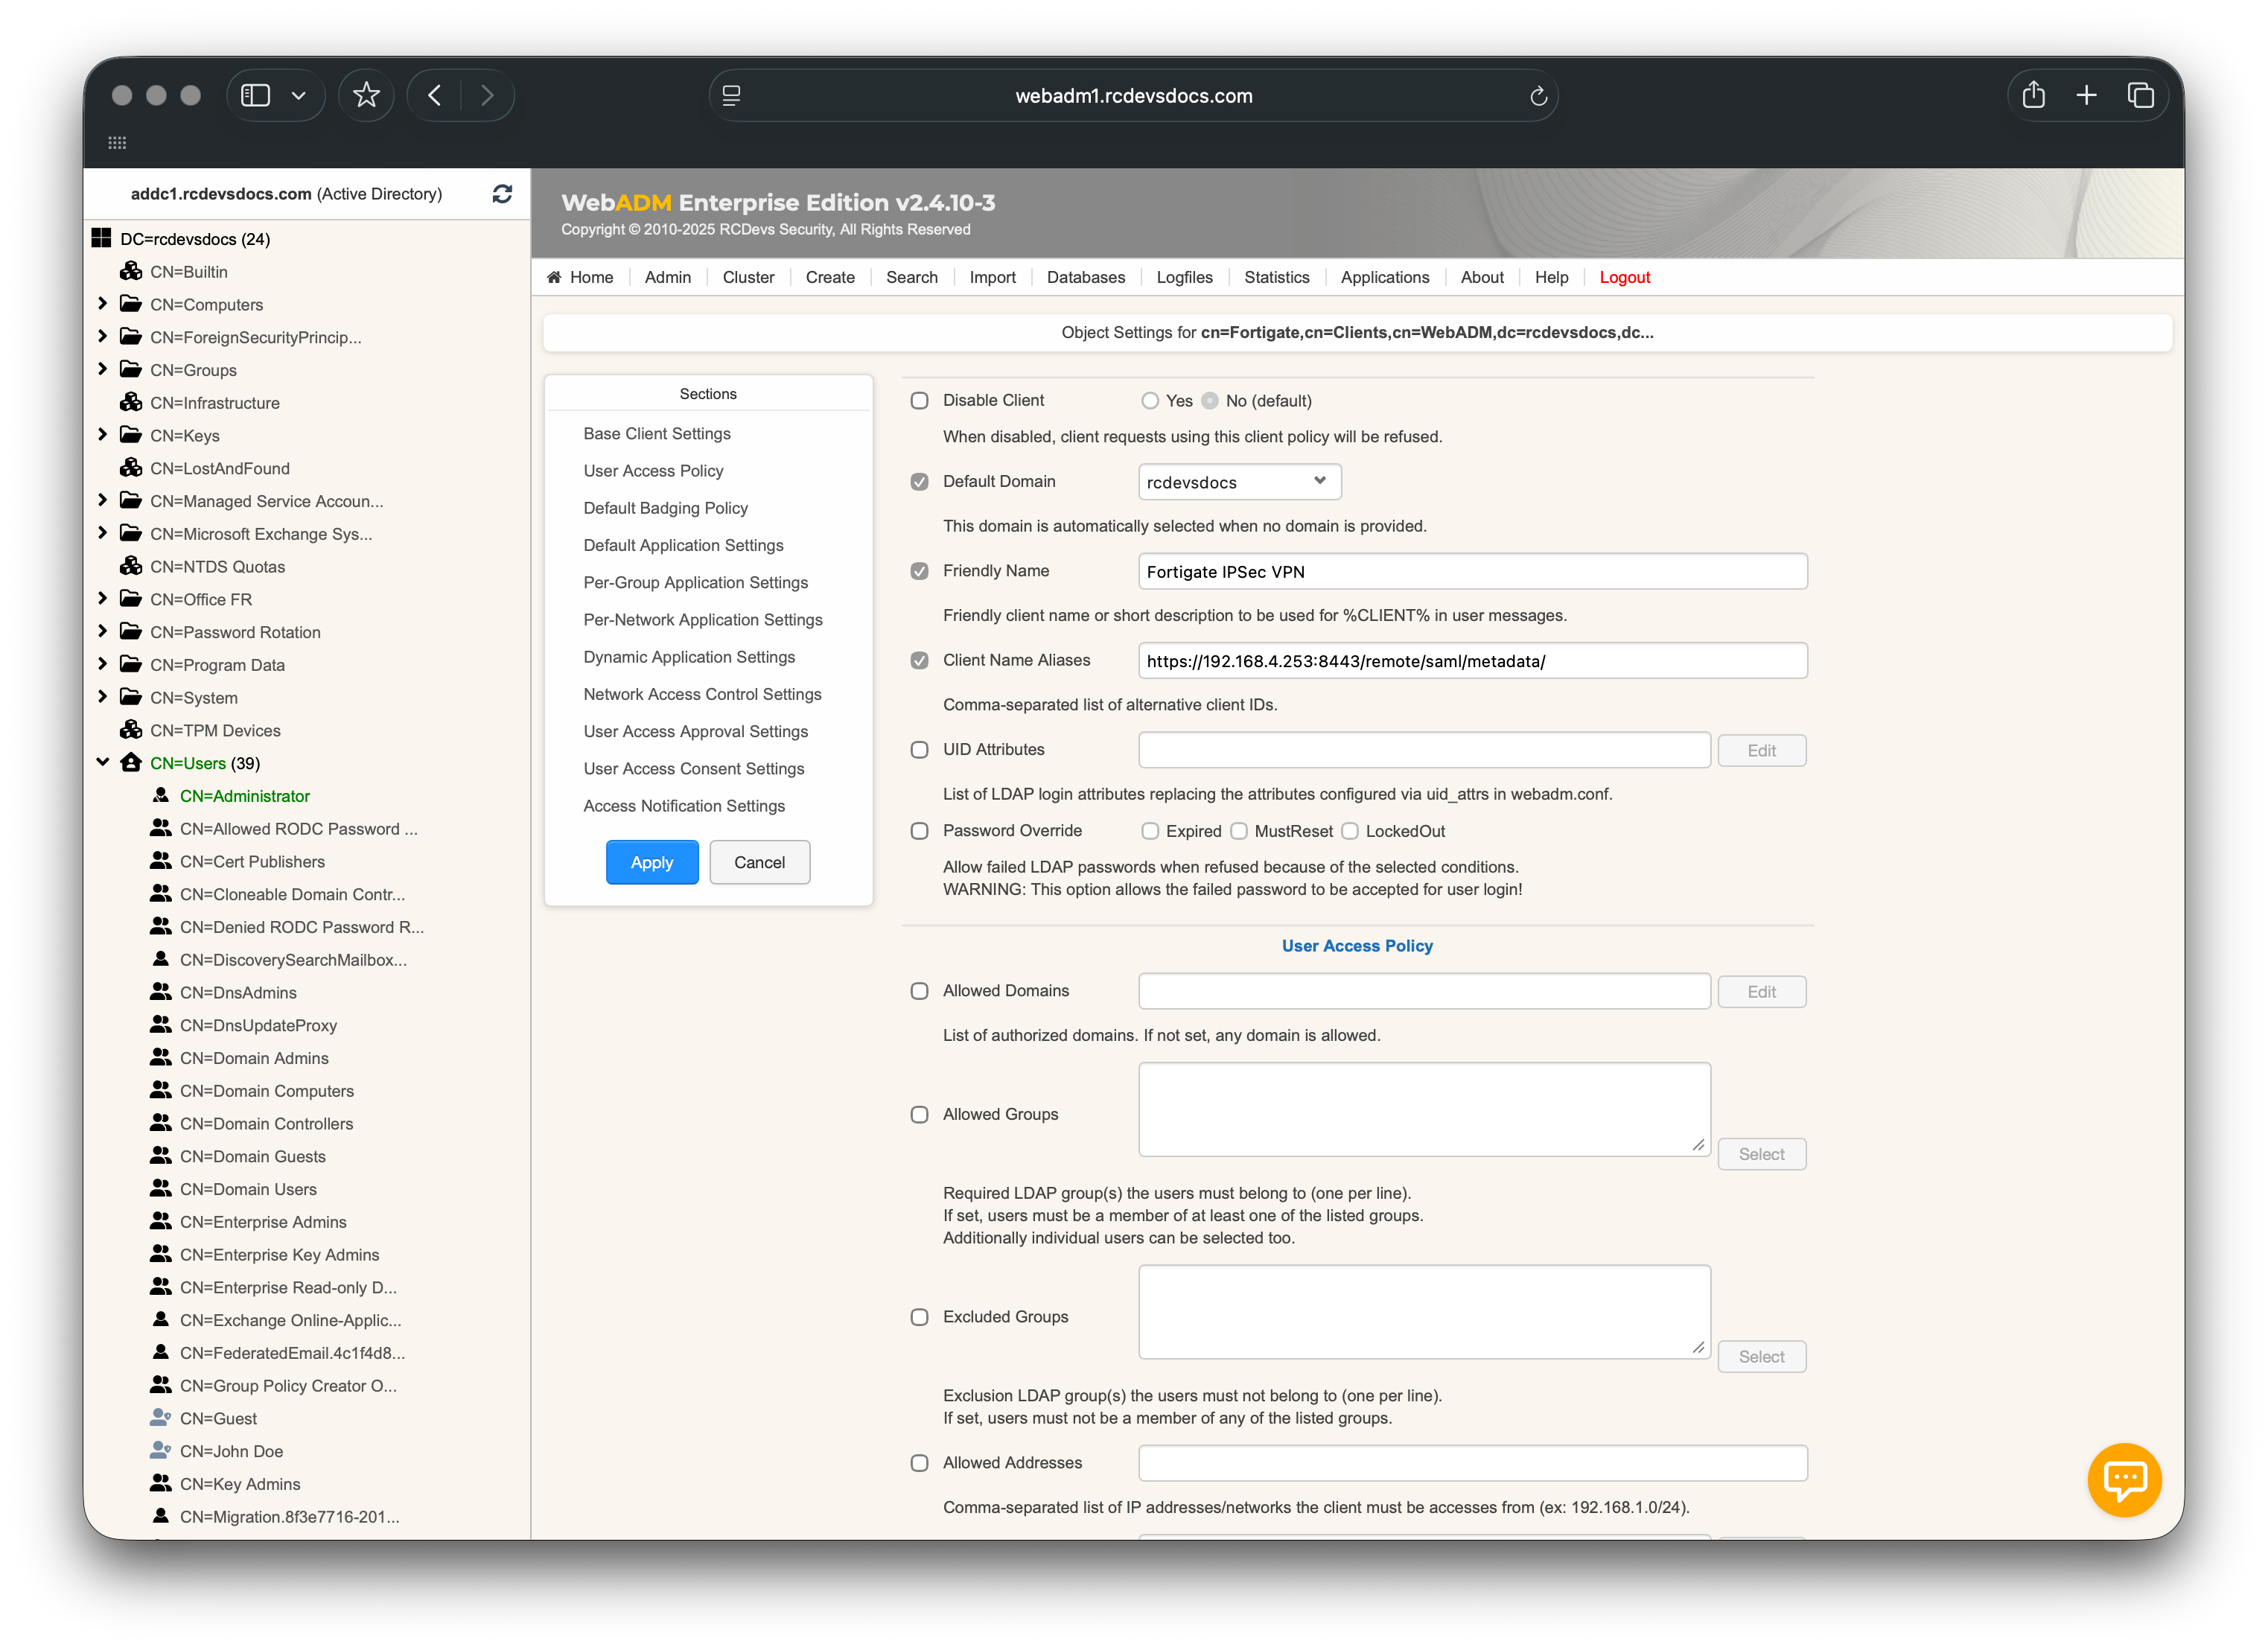
In the configurator:
- Set the Default Domain.
- Optionally define a Friendly Name.
- In Client Name Aliases, enter the Entity ID URL configured on your FortiGate Service Provider section.
Example:
https://fortigate.domain.com/remote/saml/metadata
Scroll down to Default Application Settings, enable the Enforced Settings checkbox, and click Edit.
In the Applications section, select OpenID & SAML Provider and configure it as follows:
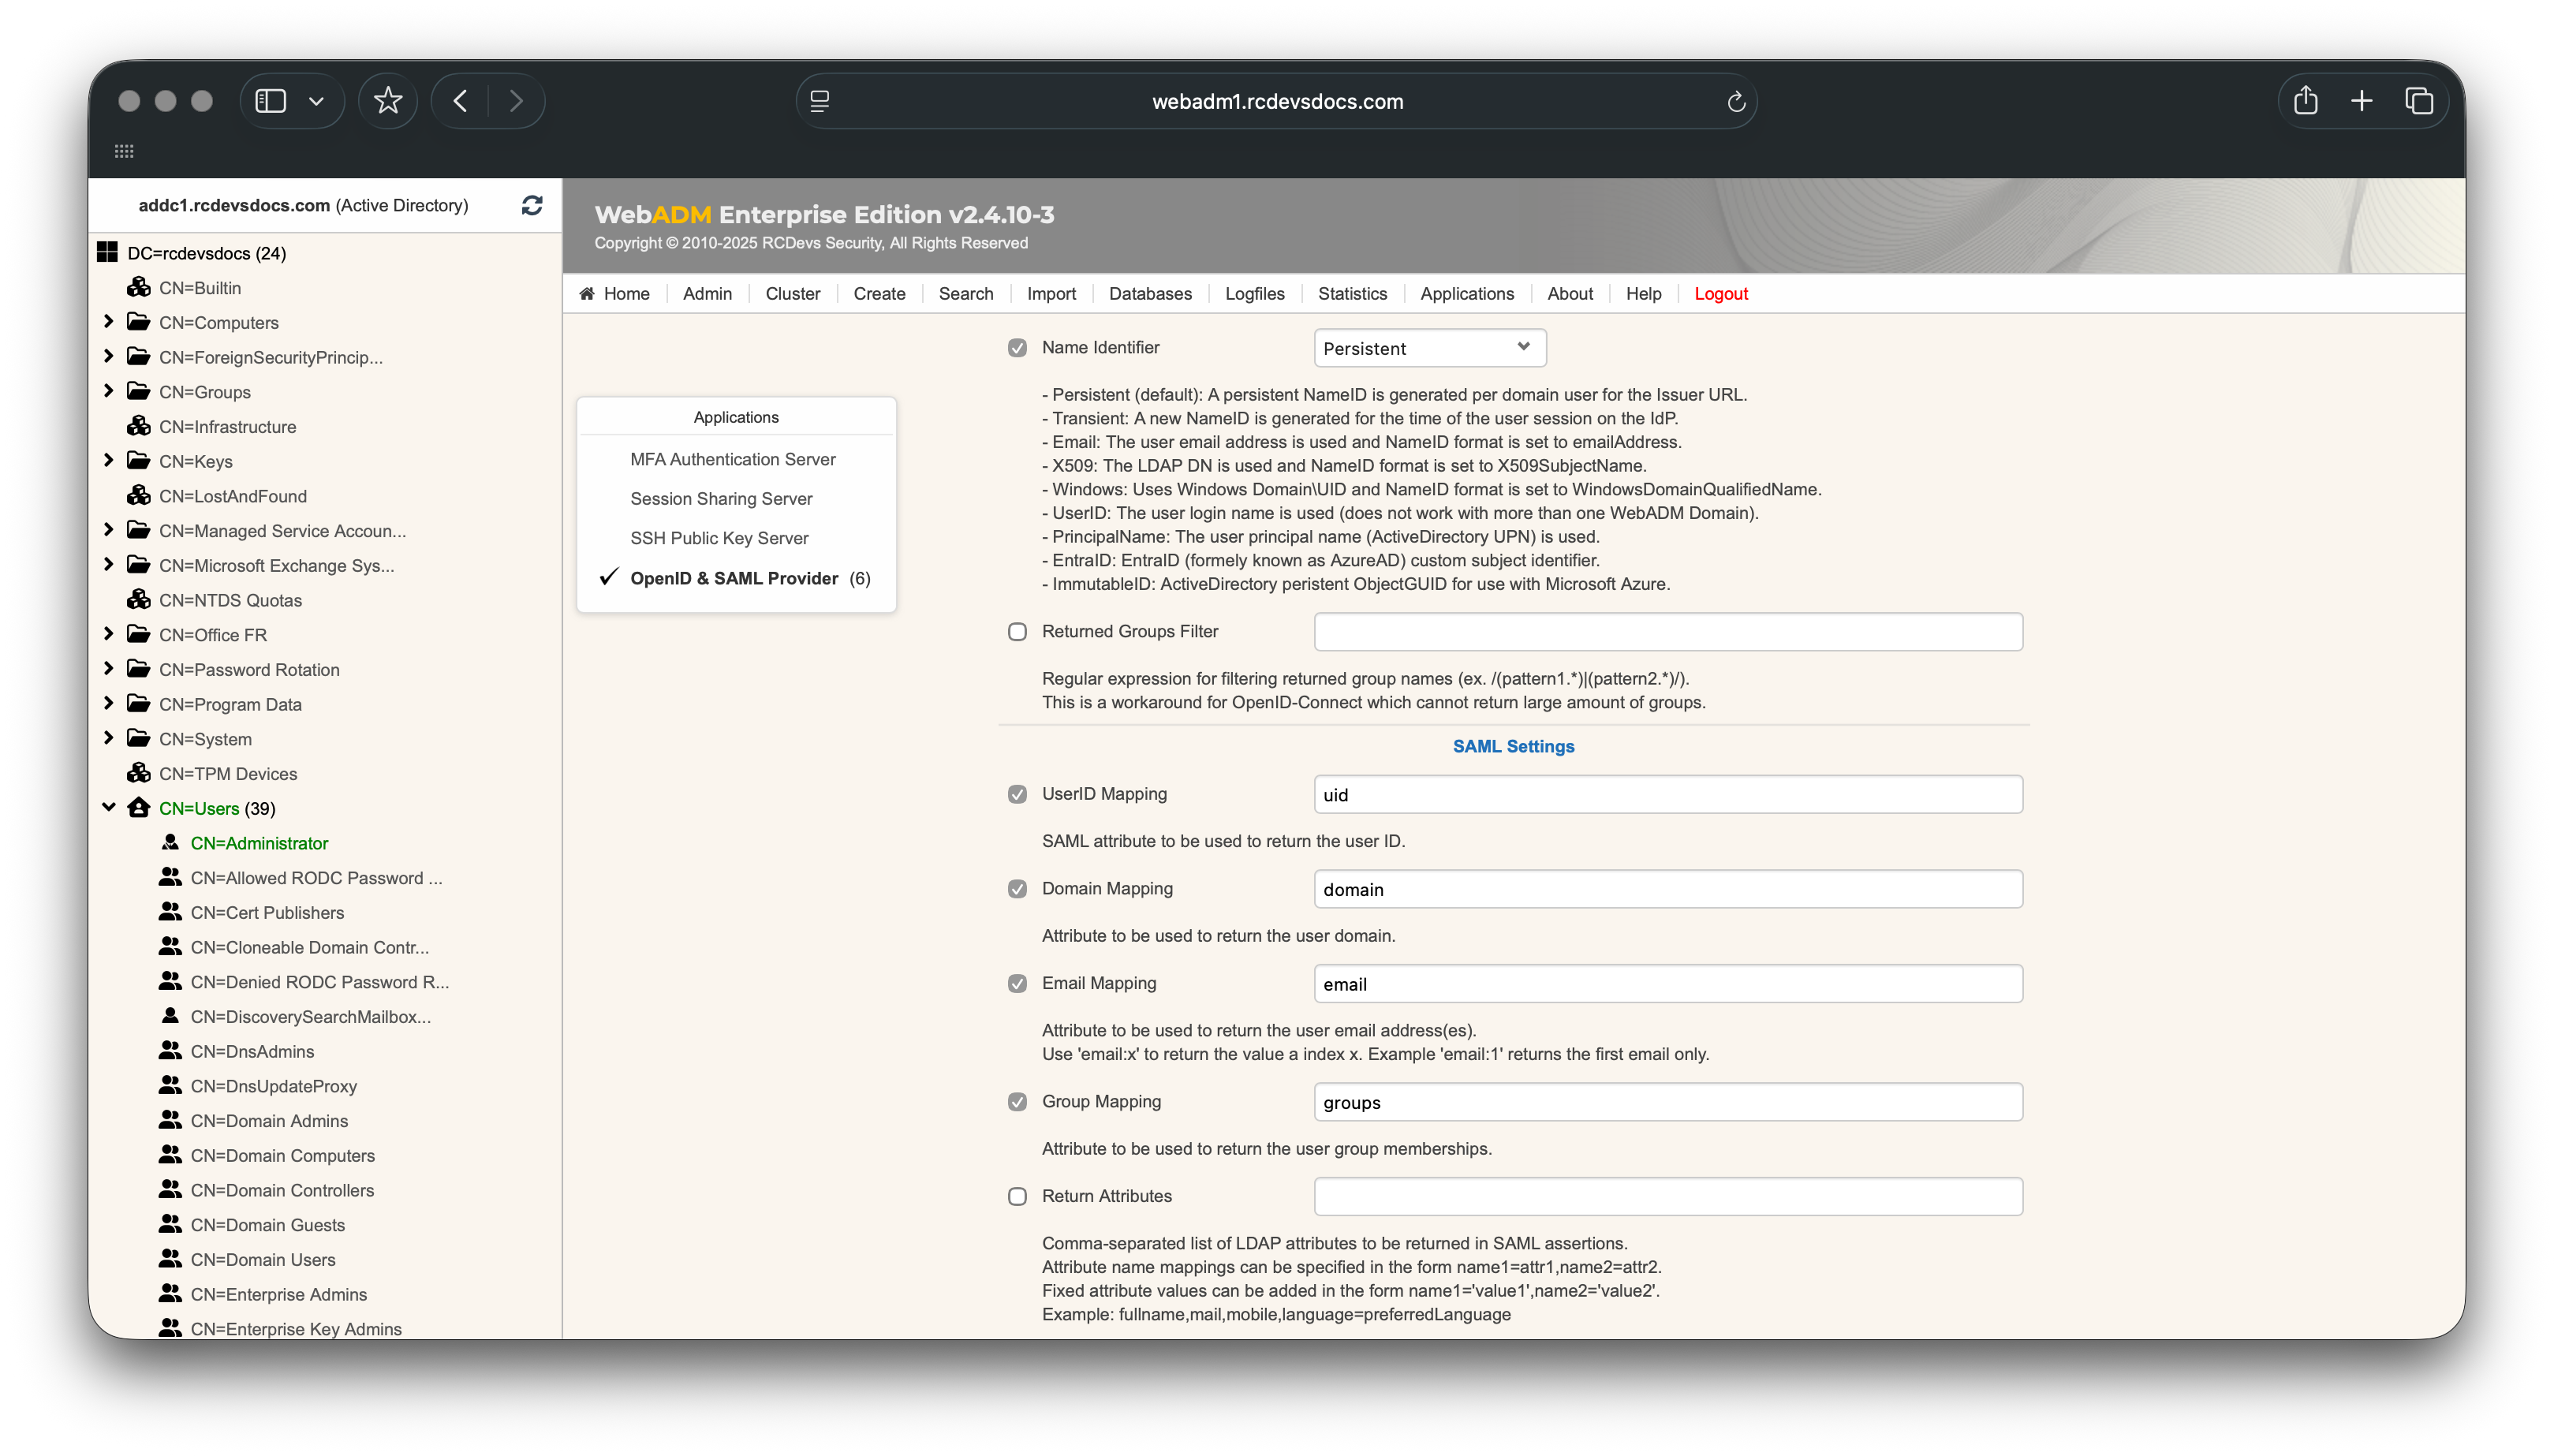
The Name Identifier configured in the client policy can be set to Persistent or PrincipalName when authenticating Active Directory users, provided that the UserPrincipalName attribute is available for the user account in WebADM.
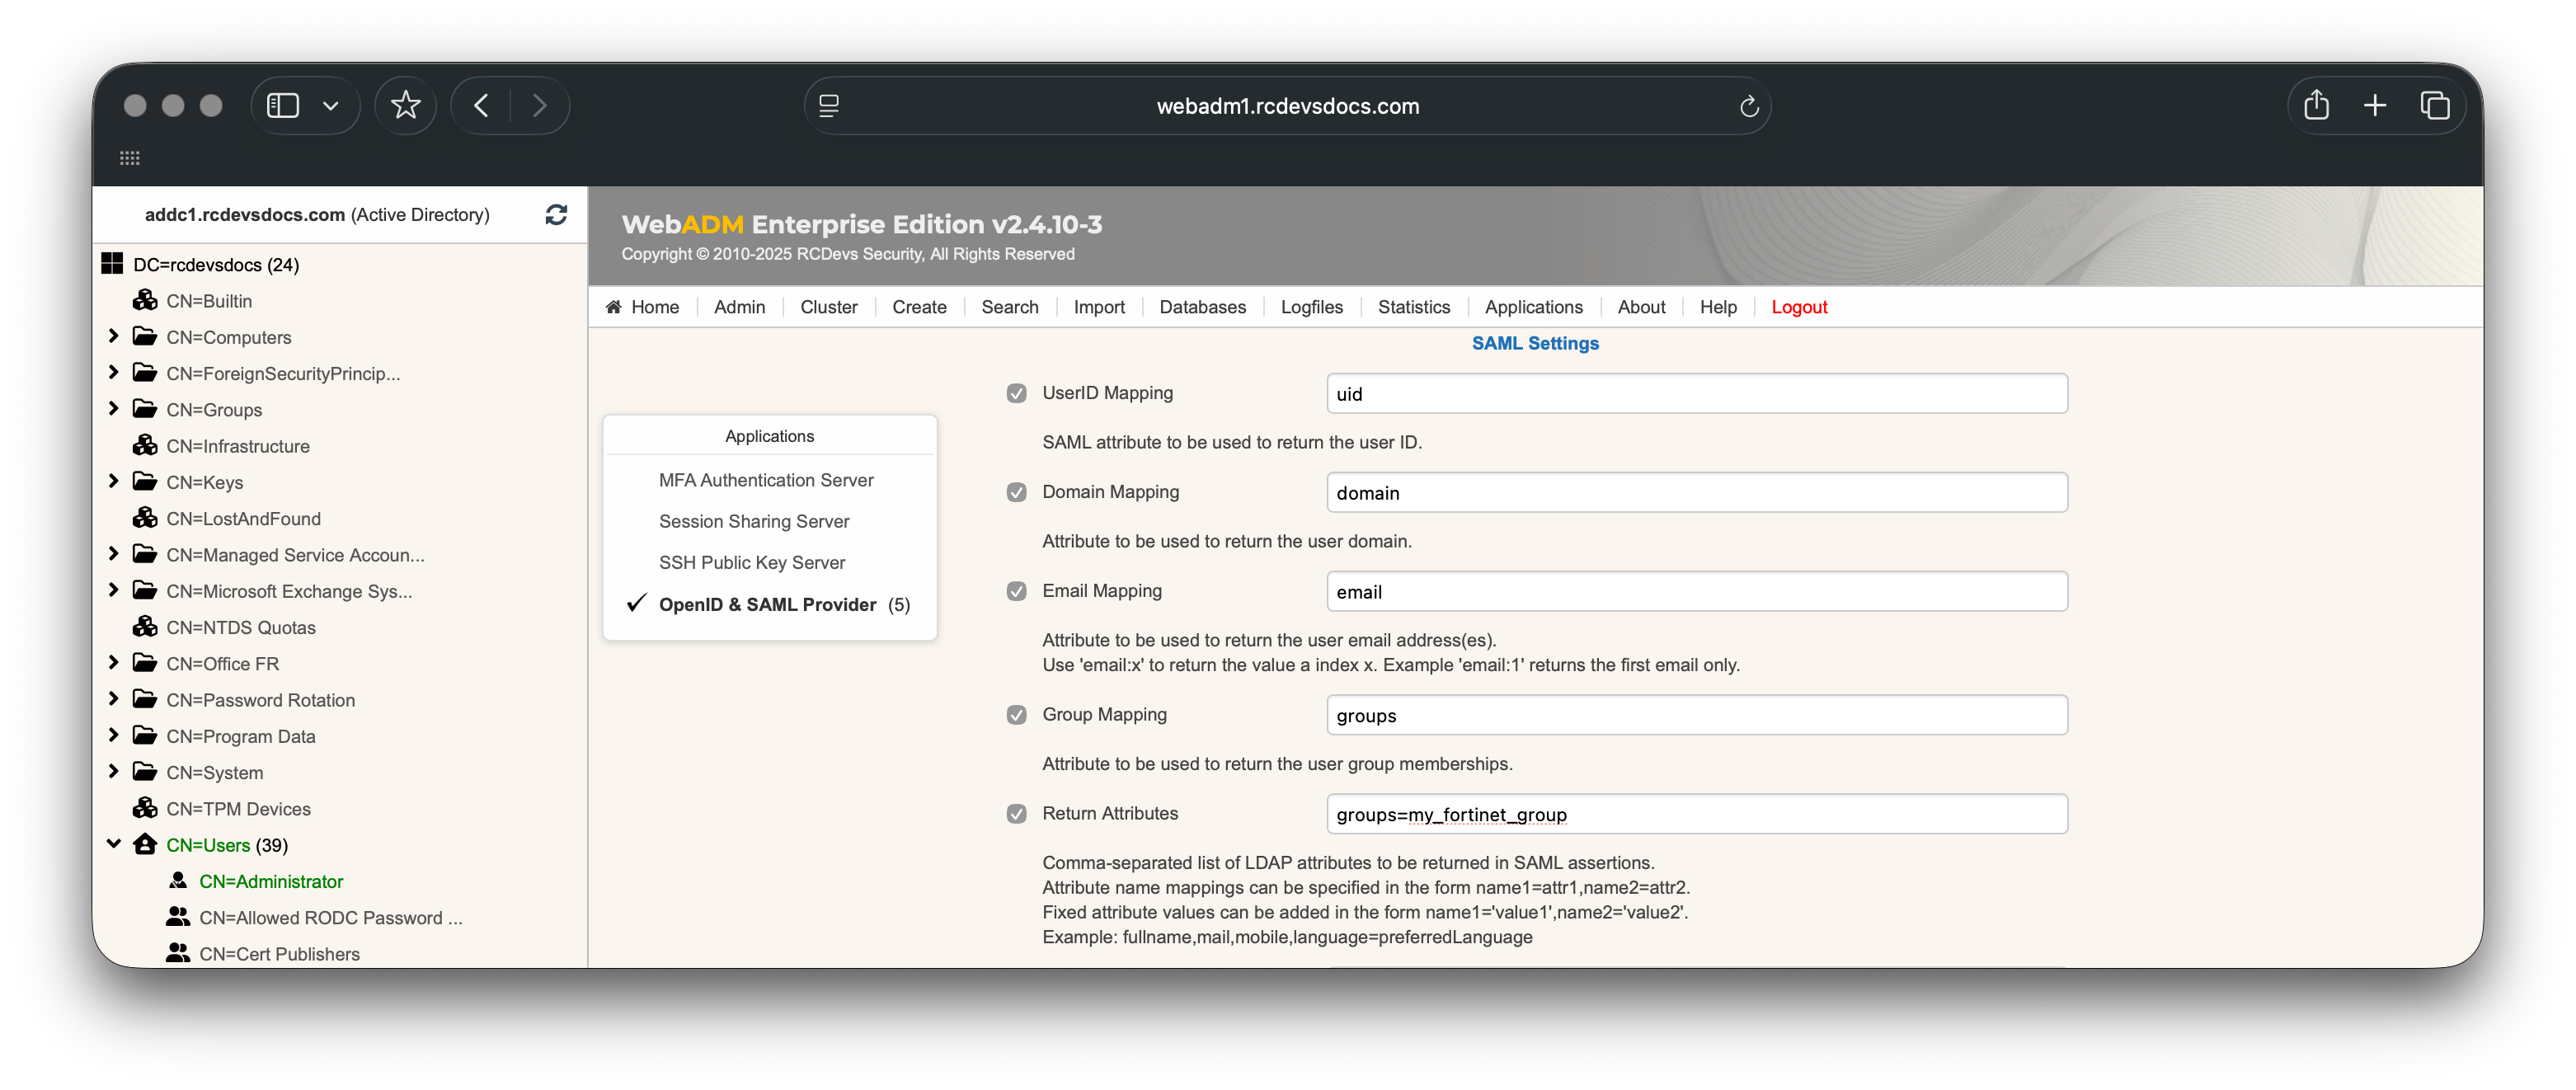
The group name configured on the FortiGate for your IPSec VPN must exactly match the group name returned by the RCDevs IdP. If the FortiGate groups do not correspond to the LDAP groups returned for the user account, you can hardcode the expected values in the Returned Attributes setting, as shown below:
You must also enable the Sign Entire SAML Response setting and configure the Assertion Consumer Service (ACS) URL, which can be obtained from the FortiGate Service Provider configuration.

Once these settings are configured you can configure the authentication settings from the Applications box > MFA Authentication Server.
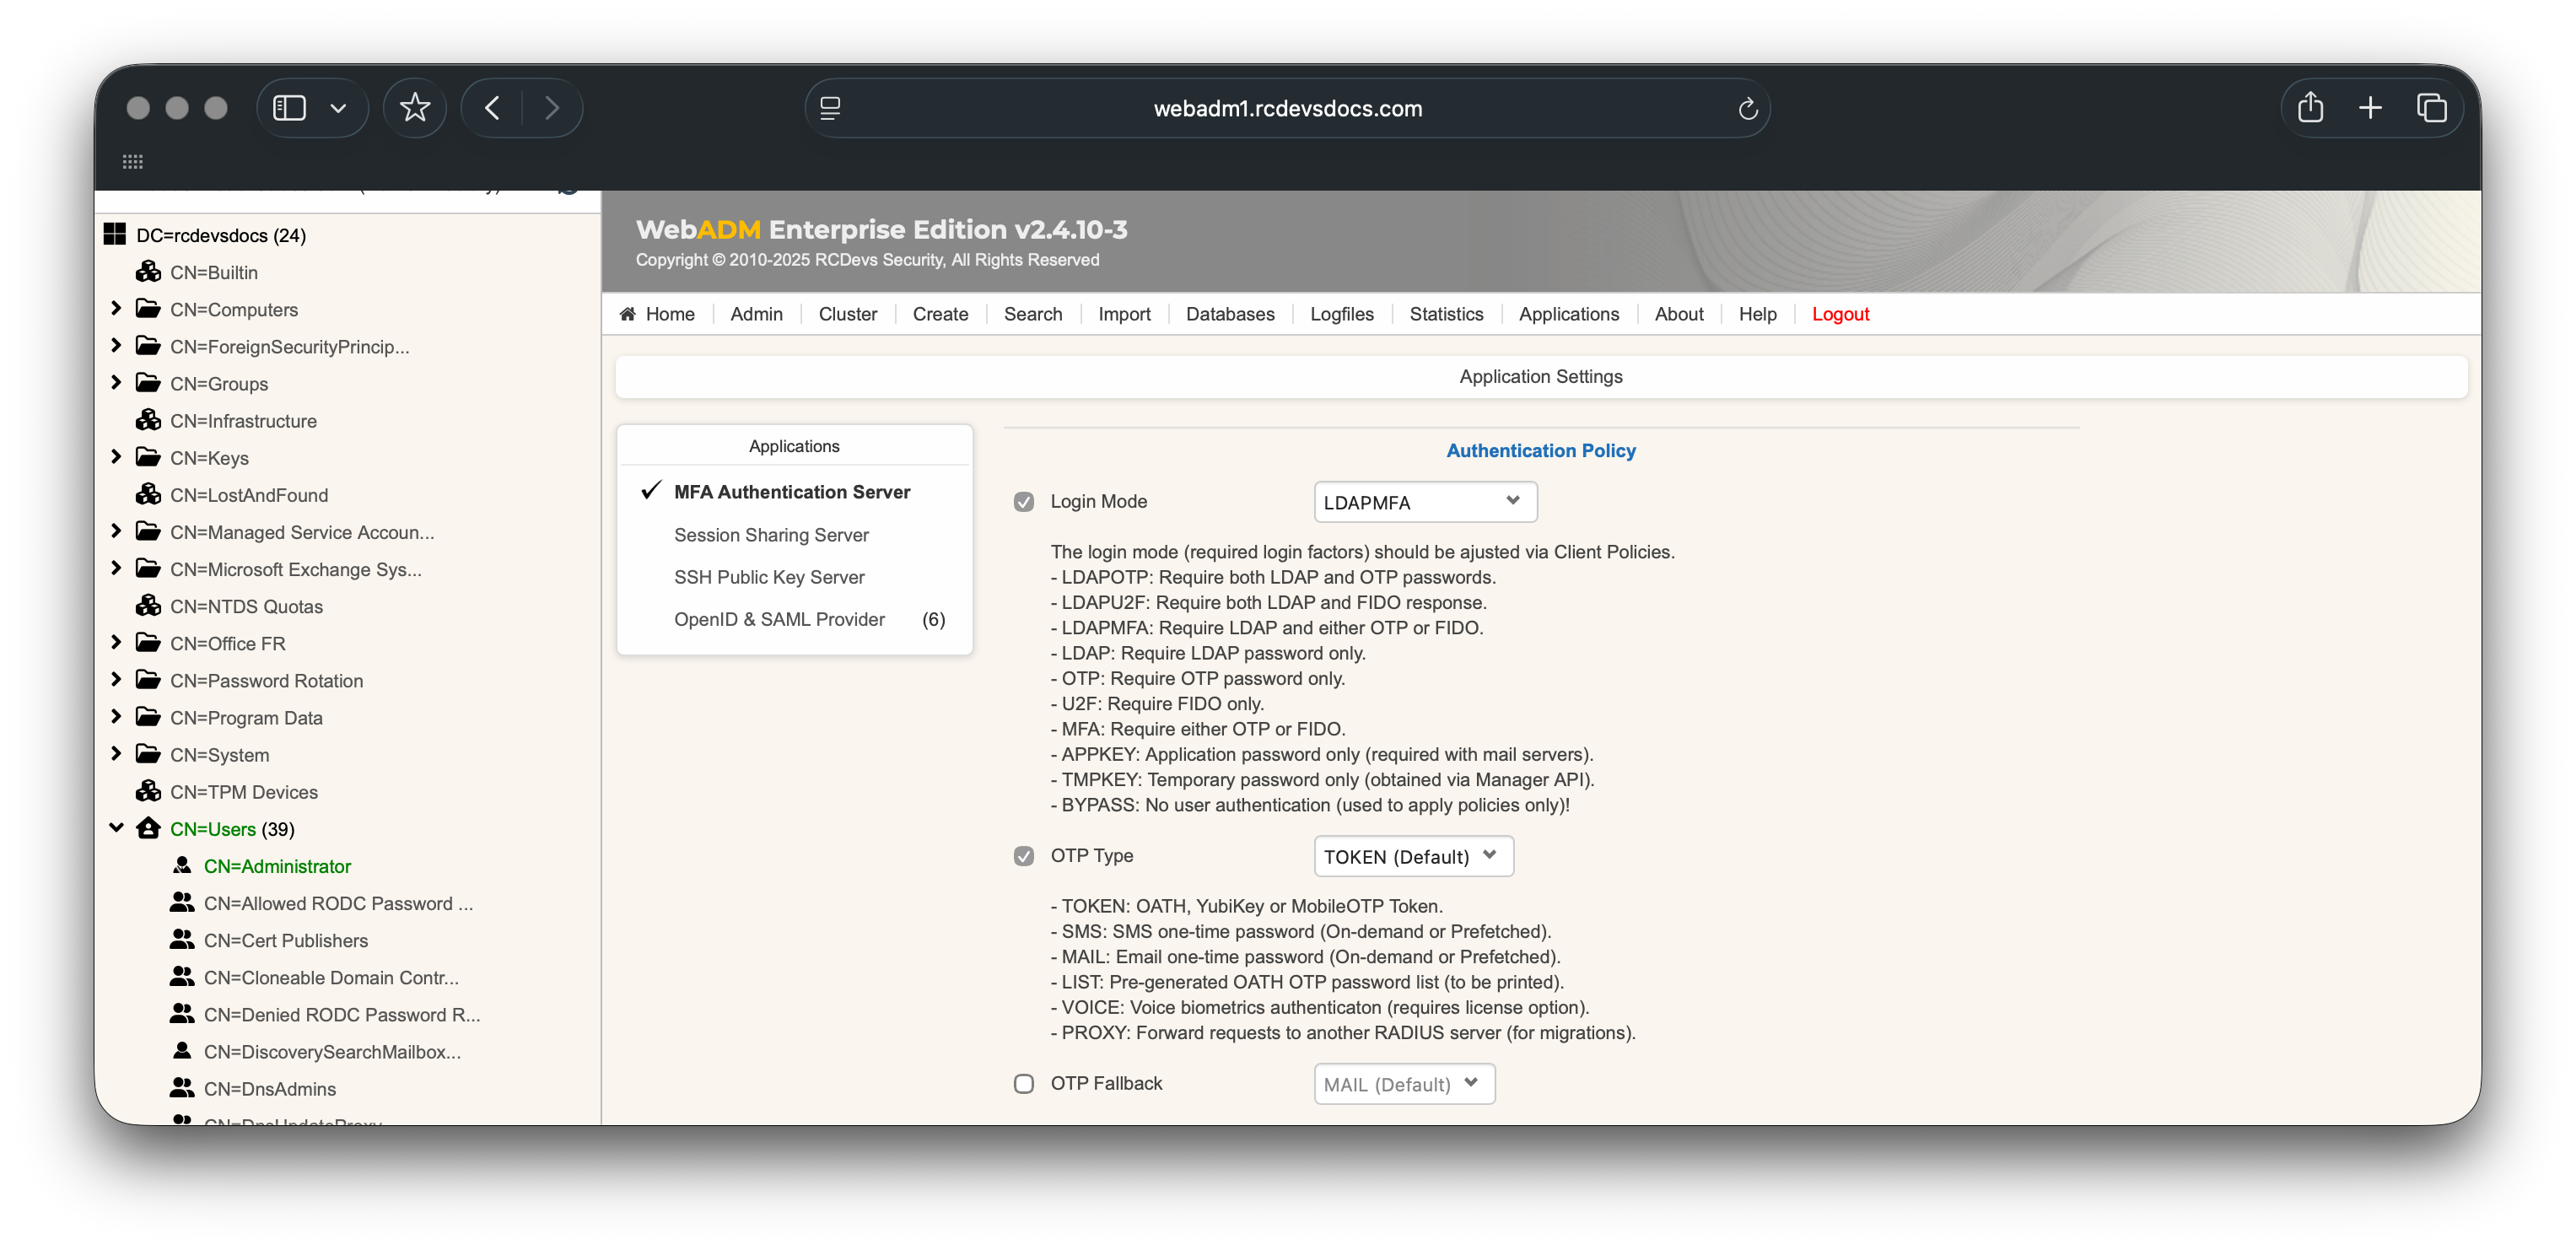
Configure the desired settings, then click the Apply buttons to save the settings and the policy.
Configuration is complete. You can now attempt to log in from your VPN client. You should be redirected to your Identity Provider’s login page. After successful authentication, you will be redirected back to FortiGate within the VPN client’s embedded webview, and the VPN connection will be established.
Troubleshooting
-
FortiGate logs and debugging
-
Check the SSL VPN log:
/var/log/sslvpn.log -
Enable SAML debug output:
diag debug application samld -1 diagnose debug authd saml enable # if supported in your FortiOS version -
Use these logs to verify authentication requests, SAML responses, and errors.
-
-
Inspect SAML assertions
-
Use a SAML debugging tool such as SAML-tracer (Firefox/Chrome) or Fiddler to capture and inspect the SAML response.
-
Verify:
- The
Audiencematches the FortiGate SP EntityID. - Signature validation passes.
- Required attributes (
uid,groups) are present. - Time validity (
NotBefore/NotOnOrAfter) matches FortiGate clock.
- The
-
-
Common issues
- Invalid Audience → SP EntityID and IdP Audience mismatch.
- Signature validation failed → Incorrect IdP certificate imported or chosen in
idp-cert. - Time validation errors → FortiGate and IdP clocks not synchronized (check NTP).
- Group mapping issues → Ensure IdP returns group attributes as plain text or hardcode expected values.