Overview
The RCDevs Mobile Badging solution is an integral part of the WebADM Framework, OpenOTP web-service, and the OpenOTP Token application. It offers the following key features:
- Time tracking of users;
- Work location verification and audit proof generated;
- Automated group membership management based on badge-in/badge-out operations;
- Automatic badge-in operation with NAC implementation on Wi-Fi/Ethernet networks. Device authentication through a client certificate can be linked to a user, and the device is not allowed to access the network until the user has badged in.
- Restriction of badging operations to specific countries or area;
- User accounts remain inactive at the LDAP level until the user has badged-in or checked-in;
- Can be utilized as a third factor of authentication. Badging operation can be required to access a system or a set of systems (Windows, VPN, Cloud applications...).
To enable this feature in your WebADM infrastructure, the following requirements must be met:
- Push mechanisms configured within your WebADM infrastructure.
- WebADM version 2.1.16 or later.
- OpenOTP version 2.1.6 or later.
- OpenOTP Token application version 1.5.16 or later.
- BADGE option included in your freeware, enterprise, or trial license.
- Optionally, the
Sign & Sealfeature included in your license with signature credits to use an eIDAS-trusted certificate for timestamping each transaction.
Enabling Mobile Badging
To configure mobile badging, navigate to the WebADM Admin interface and select the Applications tab. Under this tab, click the CONFIGURE link under MFA Authentication Server.
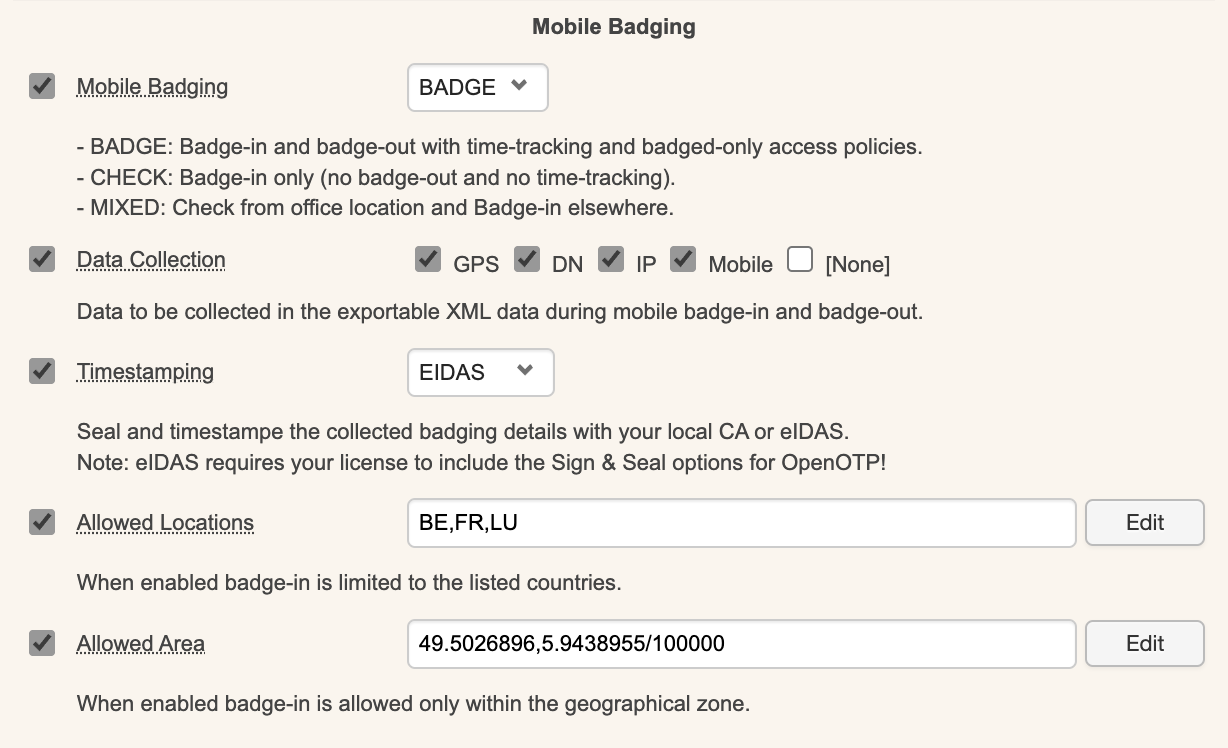
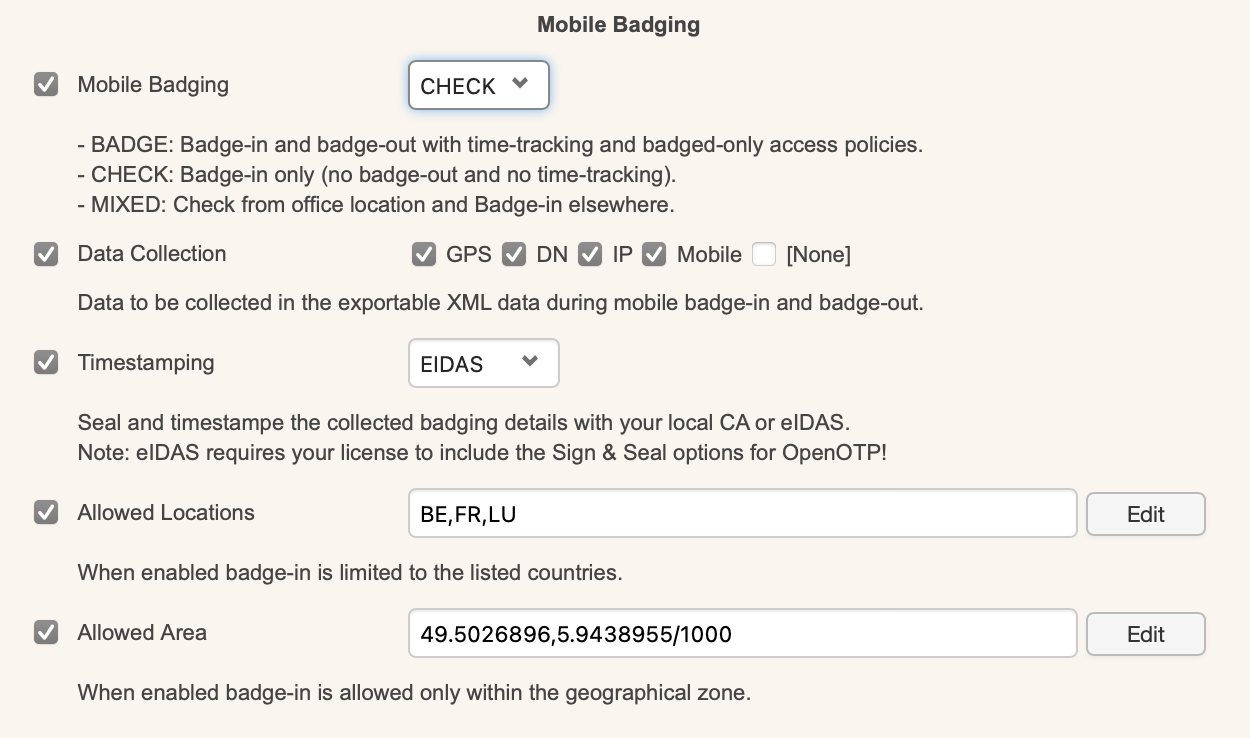
On the next page, locate the Mobile Badging section, where you can enable the Mobile Badging feature and choose between three modes: BADGE, CHECK, or MIXED.
- The
BADGEmode allows users tobadge-inandbadge-outwith atime-trackingfeature and badge-only access policies. - The
CHECKmode only allows forbadge-inwithout anybadge-outor time-tracking involved. - The
MIXEDmode combines the previous two modes, with functionality depending on the user’s location.
Combined with client policies, you can prevent a user from logging into a system if they haven't badged-in during the current day.
You can configure which information is collected by selecting Data Collection and then checking the options you want, such as GPS, DN, IP, and Mobile. This data is stored in the SQL database configured with your WebADM and submitted directly from the mobile device to your OpenOTP mobile endpoint URL. It is never forwarded through RCDevs' cloud infrastructure, and RCDevs does not have access to this data.
The next option pertains to the certificate used for timestamping badging operations. You can choose between local CA or eIDAS. The eIDAS option requires purchasing signature credits from RCDevs and communicating with https://cloud.rcdevs.com for timestamping operations. The local CA option uses the WebADM PKI service for timestamping and does not require signature credits.
The Allowed Locations feature allows you to restrict badging operations to specific countries. By enabling this option, you can select the countries from which badging operations are permitted. If this option is not enabled, badging operations are allowed from all locations.
The Allowed Area setting lets you define a GPS location with a radius where badging operations are allowed.
Except for the Timestamping feature, all listed settings can be configured per group or per user for better granularity and flexibility.
OpenOTP Token Badging
Push Token registered before enabling the badging feature
If you enable the badging feature after push token registration, users will be prompted to resynchronize their token during the next push notification they receive. The resynchronization will enable the badging feature on the Token.
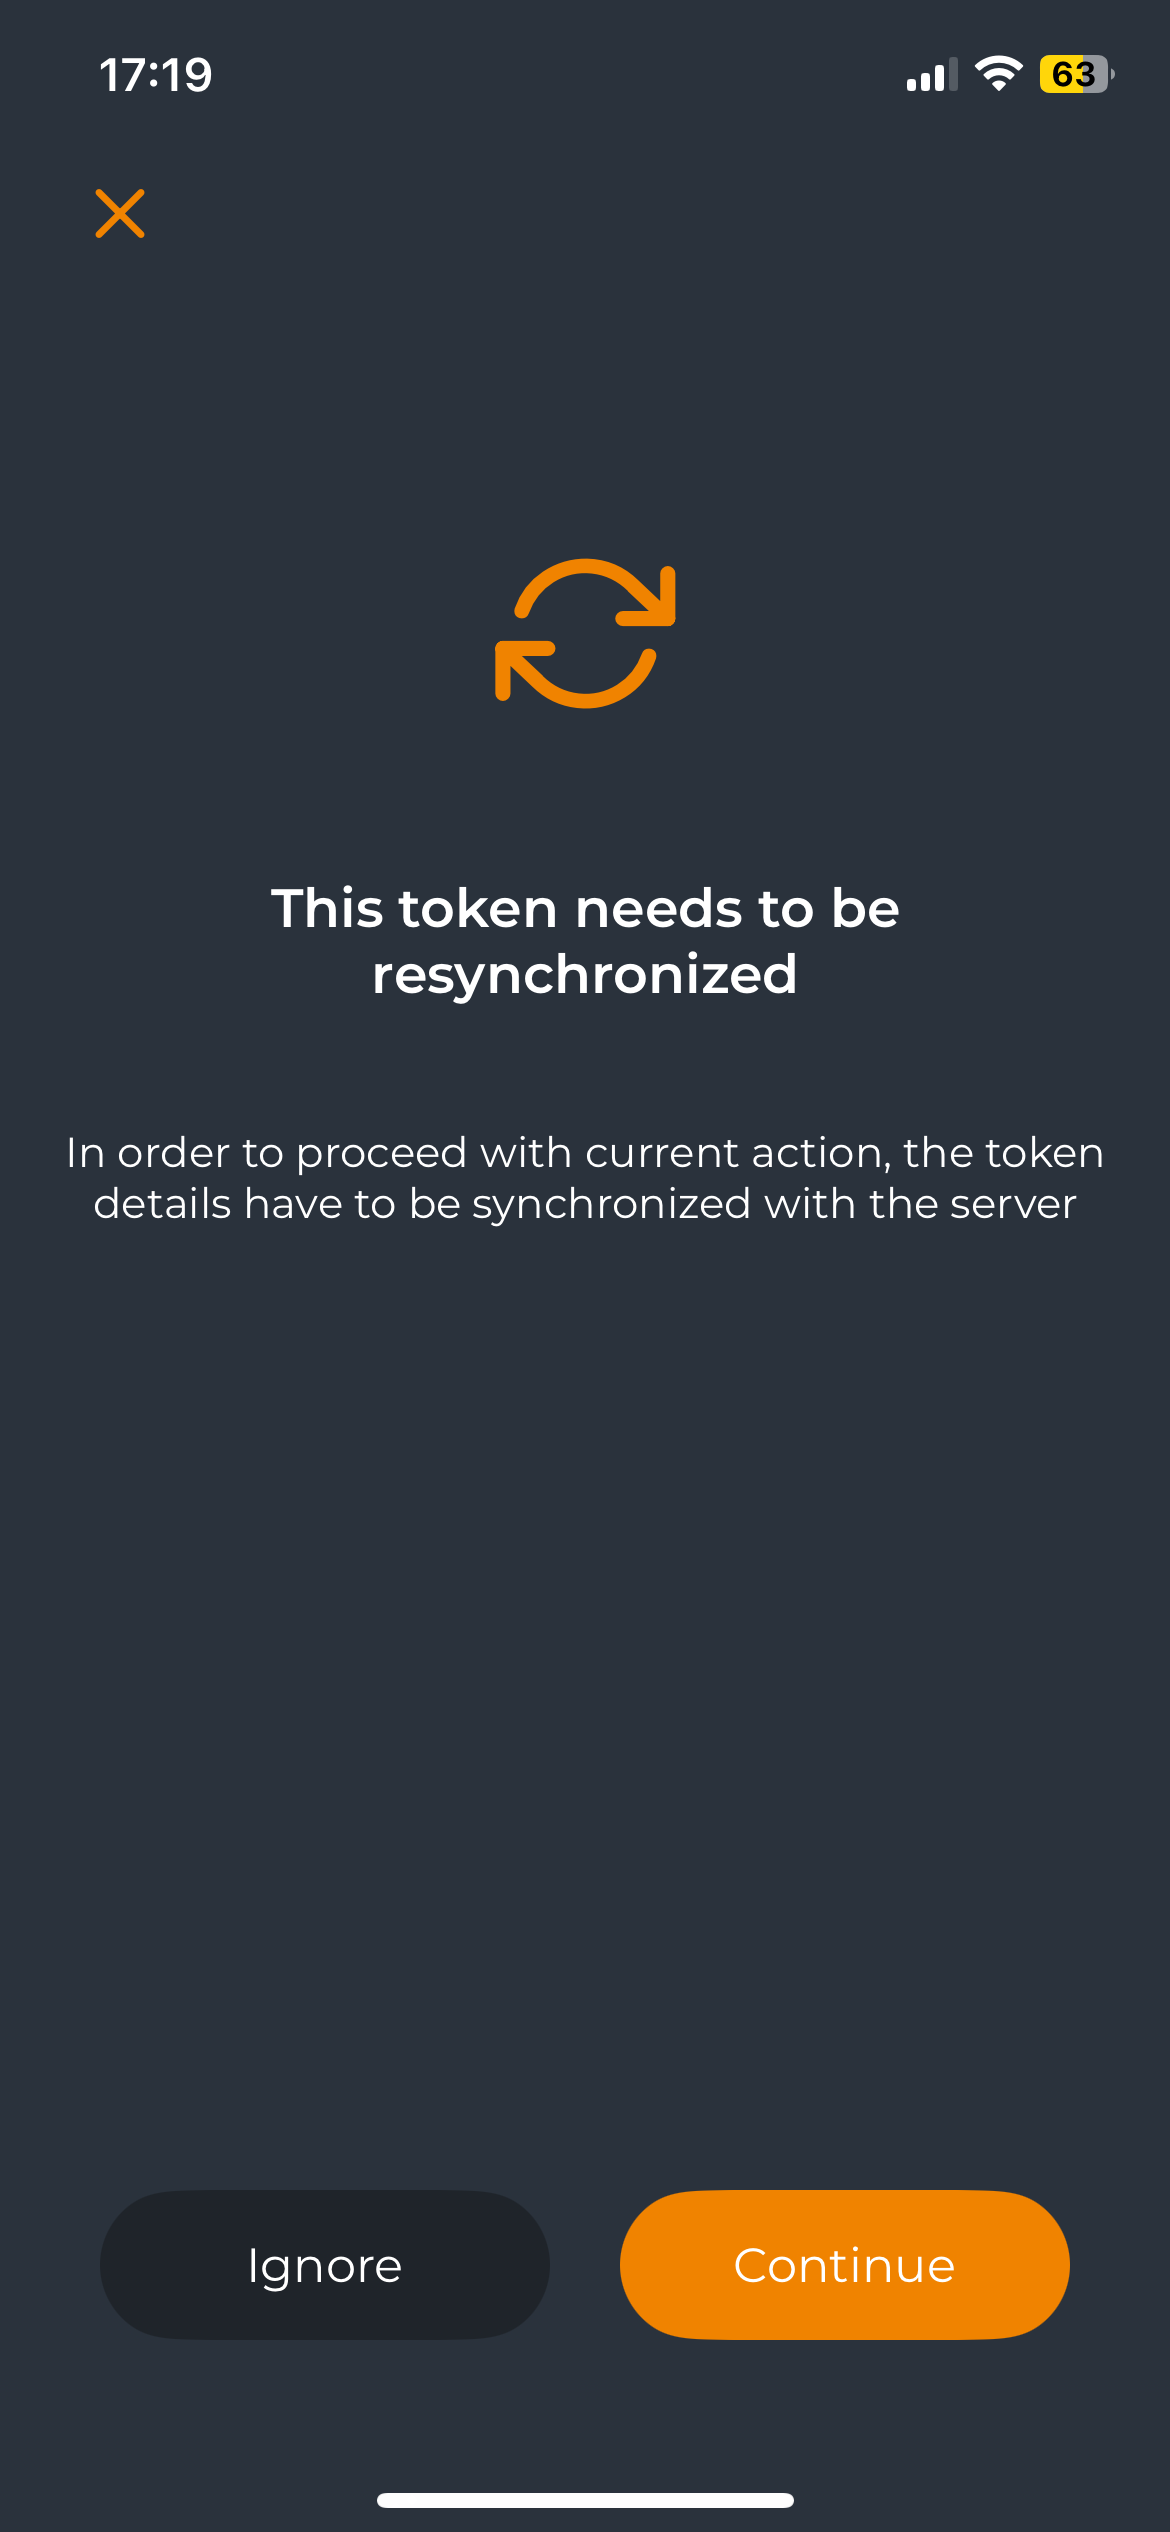
The user must click the Continue button to perform the resync operation. Afterward, the badging feature will appear on their token, along with the Badge-In button.
Users can also manually resynchronize the server configuration by clicking the Resync icon in the token view.
If the resynchronization operation is successful, a confirmation message will appear at the top of the screen, and the Badge-In button will be visible.
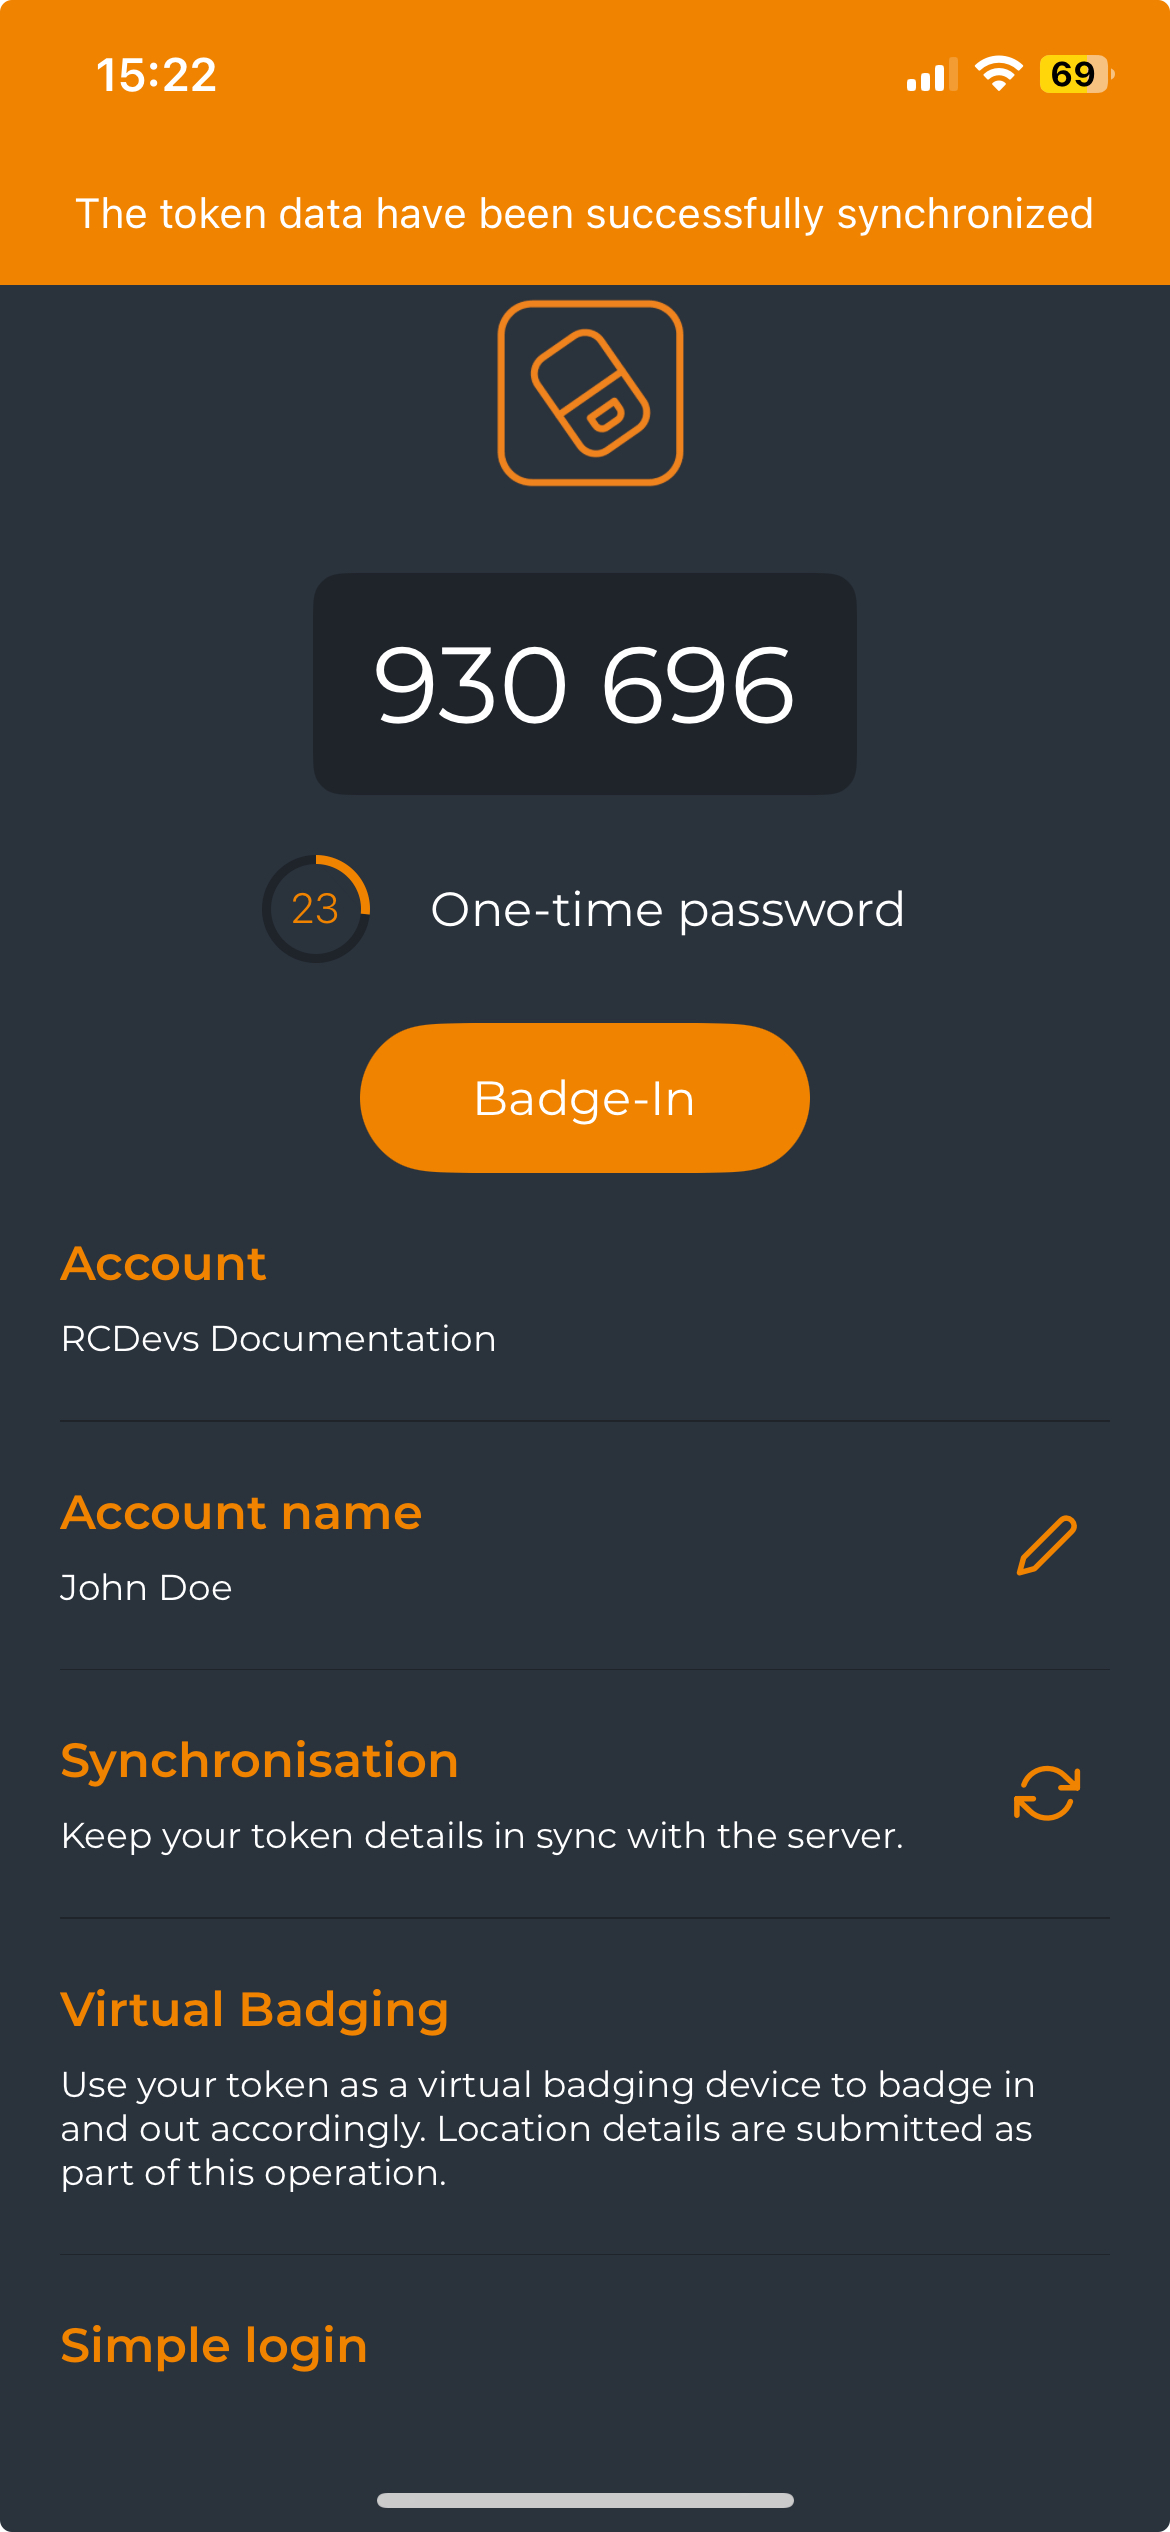
The Token is now ready for badging purposes.
Push Token registered after enabling the badging feature
If the Badging feature is enabled in the OpenOTP configuration before token registration, it will be automatically activated on the registered Token.
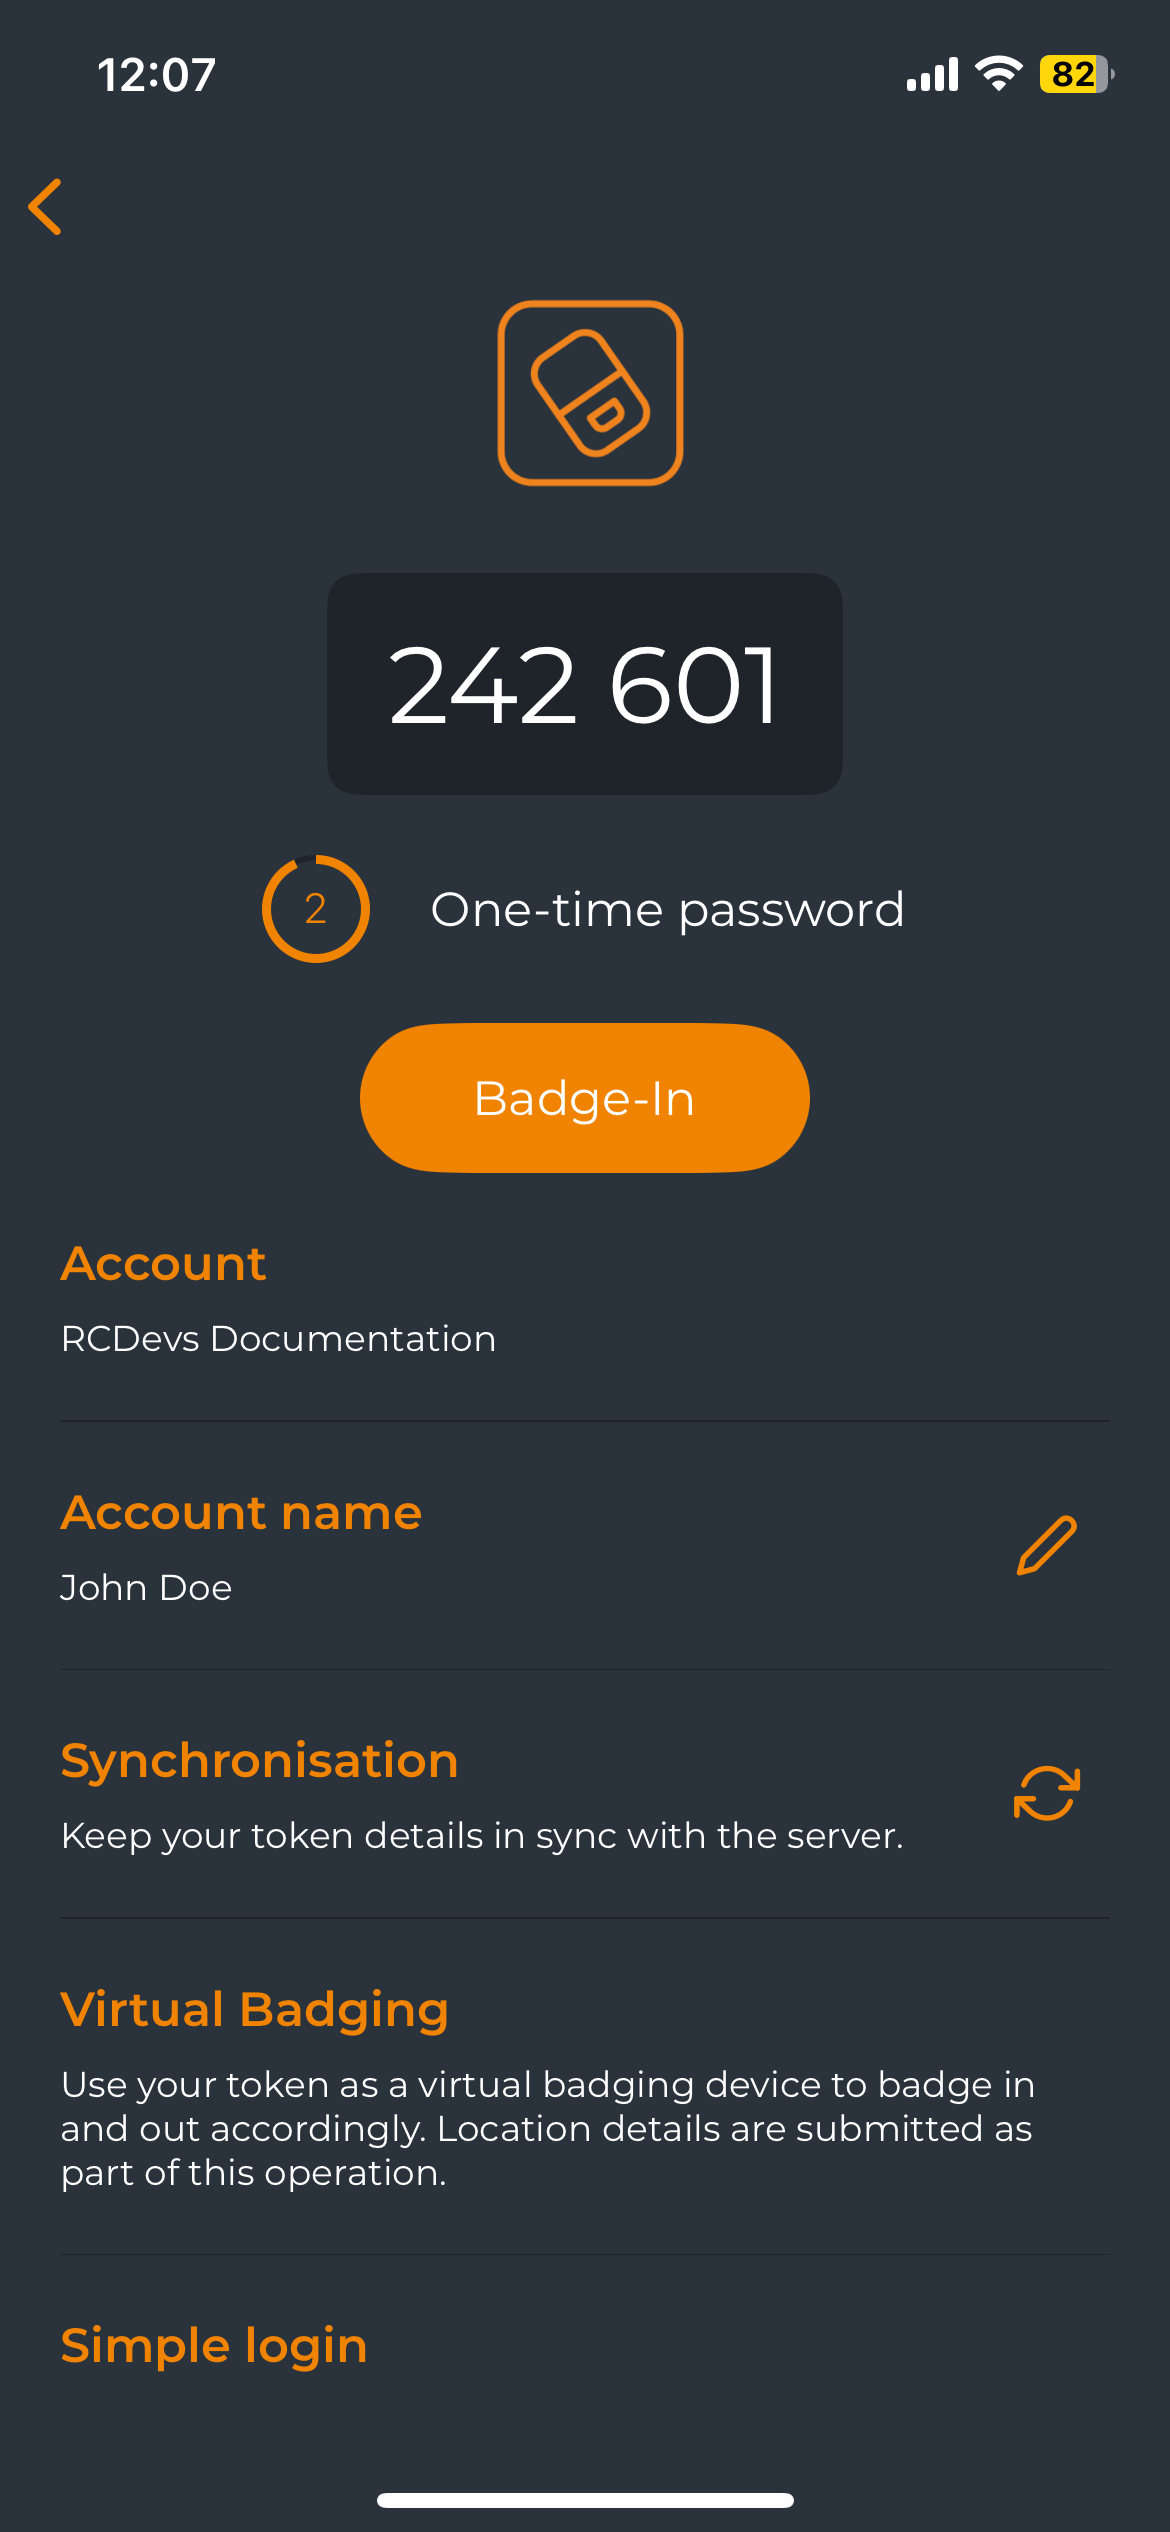
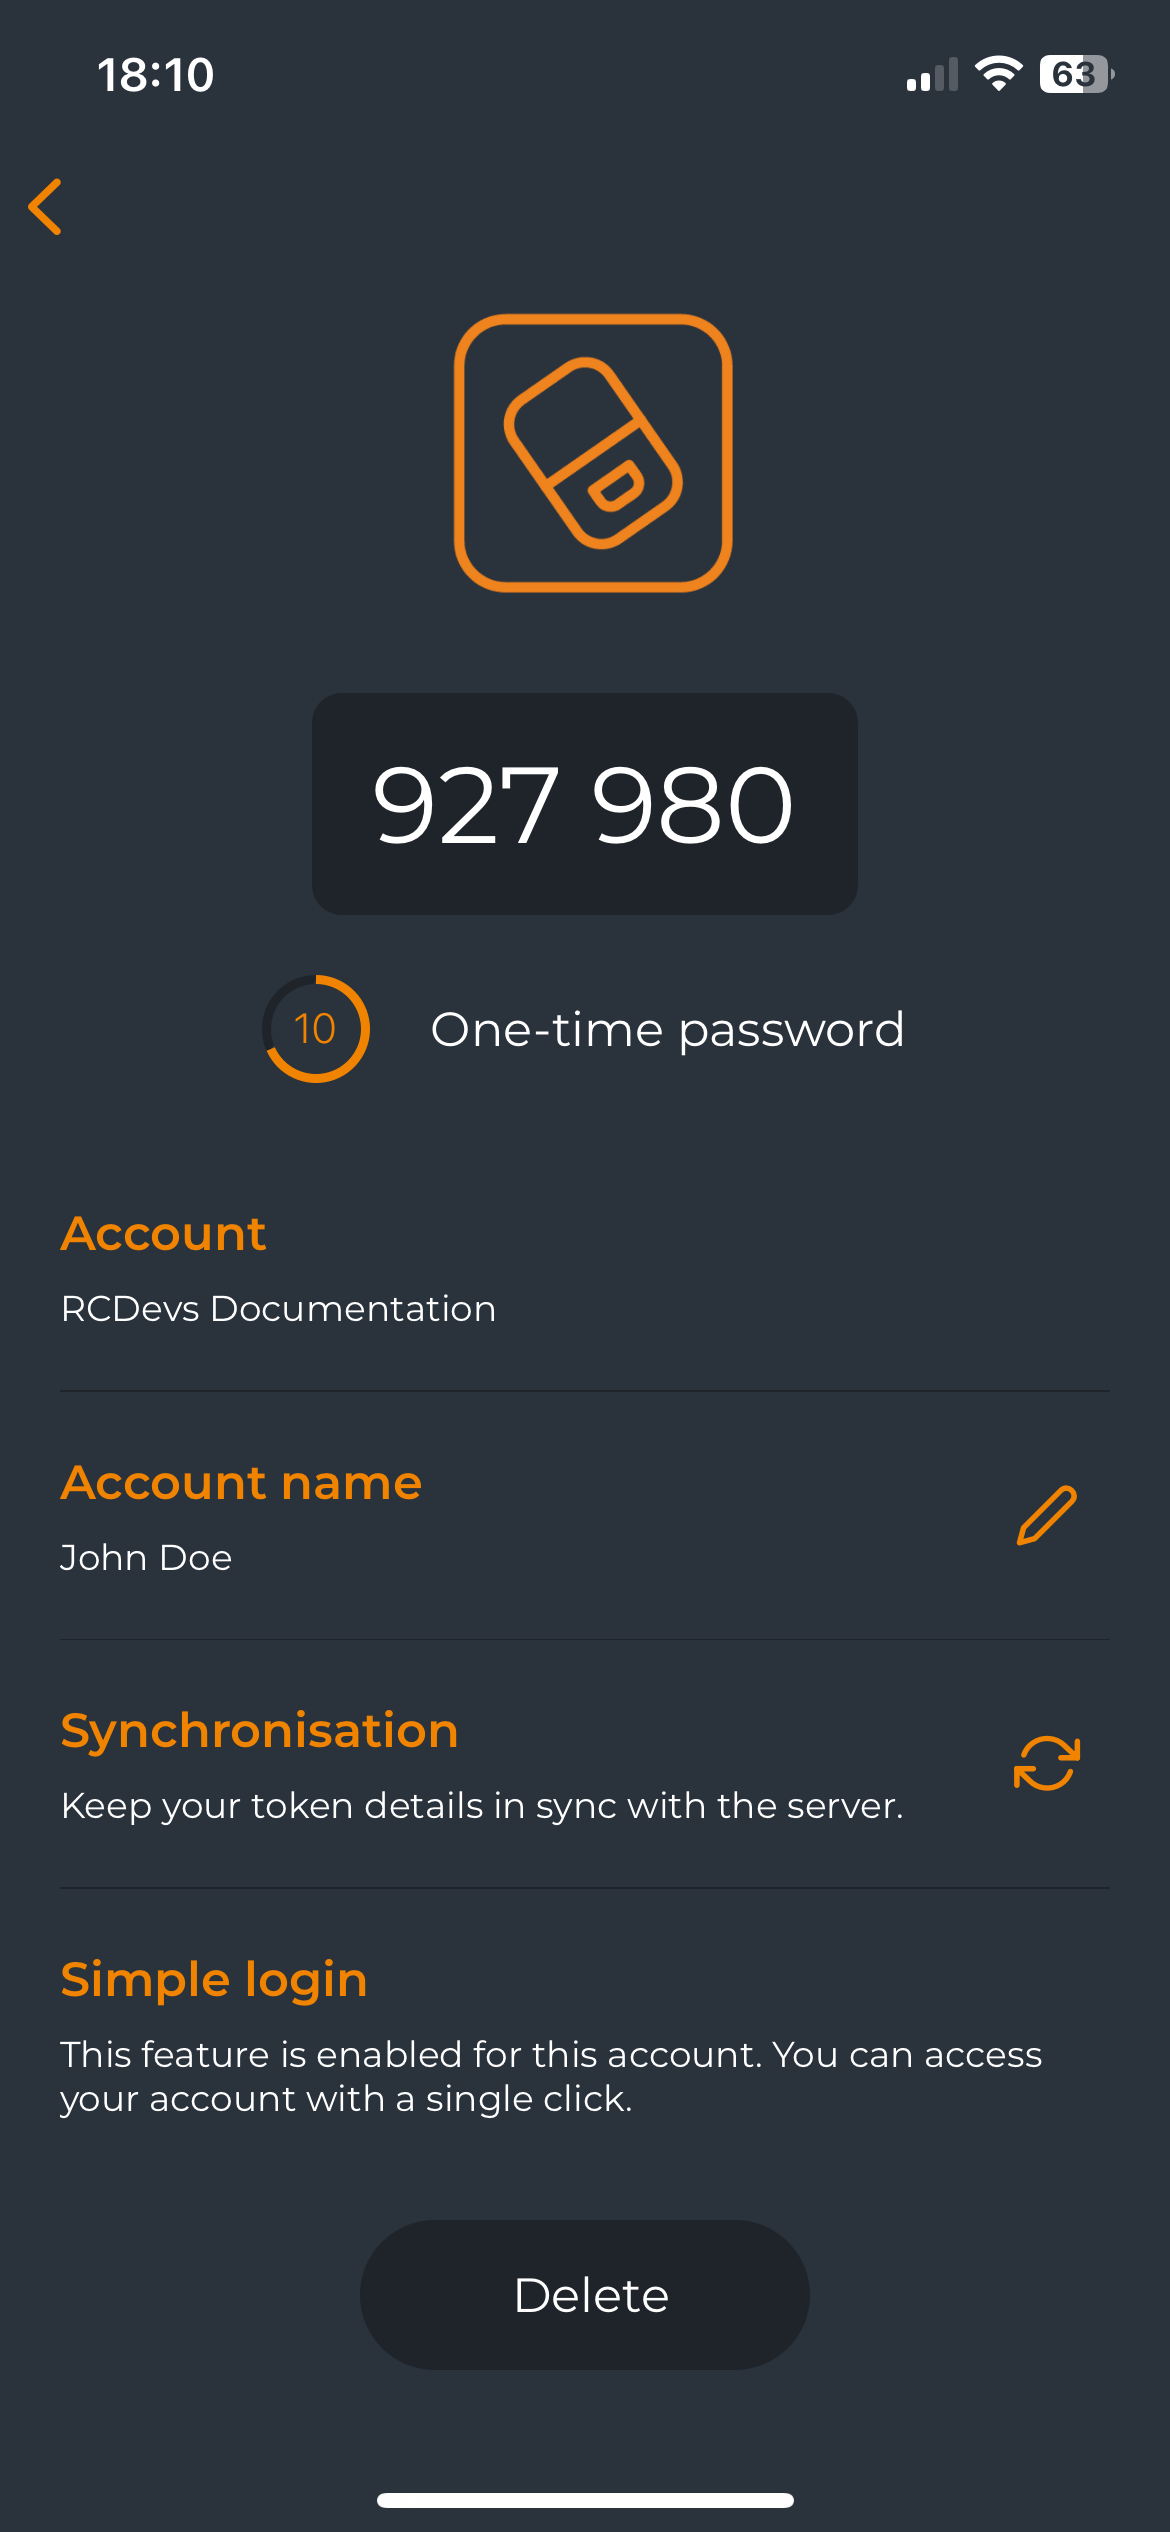
Badge Mode
Once you have a compatible token, click on it, and you will see the Badge-In button. Click the Badge-In button to proceed with the operation. A confirmation message will appear at the top of the screen when the operation is successful, and the Badge-In button will automatically switch to the Badge-Out button for the next badge-out operation.
Click on Badge-Out button to badge-out and the Badge-Out button will automatically switch to the Badge-In button for the next badge-in operation.
The time between the use of the two buttons is held in WebADM to calculate the time that the user has been badged in.
Check Mode
This time we switched the Mobile Badging setting in the OpenOTP configuration from BADGE mode to CHECK mode.
On the Token side, the main difference is that after the Badge-In operation, the button switches to Checked and is greyed-out.
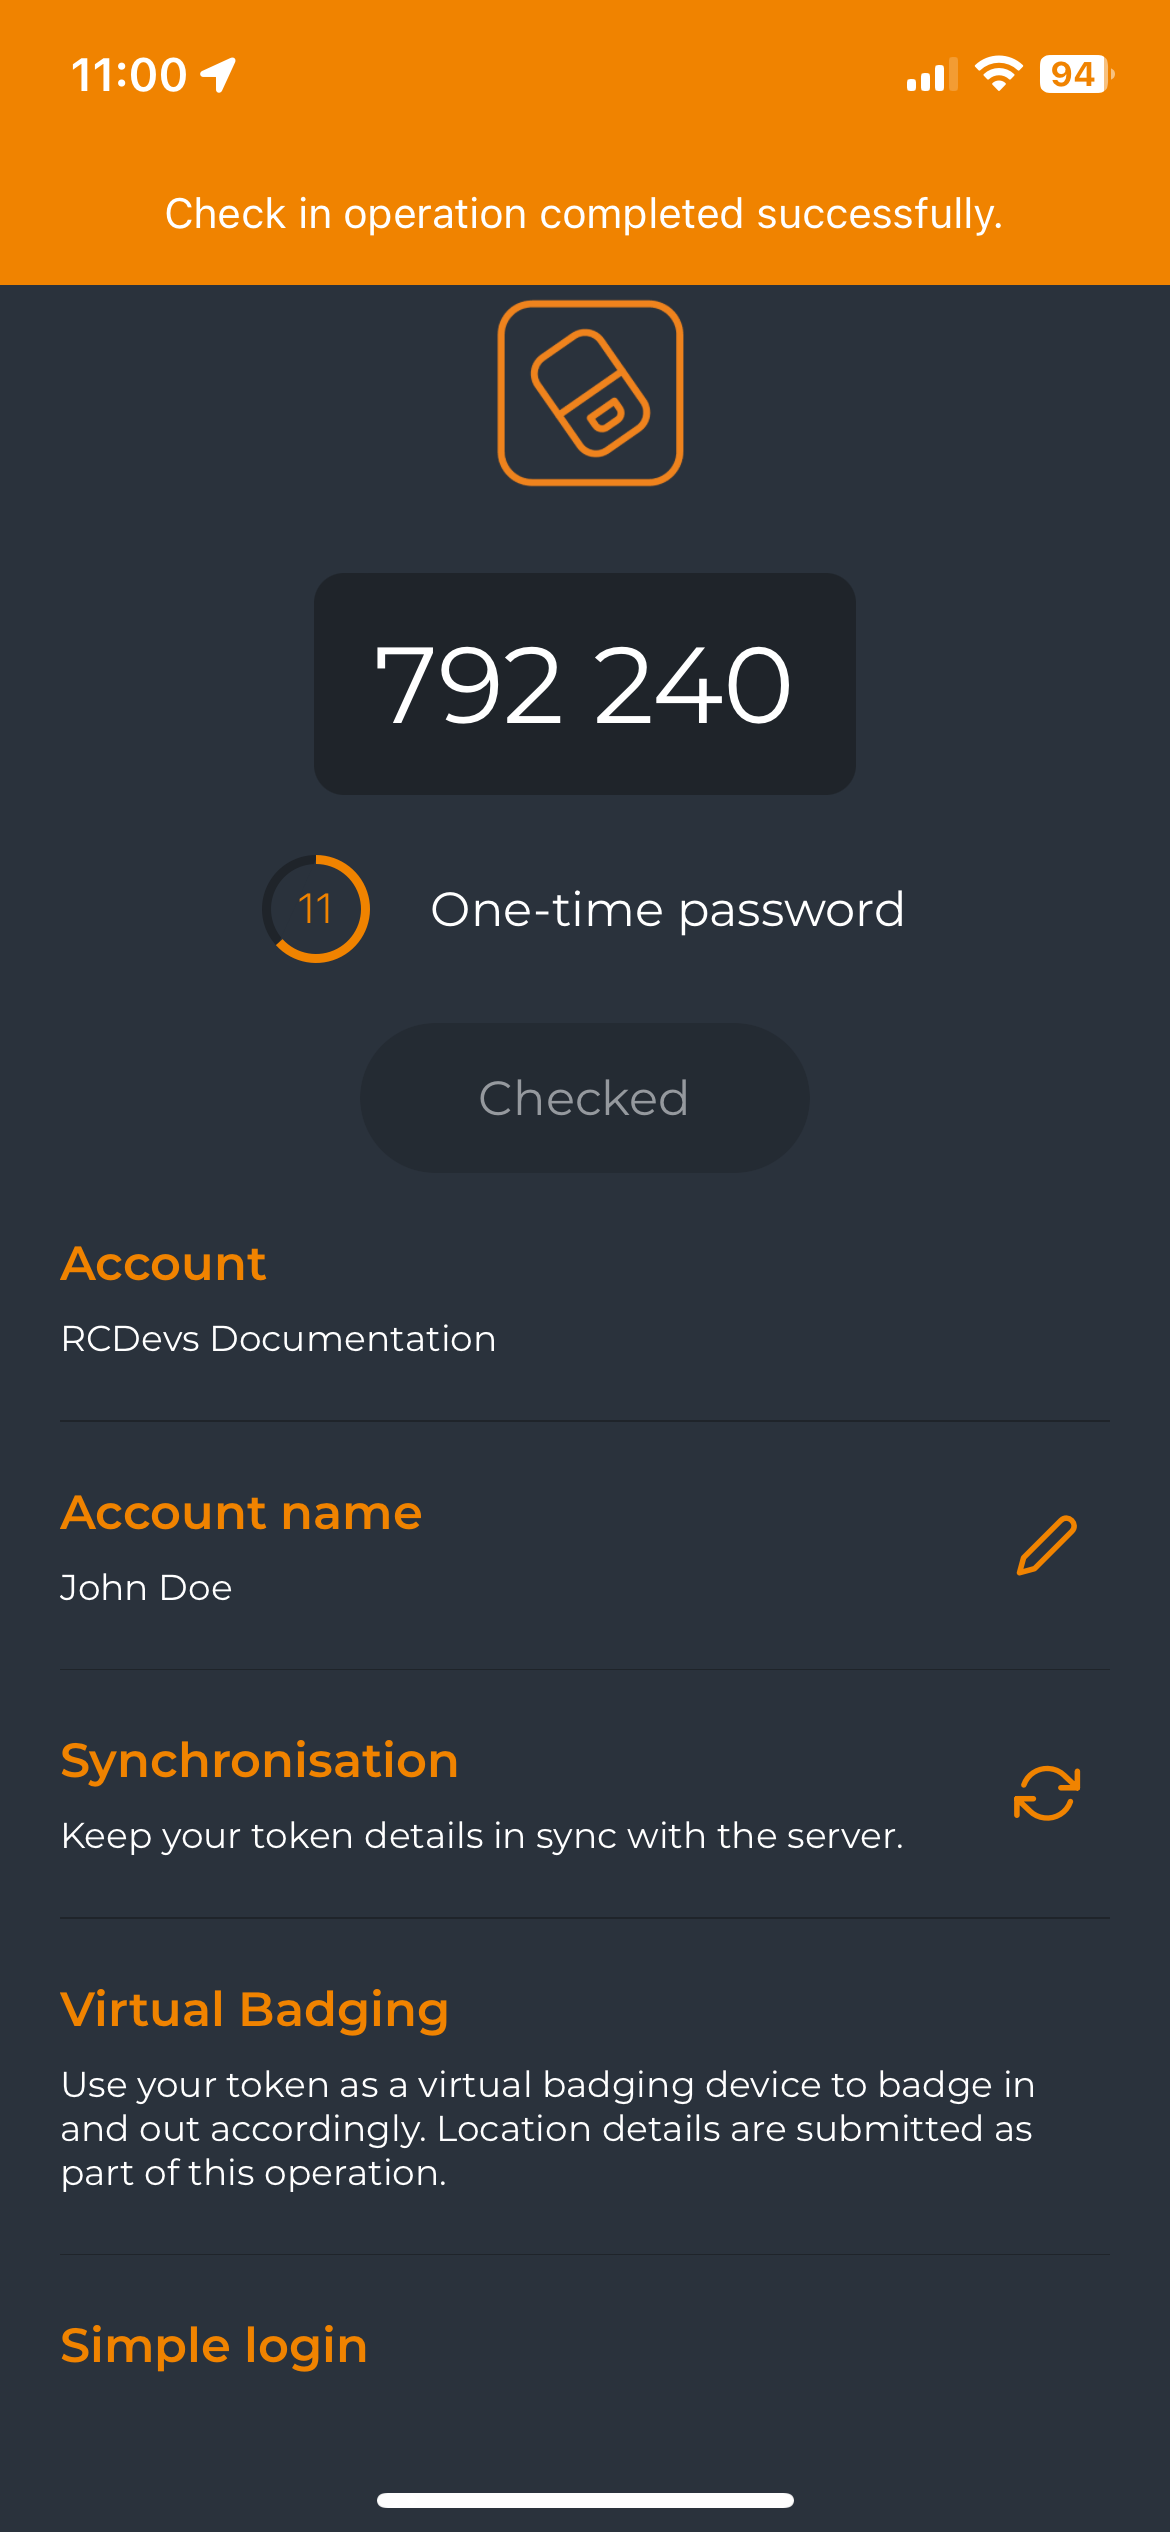
If you leave the Token and come back on it, the Badge-In button will re-appear.
Mixed Mode
To enable this mode, you must configure the office's geolocation in the WebADM LDAP OptionSets. Without this configuration, the mode will not function correctly.
This mode adapts based on the user's location. If the user is at the office, badging will operate in CHECK mode. If the user is remote (working from home or another location), mobile badging will function in BADGE mode with time tracking.
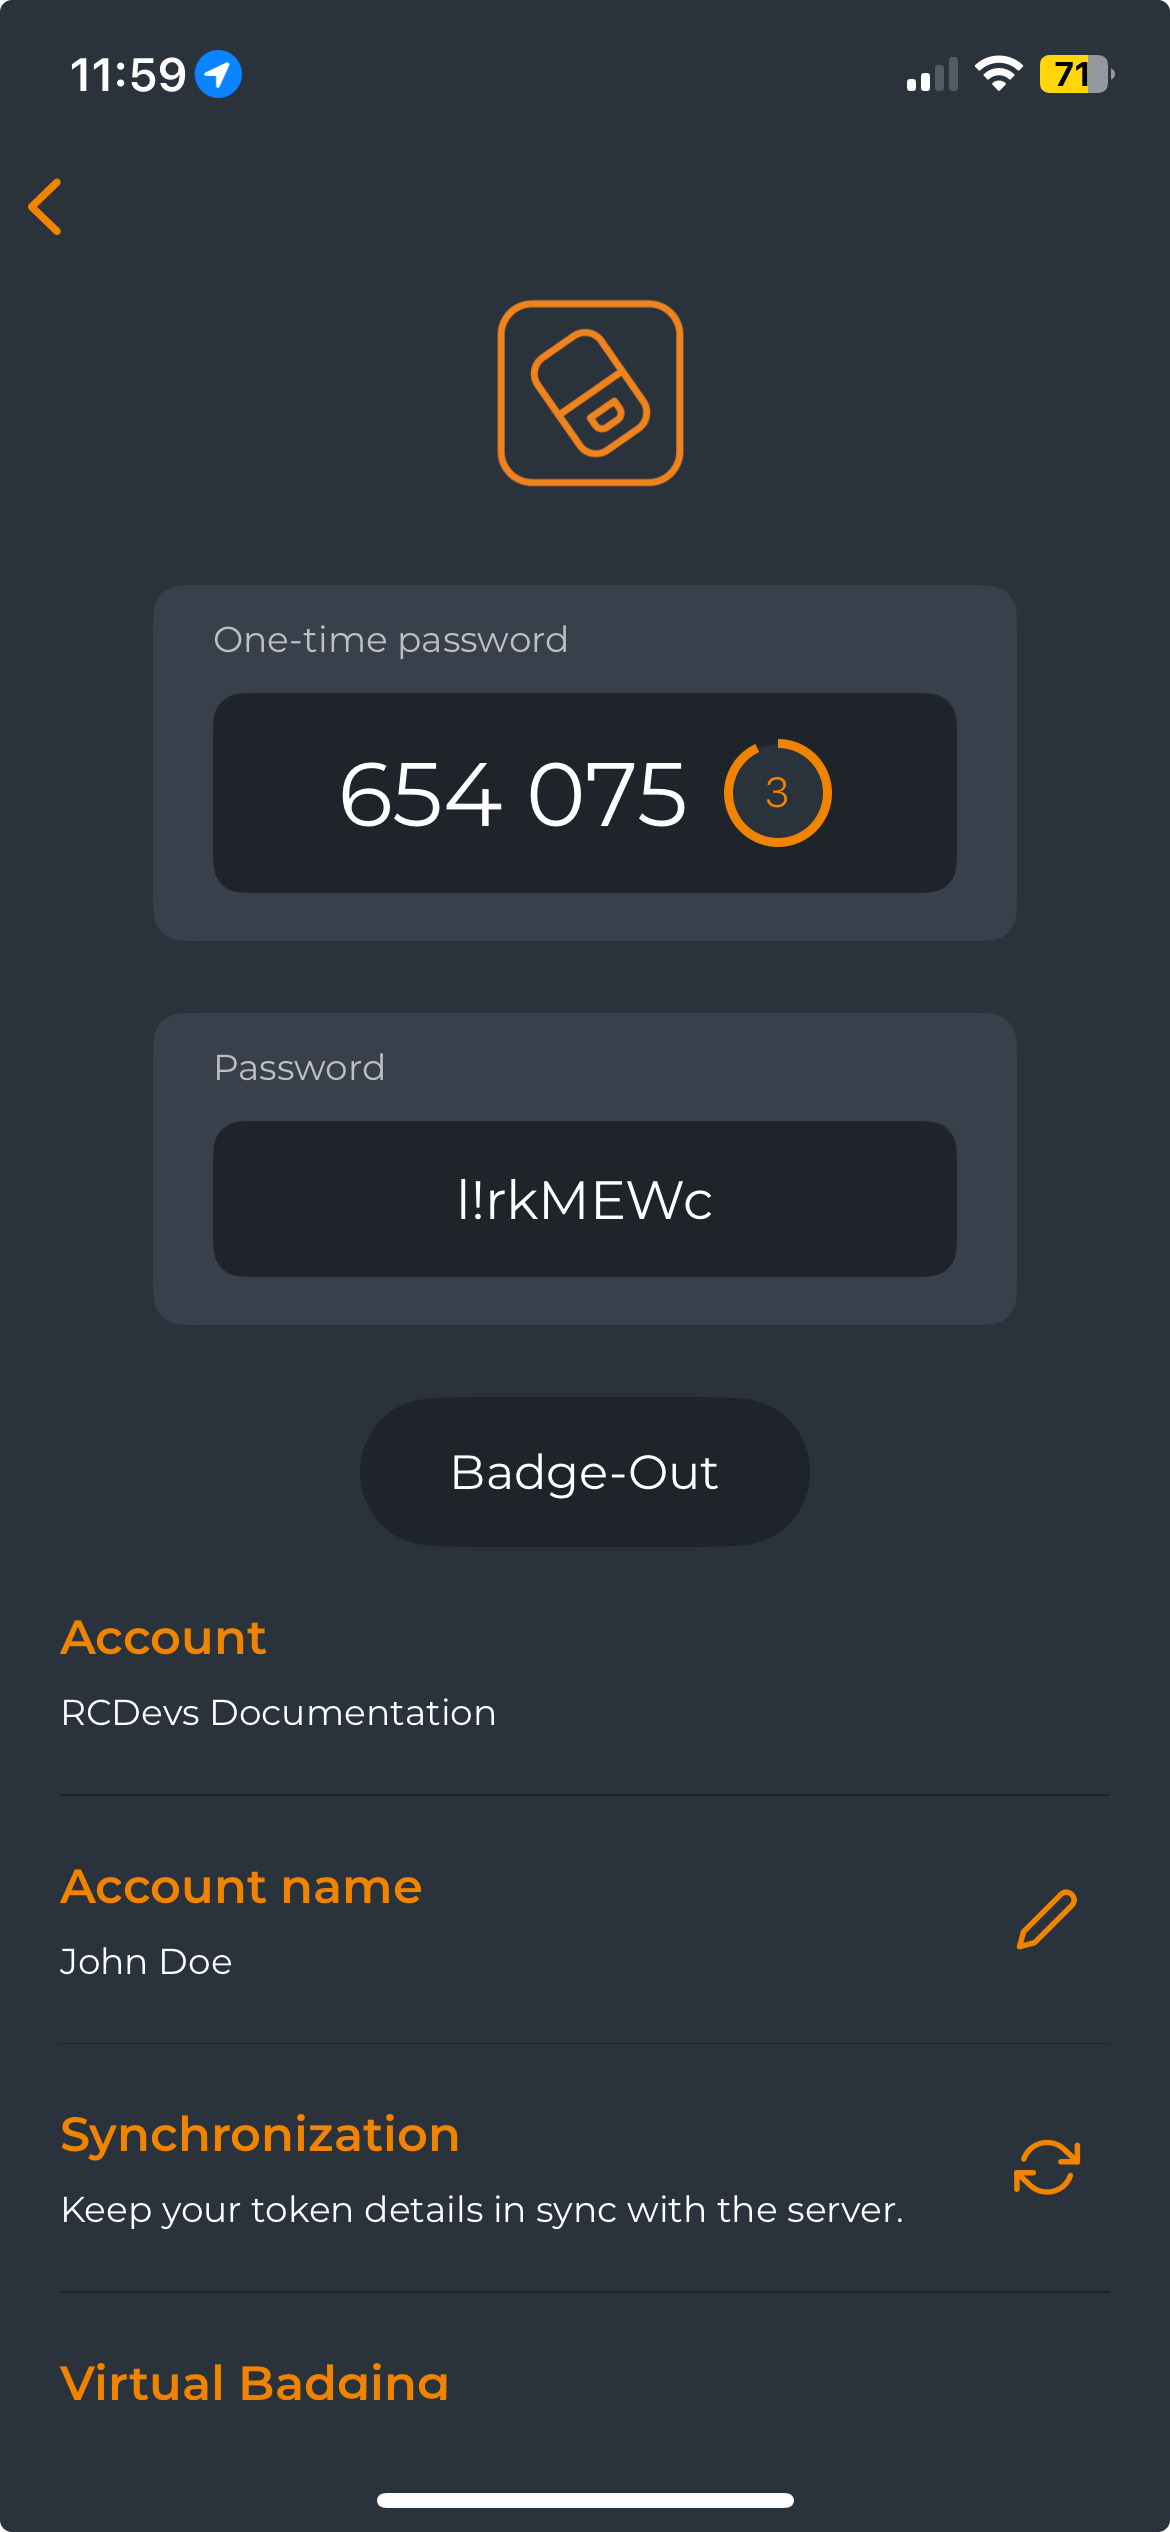
Password Setting Enabled Lockout Policy
If the password setting of the Lockout Policy in the optionSet has been enabled, you will receive your password of the day after your daily badge-in/check-in operation.
WebADM Configuration
LDAP Option Sets
Mobile Badging Settings
Some mobile badging options are configurable through LDAP Option Sets features of WebADM. You can configure multiple LDAP Option Sets to apply different settings based on the branch of your LDAP tree where the Option Sets are applied.
To edit an LDAP Option Set, go to the Admin tab, select the LDAP Option Sets box, and click the CONFIGURE button next to the set you want to modify.
If you haven’t created any LDAP Option Sets, please refer to the LDAP Option Set documentation for instructions on creating and configuring them.
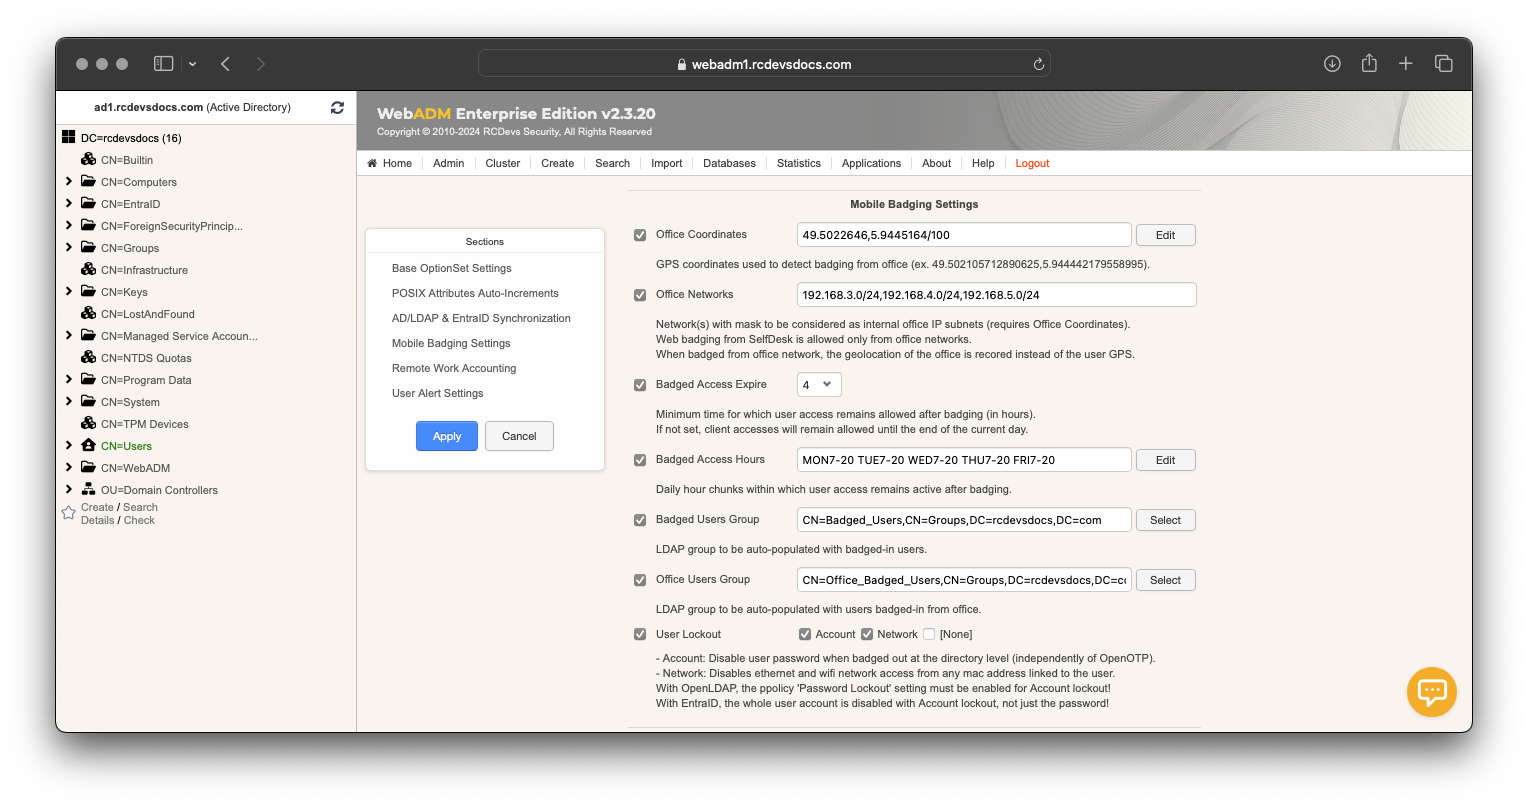
In the LDAP Option Sets, navigate to the Mobile Badging Settings section to configure the following settings:
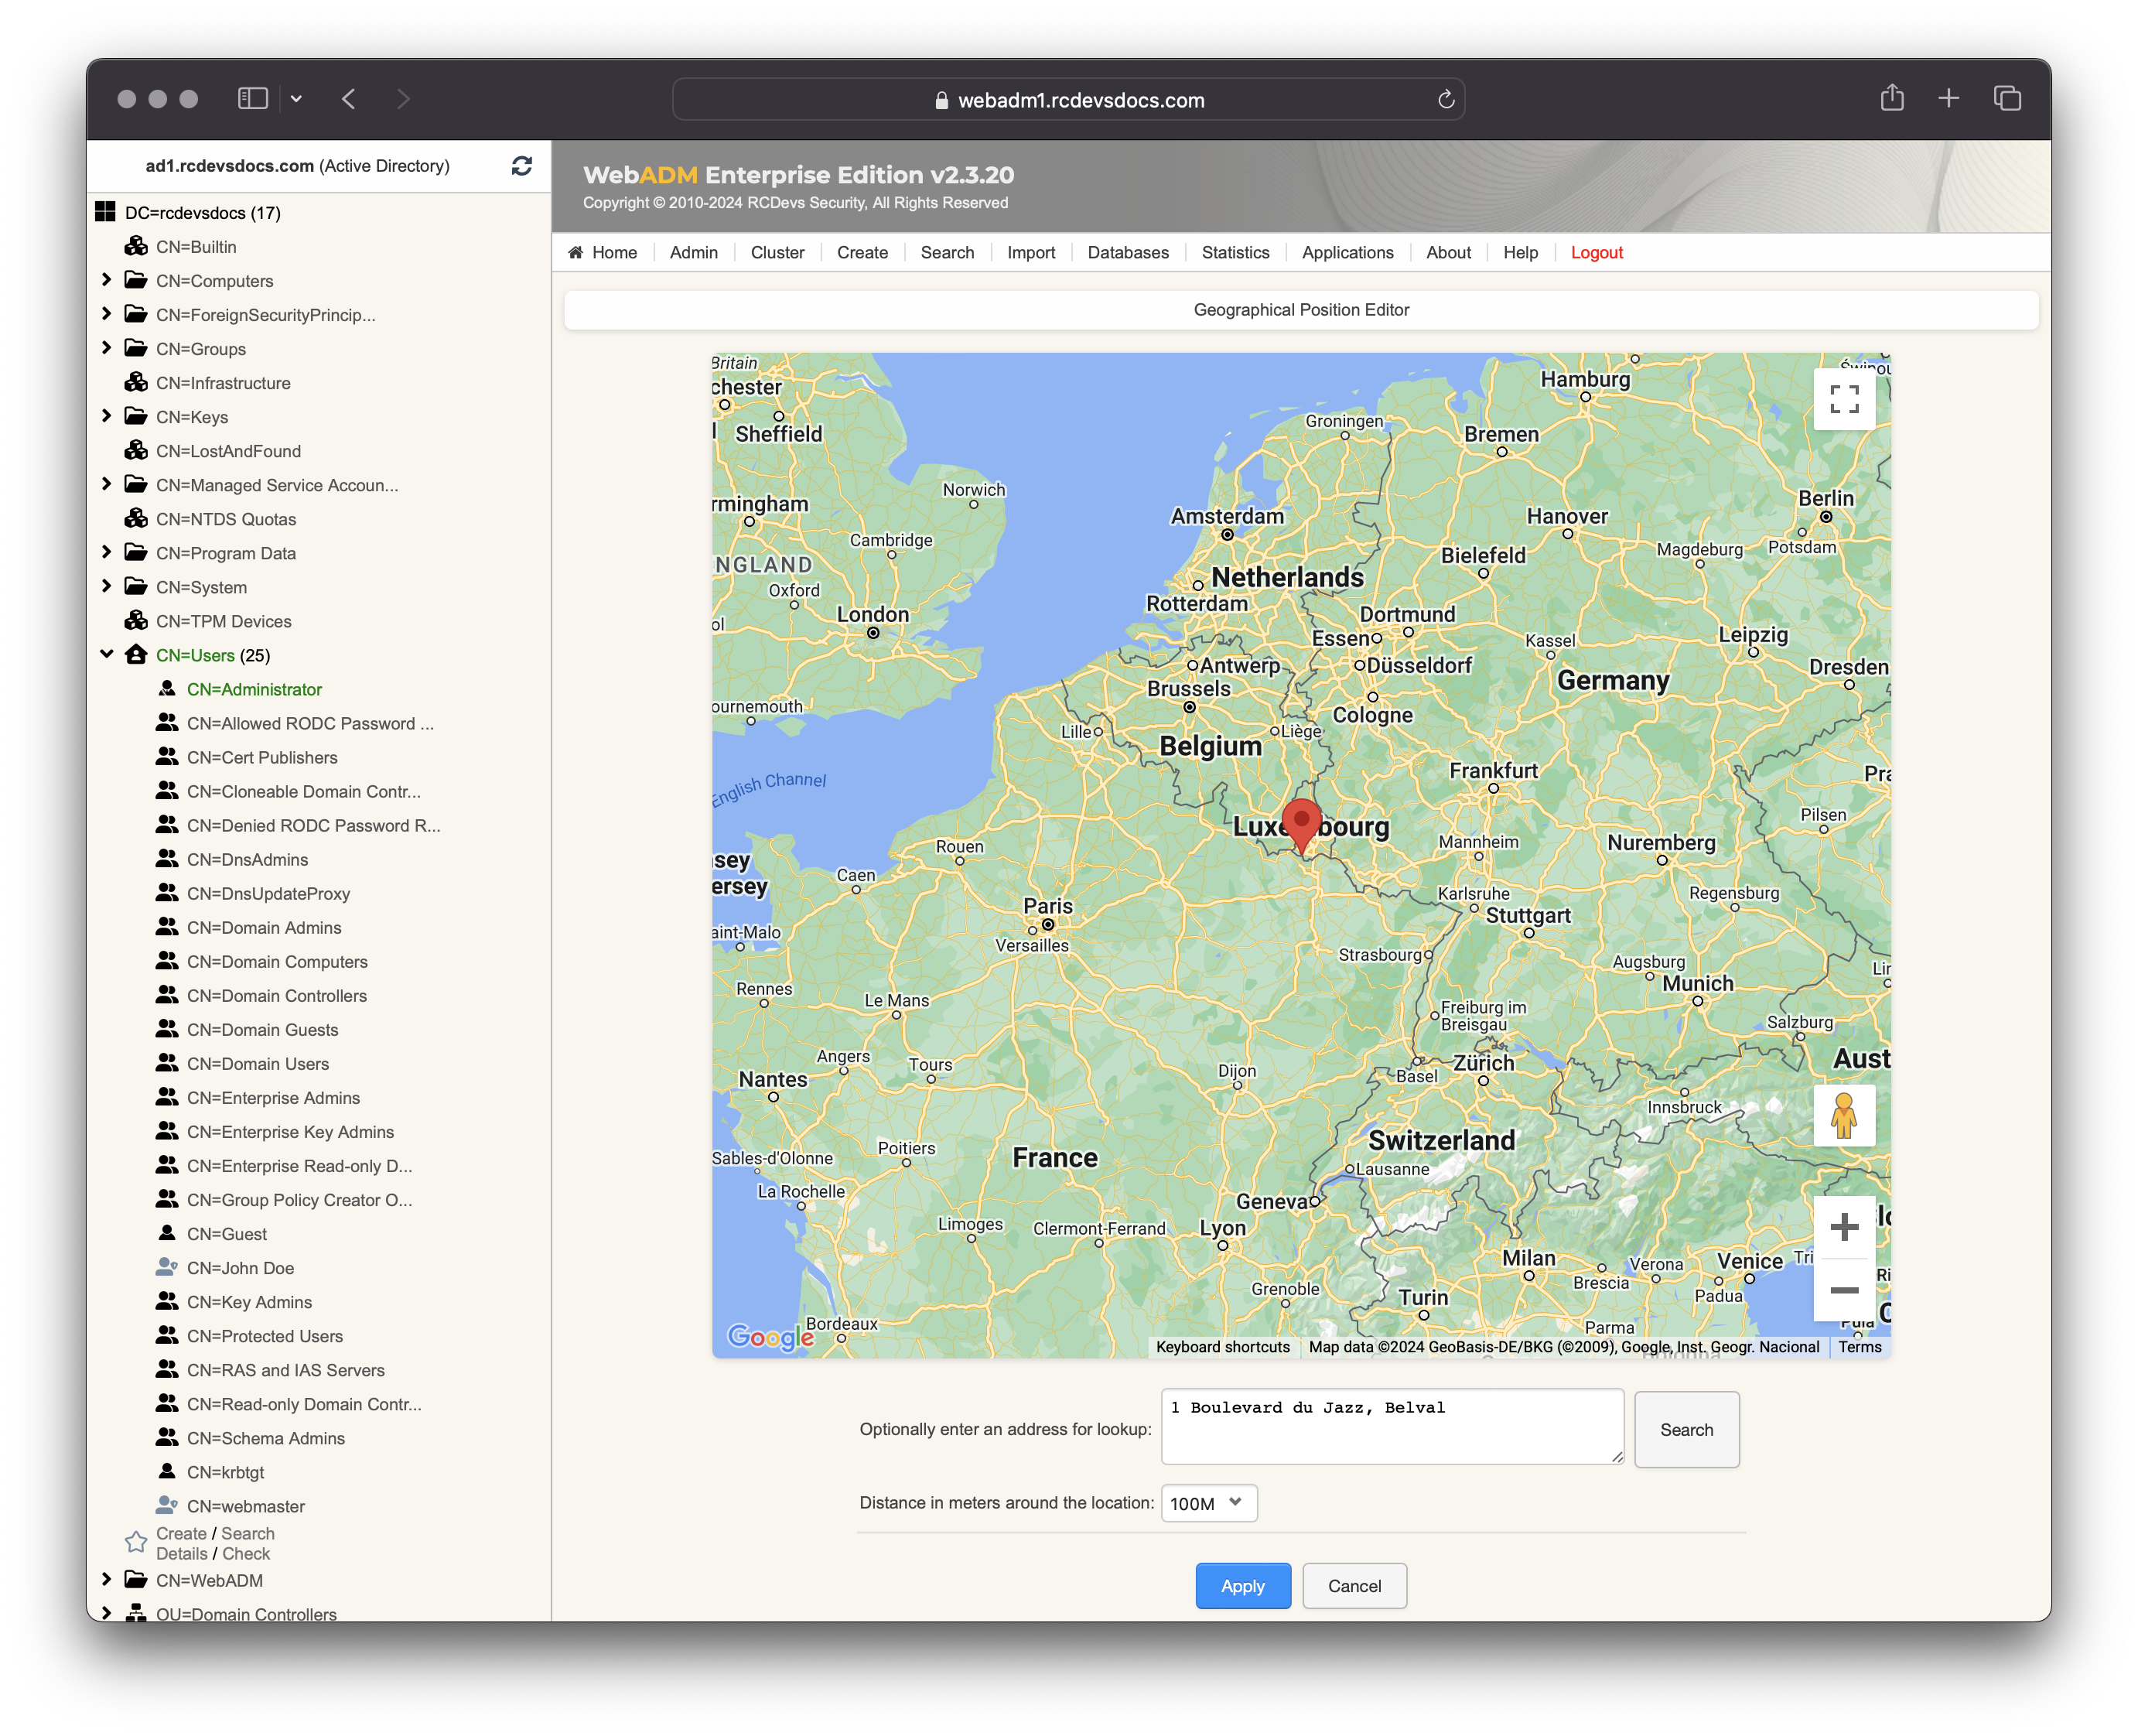
Office Coordinates: Set the location(s) of your office(s) to manage badging/check operations from these locations. Define the country (or countries) where your office is located to avoid being considered remote when badging from these areas. You can configure GPS coordinates for precise location tracking. Use the edit button to set the office position via Google Maps and define an acceptable radius around the coordinates. You can specify the office location either by entering the address or by pinpointing it directly on the map.
-
Office Networks: Define your office network subnets to enable detection of badging/check operations originating from office networks. When enabled, any badging operation performed from a device within a declared subnet will use the IP address in the proof to determine the office location, rather than the GPS location of the mobile device used for badging. -
Badged Access Expire: Defines the minimum duration (in hours) that access remains valid after a badge-in performed inCHECKorBADGEmode. If not configured, access remains valid for a default duration of one hour. -
Badged Access Hours: Defines the daily time windows during which a badge-in performed inCHECKorBADGEmode remains continuously valid. Users may badge outside these defined windows; in such cases, the badge-in remains valid only for the duration specified by Badged Access Expire. -
Badged Users Group: LDAP group that is automatically populated with users who have badged in. -
Office Users Group: LDAP group that is automatically populated with users who have badged in from the office. -
Lockout Policy: Controls user accounts and their network devices based on badging activity. When a user performs a badge-out—either manually or automatically via WebADM background jobs—the following actions can be applied:-
Account: Disables the user account at the LDAP level when badged out. The account remains unusable until the user badges in again. This is enforced independently of OpenOTP.
- On Active Directory, the
logonHoursattribute is used to control login access. When a user badges out, the logon hours are set to "Logon Denied," preventing the user from logging in. When the user badges in, the logon hours are set to "Logon Permitted," allowing login access. In practice, the logon window is empty (i.e., login is not allowed) when the user is badged out, and updated to permit access after badge-in. - On OpenLDAP, the
pwdAccountLockedTimeattribute is used (password lockout must be enabled in the password policy object). - On DS389, the
nsAccountLockattribute is used. - On Novell eDirectory, the
loginDisabledattribute is used.
Enabling that feature requires ensuring no other applications manipulate these attributes to avoid conflicts or inconsistent data.
- On Active Directory, the
-
Network: Disables Ethernet and Wi-Fi access for all MAC addresses associated with the user after a badge-out or when the badging session expires. This feature is integrated with the RCDevs NAC system and applies to 802.1X authentication using EAP-TLS or EAP-TTLS.
-
Password: Generates a new random password at each badge-in and disables it at badge-out. This effectively provides a one-time, daily-use password.
-
If the OptionSet is disabled while accounts have been locked out through that feature, a badge-in operation will be needed by users to re-enable their accounts. The next badge-out operation by the user will not lock them out.
Multiple Offices/Countries
If you operate multiple office locations, you can configure multiple LDAP Option Sets to apply location-specific settings (such as office location, network ranges, badging hours, and related policies). In this case, the LDAP directory should be structured by country or office to support distinct configurations. Each LDAP Option Set applies to a specific portion of the LDAP tree (Organizational Unit, Organization, container, etc.) and must not overlap or conflict with another LDAP Option Set within the same subtree.
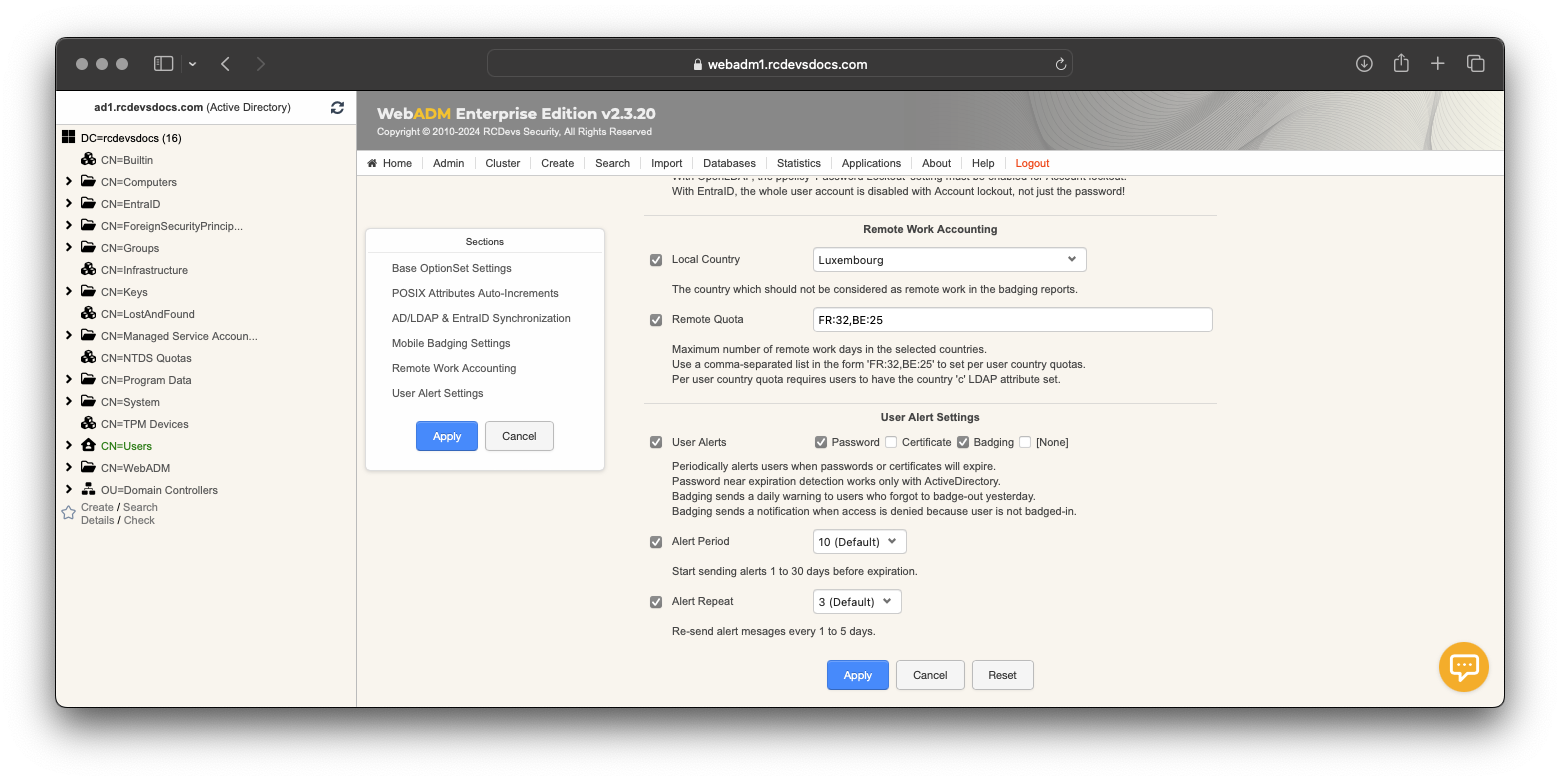
Remote Work Accounting
This section is related to mobile badging and handles the tracking and reporting of remote work activity. The Local Country setting is used to identify whether a user is on-site or working remotely.
Client Policy
Client policies defined for your systems can be configured to require a badging/check operation from your users in order to access that 3rd party system with their account. This prevents access to a system when the user is not badged-in or checked on the servers; authentication becomes unusable until the user performs the badge-in/check operation from their mobile.
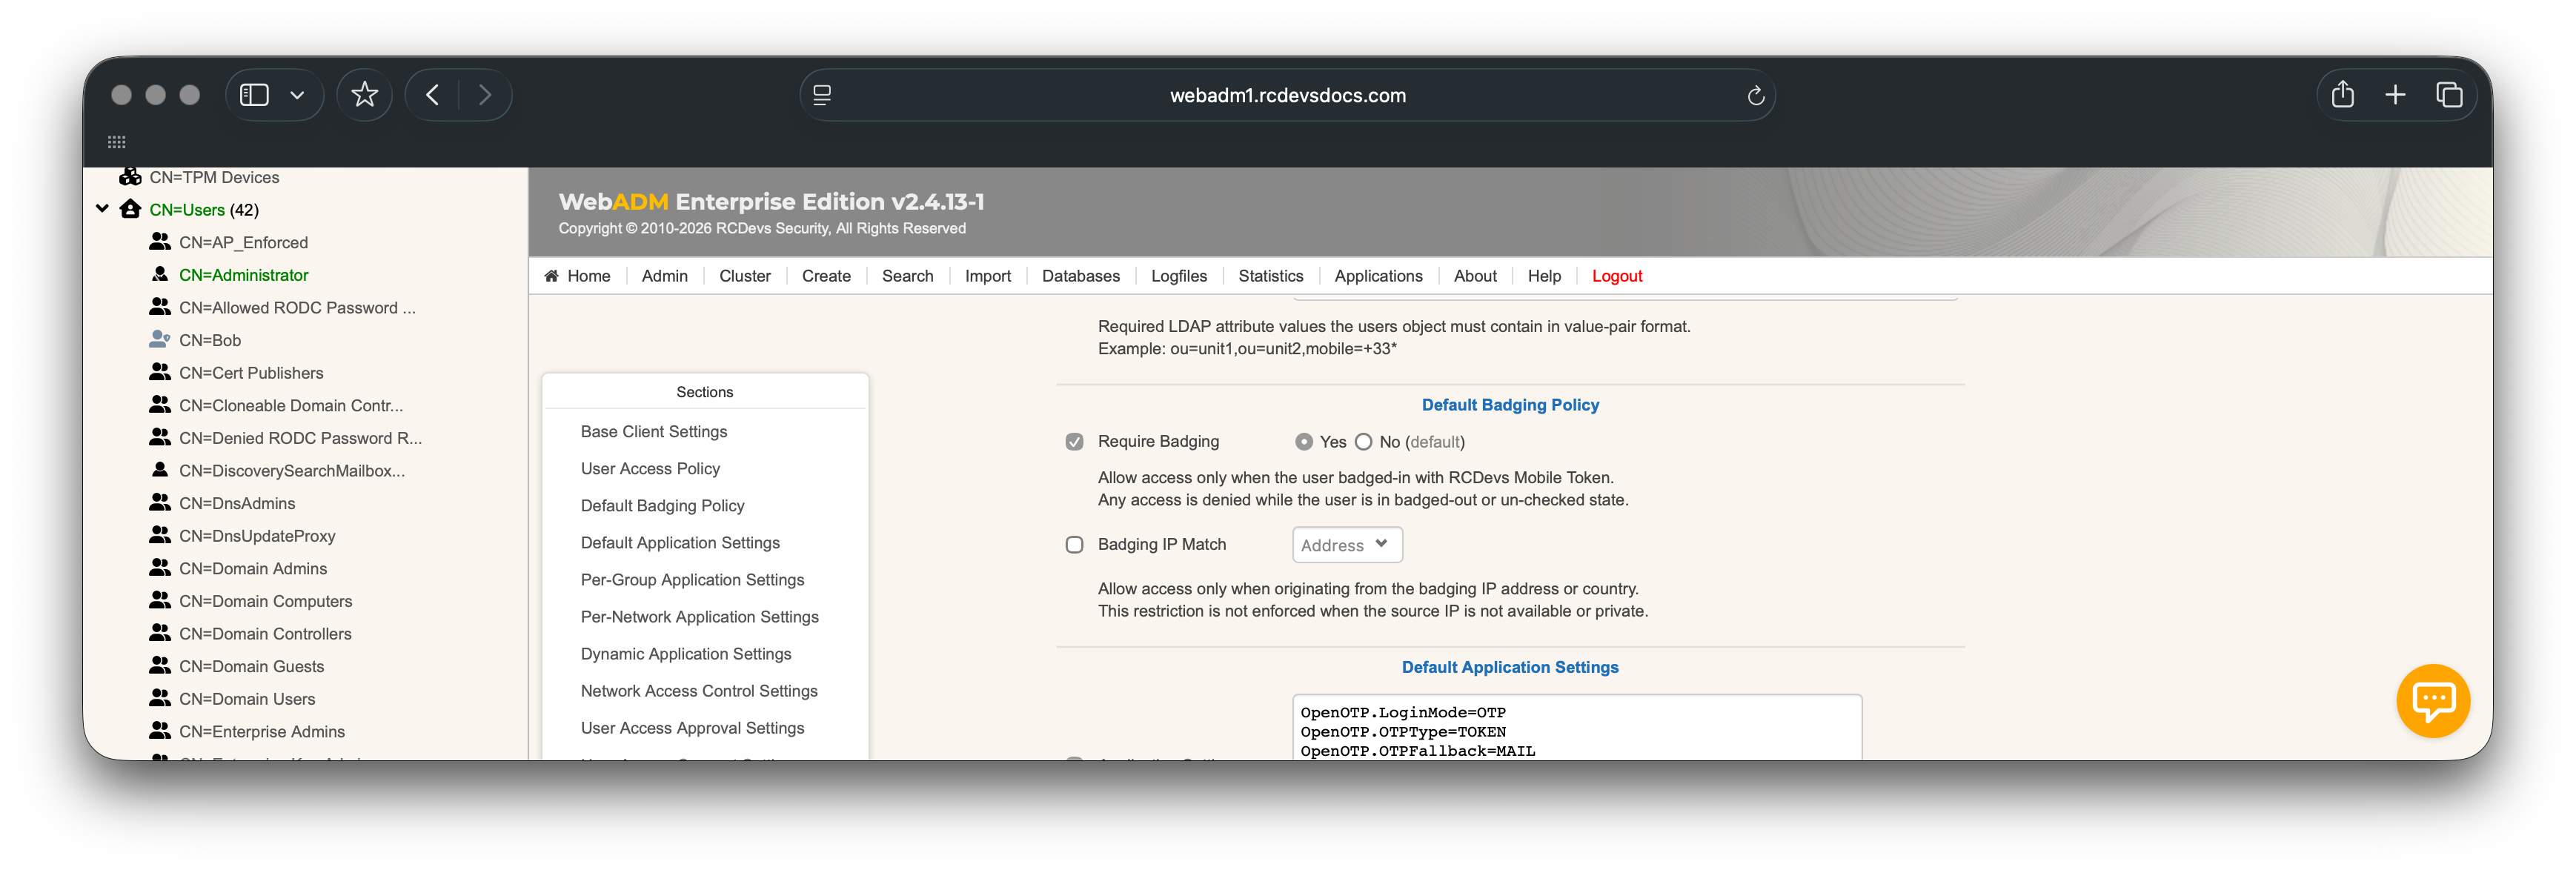
The first of these two options allows you to enforce the badging requirement in this particular client policy. It means that the user won't be able to authenticate without being badged-in or checked-in, depending on the mode of badging activated.
The second option enforces an IP address matching between the badging operation and the user IP retrieved during authentication on a third party system:
- If you use
Address, then the user mustbadge-in/checkfrom the same network location where they authenticate on that third party system. - If you use
Country, then the user mustbadge-in/checkfrom the same country where they authenticate on that third party system.
Database
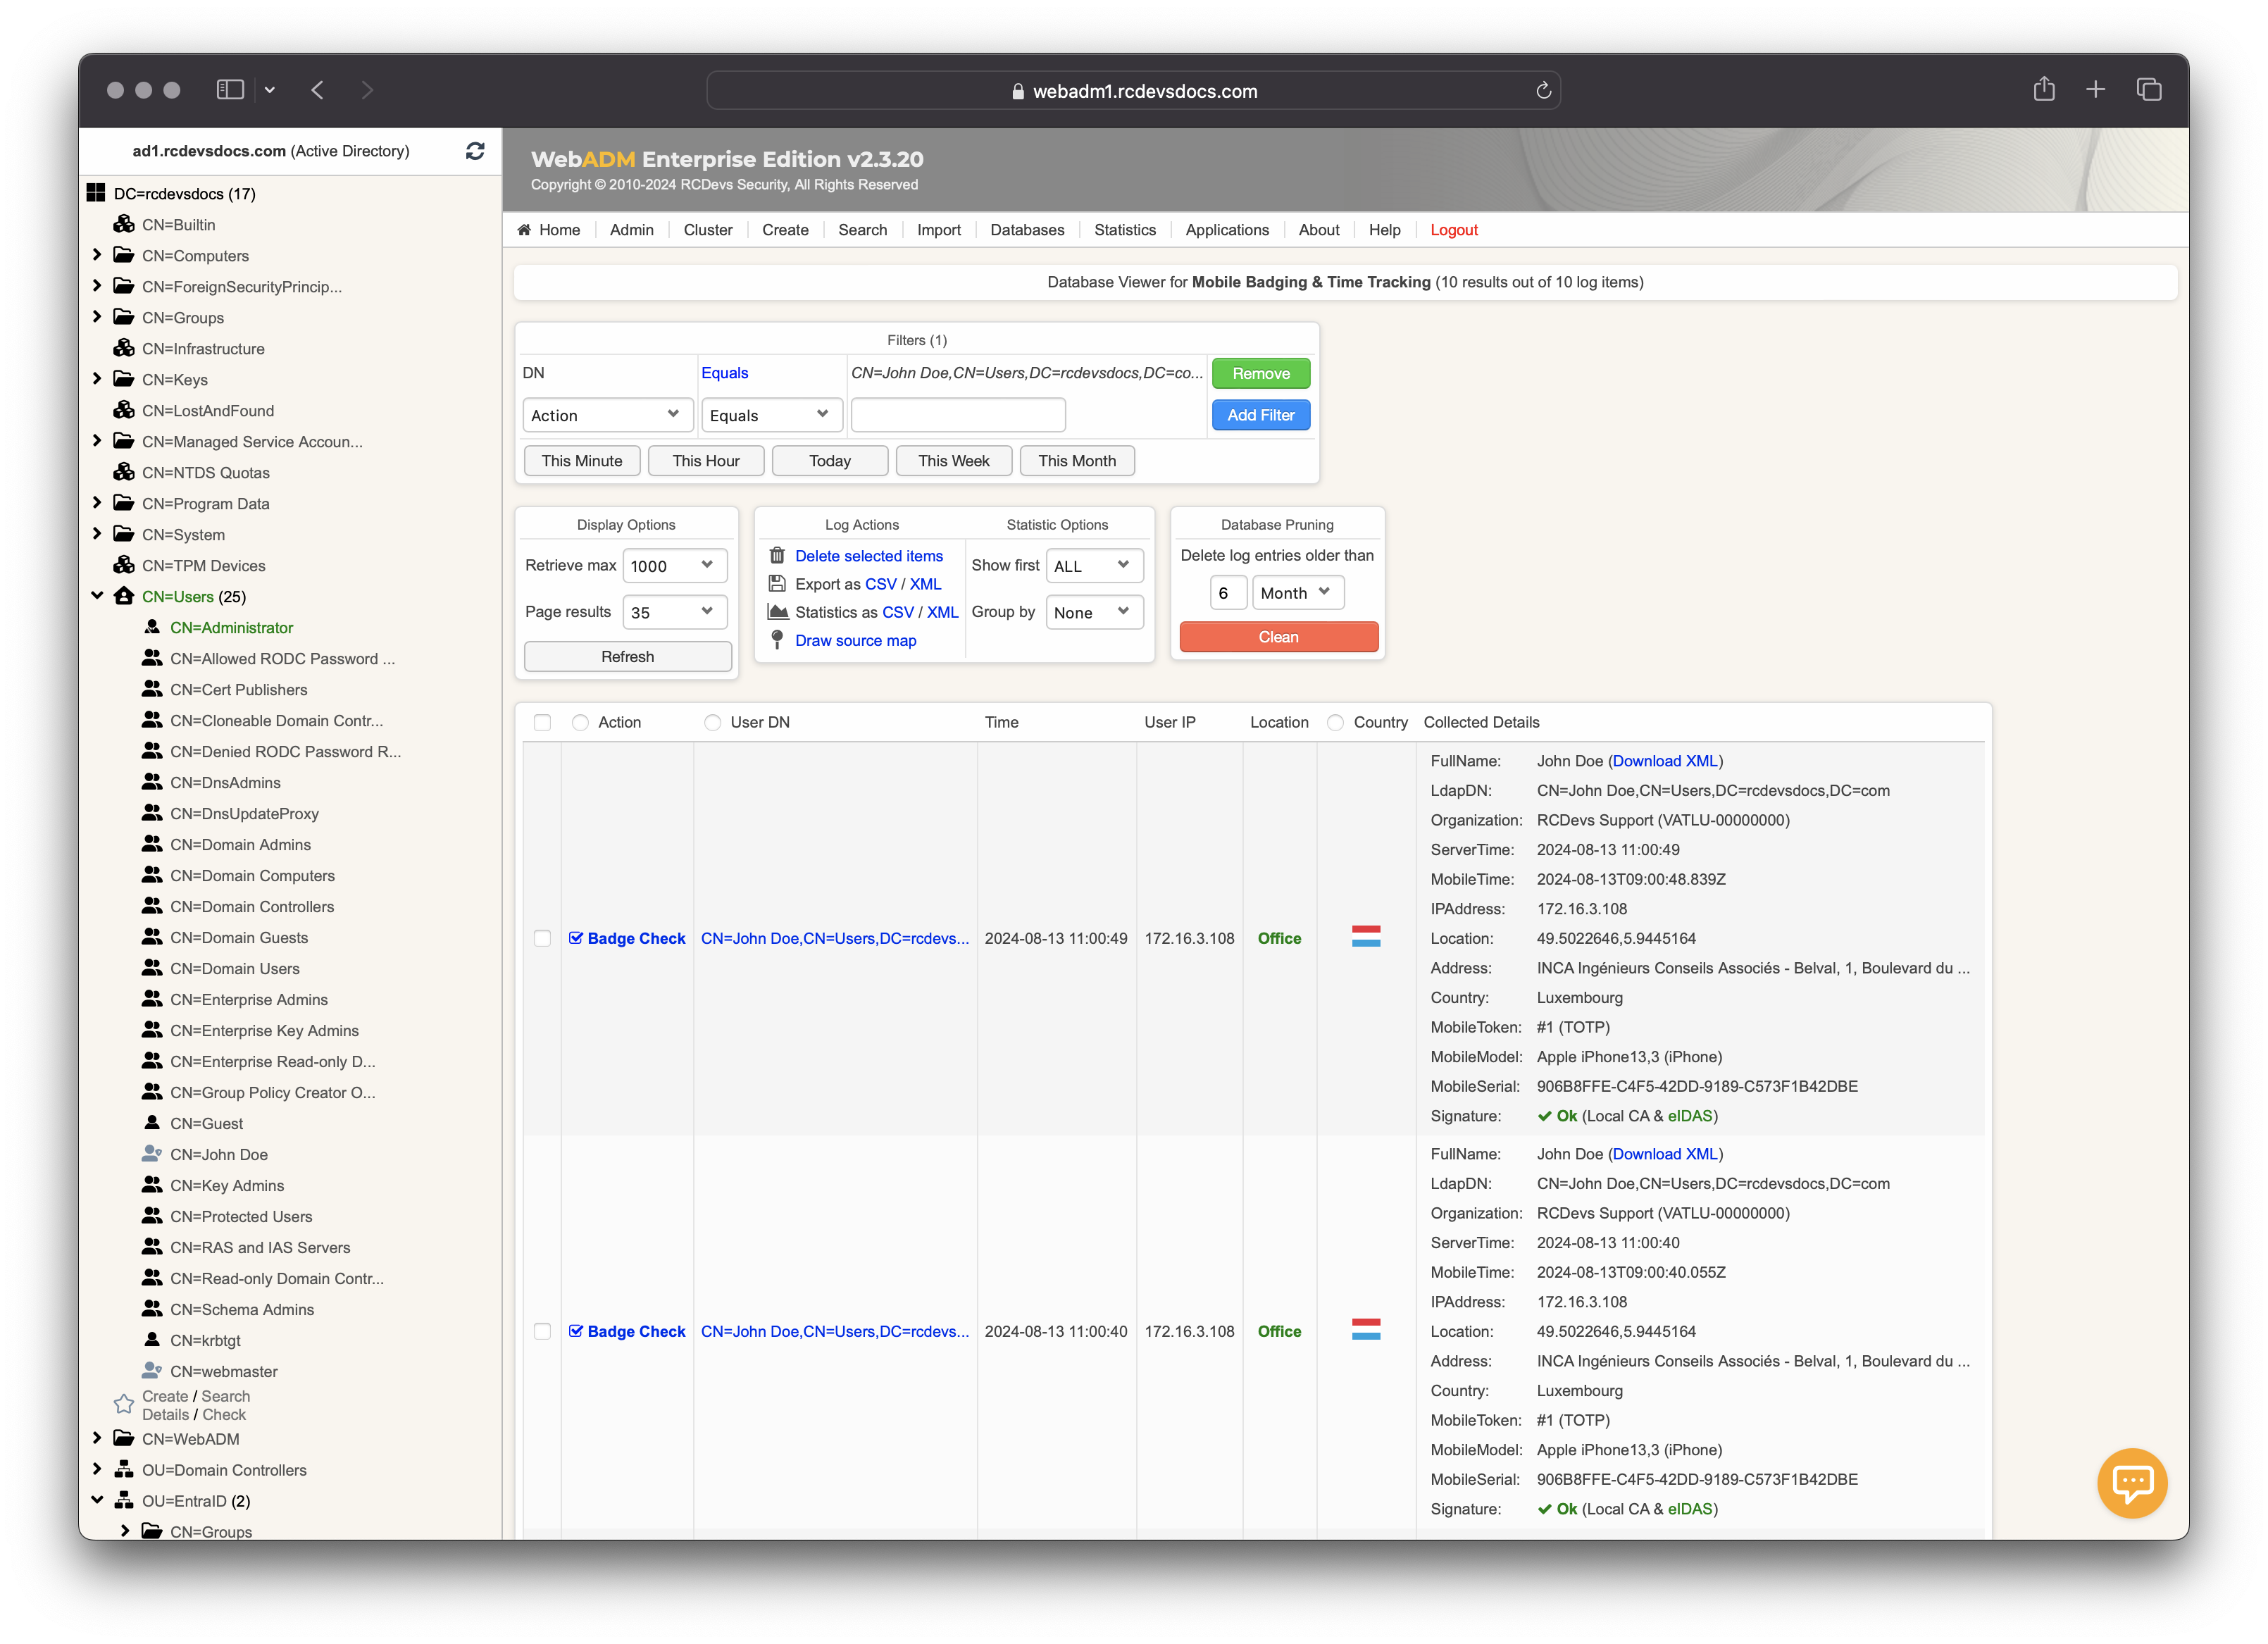
Go to the Databases tab where you will find the database Mobile Badging & Time Tracking in the section SQL Data Tables. That's where information about checks and badging of the users are stored.
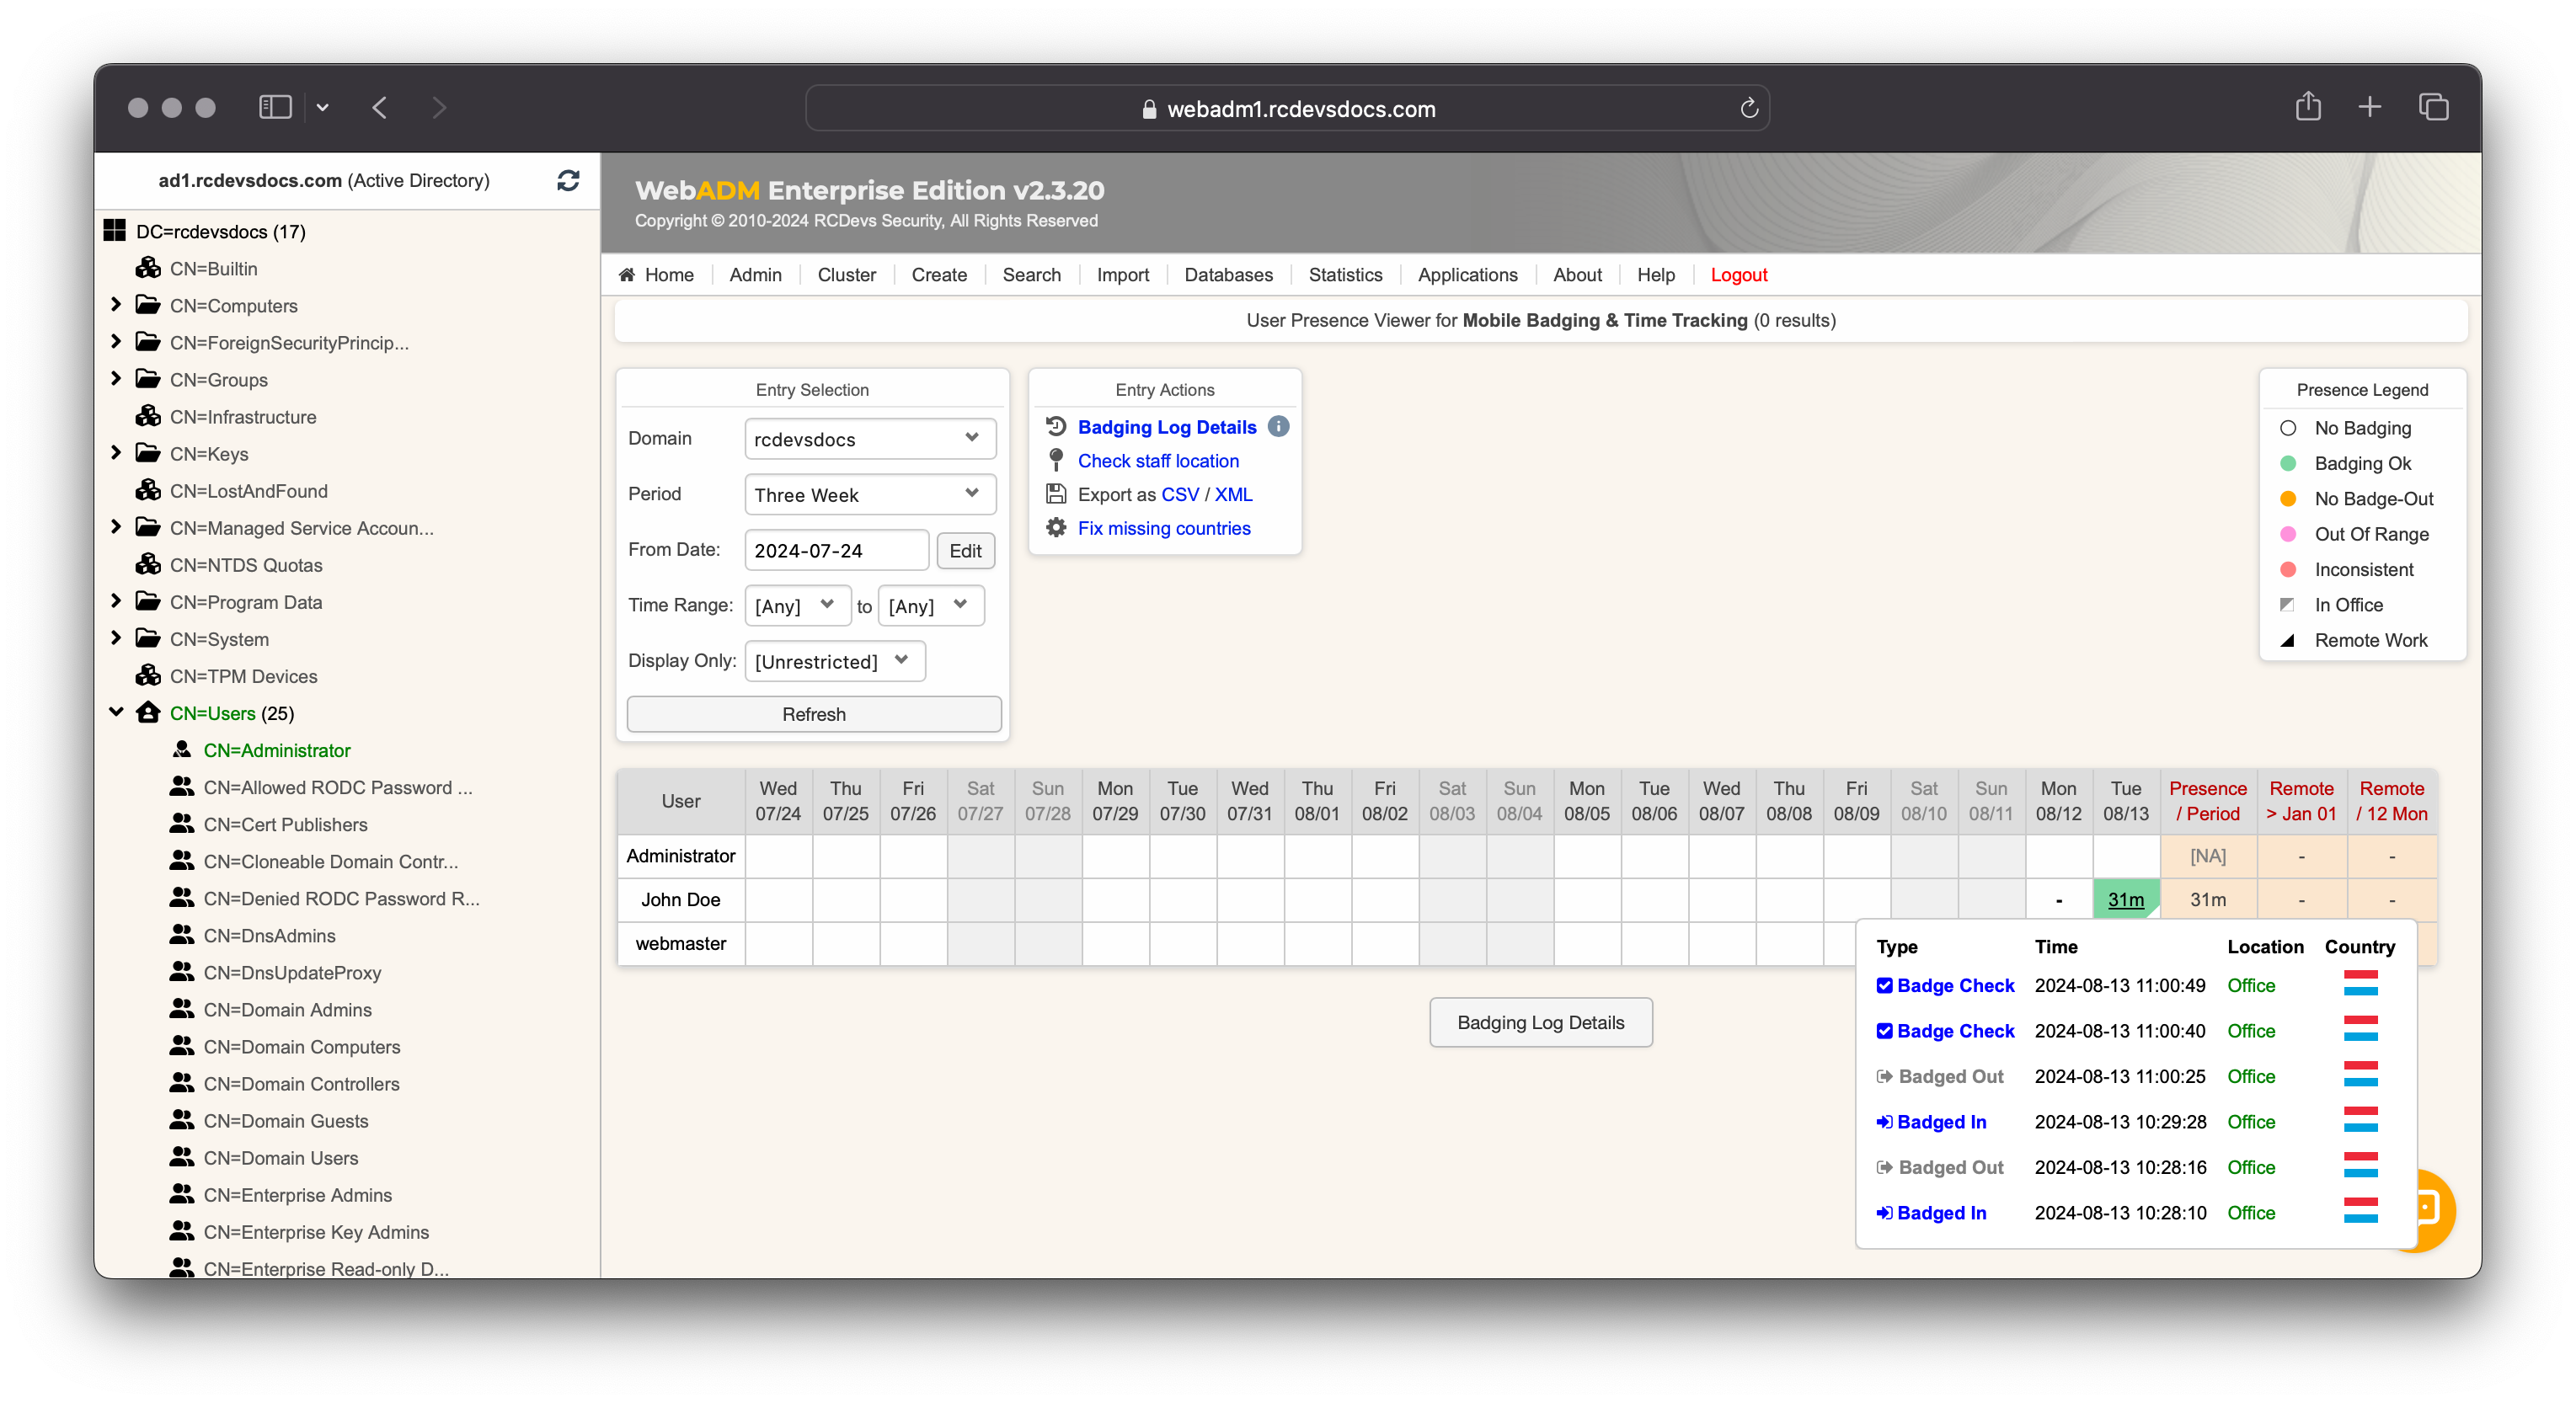
This table shows the time spent while being badged-in or checked-in by each user each day (typically over the last month). While a user is badged-in, the day remains orange until the user badges out, then it turns green.
A time range can be configured to define the range users badged-in/out or checked.
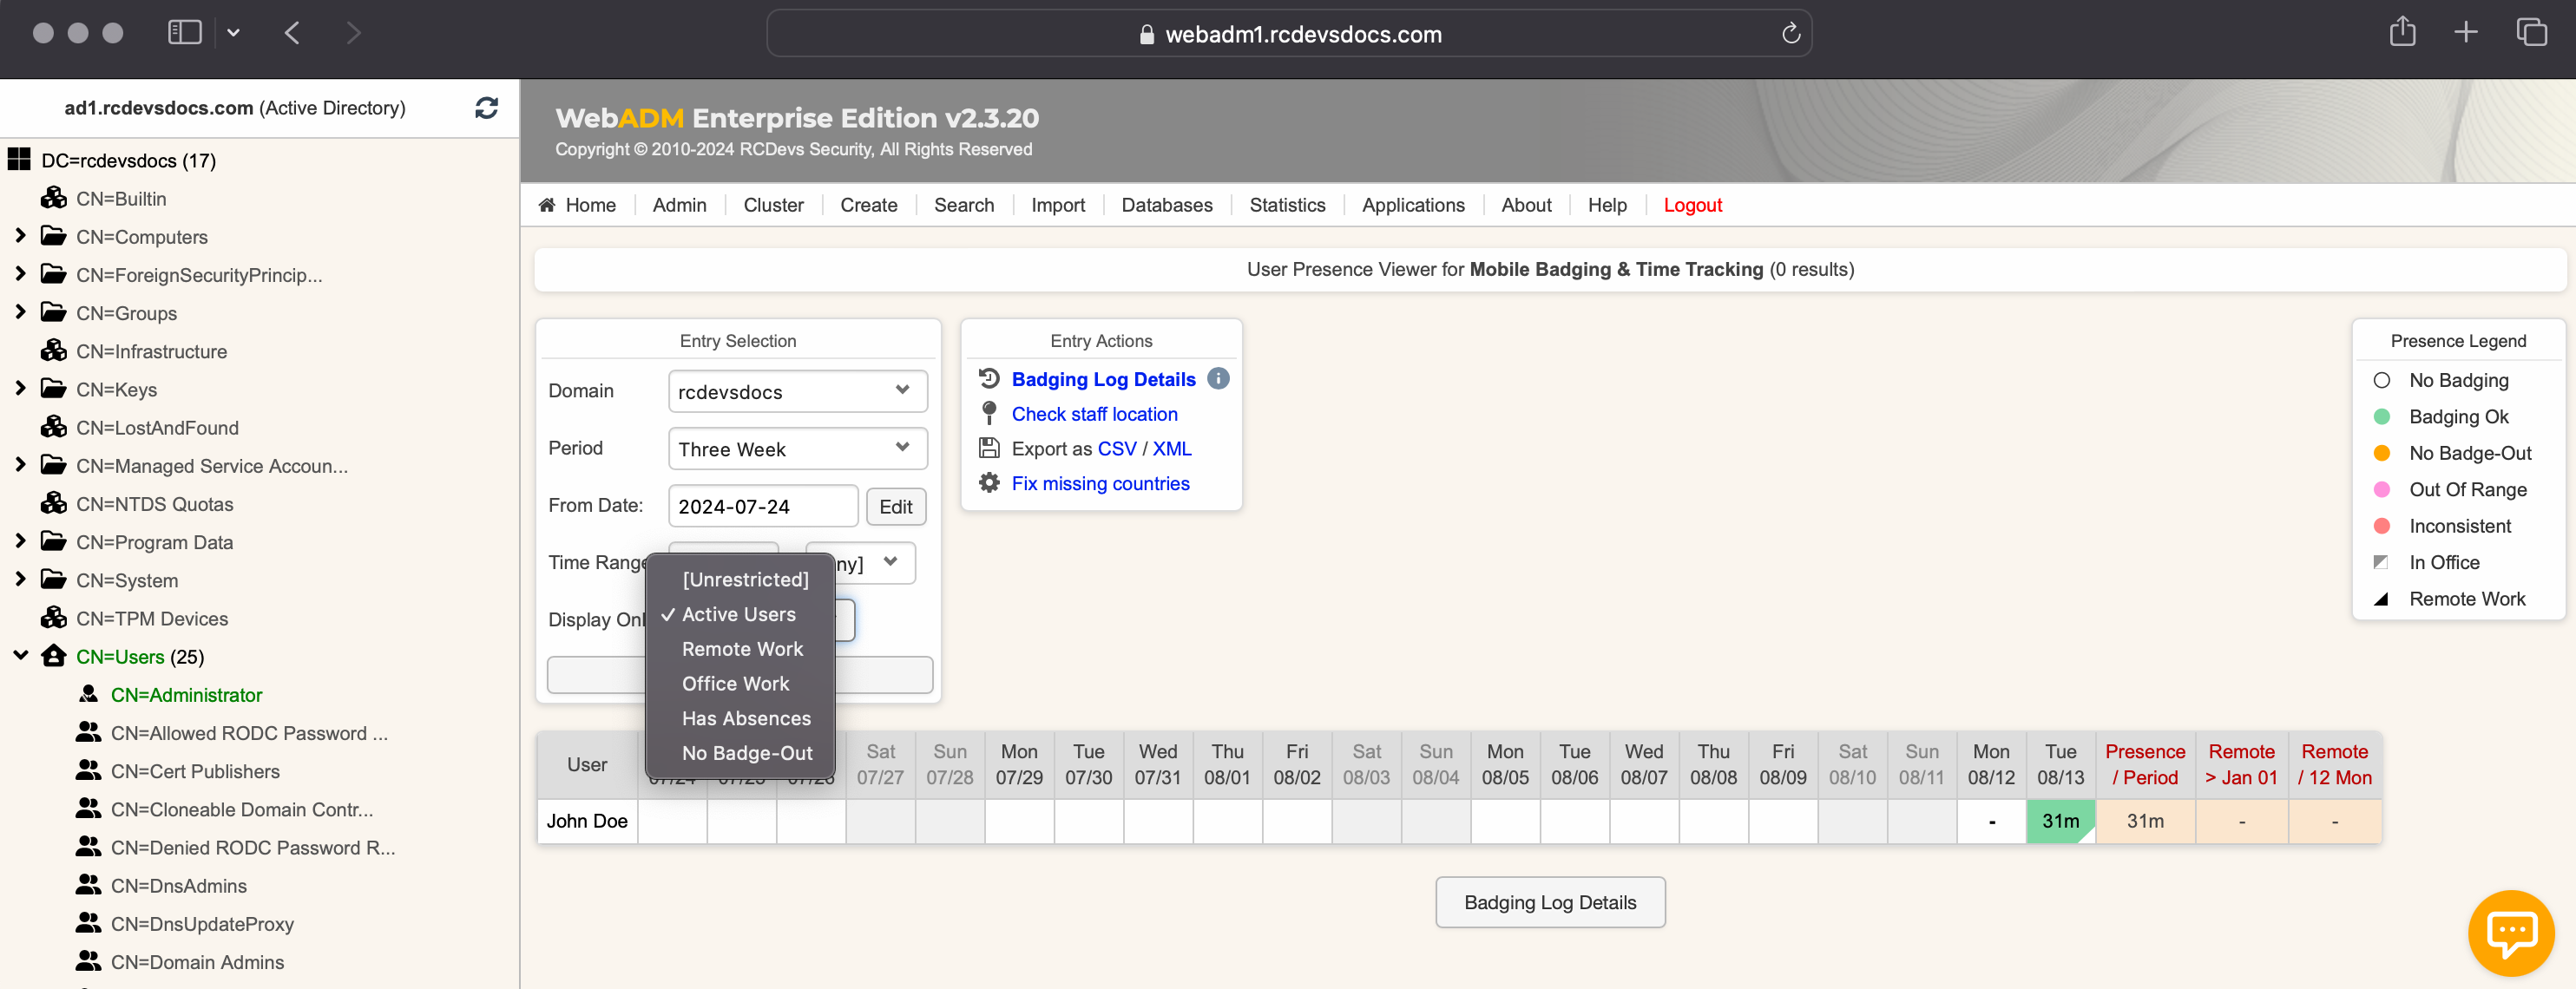
You can restrict what is displayed using filters such as: Active Users, Remote Work, Office Work, Has Absences, No Badge-out.
To have the location In Office and the little white triangle in the green cases, the Office Coordinates and the Local Country must be configured in the LDAP Option Sets.
Every single check-in, badge-in or badge-out is stored and available with full details. To view them, click on the time spent for a given day.
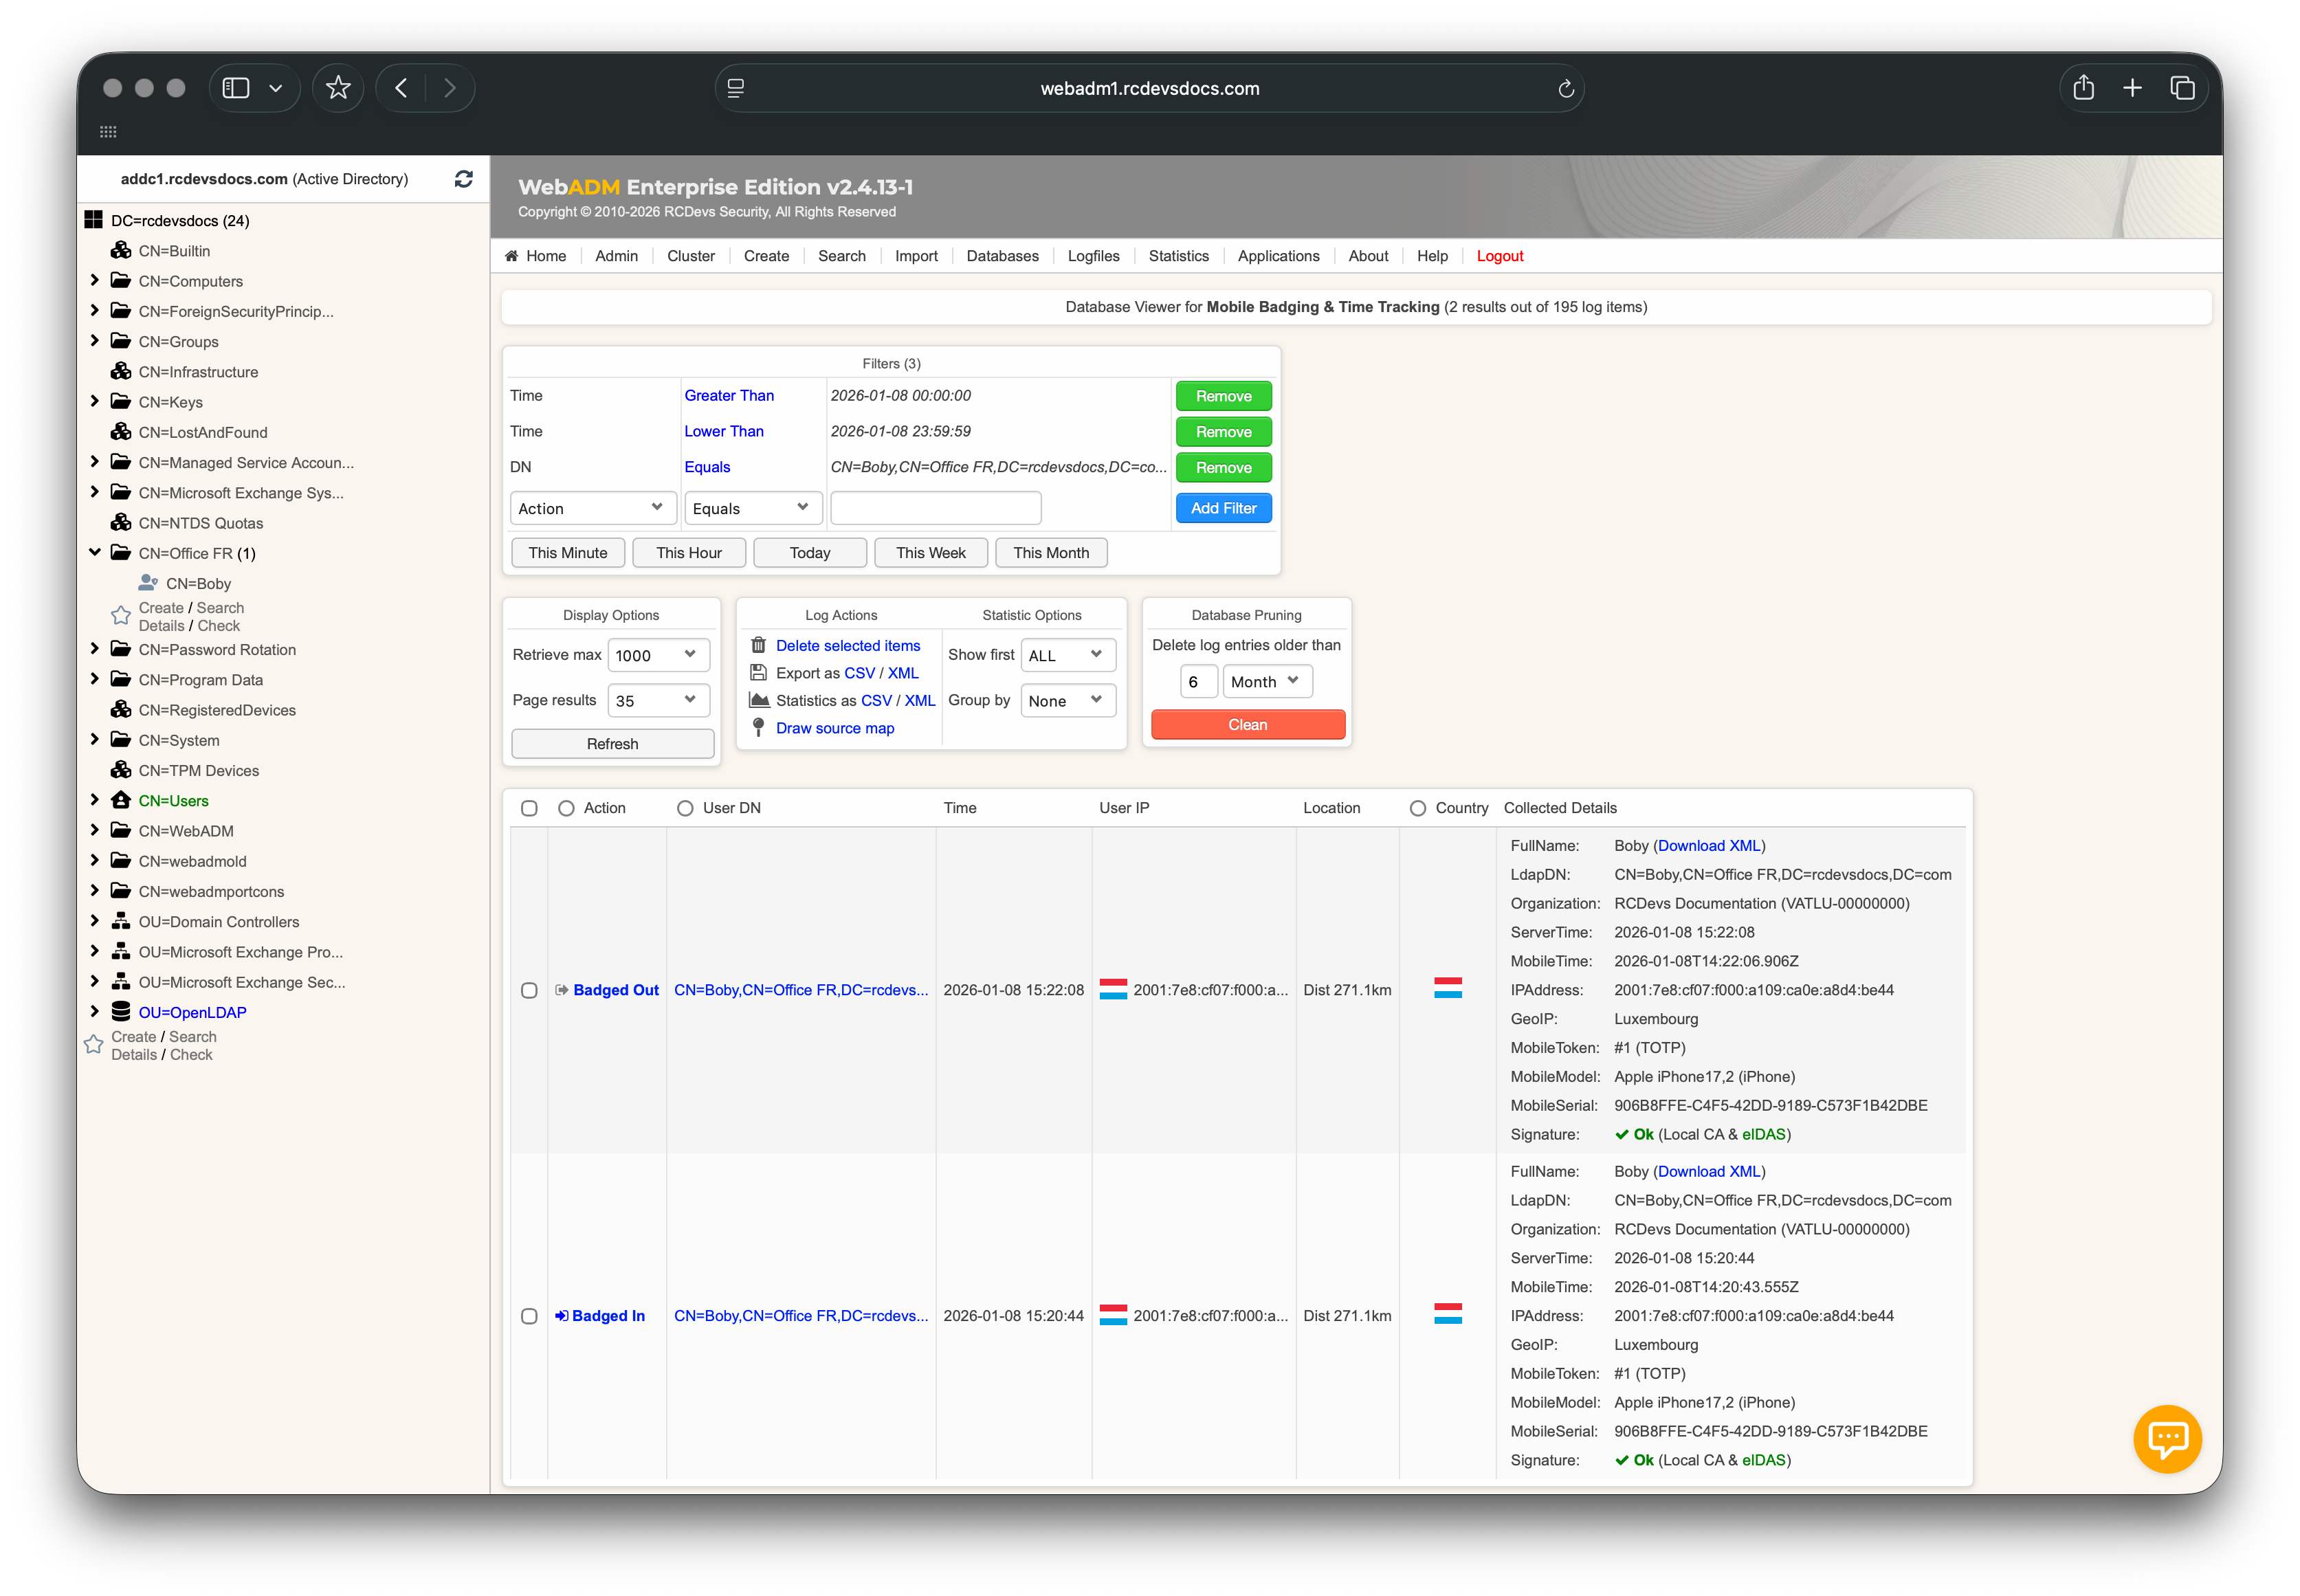
In this example, the user Boby badged in from Luxembourg while their office is located in France. The system therefore displays in the Location column the distance between the badging location and the user’s assigned office.
Badging and Network Access Control (NAC)
Badging and Network Access Control allows a device (computer, mobile phone, laptop) to be linked to a specific user or group. When a linked device performs an EAP authentication on Wi-Fi or Ethernet networks, the user associated with the device can be automatically badged-in if automatic badging is enabled for that device.
In scenarios where EAP-TLS authentication is used, a client certificate can be linked to the device. This linkage ensures that the certificate is only usable from that specific device, as the certificate is tied to the device's MAC address.
If the Lockout Policy feature is enabled in the LDAP Option Set, badge-out can trigger account/network/password actions, and badge-in can unlock/restore access (depending on which Lockout Policy options are enabled).
Automatic User Badging from Trusted Devices and Trusted Networks
When the NAC (Network Access Control) feature of OpenOTP and Radius Bridge (Authentication Servers) is enabled and configured with your network devices (Authenticators), the MAC addresses of your end-users' devices (Supplicants) will be populated in the SQL table specified in WebADM, within the Network table. Additionally, you can enable automatic badging by clicking on the Auto Badge radio button, which will automatically badge the user when their device is authenticated. Accesses requiring badging will then be granted, and if the user account was locked through the Lockout Policy feature of the LDAP Option Set, the account will also be automatically unlocked.
In the example below, the device with MAC address 1E:45:C1:F3:BE:51 belongs to John Doe's mobile phone. When John is at the office, his phone will attempt to connect and log in to access the Wi-Fi network. Since auto-badging is enabled for this MAC address, John will be automatically badged in.
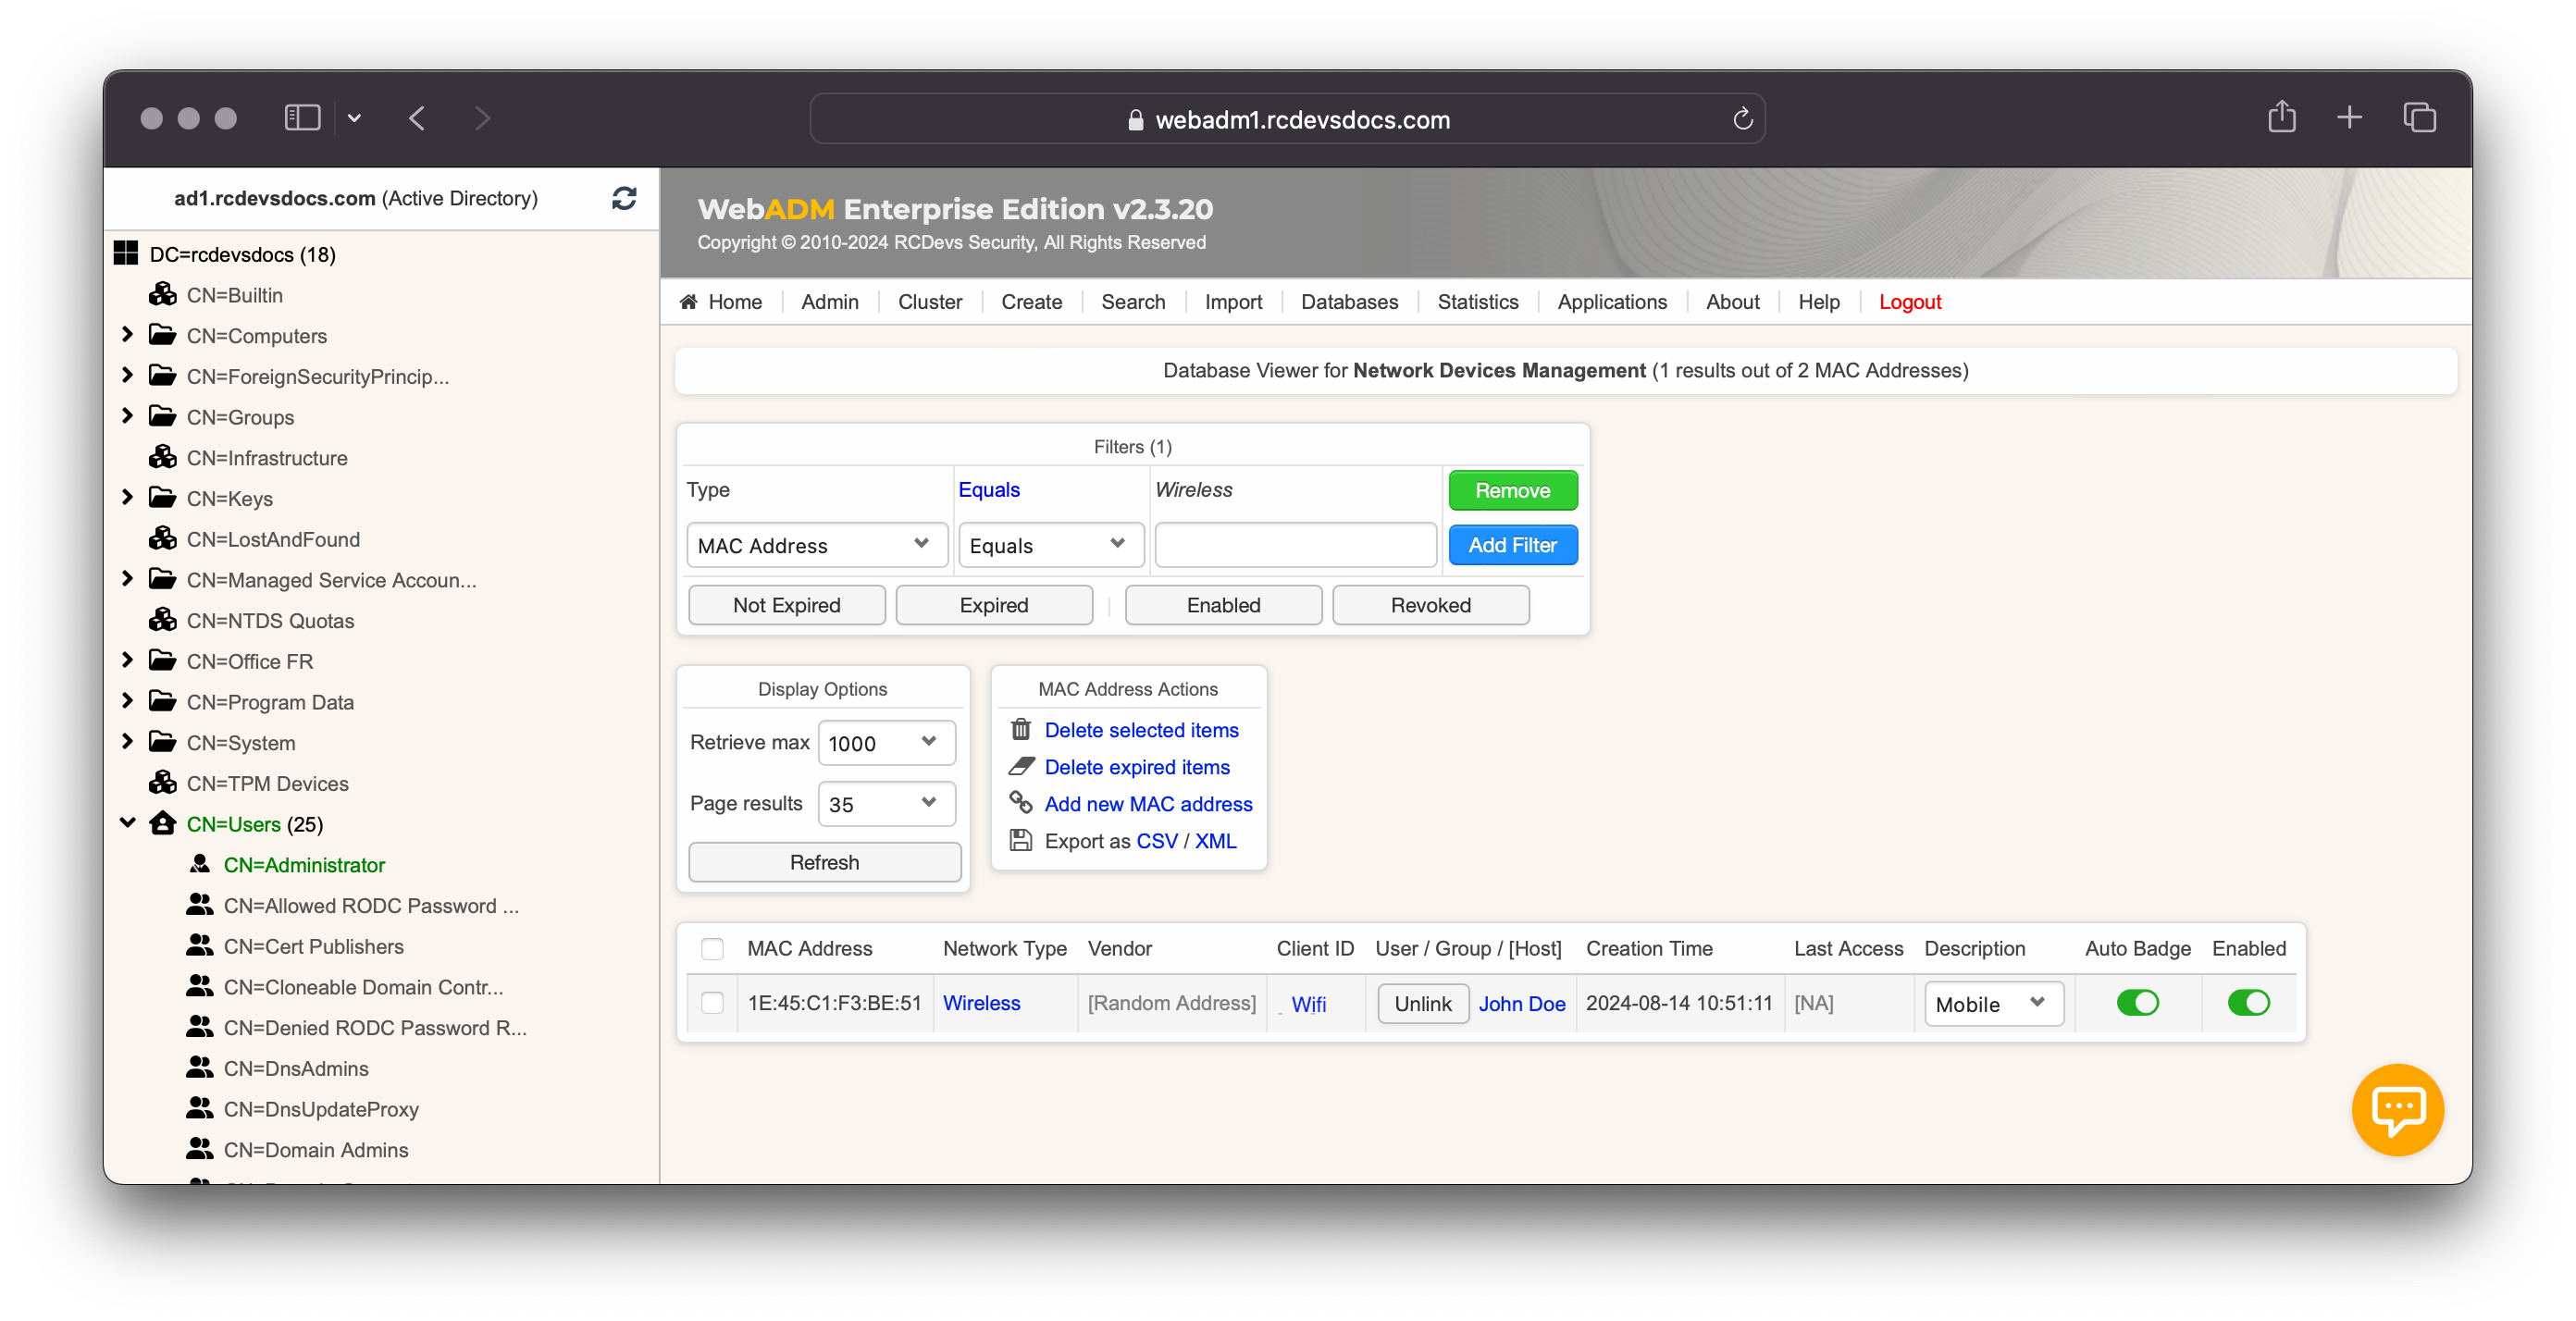
Automatic badging should not be enabled on devices that remain constantly connected, such as a computer. Otherwise, the user will always be badged in, even when they are not physically at the office.
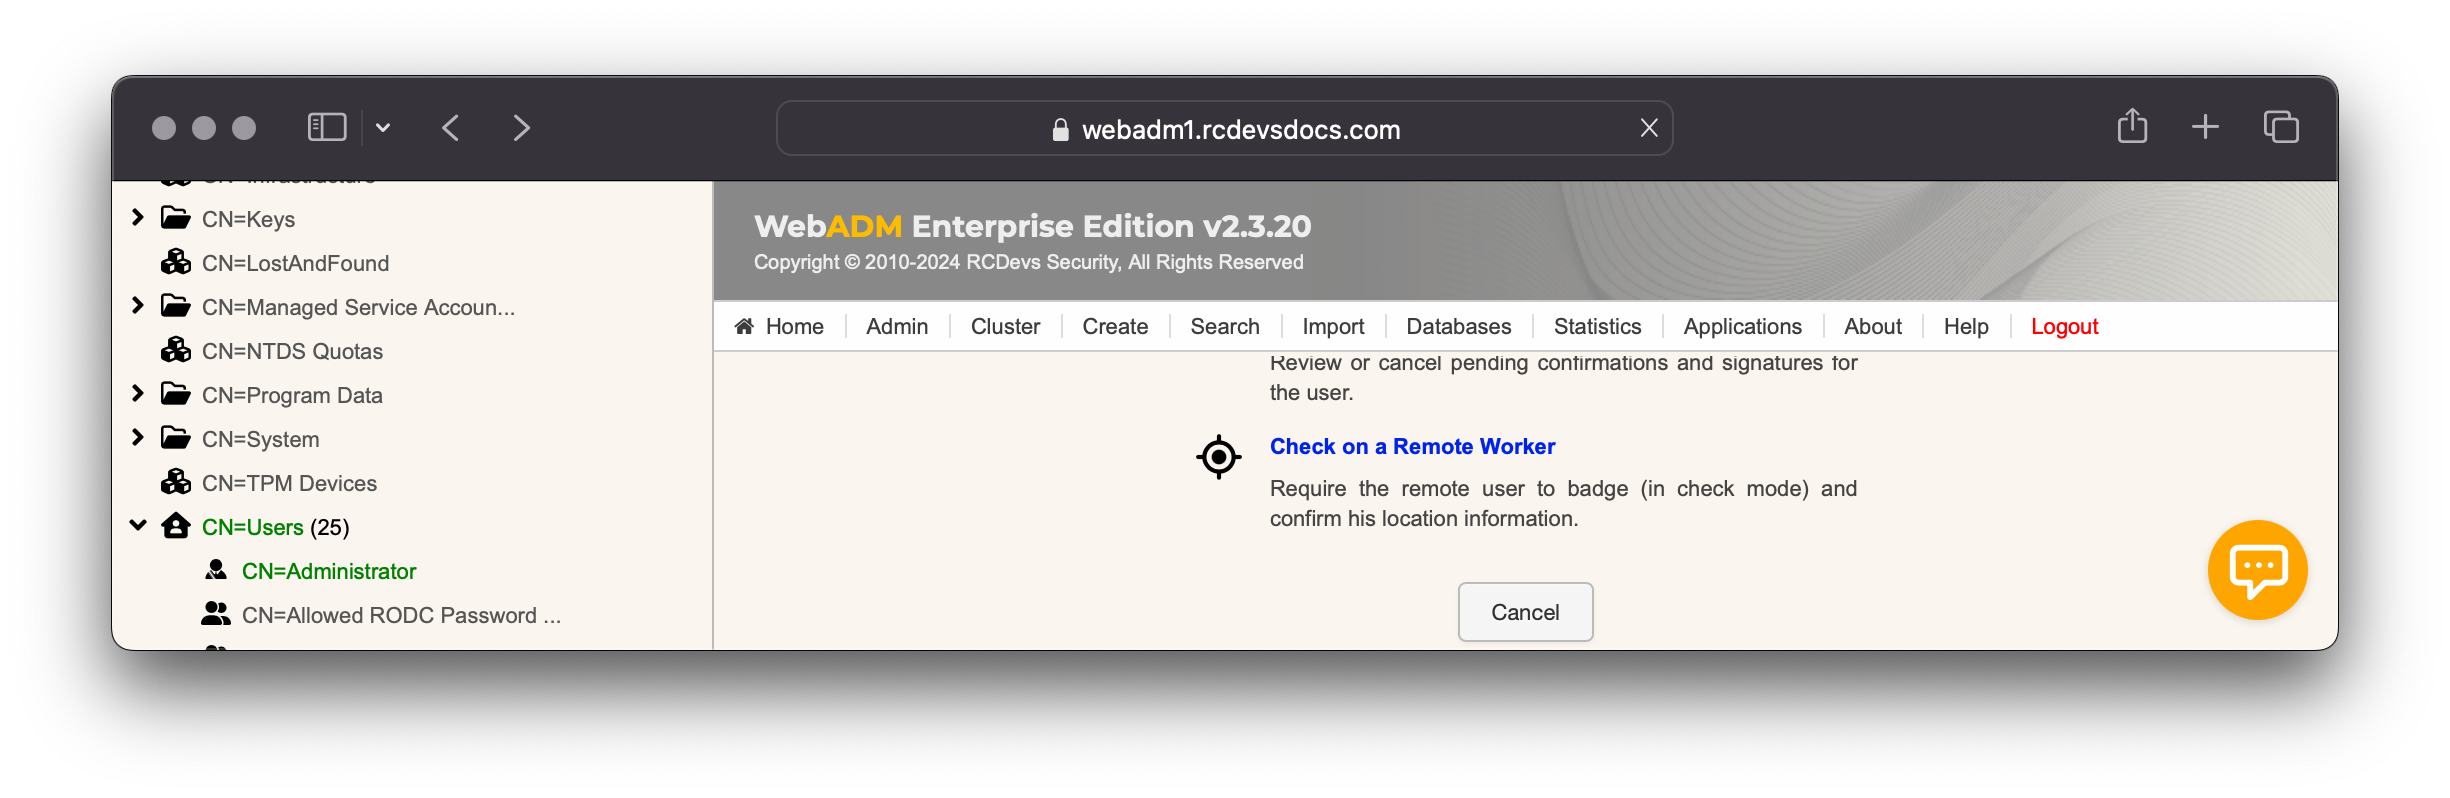
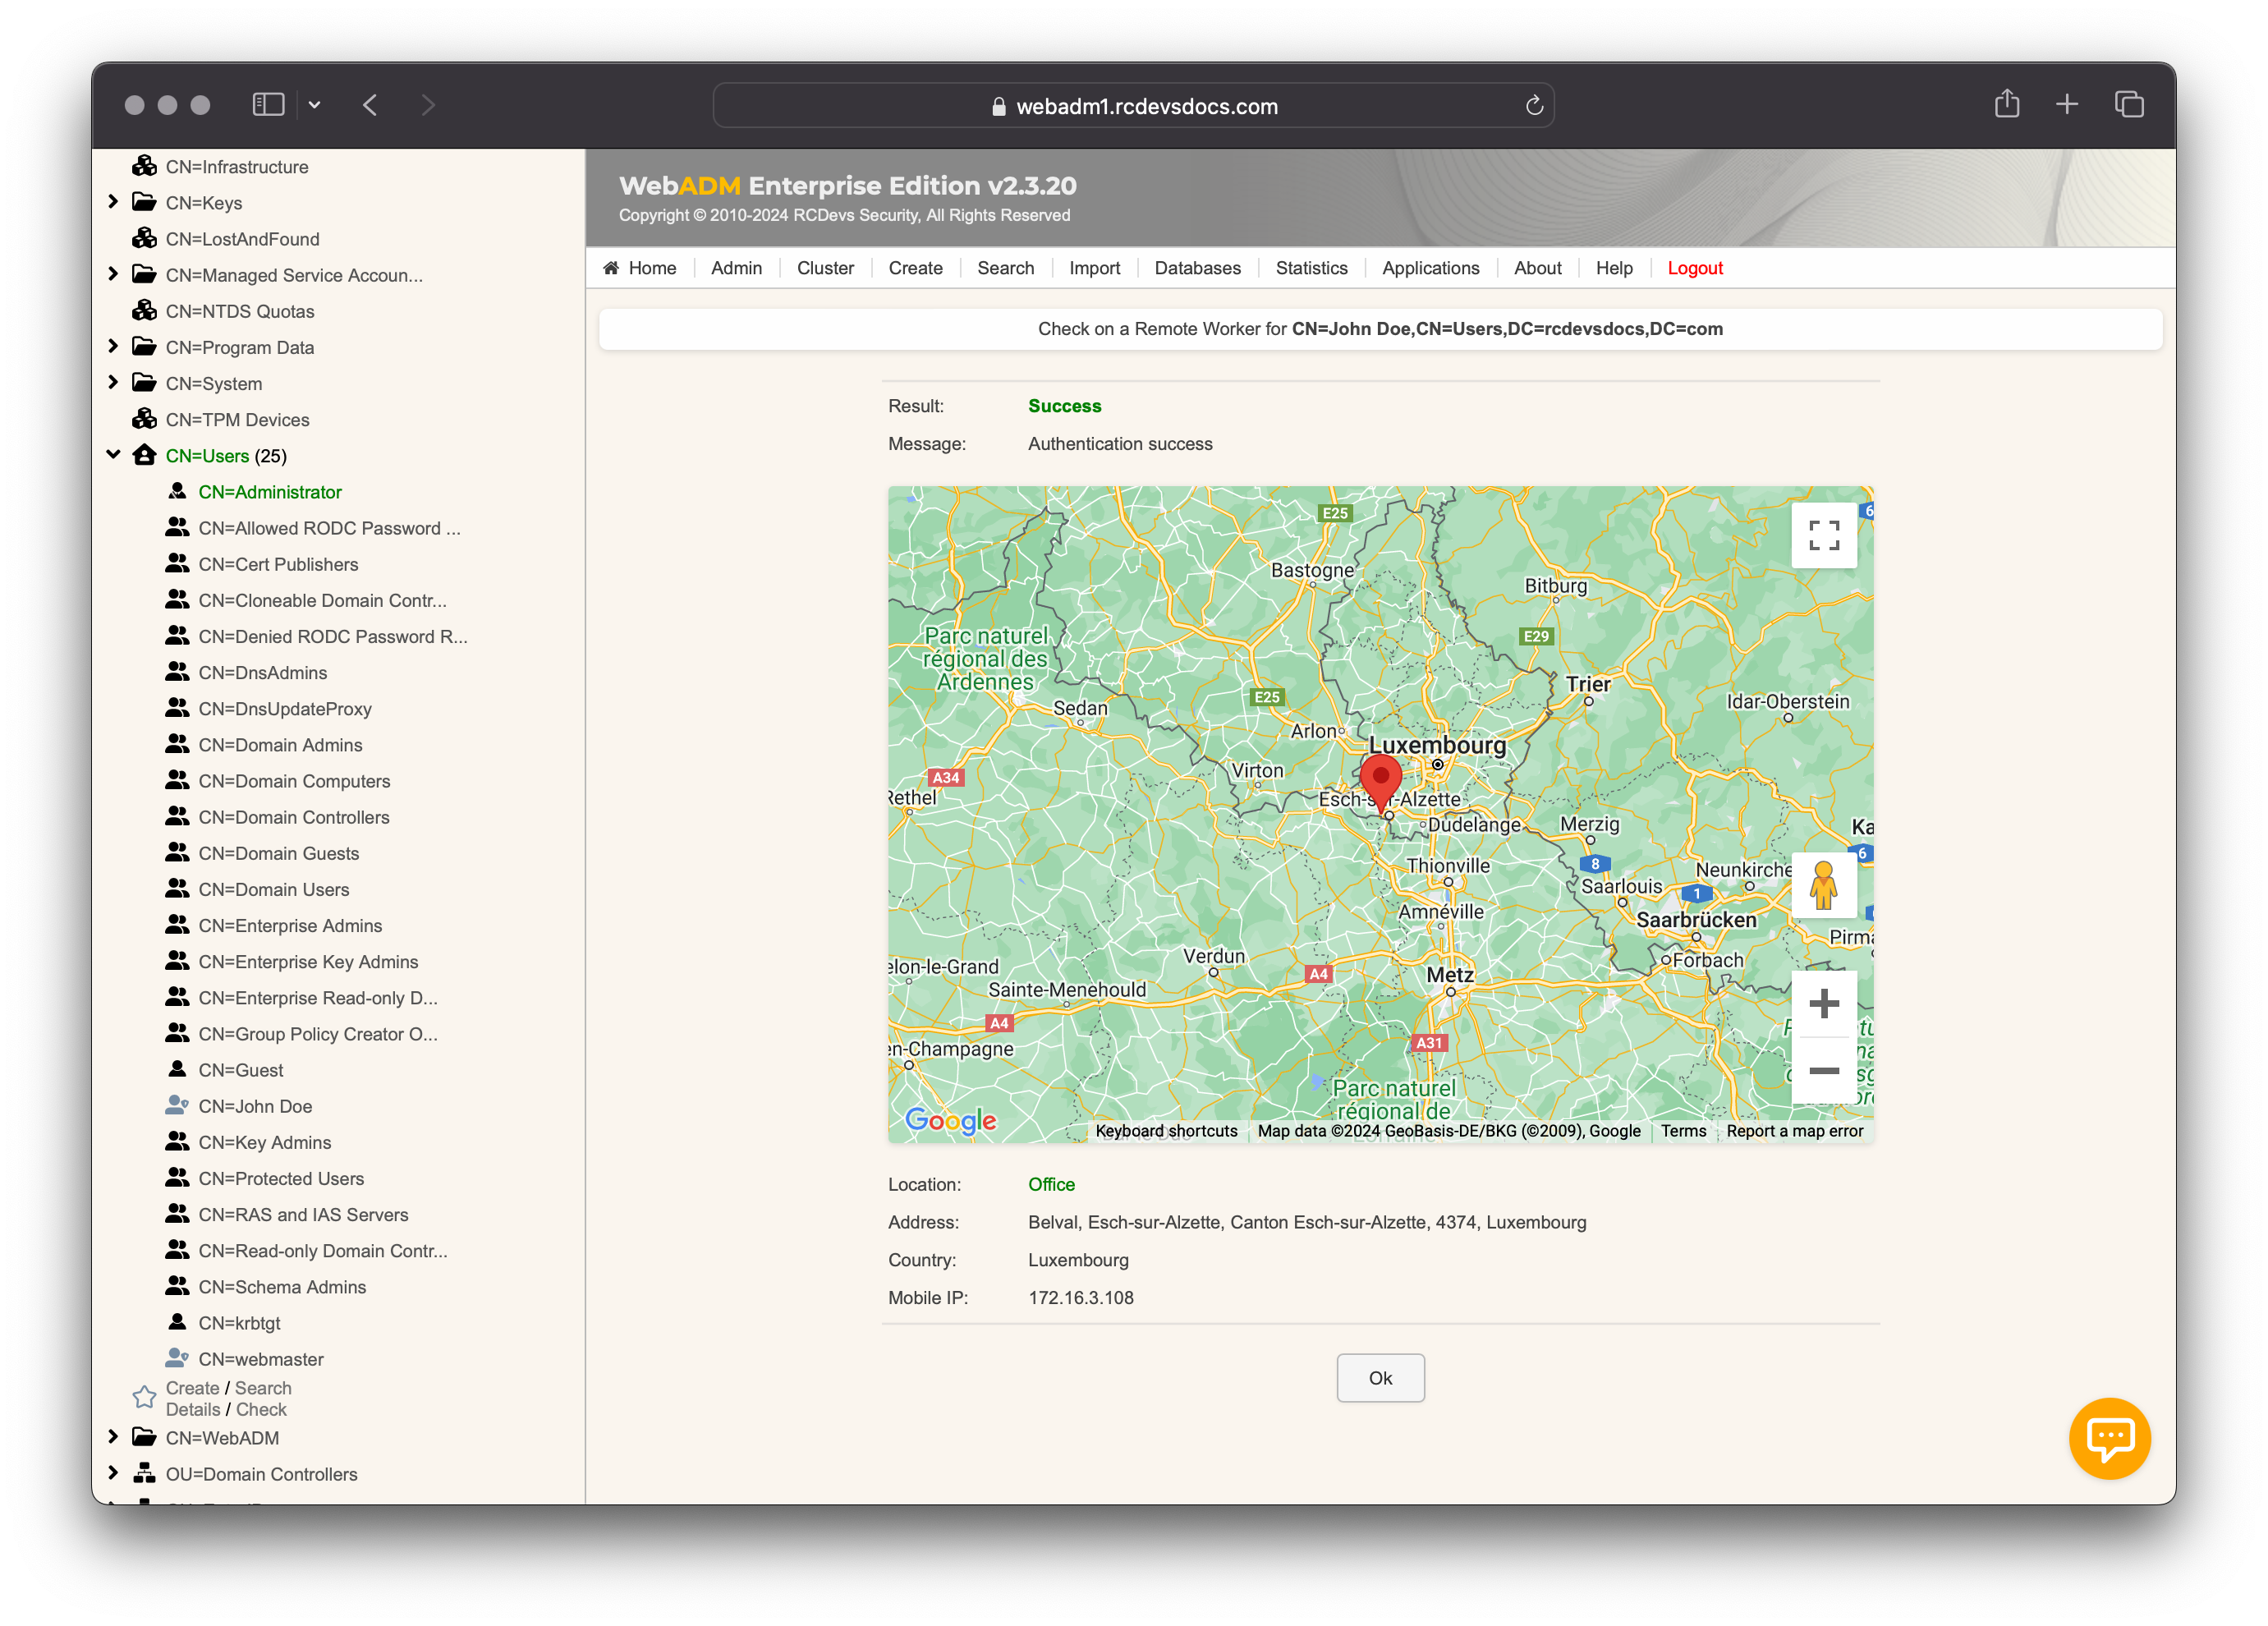
Check worker location
At any time, you can send a location check request to your end users. To do this, log in to the WebADM Administrator portal, click the user account in the LDAP tree, or search for it through the Search menu. In the Application Actions box, click on MFA Authentication Server. Scroll down to find the Check on a Remote Worker menu.
You will then reach a form that allows you to send the request to the end user and customize the message shown in the request.
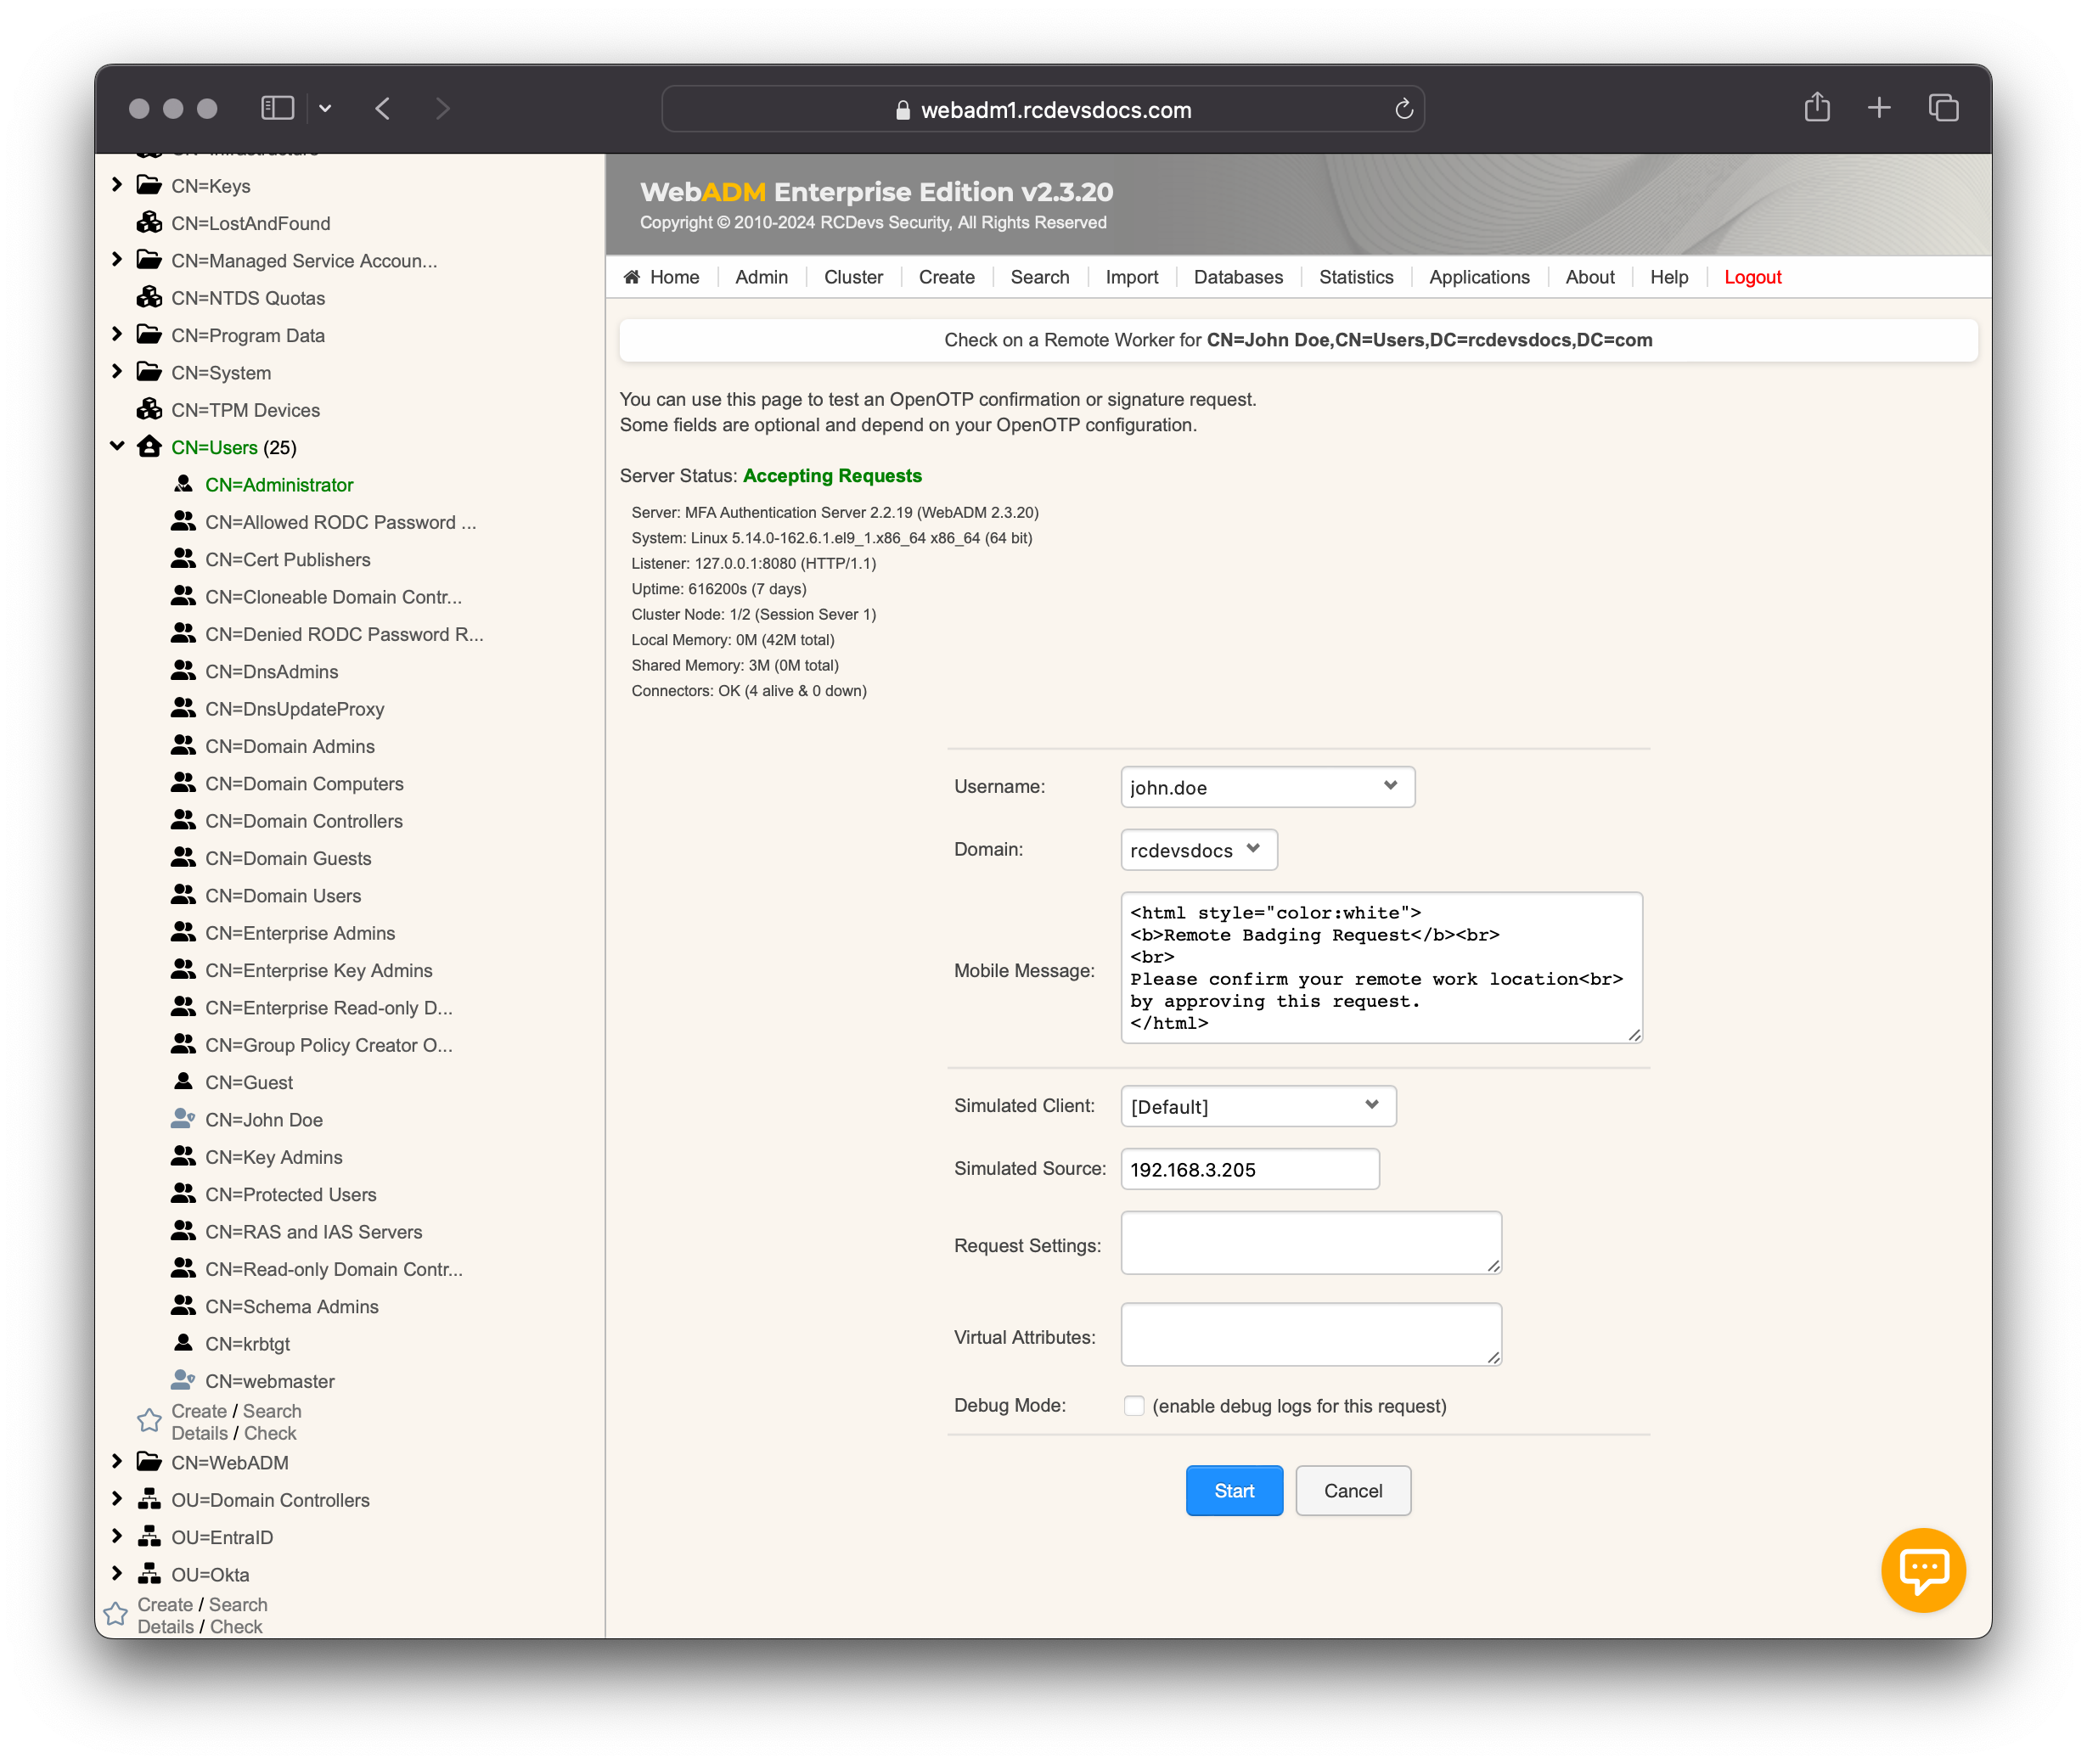
Click Start to send the notification to the user's mobile phone.
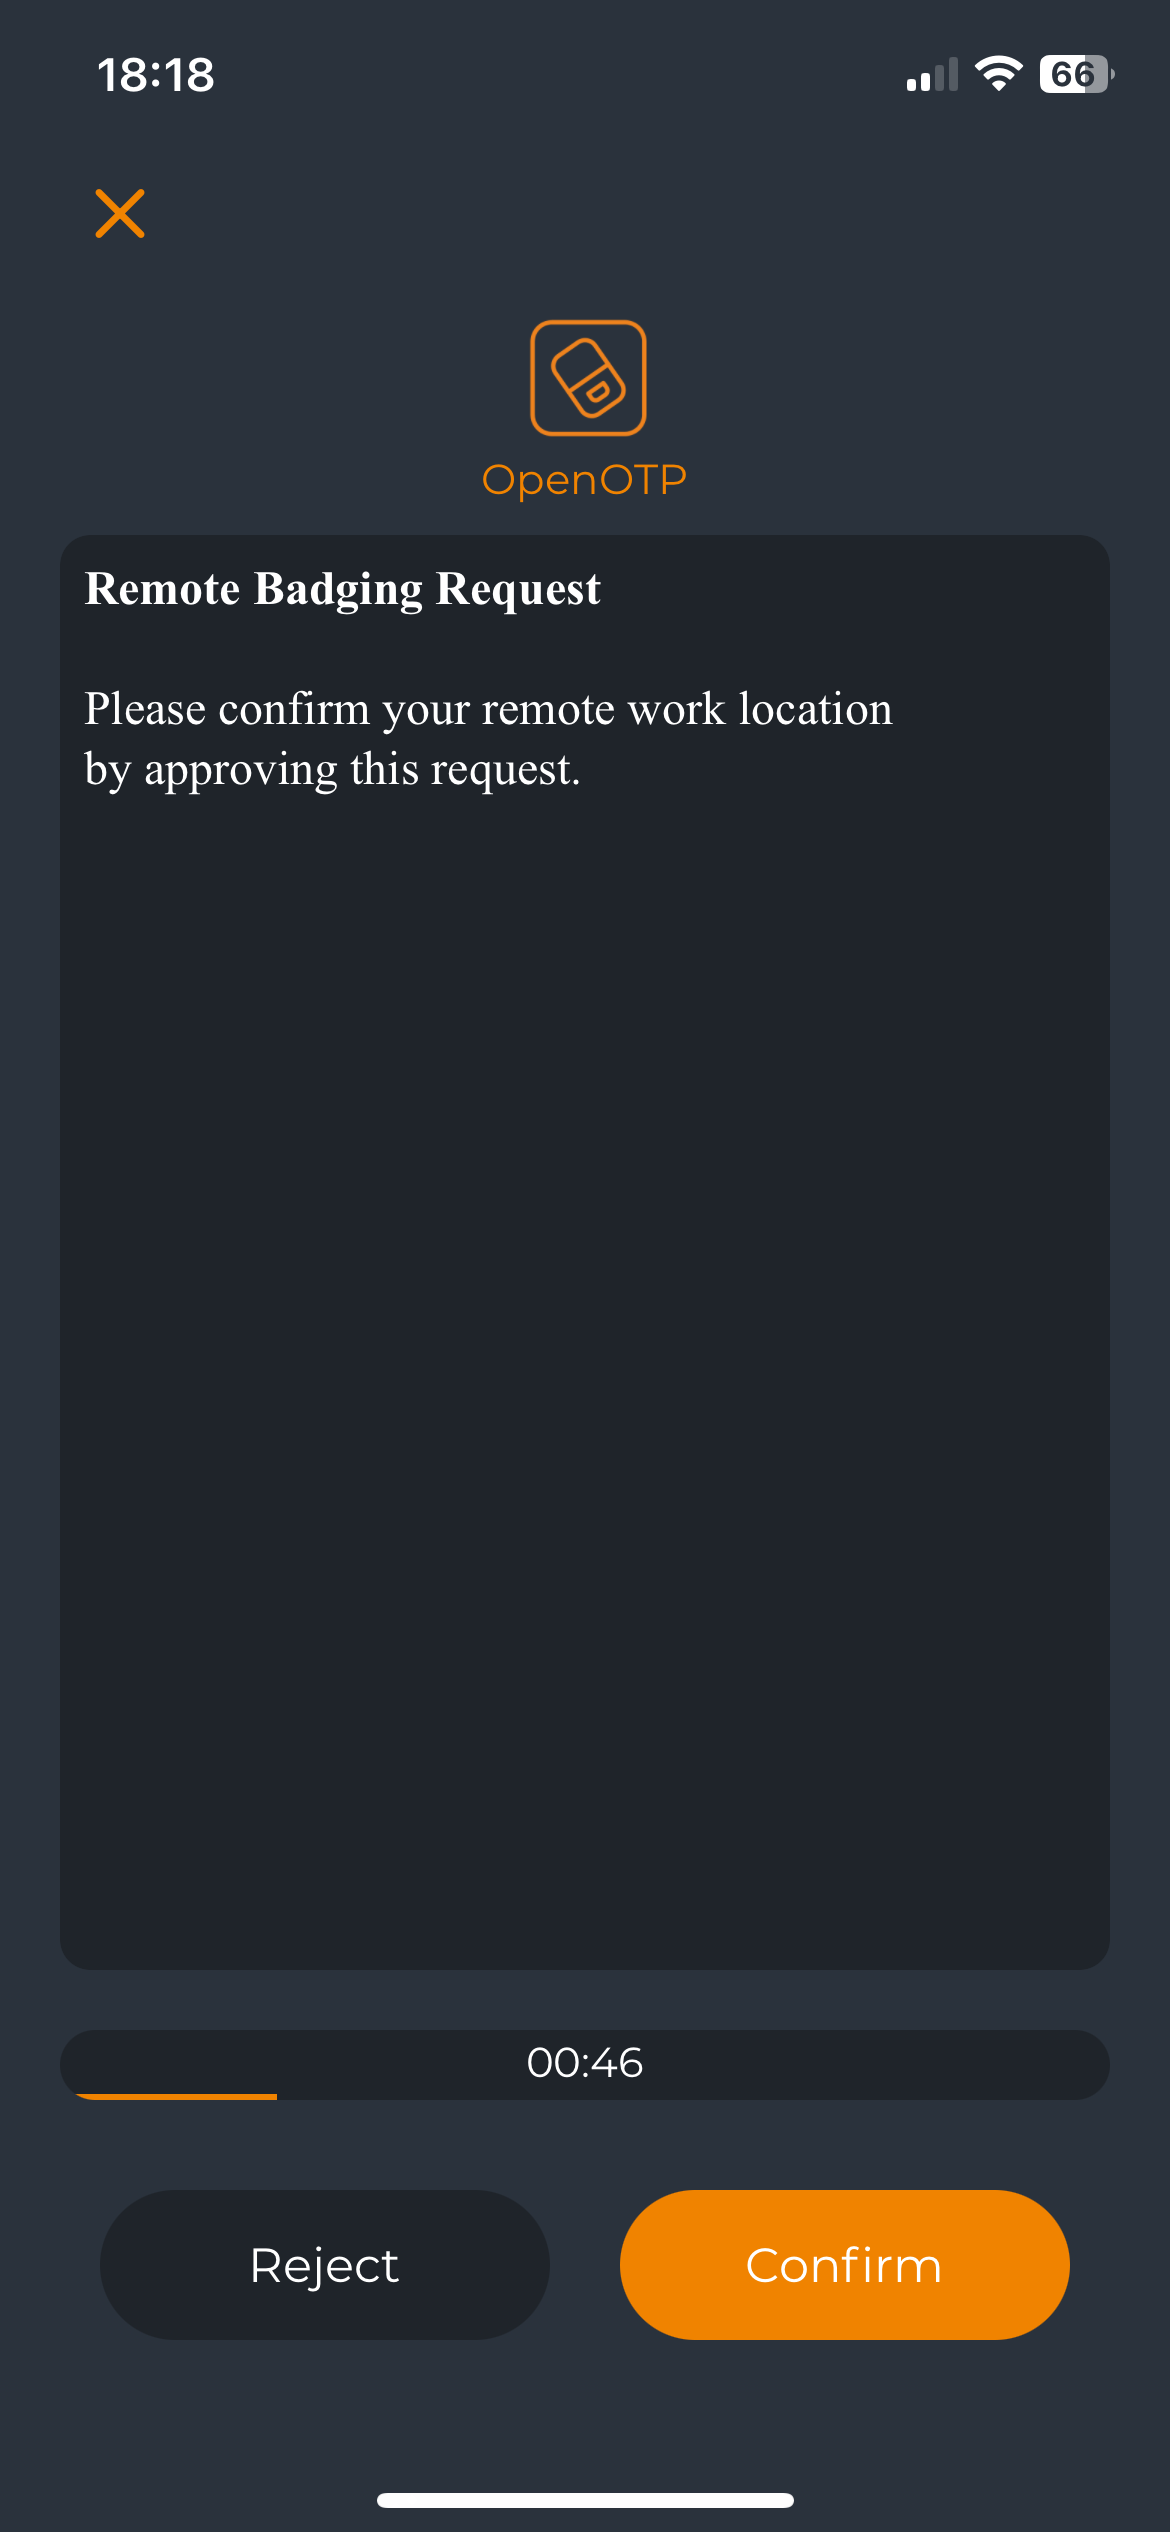
After the user completes the action on their mobile, WebADM shows the confirmation and location details.
The remote worker check API used behind the previous form can be integrated into an HR system by implementing API calls.