How To Enable OpenOTP Authentication On Juniper-Pulse Secure
This document explains how to enable OpenOTP authentication with Radius Bridge and Juniper SSL VPN.
1. WebADM/OpenOTP/Radius Bridge
For this recipe, you will need to have WebADM/OpenOTP installed and configured. Please, refer to WebADM Installation Guide and WebADM Manual to do it. You have also to install our Radius Bridge product on your WebADM server(s).
2. Register Your Juniper VPN In RadiusBridge
On your OpenOTP RadiusBridge server, edit the /opt/radiusd/conf/clients.conf and add a RADIUS client (with IP address and RADIUS secret) for your Juniper VPN server.
Example:
client <VPN Server IP> {
	secret = testing123
	shortname = Juniper-Pulse
   }
3. Configuring New Radius Server On Juniper
-
Log in to the Pulse web-based management interface.
-
From the left-hand menu, select Authentication —> Auth. Servers. —> Radius Server —> New Server.
-
On New Radius Server page configure (see example below):
-
Name - i.e. OpenOTP
-
NAS-Identifier - any value to describe your Juniper.
-
Radius Server - your OpenOTP server IP or hostname.
-
Shared Secret - i.e. testing123 (this value pre-configured to OpenOTP Virtual Machine). Finally, save changes.

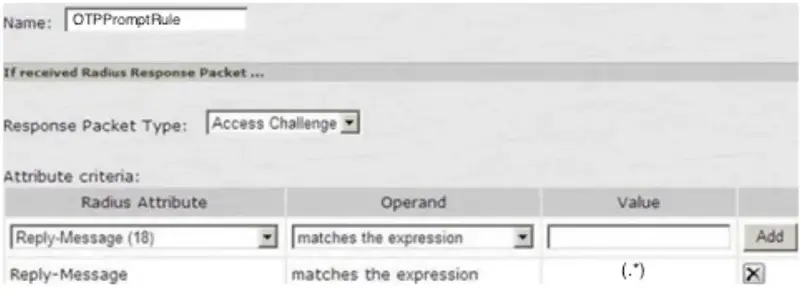
4. Enabling Challenge-Response (OTPprompt)
On your new RADIUS server settings page, scroll down to section Custom Radius Rules and click New Radius Rule… button. In subsequent window configure (see example below):
-
Name - i.e. OTPPromptRule
-
At Response Packet Type choose Access-Challenge.
-
At Attribute criteria:
-
Choose Reply-Message for Radius Attribute.
-
Operand must match the expression.
-
Value must be “(.*)”, without the quotes.
-
Click Add.
-
Under then take action to select the Show Generic Login Page radio-button.
-
Click Save to complete configuring a new RADIUS server.
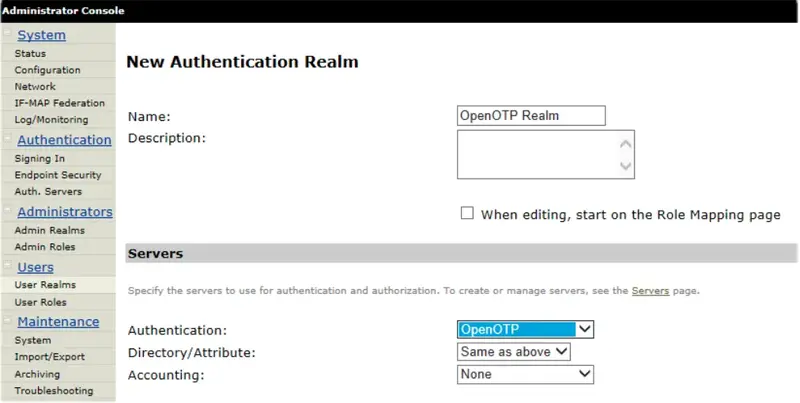
5. Activate New RADIUS Server
In the left-hand menu, select User Realms —> Create New Authentication Realm. In subsequent window configure (see example below):
-
Name - i.e. OpenOTP Realm (this value will be shown in Realms drop-down on your login page).
-
For Authentication under Servers, choose RADIUS server created in previous steps (OpenOTP).
-
Click the Save Changes to complete configuring a new authentication realm.
-
In the left-hand menu, click Sign-In —> Sign-In Policies.
-
Select the Sign-In policy to which you like to tie the new Realm with, i.e. Default Sign-In Policy (/*).
-
Select User Picks from a List of Authentication Realms under Authentication Realms (see example below):
-
From a list of Available Realms, add your new Authentication Realm to list of Selected Realms.
-
Click Save Changes and your Juniper/Pulse configuration is complete, and you can start to log in by using OpenOTP.

Note
Don’t forget to authorize the communication on 1812 UDP port (default RADIUS port for the authentication) from your Juniper-Pulse system to your WebADM instance at the firewall level.
6. Example Login
OTP Token Note
This chapter assumes you have already enrolled your token to OpenOTP, or that you are logging in with a Token less mode (i.e. SMS or Email OTP).
-
Go to your Juniper sign-in URL.
-
From Realm, drop-down choose the OpenOTP Authentication Realm.
-
Enter your domain login name and password:
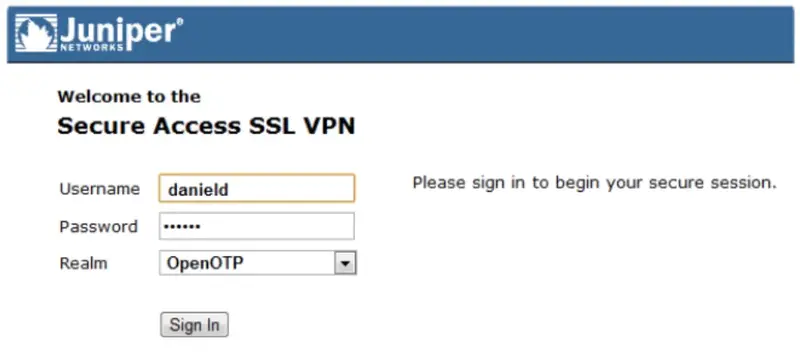
- Page will refresh to prompt you to enter your OTP.
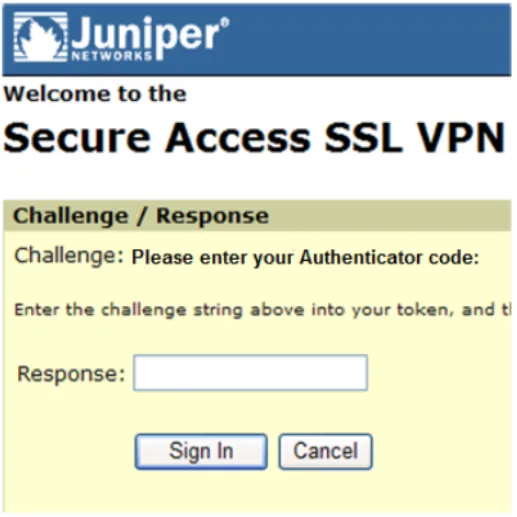
- Enter the OTP delivered to you via SMS, Email or provided by your OATH Token, Yubikey or similar device. You should be successfully logged in now!