1. WebADM/OpenOTP/Radius Bridge
For this recipe, you will need to have WebADM/OpenOTP installed and configured. Please, refer to WebADM Installation Guide and WebADM Manual to do it. You have also to install our Radius Bridge product on your WebADM server(s). Another documentation on that setup is provided by Cisco at this link
2. Register your ASA SSL VPN in Radius Bridge
On your OpenOTP RadiusBridge server, edit the /opt/radiusd/conf/clients.conf and add a RADIUS client (with IP address and RADIUS secret) for your ASA SSL VPN server.
Ex:
client ASA-SSL {
    ipaddr          = <VPN Server IP>
    secret          = testing123
}
3. Configuring new RADIUS AAA Server in Cisco ASA
Configuring OTP authentication to ASA means adding a RADIUS AAA Server configuration to a new or an existing Connection Policy. To do add both new RADIUS AAA Server and Connection Policy:
- Log in to your Cisco ASA Device Manager administration UI.
- From the top menu, select Configuration and then from left menu Remote Access SSL VPN.
- Under AAA/Local Users select AAA Server Groups.
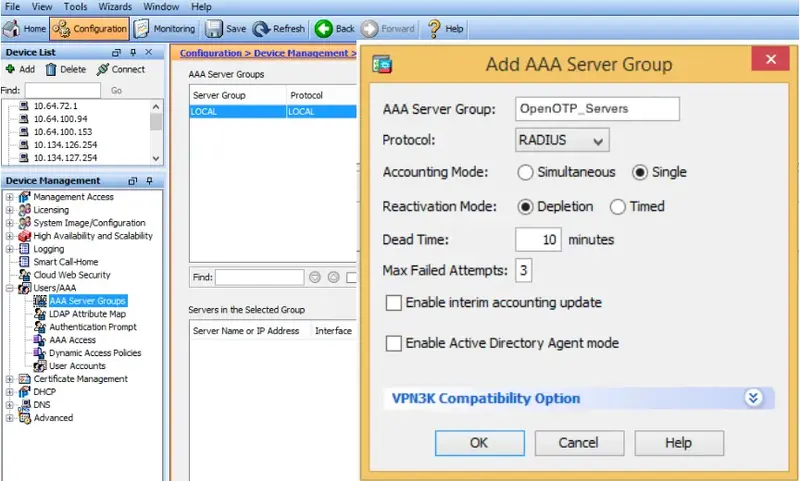
- In AAA Server Groups page that opens select Add.
- Set (see example picture below):
- Name - OpenOTP_Servers
- Protocol - select RADIUS
- Leave rest as defaults and commit add.
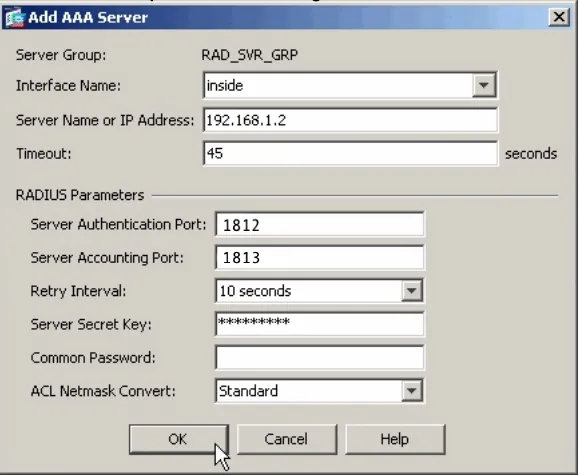
6. In Servers in the Selected Group section select Add.
7. In Add AAA Server view set (see example picture below):
- Interface - interface through which Cisco communicates with OpenOTP. This should be management or intranet.
- Server Name or IP Address - OpenOTP IP address or hostname.
- Timeout - i.e. 10 seconds.
- Server Secret Key - value testing123 (preconfigured to OpenOTP).
- Leave other values as default and commit add.
8. Cisco ASA - OpenOTP RADIUS connectivity is now configured. The remaining step is to activate the new RADIUS Server on or more of Cisco ASA Connection Profiles, whereas here we create a test profile.
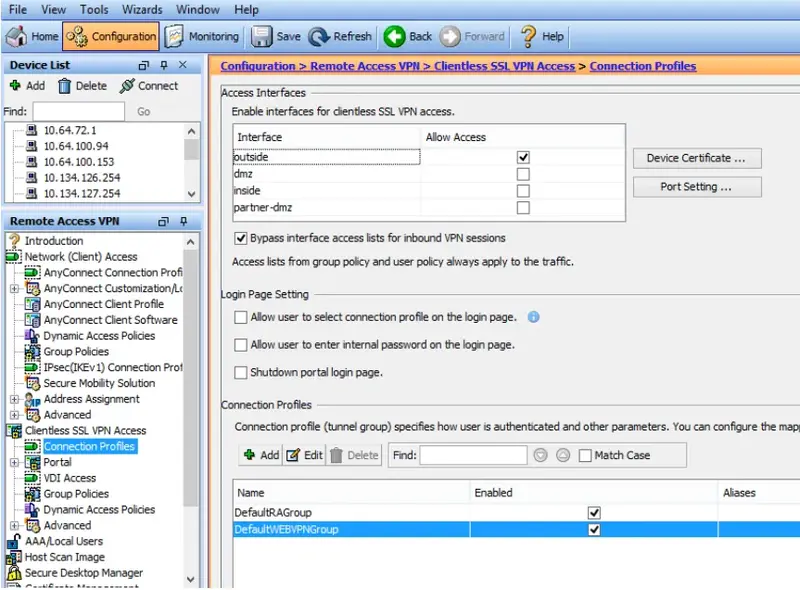
9. Select Clienteles SSL VPN Access —> Connection Profiles
10. Click Add in Connection Profiles section.
11. In Add Clientless SSL VPN Connection Profile set (see example picture below):
- Name - OpenOTP_Test_Profile
- AAA Server Group - select the previously created server group OpenOTP_Servers.
- In Clienteles SSL VPN menu entry on left:
- In Connection Aliases section select Add.
- Enter Alias OpenOTP (user will display a drop-down menu on login with OpenOTP as one entry).
- Click OK

12. In Login Page Settings section check Allow users to select connection profile.
13. Cisco ASA is now configured, and you can proceed to test your login.
Note
Don’t forget to authorize the communication on 1812 UDP port (default RADIUS port for the authentication) from your ASA system to your WebADM instance at the firewall level.
4. Simple push-based authentication with ASA
This chapter is only relevant if you want to use simple push to Accept/Reject as the 2nd-factor authentication. For more information on simple push please see how to configure push login with OpenOTP
Cisco ASA radius authentication timeouts are typically too short for the user to be able to authenticate with a simple push. To use push authentication, you must edit the /opt/radiusd/conf/radiusd.conf and enable “fix_timeout = yes” option.
If you have configured multiple Radius Bridge servers in high-availability mode into your ASA AAA Server Group, you also need to ensure that the Cisco ASA config-aaa-server-host timeout setting is longer than your Push Timeout.
Another timeout needs to be considered with OpenOTP push login is the Anyconnect Client timeout. This timeout is configurable under the ASDM console > AnyConnect Client Profile > Preferences (2) > Authentication Timeout Values :

In order for changes to take effect on the client side, a success login from AnyConnect client needs to be done. After that, the new profile file will be downloaded and applied to Annyconnect client. Next login, the authentication timeout set to 60 seconds will be applied.