This document is an installation guide for the OpenOTP Authentication Provider for AD FS 3.0 / 4.0. Hence, the installation or configuration of WebADM, including token registration is not covered in this guide. For installation and usage guides to WebADM refer to the RCDevs WebADM Installation Guide and the RCDevs WebADM Administrator Guide available through the RCDevs’ online documentation library.
2. Product Overview
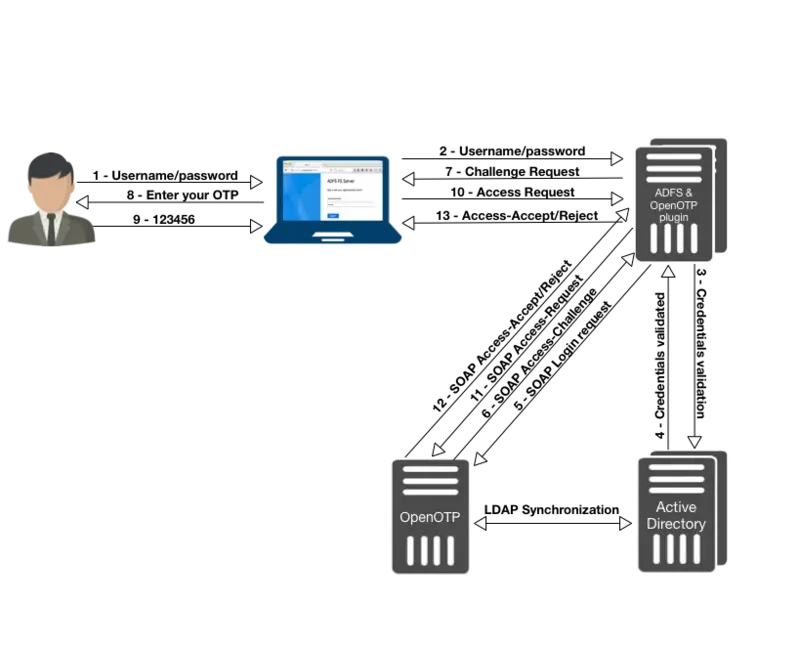
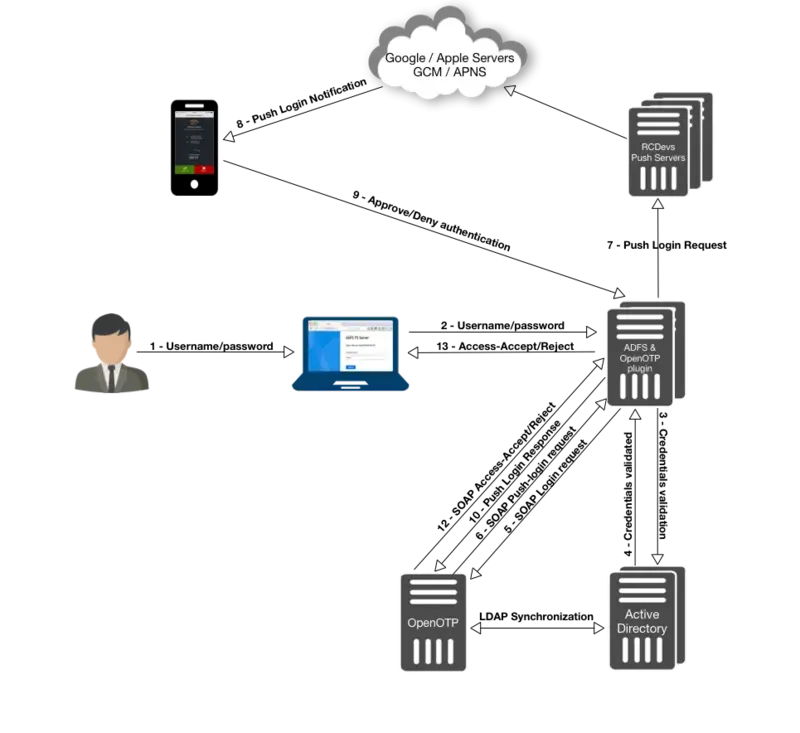
The OpenOTP Authentication Provider for AD FS is a component that integrates the RCDevs OpenOTP one-time password authentication into an Active Directory Federation Services server, adding OpenOTP authentication as a possible MFA option in the AD FS Management tool. RCDevs OpenOTP Authentication Server is a WebApp that is tightly coupled to the RCDevs WebADM application server.
The Authentication Provider enables you to use all types of authentication tokens and authentication standards supported by the OpenOTP authentication module. That includes OATH/HOTP, OATH/TOTP, OATH/OCRA, Mobile-OTP, YubiKey, SMSOTP, MailOTP. Software tokens are provided by various publishers and for a variety of platforms including Android and iOS.
3. System Requirements
The OpenOTP Authentication Provider has to be installed on the Windows servers with an AD FS role. Your environment should fulfill the following requirements:
Windows 2008 or later.
Network access.
An instance of WebADM and OpenOTP running in your network.
Permanent connection to OpenOTP server’s network API.
DNS suffix set to match your AD domain.
4. Preliminary Information
Administrative/elevated permissions are necessary on any server to correctly set up and/or change the OpenOTP Authentication Provider’s configuration.
To correctly set up the provider, please gather the following information. You will need to enter during the installation process:
The URI(s)s of the OpenOTP web-service(s) (mandatory).
These URIs are mandatory, due to the client needs to know where the OpenOTP SOAP network API can be reached. They are entered as a comma-separated list. At least one URI is necessary.
Your local domain (optional). Needed to force a domain, which is not set as default on the OpenOTP side.
A custom login text or tile caption (optional). A text that is displayed on the AD FS login pane.
A client ID (optional). An ID to identify this part of your infrastructure to OpenOTP, allowing to modulate OpenOTP’s behavior with client policies.
A certificate authority (CA) file (optional).
A certificate file and the certificate password (optional).
A custom settings string (optional).
SOAP timeout delay (optional).
Note
OpenOTP plugin for ADFS works for ADFS 3.0 & 4.0 (earlier than Windows server 2008). If you have an older version, you have to update your ADFS Infrastructure.
5. Installation and Configuration
5.1 Installation
In this post, we will assume an existing ADFS infrastructure installed and available. This post will not cover how to set up ADFS. Please refer to the Microsoft documentation and/or the TechNet blog for details about how to install and configure ADFS Microsoft Documentation. For this recipe, you will need to have WebADM/OpenOTP installed and configured. Please, refer to WebADM Installation Guide and WebADM Manual to do it.
Note
Before running the MSI file, please make sure your ADFS services are running.
The OpenOTP plugin for ADFS must be installed on every ADFS server. Please download the plugin from the RCDevs Website.
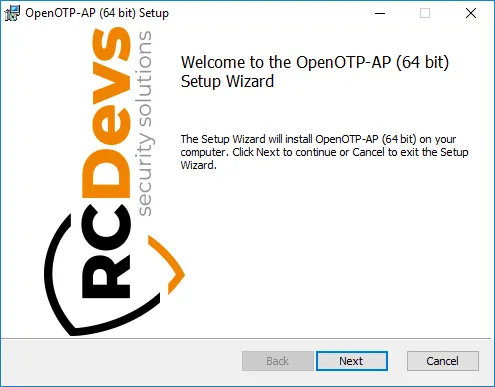
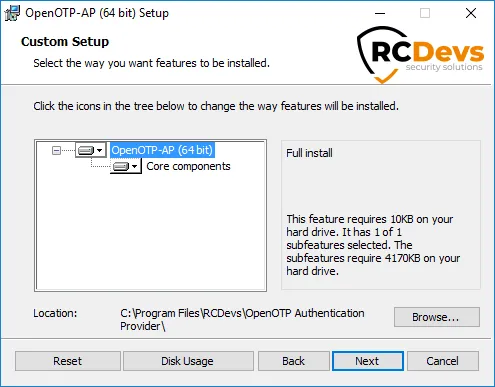
Extract files from the archive on your ADFS server(s) and run the MSI file and click on Next.
Note
MSI file should be executed with domain admin permissions or local admin permissions. To ensure that you have the required permissions for the installation, you can execute the MSI file through PowerShell executed in “Run As Administrator” mode.
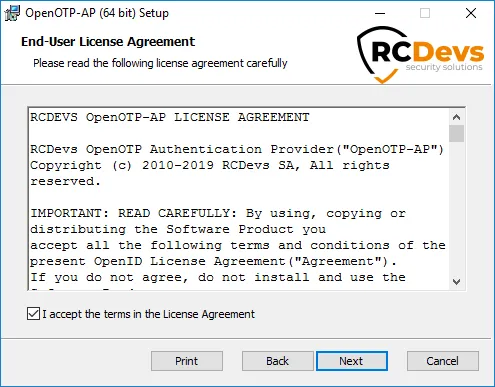
Consent for End-User License Agreement and click on Next. On the next page, choose your default folder location and click on Next.
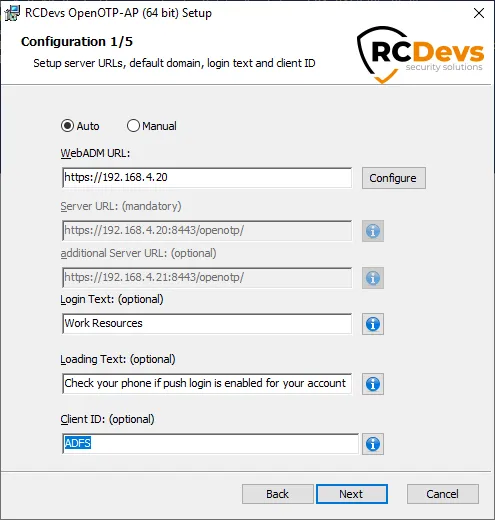
On this page, you have to configure one of your WebADM servers URL. If you are running a WebADM cluster, then both OpenOTP URLs should be automatically retrieve in the Auto mode. If your OpenOTP URL(s) can not be automatically retrieve, then configure URL(s) manually like below :
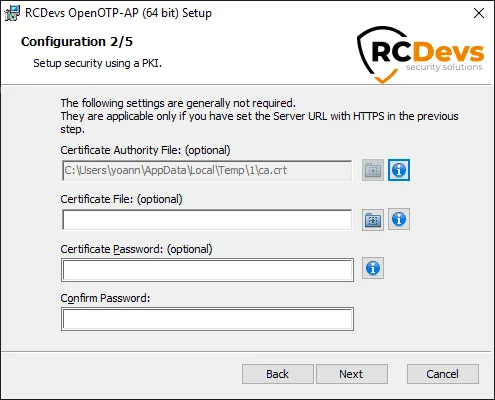
Click Next. On the next page, every configuration is optional. If you’d like to use a client certificate for enhanced security, please use this next screen to provide the detail.
Clicking on the information marks (i) will provide additional help during the installation procedure.
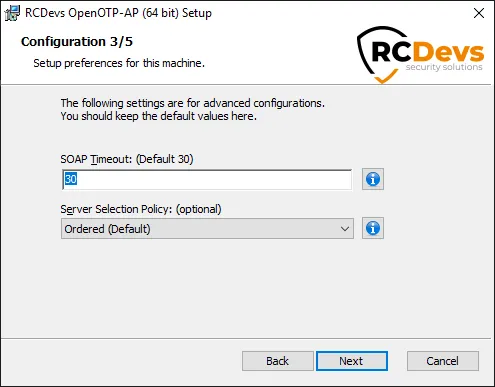
The next page allows you to configure failover with OpenOTP, SOAP request timeout and UPN Mode. Keep the default configuration if you are not sure of what you need. Click on Next and Install.
Here you may set up a custom settings string for your WebADM and OpenOTP configuration (This setting is deprecated since WebADM client policies). Furthermore, you may change the default SOAP service timeout. If two server URLs are defined in server URL, you can optionally configure a request routing policy (i.e. the server selection policy).
There are three policies available:
Ordered: The first server is always preferred. When it does not respond, the second server is used.
Balanced: The server is chosen randomly for each request. When it does not respond, the other is used.
Consistent: The server selection depends on the user ID. A request for one specific user is also always routed to the same server. If it does not respond, the other server is used.
Click Next when you are done and afterward Install.
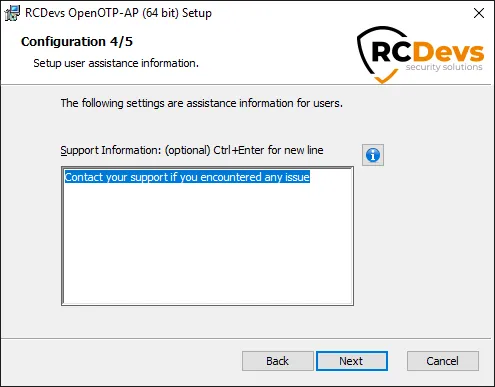
On the next page, you can configure a custom message when users need assistance. For example:
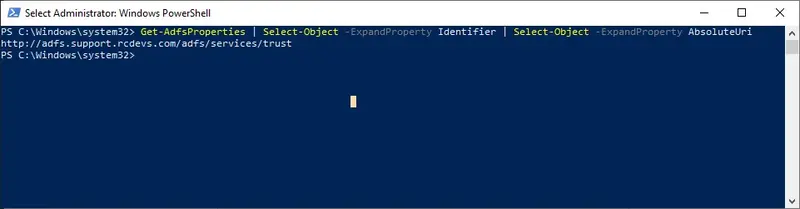
On the next screen, you are prompted to provide the ADFS WAP IP address(es) and the ADFS absolute URI which can be returned by the following PowerShell command:
The checkbox Send the service provider ID as the Client ID to OpenOTP can be used to return to OpenOTP, a unique value per service provider in order to create and match a dedicated client policy for each service provider configured with ADFS. If no unique identifier can be retrieve for a service provider, then the default Client ID value configured in step 1/5 is sent to OpenOTP.
This feature is supported over WS-Federation, SAML and OpenID implementations. The ADFS absolute URI is mandatory as soon as you are using SAML and per service provider identifier.
Click Next to continue the setup.
Installation is near complete. At the end of the installation of ADFS plugin, you will have a message like below:
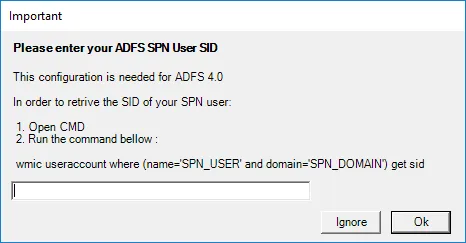
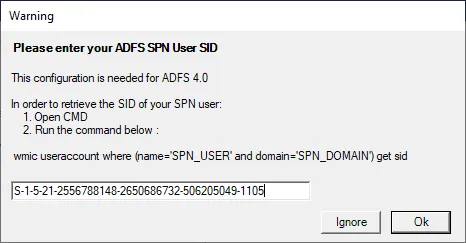
You need to provide the SID of your ADFS service account. On my side, the command will be:
C:\Users\administrateur>wmic useraccount where (name='svc_adfs' and domain='SUPRCDEVS') get sid
SID
S-1-5-21-2556788148-2650686732-506205049-1105
Important Note
The previous command should be executed through Windows Command Prompt and not with PowerShell.
In case you are using Managed Service Account, the above command will not give you the SID and you might need to use Get-AdServiceAccount command instead on your AD domain controller. In this example the service account is “adfs$”:
The previous command should be executed through PowerShell and not with Windows Command Prompt.
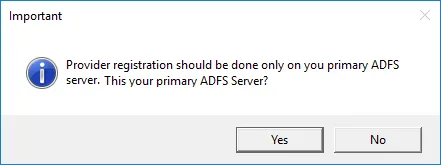
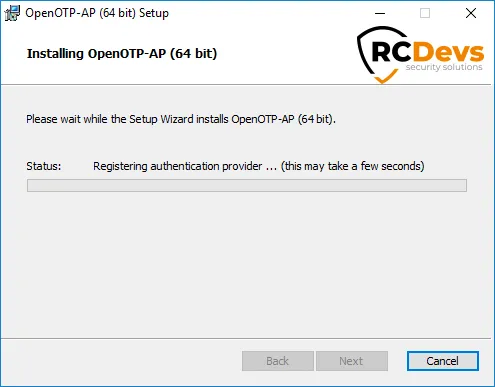
On the next screen, you have to register the OpenOTP service in your ADFS instance. The registration should be done only once per ADFS instance. Click on Yes if it’s the first time you install OpenOTP ADFS plugin. For the others, ADFS servers in the same instance, click on No. ADFS services should be running during the registration.
Note
After provider registration, ADFS services will be automatically restarted.
On the next screen, click on Finish and the installation is done.
Plugin installation
Repeat this procedure on every ADFS servers! The registration of the plugin must be done only once.
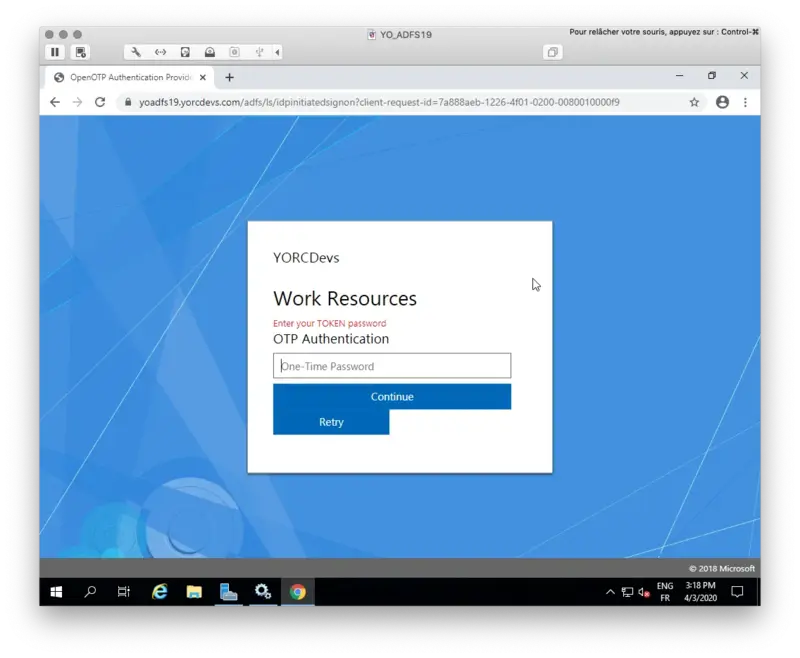
6. ADFS Configuration for Multi-Factor Authentication
In this documentation, we enable OpenOTP Multi-Factor authentication on the default ADFS login page. This page is disabled by default. Have a look to Technet Microsoft to enable the default ADFS login page. With ADFS 4.0 on Windows Server 2019, the PasswordLess feature is now available. That involves you can login on ADFS by just providing the Username and the OTP. The username provided must match a valid account in the AD.
6.1 Configuration for ADFS 3.0
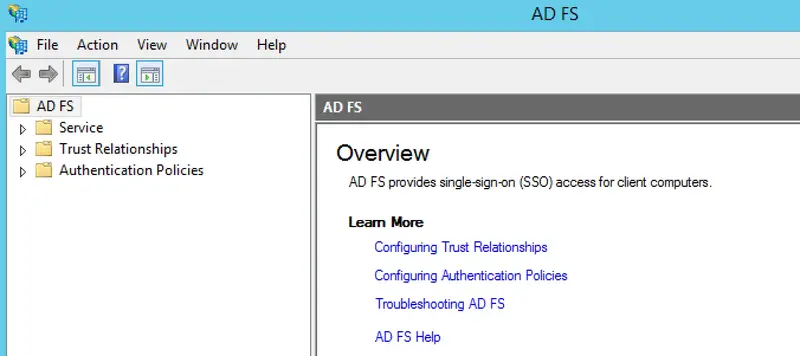
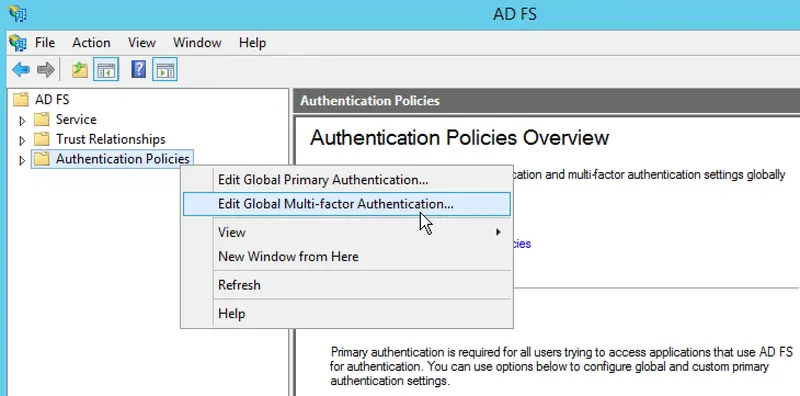
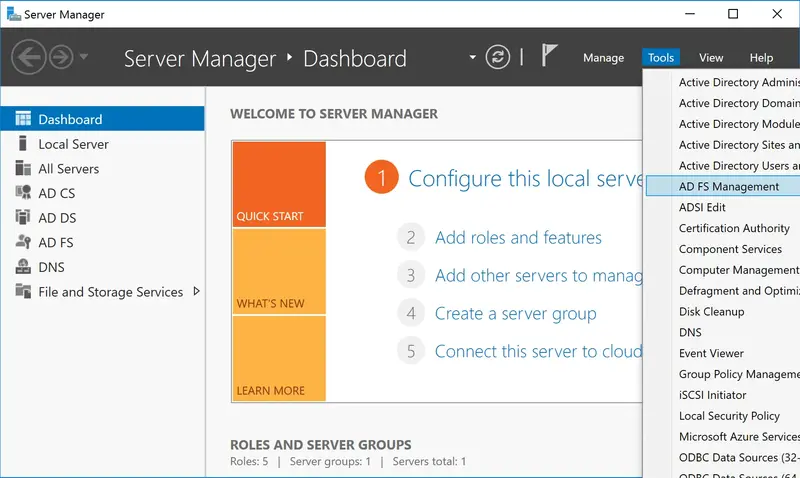
Now, we will configure the ADFS server(s) to have multi-factor authentication. For this, go on Windows Server Manager, click on Tools and ADFS Management.
On the ADFS Management page, right click on Authentication Policies and click on Edit Global Multi-factor Authentication…
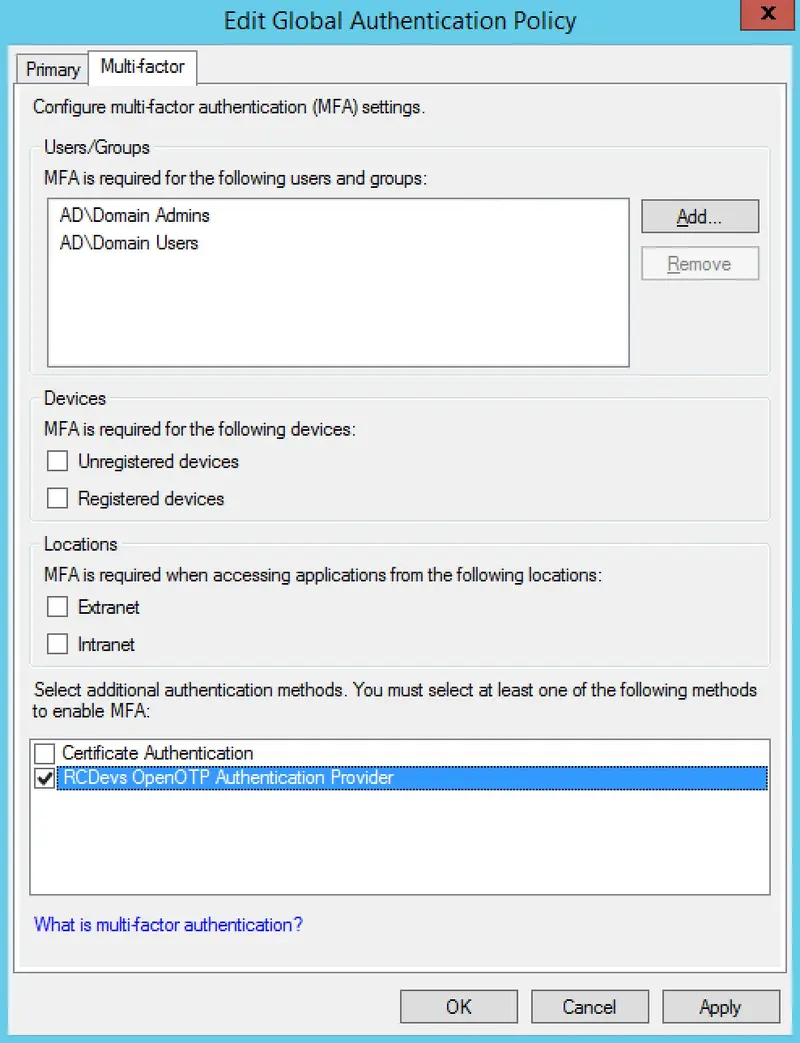
On the next page, you will find a new option available in the additional authentication methods named “RCDevs OpenOTP Authentication Provider”. Check the box of this option and click on Ok.
Your ADFS server is now configured with OpenOTP for ADFS plugin. In order to use it, your relaying party must be configured for multi-factor authentication.
OpenOTP User Activation
All accounts where authentication will be handled by OpenOTP must be activated. Look the following How-To to activate an account.
6.2 Configuration for ADFS 4.0
Now, we will configure the ADFS server(s) to have multi-factor authentication. For this, go on Windows Server Manager, click on Tools and ADFS Management.
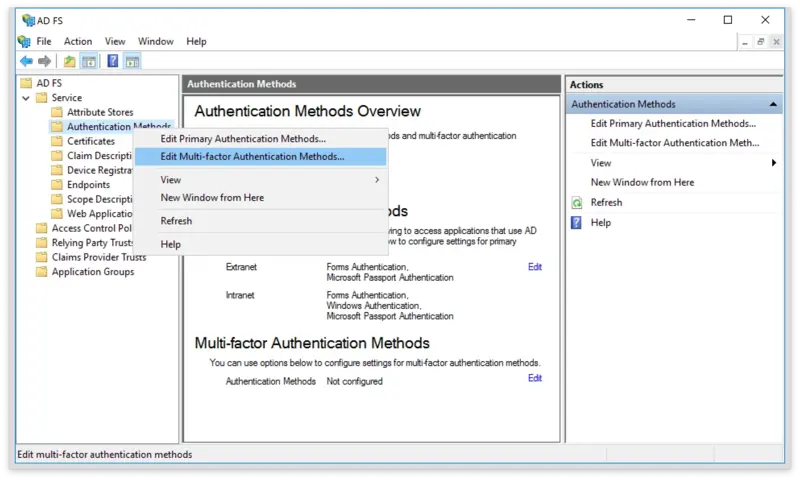
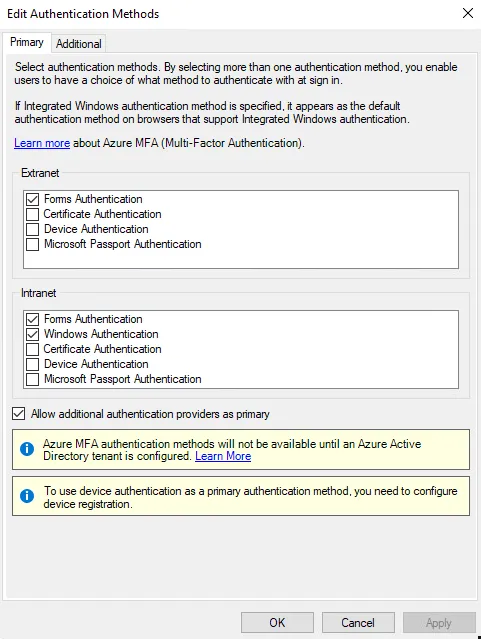
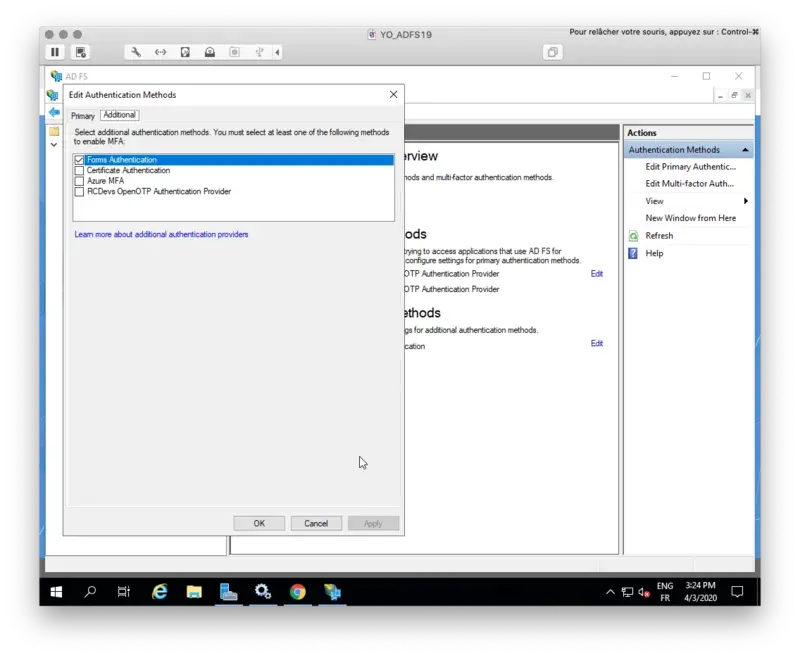
On the ADFS Management page, under Service right click on Authentication Methods and click on Edit Multi-factor Authentication Methods.
On the next page, you will find a new option available in the additional authentication methods named RCDevs OpenOTP Authentication Provider. Check the box of this option if it’s not already checked and click Apply.
Relaying parties configured for MFA authentication can now use OpenOTP for ADFS plugin.
6.3 Windows Hello For Business
In order to be able to use OpenOTP authentication for Windows Hello for Business devices registrations, you need to execute the following command through PowerShell on your primary ADFS server :
Windows Server 2019 brings some changes to ADFS. Two of these are especially interesting for use cases with OpenOTP:
External Authentication Providers as Primary authentication method : OpenOTP can now be used as the first authentication factor, allowing you to not expose AD password as the first factor. Furthermore, since OpenOTP ADFS plugin can validate both AD password and a 2nd factor, it can be configured as primary authentication provider.
Password Authentication as additional Authentication : You can optionally change the default authentication flow from surname + password followed by OTP, to username + OTP followed by password. In that scenario, the second factor is the AD password. This is especially useful for preventing the AD account from being locked due to a brute force attack on the password of a leaked username.
6.4.1 ADFS OpenOTP Plugin as Primary Authentication Method
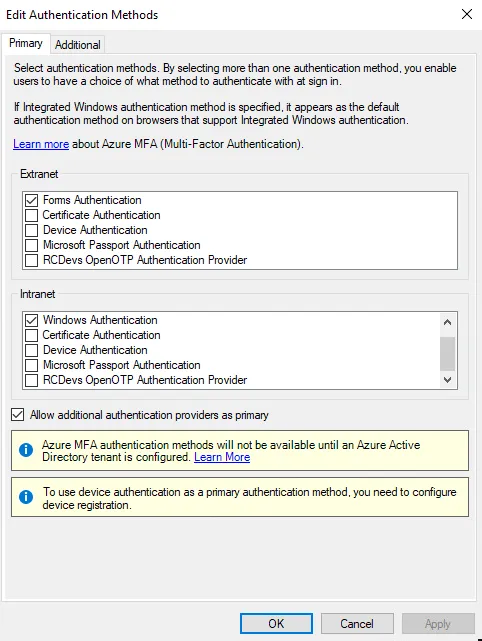
To configure ADFS OpenOTP plugin as primary authentication method, open the ADFS Management console, expand Service folder and click on Authentication methods, configure ADFS Authentications Methods > Primary Authentication Methods > Edit and enable the setting Allow additionnal authentication provider as primary :
Click Ok button and edit again Primary Authentication Methods. As ADFS OpenOTP plugin is already installed, you should now see RCDevs OpenOTP Authentication Provider available.
Enable it for access you want to protect with OpenOTP :
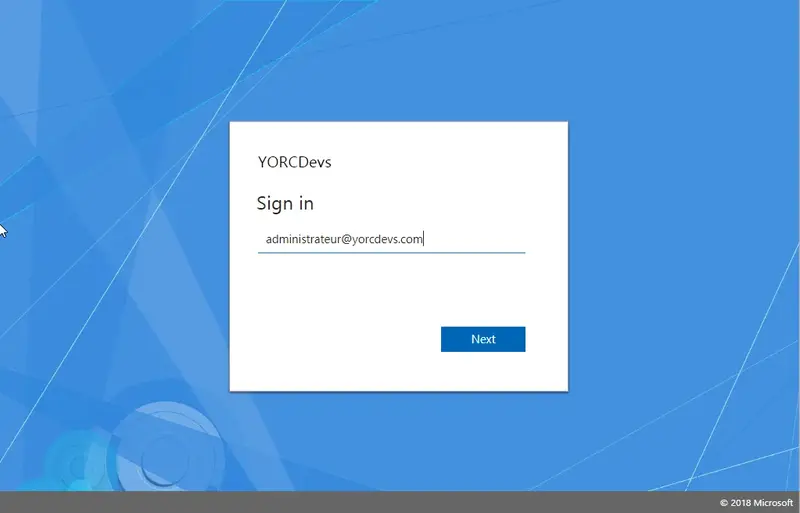
You can now try to perform a login with PasswordLess authentication.
Note
The following screenshots are coming from another instance of ADFS. Don’t take into account the ADFS URL and UPN value use for that login example
Click Next button :
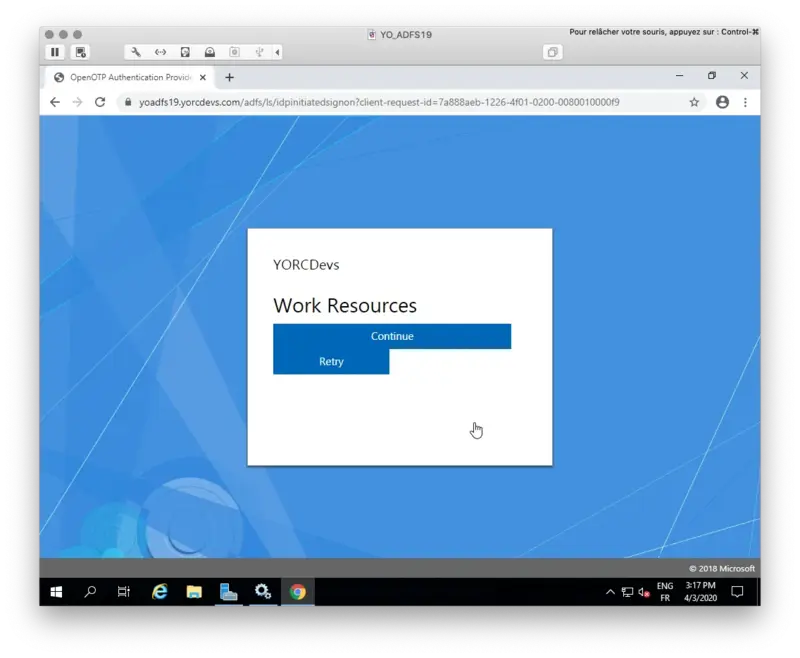
Click Continue button and OpenOTP plugin will call OpenOTP server for authentication :
Provide the OTP and you are logged in.
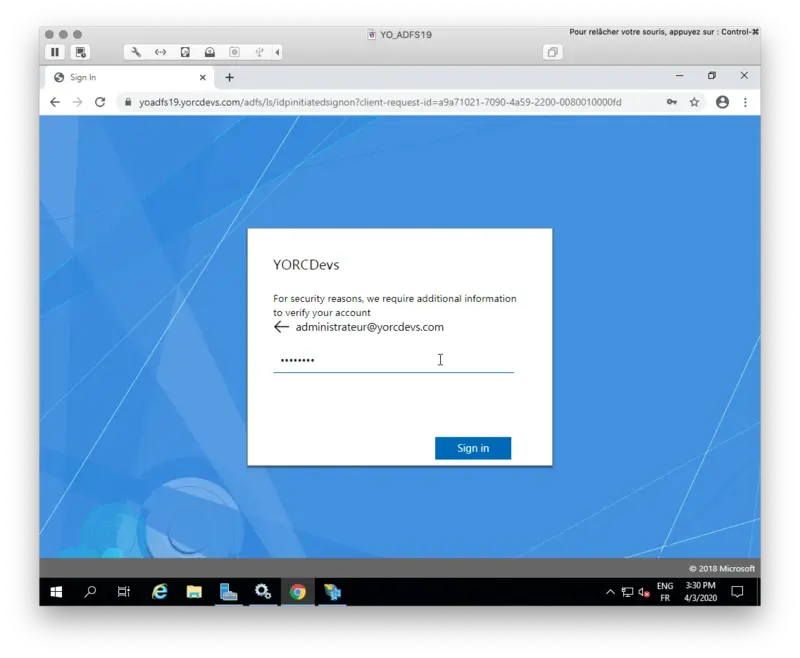
6.4.2 LDAP Password as Additional Authentication Method
To configure LDAP password as second factor, open the ADFS Management console, expand Service folder and click on Authentication methods, configure ADFS Authentications Methods > Additional Authentication Methods > Edit and enable the setting Forms Authentication :
Apply the configuration.
Now, all policies requiring additional factor or MFA will ask for User LDAP password as 2nd factor.
After OpenOTP success login, I’m now prompted for the LDAP password of my account :
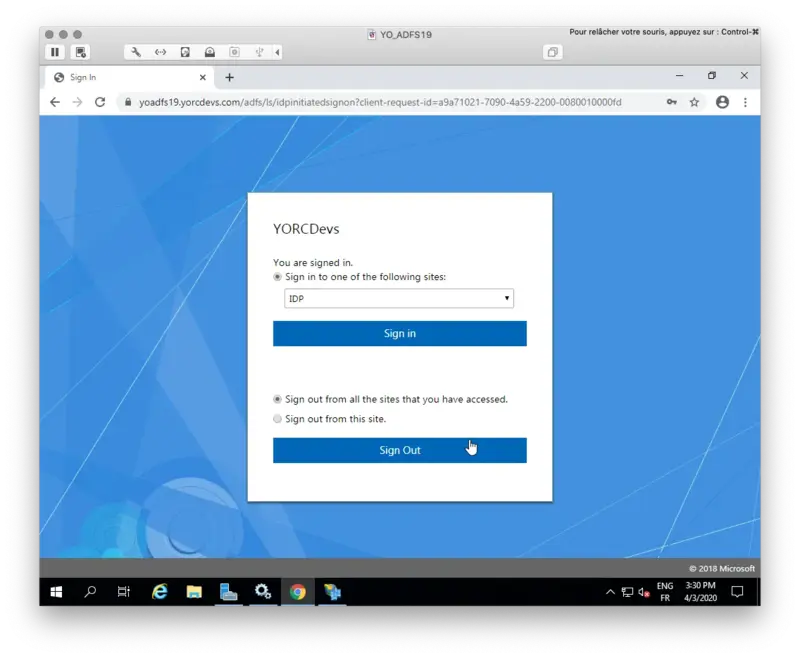
I provide my password and then I’m connected :
6.5 Voice Biometric Authentication through Web Browser
In order to use Voice authentication with ADFS and to provide your VOICE password through the microphone of your computer/laptop and your Web browser, ADFS needs to support some additional HTTP headers (worker-src).
By default, we advise to configure the following through PowerShell :
You may have a custom ADFS configuration where the HTTP headers values configured are different from the ones previously described.
The important part is regarding ‘worker-src blob:’ which must be added to your existing configuration.
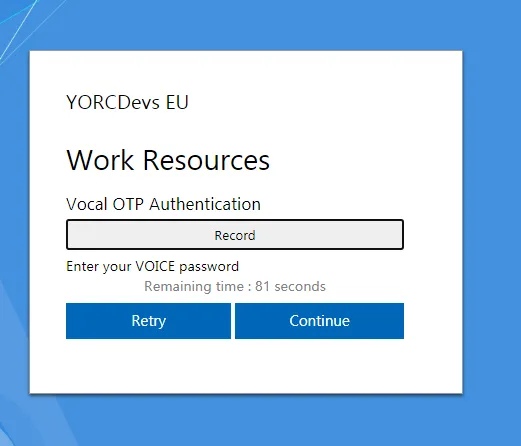
After enabling it, you can use VOICE authentication through ADFS. You will be prompted for VOICE password as below :
Click on Record button, the microphone is triggered and then provide your VOICE password, and you are logged in. More information on VOICE authentication and registration are available on the following documentation
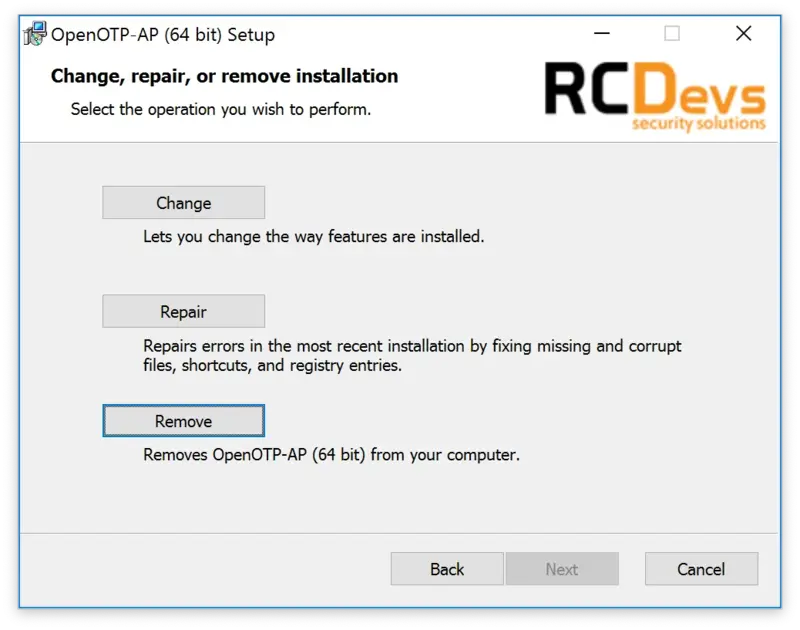
7. Uninstalling the OpenOTP Authentication Provider
If you ever decide to uninstall the provider, simply re-run the installer and choose Remove.
8. Troubleshooting
To pinpoint a problem in your ADFS for OpenOTP plugin setup, you can start with the Windows Event viewer: “Applications and Services Logs”, enter in “AD FS” folder and then “Admin” logs.
Also look at /opt/webadm/logs/webadm.log.
If the provider registration failed, you can manually register OpenOTP Authentication provider by executing the following command through PowerShell. You may need to adjust the version number and the PublicKeyToken of OpenOTP plugin for ADFS.
The name folder containing the OpenOTPAuthenticationProvider.dll may change according to the version of the ADFS plugin. Please adapt the path if required. The path below is for 1.0.12.0 version of ADFS plugin.