This document will present you how to use WebADM as Identity Provider (IDP) with different Service Provider (SP) which will consume OpenOTP for authentication processes. We will also see how we can configure and return different information per service provider through users/groups and client policies.
The installation of OpenID/SAML IdP is straightforward and only consists of running the self-installer or install the openid package from RCDevs repositories and configure the application in WebADM.
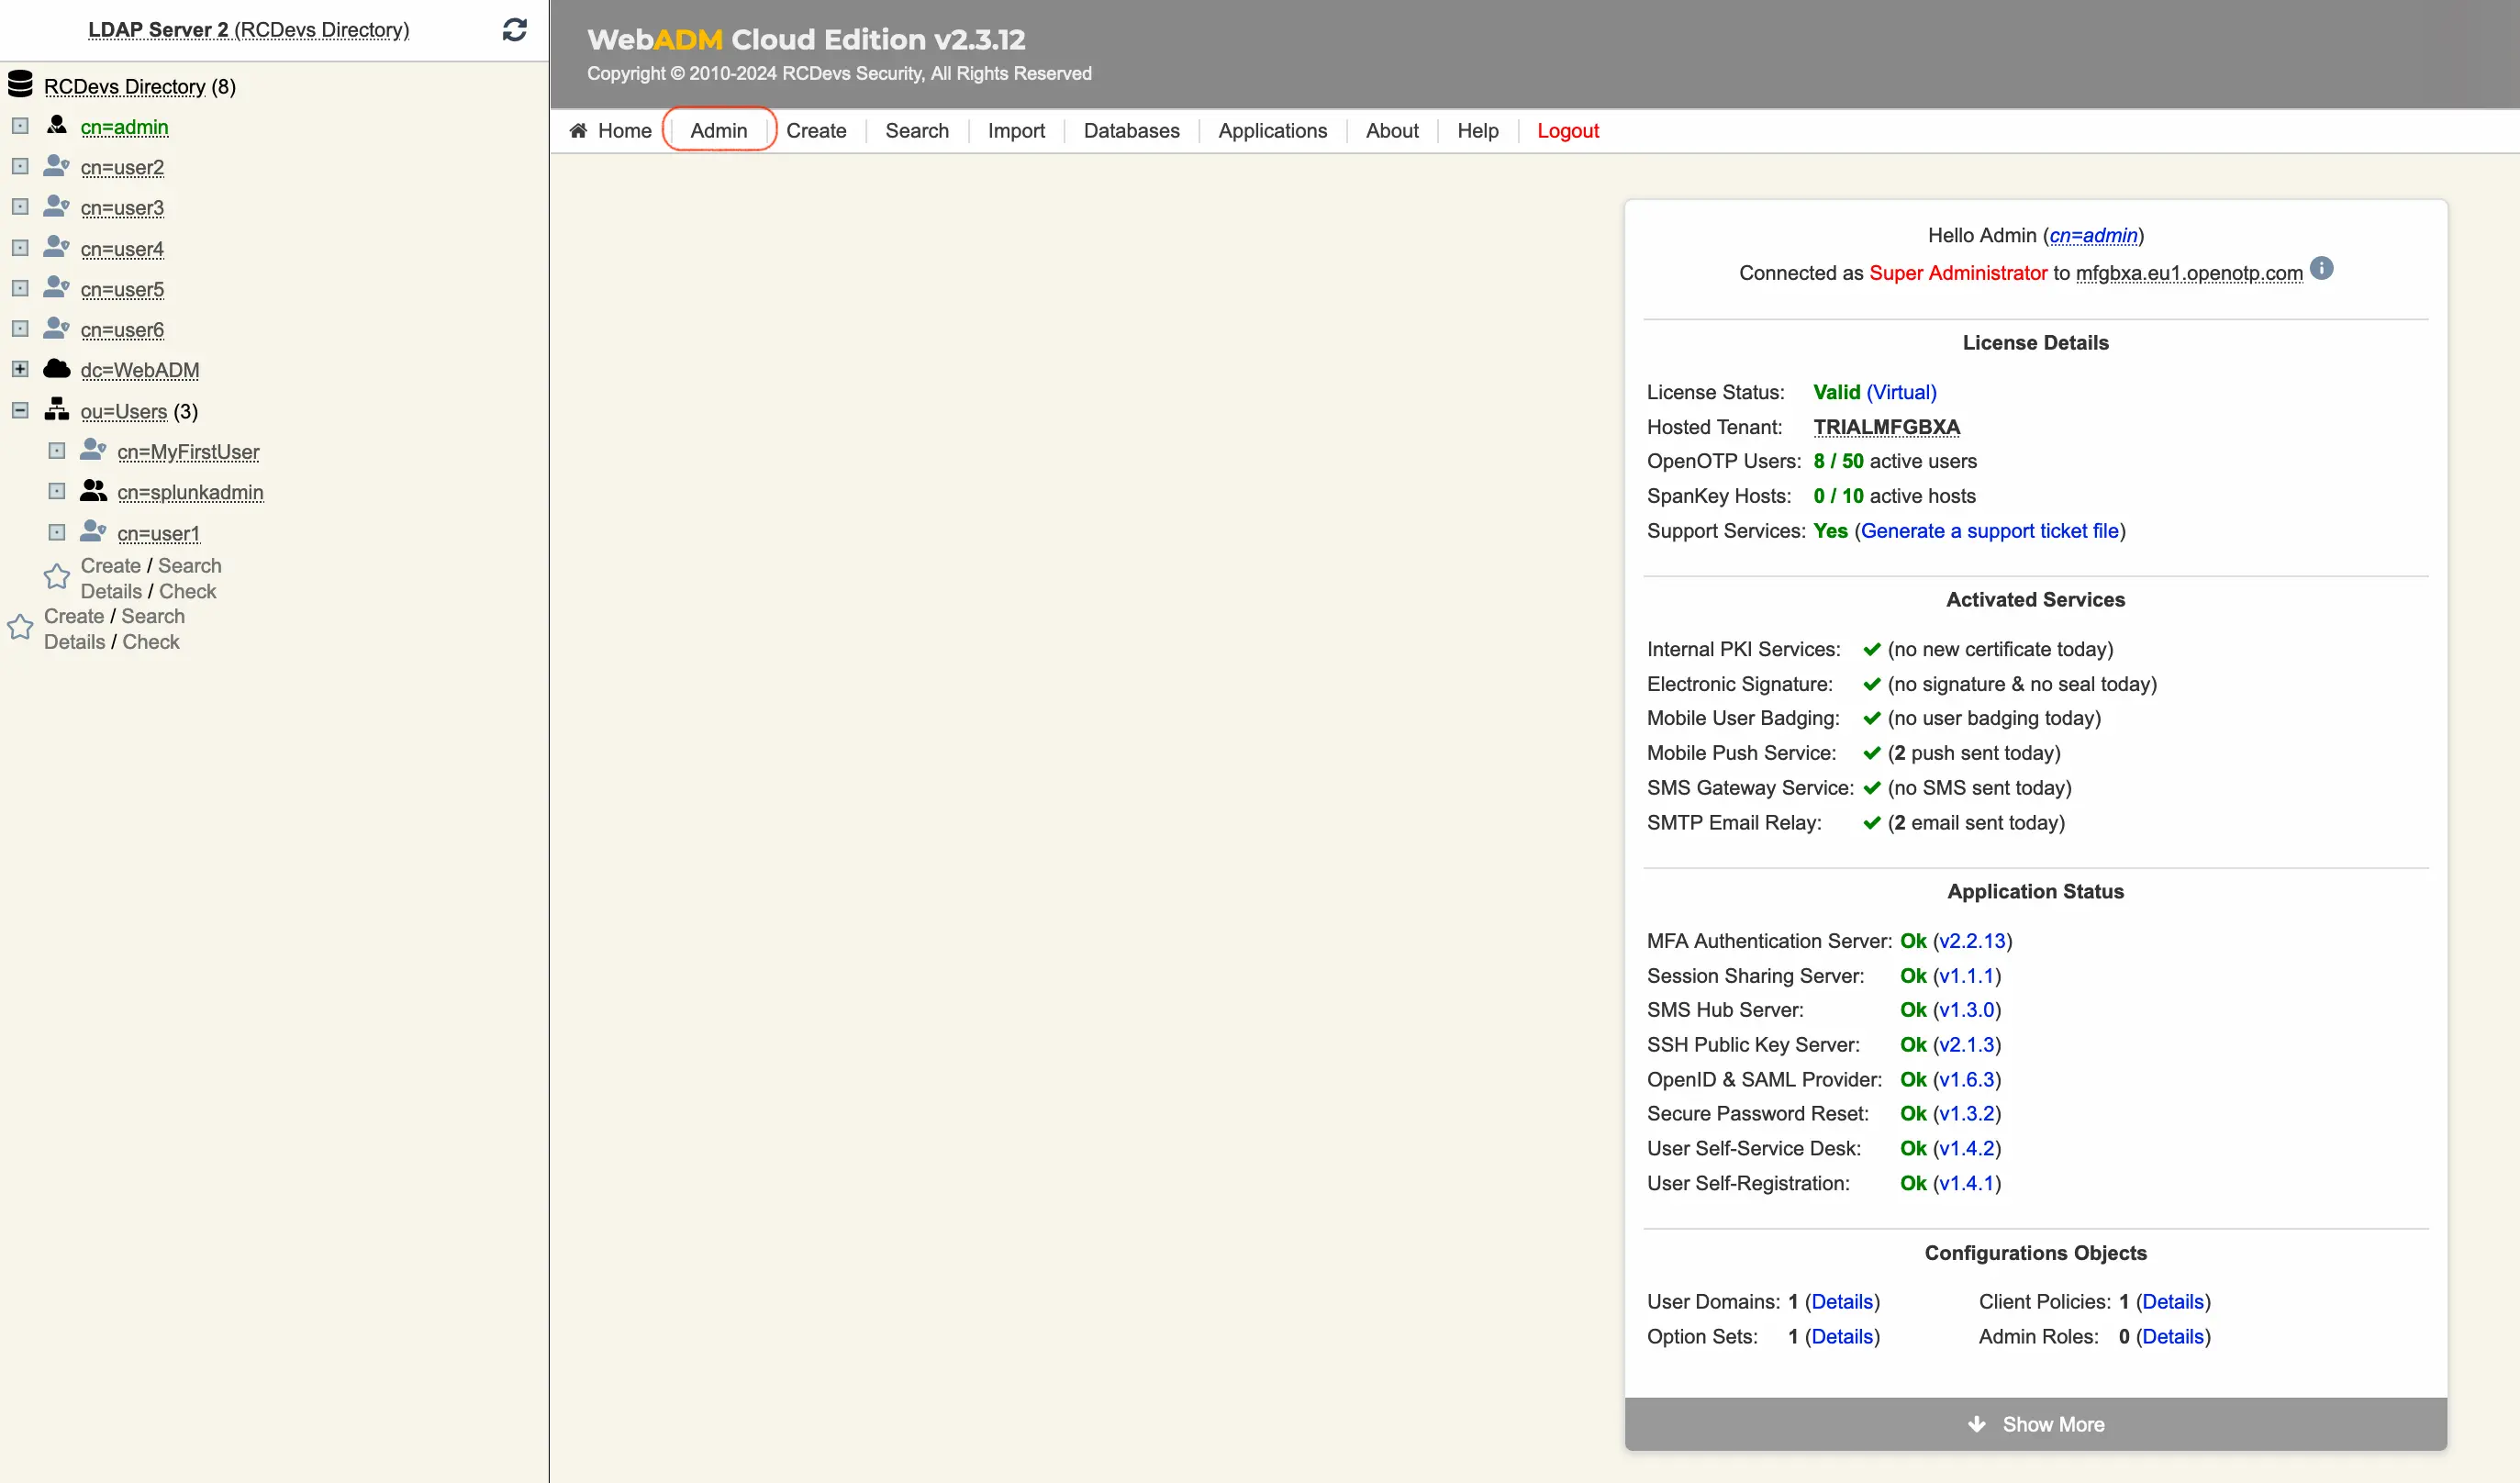
You do not have to modify any files in the OpenID install directory! The web application configurations are managed and stored in the LDAP configured with by WebADM. To configure OpenID/SAML provider, your must login on WebADM as super administrator and go to the Applications menu. Click CONFIGURE on OpenID/SAML to enter the web-based configuration.
OpenID/SAML application logs are accessible in the Databases menu in WebADM.
Note: To be able to use OpenID/SAML, any LDAP users’ accounts must be a activated in WebADM.
You can embed the SAML & OpenID Webapp on your website in an HTML iFrame or Object.
Once your IDP global configuration is done, the best practice is to create Client policy for each Service Provider you are configuring with your IDP.
That will be describe later in that documentation.
2. WebADM IDP configuration
First, we need a WebADM server with MFA Authentication Server and OpenID & SAML Provider packages installaled.
Once the server is up and running, we can configure it as a SAML Identity Provider (IdP).
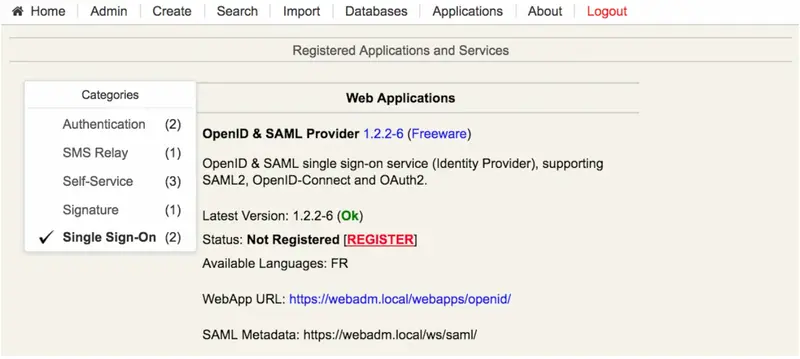
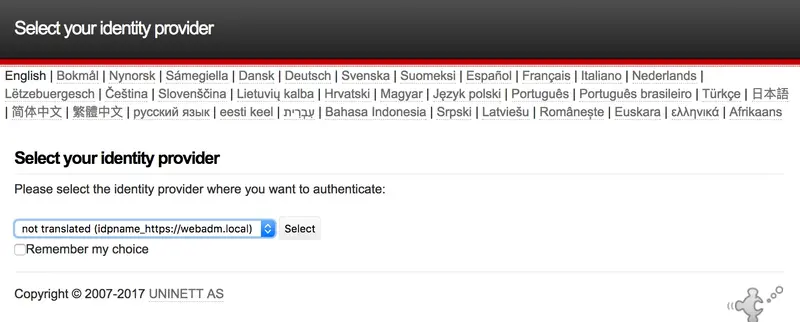
Login to the WebADM Admin Portal and navigate to Applications tab > Singe Sign-On > OpenID & SAML Provider. Click then REGISTER button. The LDAP object containing the IDP configuration is created.
Once the appliaction is registered, click on CONFIGURE button to configure the IDP:
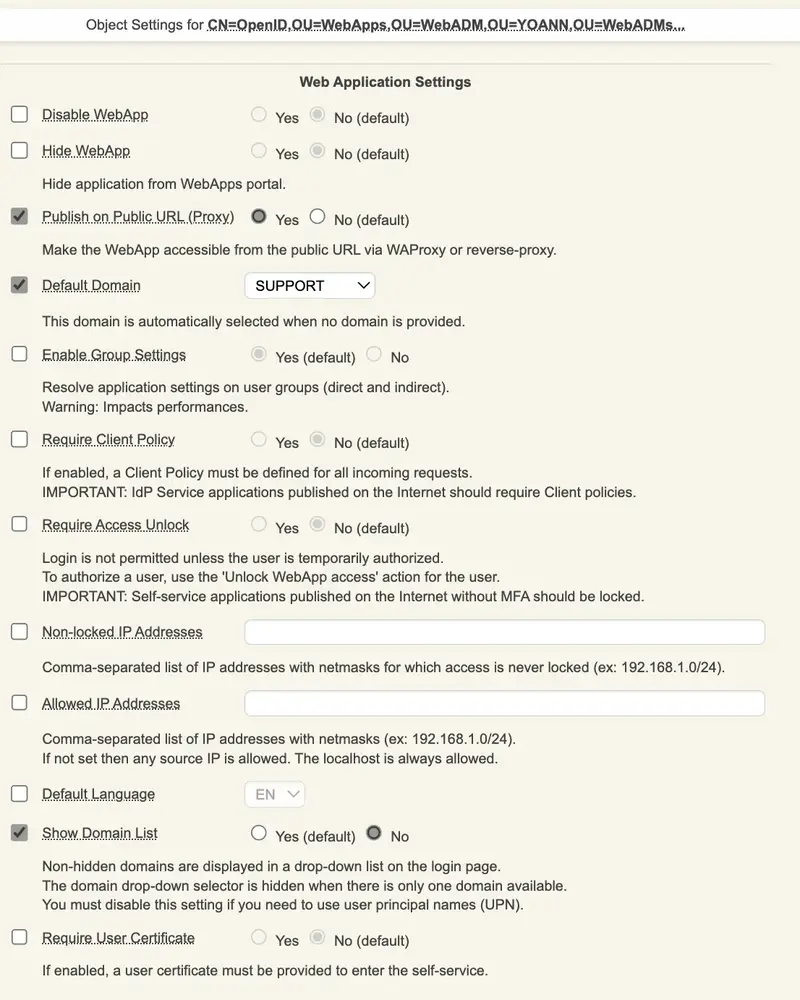
2.1 Web Application Settings and Common Features
You are now in the global configuration of your OpenID & SAML Identity Provider.
Configure the setting you would like to apply. On my side, I published the Web application on my WAProxy, hidden the Domain List because multiple domains are available on my infrastructure and I do not want that information displayed on my IDP login page. I also enforced a default domain but remember that this can be configured at the Client Policy level.
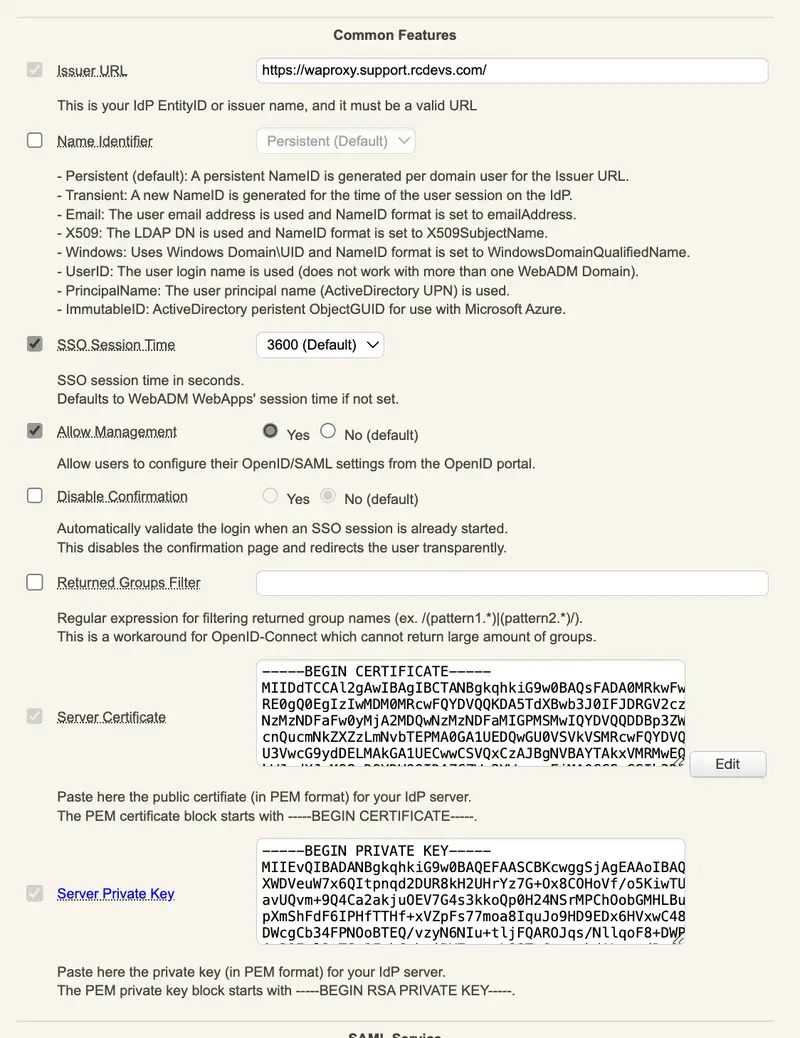
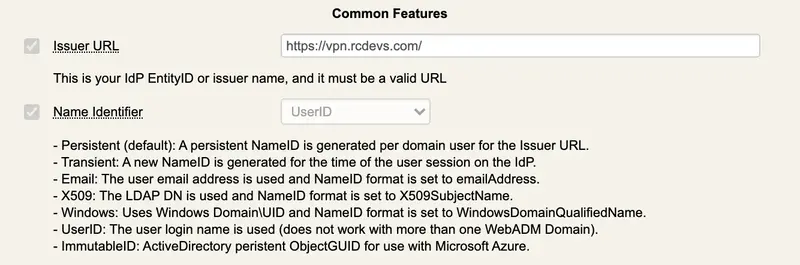
We are now entering in the Common Features section.
The Issuer URL or EntityID is a unique identifier that is used to identify a specific entity in the SAML authentication and authorization protocol. A SAML entity ID is typically a URL or URI that is assigned to the entity, and it is used to identify the entity in SAML messages and metadata. That setting will refer to Issuer value for OpenID. In that documentation, I configured my Issuer URL with the public DNS name targeting my WebADM infrastructure. In most of the case, the IDP URL will be a public URL which can be easily proxied with WebADM Publishing Proxy or with another Reverse Proxy solution.
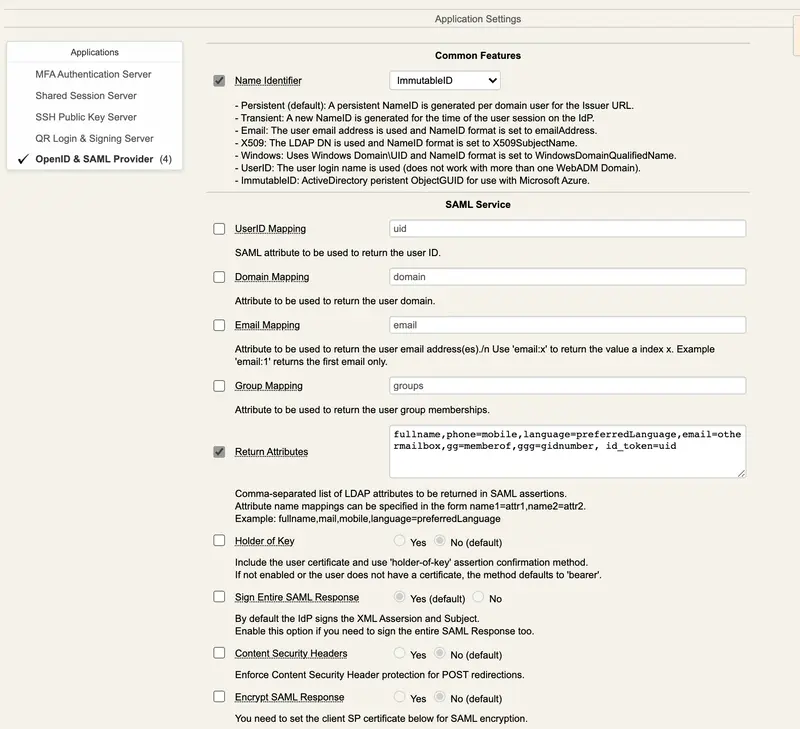
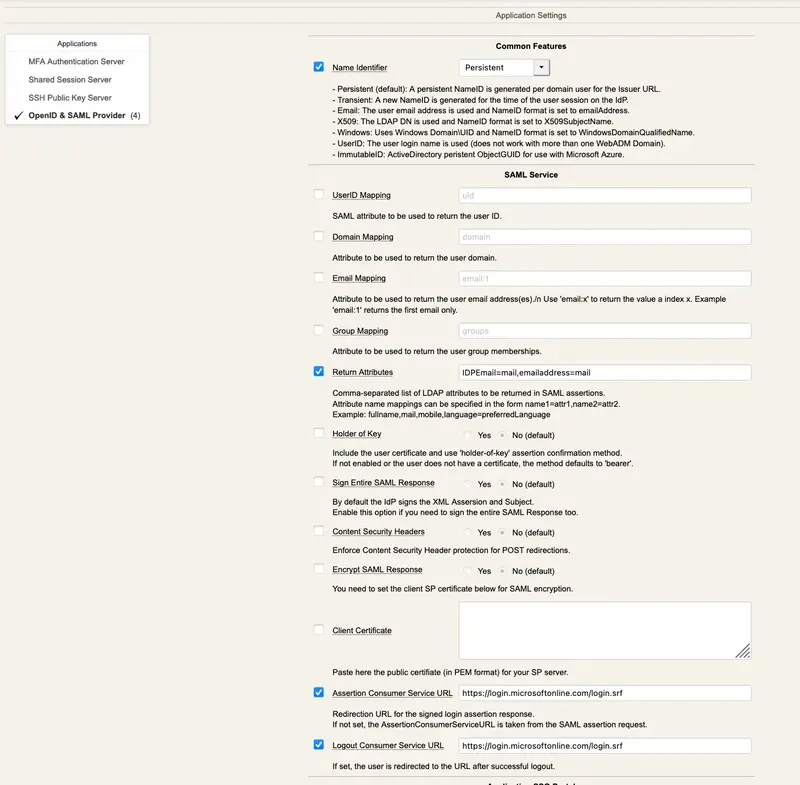
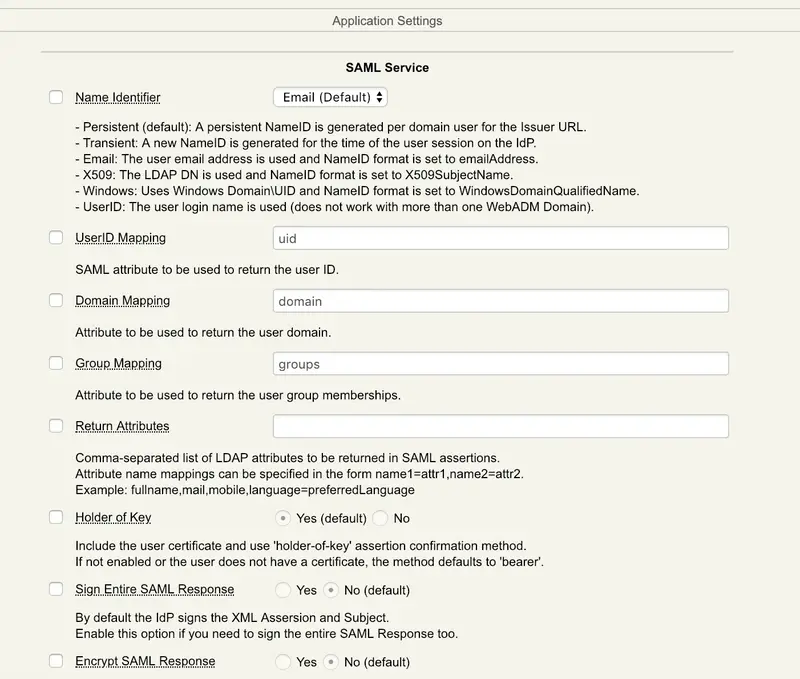
The Name Identifier setting is the unique identifier of the user. It should be non-volatile and opaque. It should not contain personal information or information that is changeable over time, such as the user’s name or email address. The accepted Name Identifier may vary according to the Service Provider you are integrating and for that reason it can make more sens to configure it per Service Provider Client Policy.
The SSO Session Time define the time for a user session remains valid on the IDP.
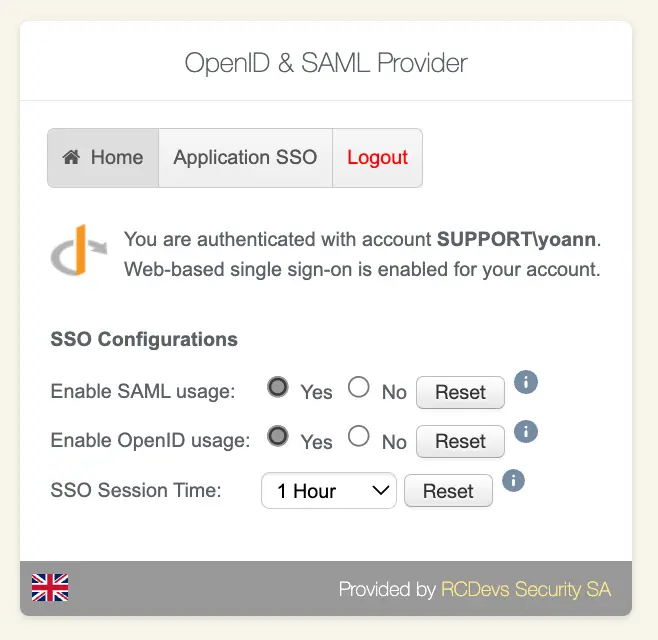
The Allow Management setting provides the possibility to your end-users to enable/disable the SAML/OpenID usage for their account and configure their SSO Session timeout. It is recommanded to disabled that setting by default.
Example below of end-user view once authenticated on the IDP and when that setting is enabled:
The SSO Session Time setting allow the transparent redirection to an Service Provider once the user is authenticated.
The Returned Groups Filter is a regular expression which can be configured in order to filter groups returned in the SAML or OpenID responses based on the RegEx match.
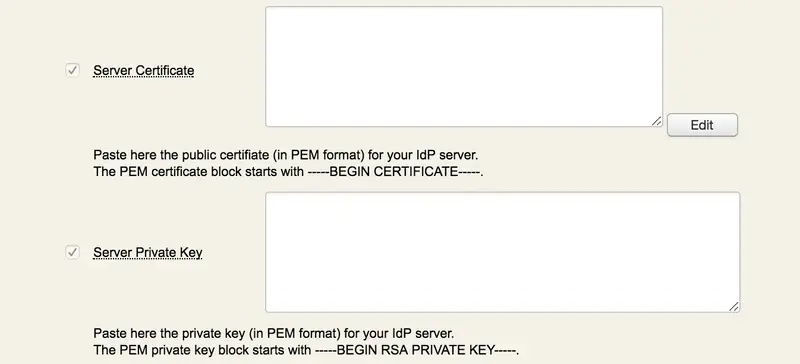
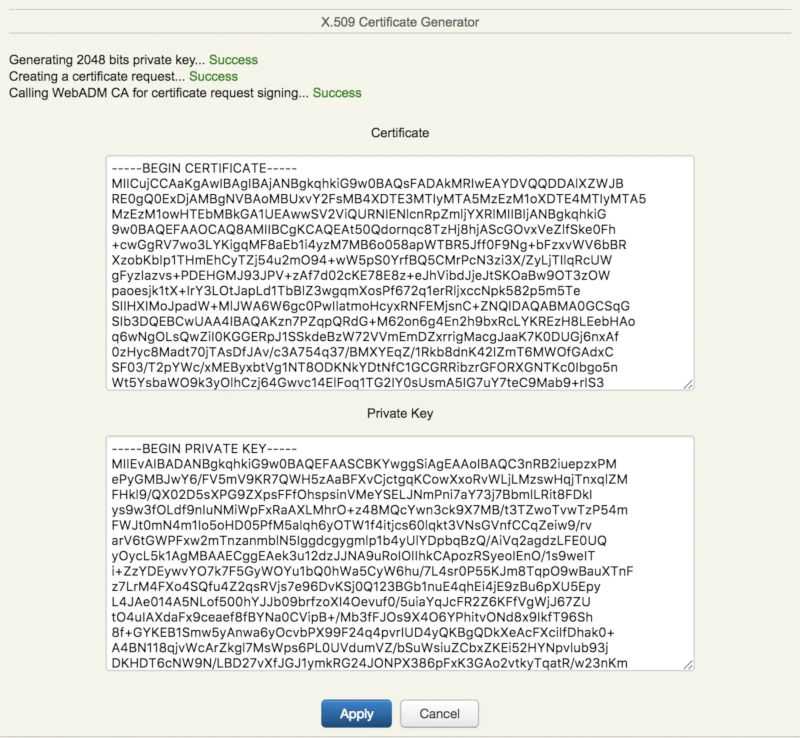
The Server Certificate and Server Private Key settings are mandatory and will be used for request signing purposes. Click Edit and Generate buttons, then a certificate with WebADM internal PKI is issued.
Now, we have the IdP certificate, we click on Apply and the Server Certificate and Private key will be auto filled in the configuration. You can also issue a certificate with your Entreprise CA if desired.
The Common Features section is now configured.
2.2 SAML Configuration
We are now entering in the SAML dedicated configuration.
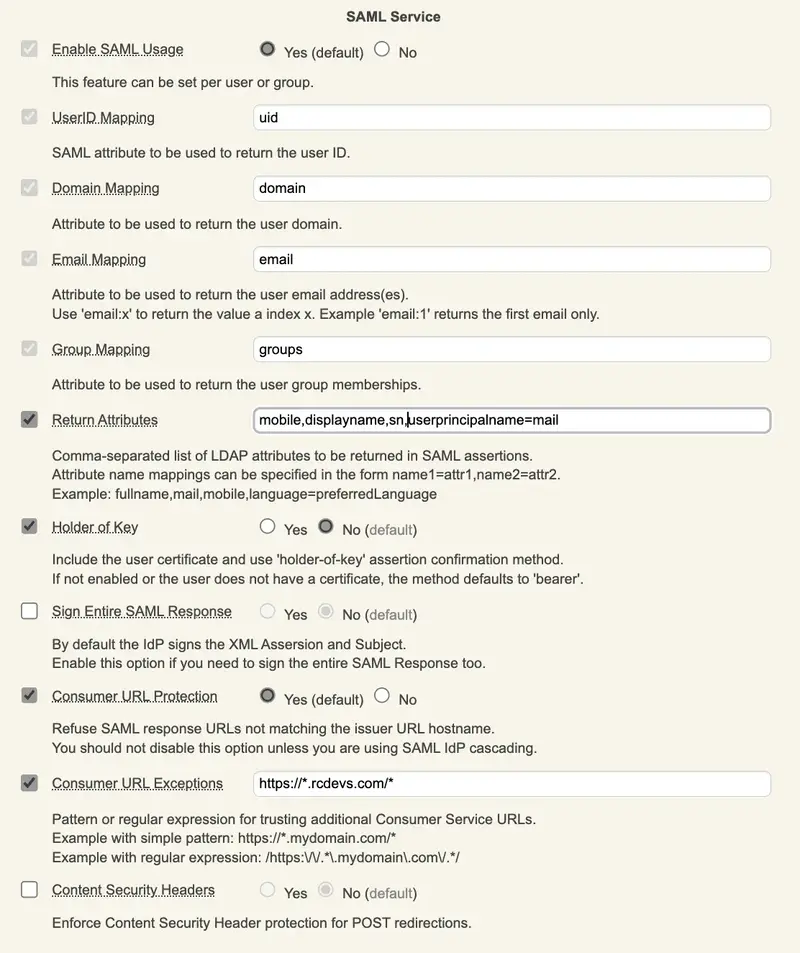
The Enable SAML Usage setting enable the SAML configuration in order to implement SP through SAML.
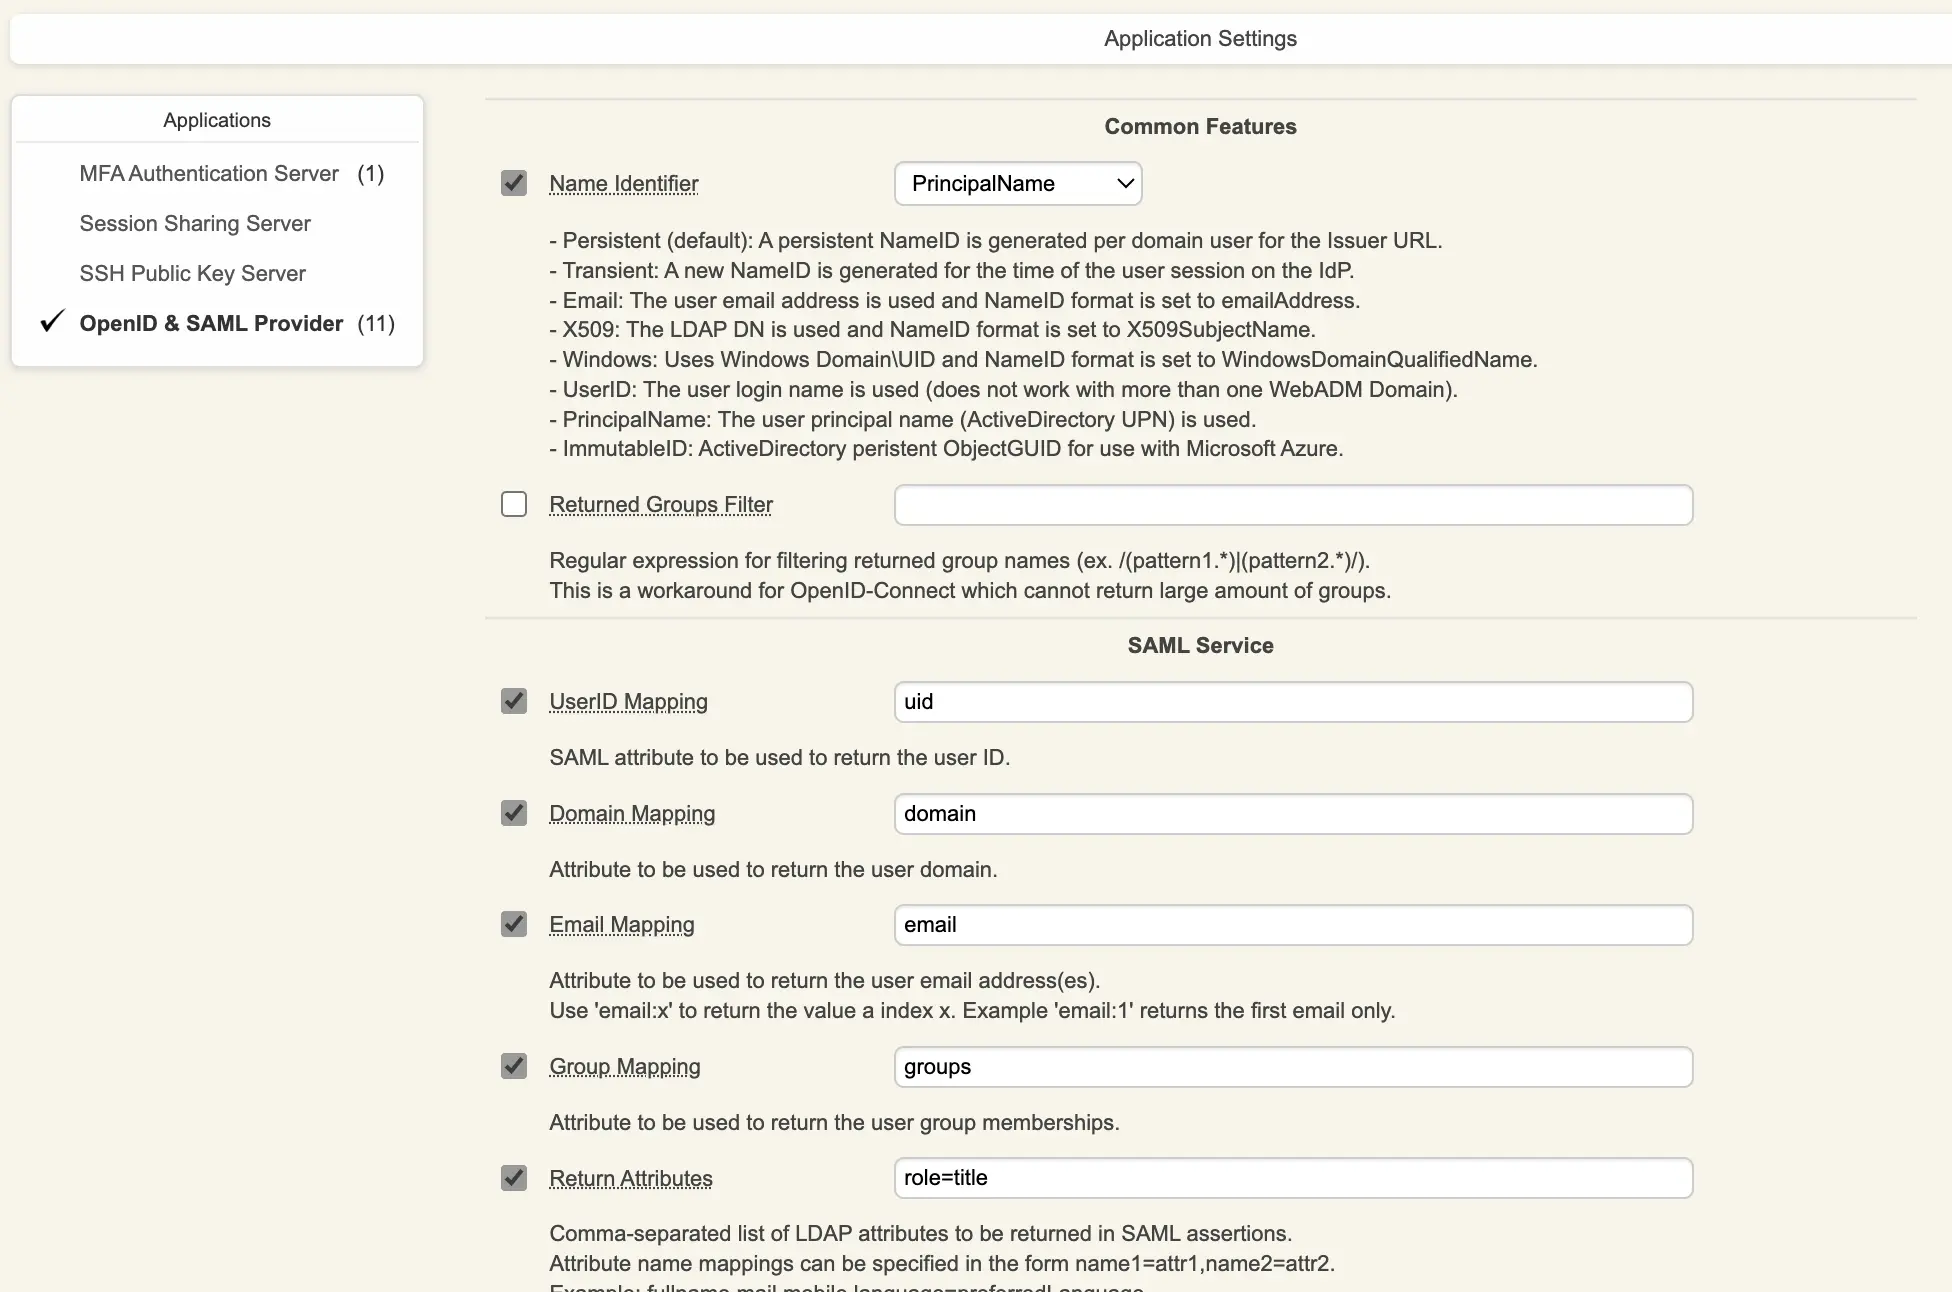
The UserID Mapping setting is the attribut value used in the SAML response to return the user ID.
The Domain Mapping setting is the attribut value used in the SAML response to return the domain value. By default, the WebADM domain name is returned based on the domain used to authenticate the user.
The Email Mapping setting is the attribut value used in the SAML response to return the users’ email value(s).
The Group Mapping setting is the attribut value used in the SAML response to return the user group memberships.
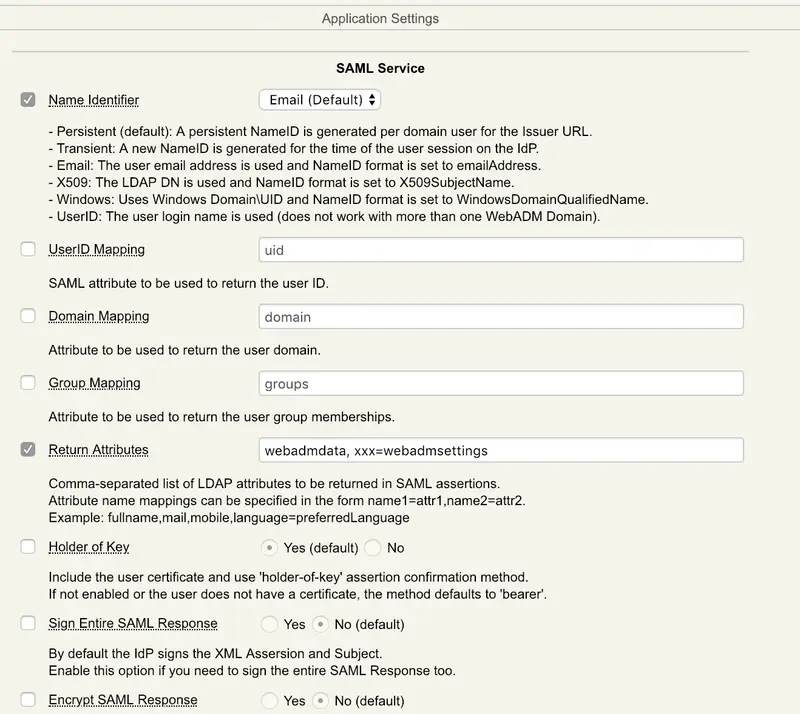
The Return attributes setting is the attribut value used in the SAML response to return a list of desired attributs. You can also manipulate values returned. For example here, I returned in SAML response mobile, displayname sn attributs retrieved from the LDAP account and in userprincipalname I put the user email value.
The Holder of Key setting is used to include the user certificate and use ‘holder-of-key’ assertion confirmation method. If not enabled or the user does not have a certificate, the method defaults to ‘bearer’.
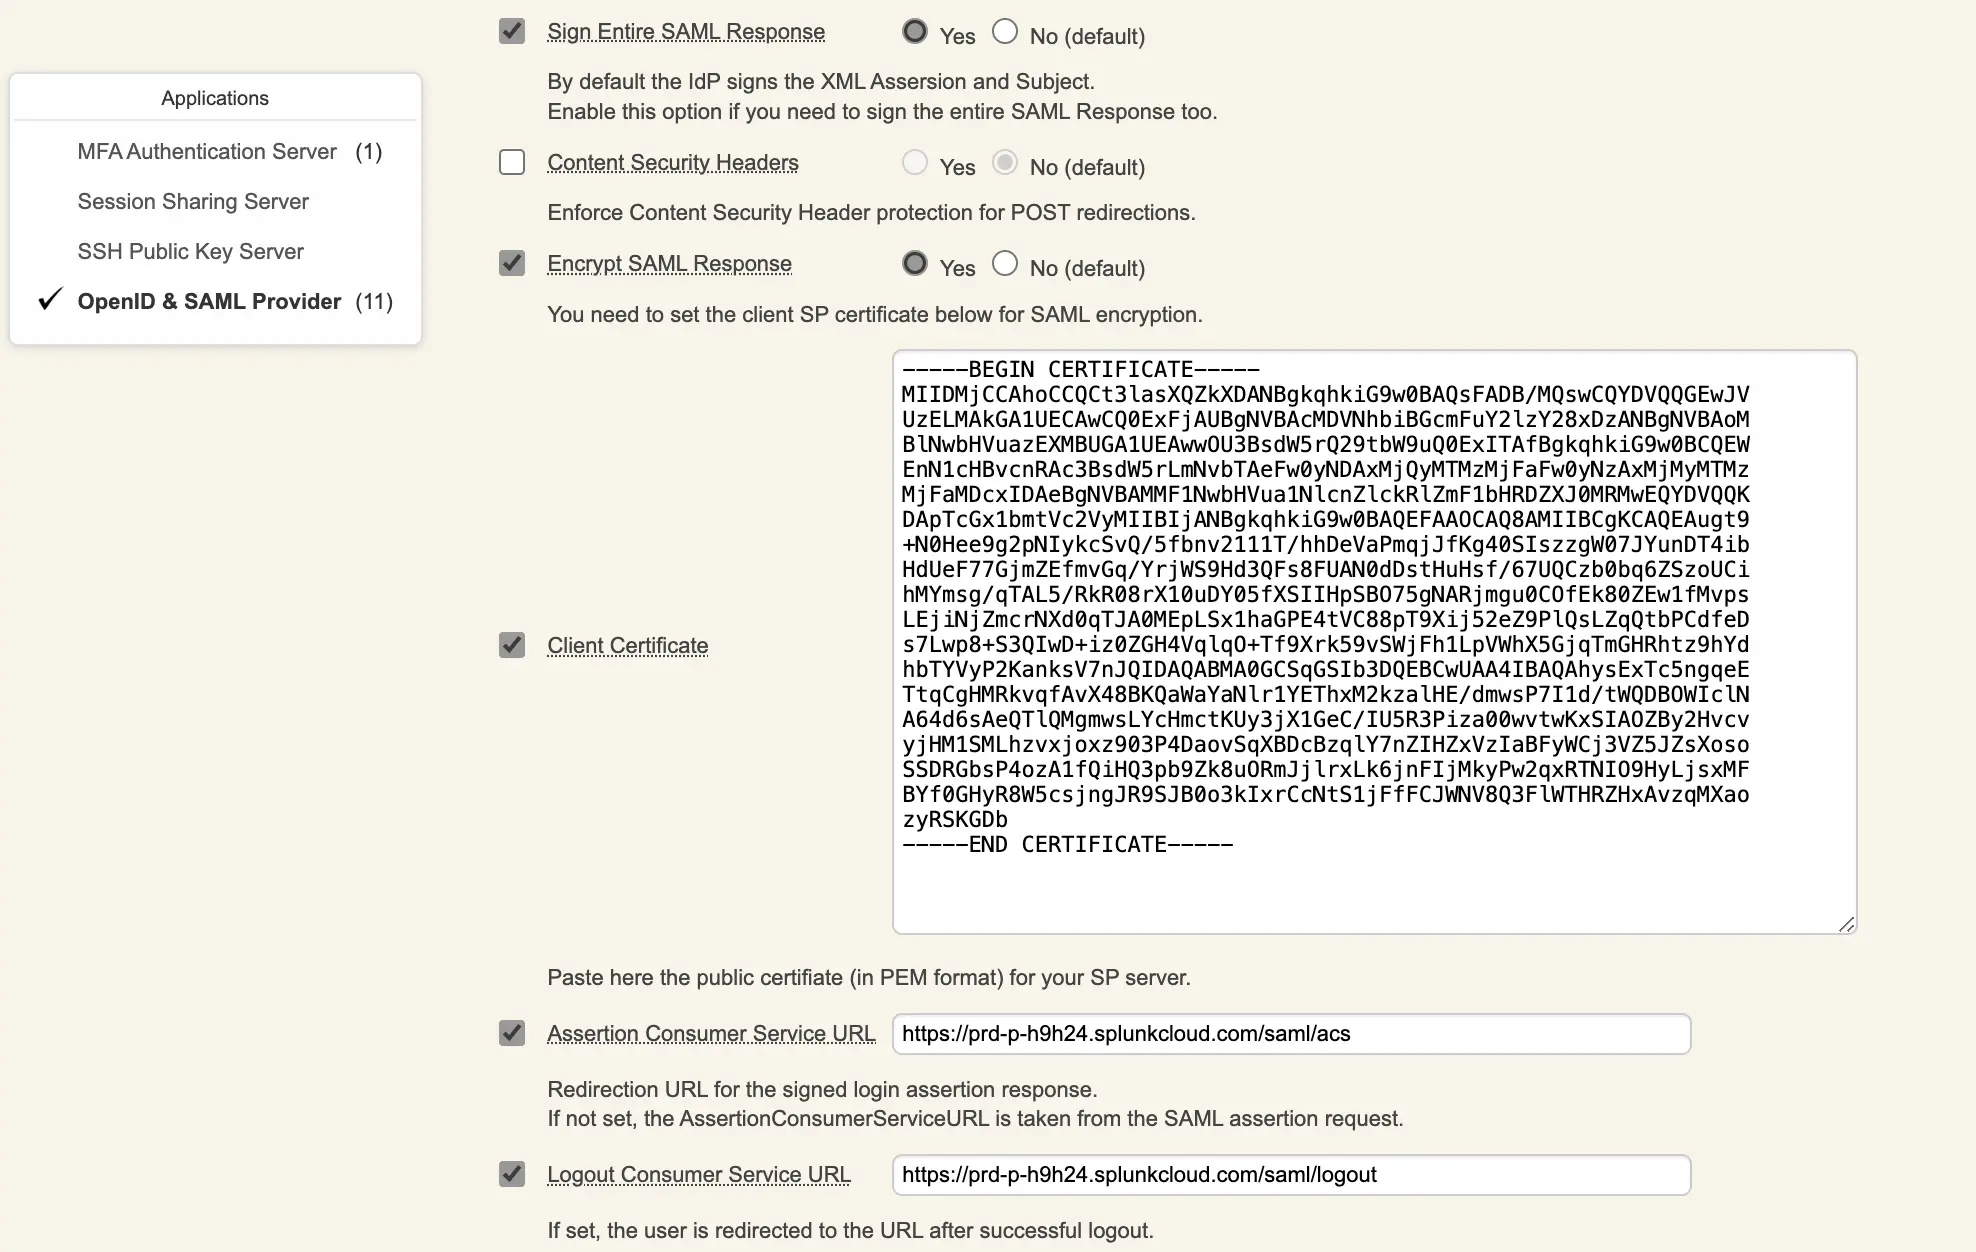
The Sign Entire SAML Response setting is used to intirely sign the SAML response. This can be an option on some service provider. By default, the IdP signs the XML assersion and the subject.
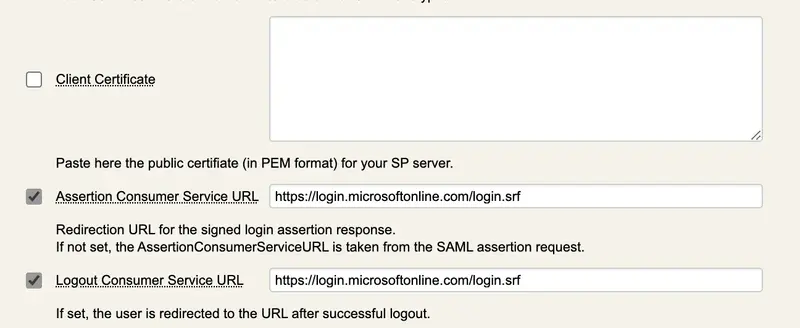
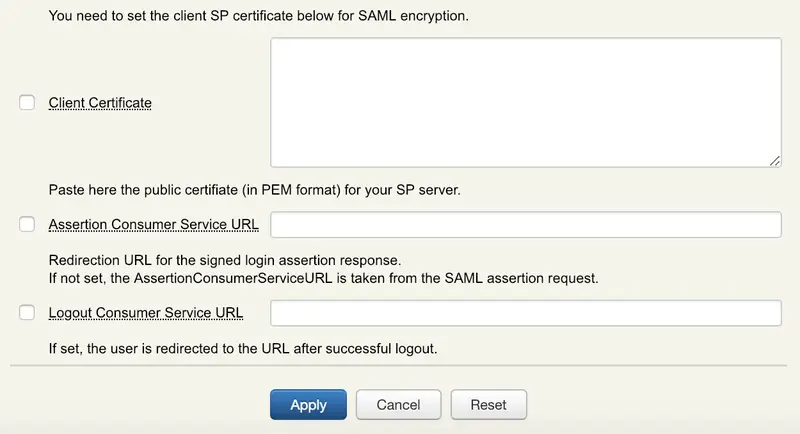
The Consumer URL Protection is a security setting used to refuse SAML requests containing AssertionConsumerServiceURL which do not match the Issuer URL hostname present in the same request.
The Consumer URL Exception setting can be used when the AssertionConsumerServiceURL present in the SAML request do not match the SP issuer URL.
In that example, the AssertionConsumerService URL hostame (system.netsuite.com) do not match the Issuer hostname (netsuite.com).
I can then configure a Consumer URL Exceptions like this:
By default, the AssertionConsumerServiceURL is taken from the SAML request and is used by ther IDP after the user authentication to send the response to the service provider. The AssertionConsumerServiceURL can be rewrite by client policies if needed. If multiple AssertionConsumerServiceURL are available on your service provider, then you can also use the Consumer URL Exception and configure a regex that will match all URLs.
The Content Security Headers setting can be used to enforce content security header protection for POST redirections.
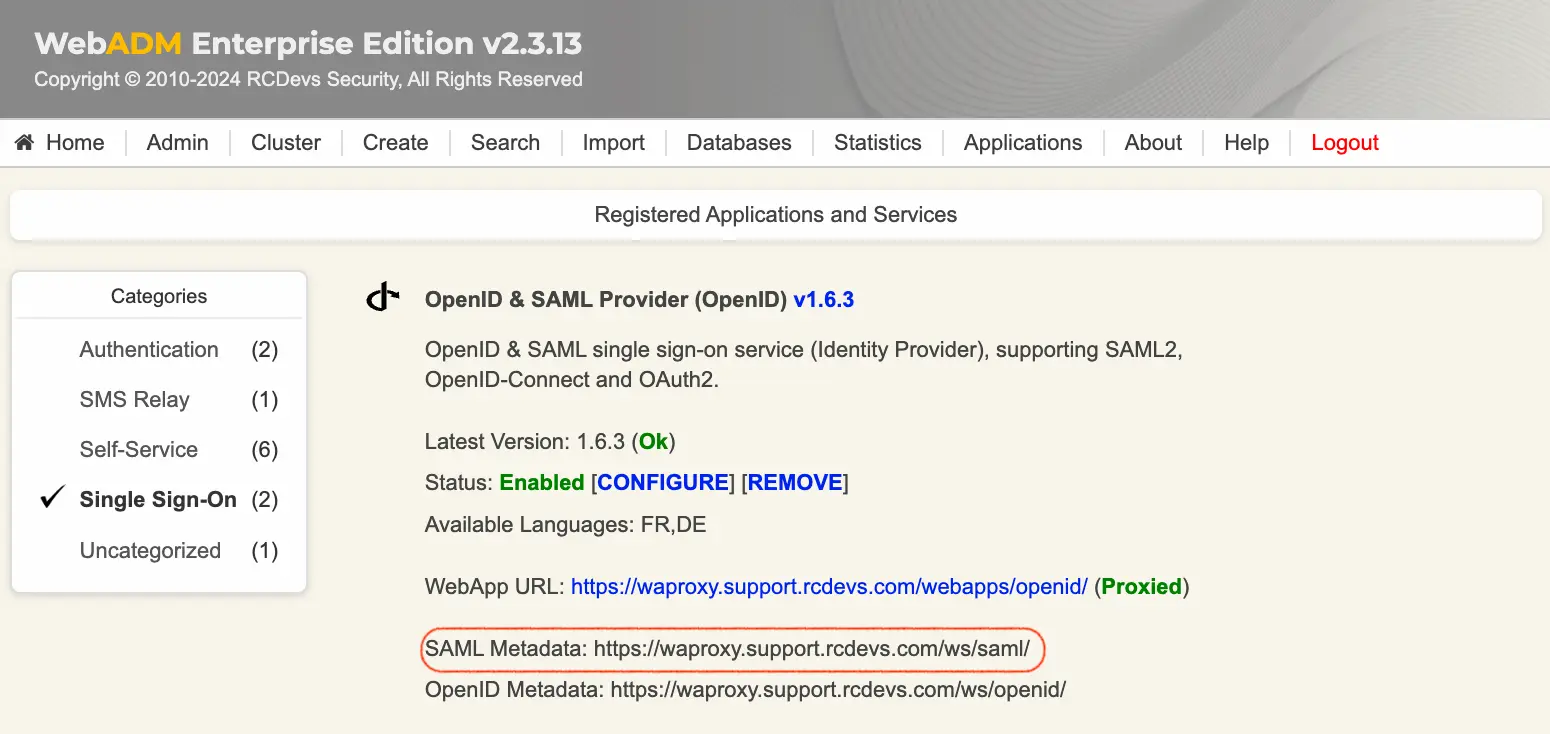
You can now save your SAML configuration. The SAML metadata URL is accessible through WebADM servers and through WAProxy servers if the Web Application is published through WAPRoxy:
This XML file does not appear to have any style information associated with it. The document tree is shown below.
<EntityDescriptorxmlns="urn:oasis:names:tc:SAML:2.0:metadata"entityID="https://waproxy.support.rcdevs.com"><IDPSSODescriptorprotocolSupportEnumeration="urn:oasis:names:tc:SAML:2.0:protocol"><KeyDescriptoruse="signing"><KeyInfoxmlns="http://www.w3.org/2000/09/xmldsig#"><X509Data><X509Certificate>MIIDdTCCAl2gAwIBAgIBCTANBgkqhkiG9w0BAQsFADA0MRkwFwYDVQQDDBBXZWJBRE0gQ0EgIzIwMDM0MRcwFQYDVQQKDA5TdXBwb3J0IFJDRGV2czAeFw0yMTA2MDQwNzMzNDFaFw0yMjA2MDQwNzMzNDFaMIGPMSMwIQYDVQQDDBp3ZWJhZG0xLnN1cHBvcnQucmNkZXZzLmNvbTEPMA0GA1UEDQwGU0VSVkVSMRcwFQYDVQQKDA5SQ0RldnMgU3VwcG9ydDELMAkGA1UECwwCSVQxCzAJBgNVBAYTAkxVMRMwEQYDVQQHDApMdXhlbWJvdXJnMQ8wDQYDVQQIDAZCZWx2YWwwggEiMA0GCSqGSIb3DQEBAQUAA4IBDwAwggEKAoIBAQDMG15m4VhS8vIEXWDVeuW7x6QItpnqd2DUR8kH2UHrYz7G+Ox8COHoVf/o5KiwTUOnWfdBP+yhn0gkavUQvm+9Q4Ca2akjuOEV7G4s3kkoQp0H24NSrMPChOobGMHLBuFo2NRhbhvU3S5jpXmShFdF6IPHfTTHf+xVZpFs77moa8IquJo9HD9EDx6HVxwC48051fha+dImGOTrDWcgCb34FPNOoBTEQ/vzyN6NIu+tljFQAROJqs/NllqoF8+DWPF3Dj5PplZrAuJ6jz29Inl2xTSz2FwbCqhxjBX7teteL88TuGxosqkd1L+gpdRmCReaKe4yuNTxno81tAM+iz8zAgMBAAGjNjA0MCUGA1UdEQQeMByCGndhcHJveHkuc3VwcG9ydC5yY2RldnMuY29tMAsGA1UdDwQEAwIF4DANBgkqhkiG9w0BAQsFAAOCAQEAeGwXTFNSCh6JnGdVIDSVj5NGRTTrF1iyCEKMDo1x6fJNCjUHjHIIv5nLzm+xanguCkFymFuwngT9+x3hDWAmCpOZO9ROrWXiCfHEF3LwPf5SqGKDpA+fvVyYeVOKhbUxRd25nUq7PTt2TYTA8UW0Twh80mkX+b4u2xa/fnyBmVthWFJTtYhGAO94n5eKhQsKk427mnVXtm8GlxK8flmOWl6ImJCUSONqP4WSSl5hj/smqzVpoISlhl9R9e3KXLD8V5jRpMxQ5agk5+foMQPsR3fcPWjNkm8CkDhnOyPdsPeRf/dKMCPA3Zw6haHaW+0IU7beMf1gAazE7sYq4sFm1w==</X509Certificate><!-- Cert Fingerprint (SHA1): 23c92977b9547dd71ea892f8dde895271b78c907 --><!-- Cert Fingerprint (SHA256): 0bc0fe361e37a4b9af080e6f194a621fe9b4e2f94853330c050667c127443e80 --><!-- Cert Fingerprint (MD5): 2643ed6f4569486969b6d1a880a5e44b --></X509Data></KeyInfo></KeyDescriptor><SingleLogoutServiceBinding="urn:oasis:names:tc:SAML:2.0:bindings:HTTP-Redirect"Location="https://waproxy.support.rcdevs.com/openid/index.php"/><SingleLogoutServiceBinding="urn:oasis:names:tc:SAML:2.0:bindings:HTTP-POST"Location="https://waproxy.support.rcdevs.com/openid/index.php"/><SingleSignOnServiceBinding="urn:oasis:names:tc:SAML:2.0:bindings:HTTP-Redirect"Location="https://waproxy.support.rcdevs.com/openid/index.php"/><SingleSignOnServiceBinding="urn:oasis:names:tc:SAML:2.0:bindings:HTTP-POST"Location="https://waproxy.support.rcdevs.com/openid/index.php"/></IDPSSODescriptor></EntityDescriptor>
The SAML clients (Service Providers) need to know about the SAML IdP endpoints. Most clients will accept the autoconfiguration with an XML-based metadata URL. You can provide the previous URLs according to your scenario.
Important
Many SAML Service Providers will require your WebADM to be run with a trusted SSL certificate. To use your own trusted certificate and key, please have a look on Trusted Certificate documentation.
2.3 OpenID Configuration
The configuration of OpenID service is very simple.
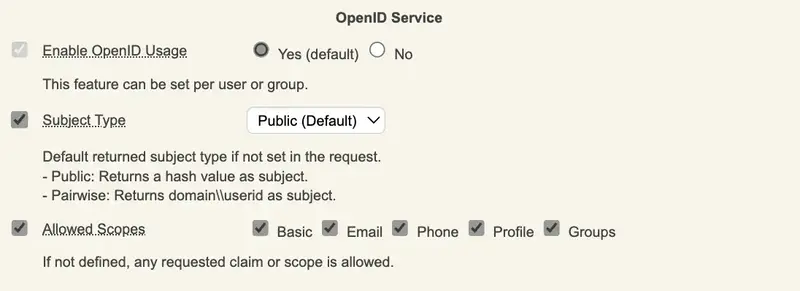
Version 1.2x includes the support for OpenID-Connect and OAuth2.
To use your identity provider in OpenID-Connect mode, the client configuration must pass the scope ‘openid’ in the IdP requests.
The supported OpenID-Connect scopes are: basic, email, phone, profile and groups.
To use your identity provider in OAuth2 mode, the client must pass the scope ‘profile’ in the IdP requests.
If your client application needs the user’s email address, you can additionally request the openid email scope.
The Allwed scopes must be enabled in the global configuration or per client policy in order to be returned to the service providers which are requesting them in their request.
The OpenID metadata URL is accessible through WebADM servers and through WAProxy servers if the Web Application is published through WAPRoxy:
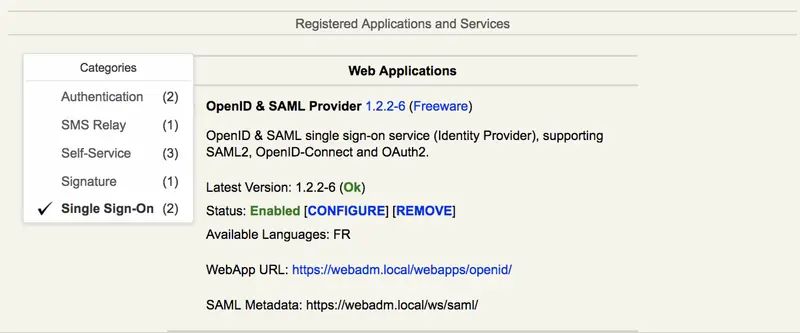
In this scenario, the authentication will be started directly from OpenID & SAML Provider web application. We will configure WebADM to manage authentications with Amazon Web Service (AWS). Other Service providers are available but not shown in this HowTo: GSuite, SalesForce, SugarCRM, Zimbra, GoToMeeting, GoToWebinar, GoToTraining and GoToAssist.
3.1.1 AWS SAML integration
3.1.1.1 SAML Configuration on AWS
First, we save the SAML metadata in a file. For our IdP server, we find it in https://webadm.local/ws/saml/.
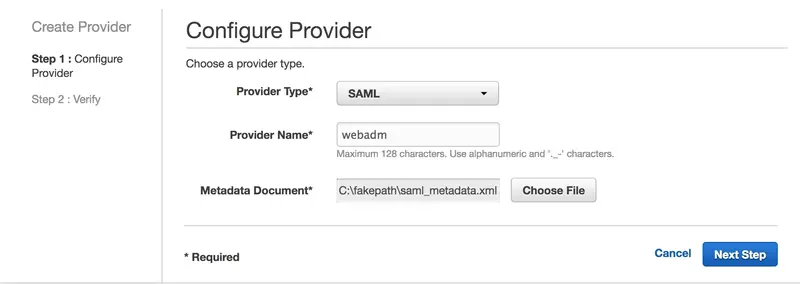
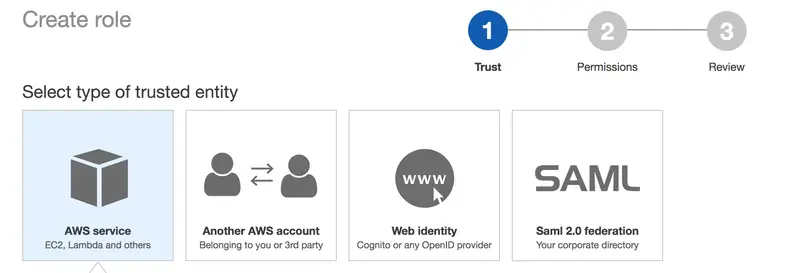
We open AWS console > IAM > Identity providers > _Create Provider:
We select SAML, add a name, insert the metadata file and click on Next Step:
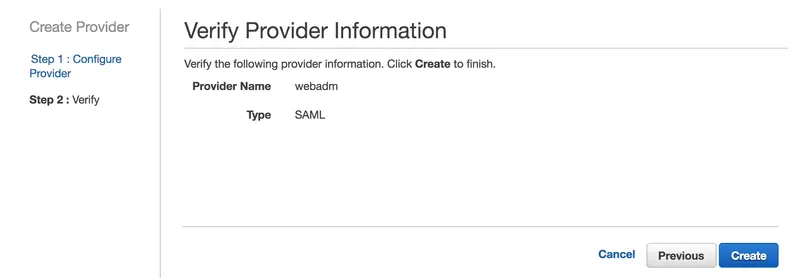
We click on Create:
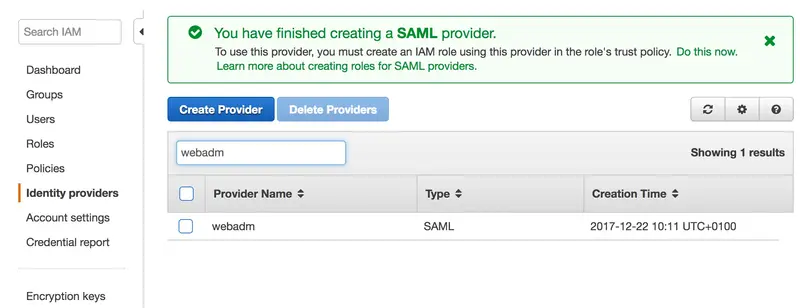
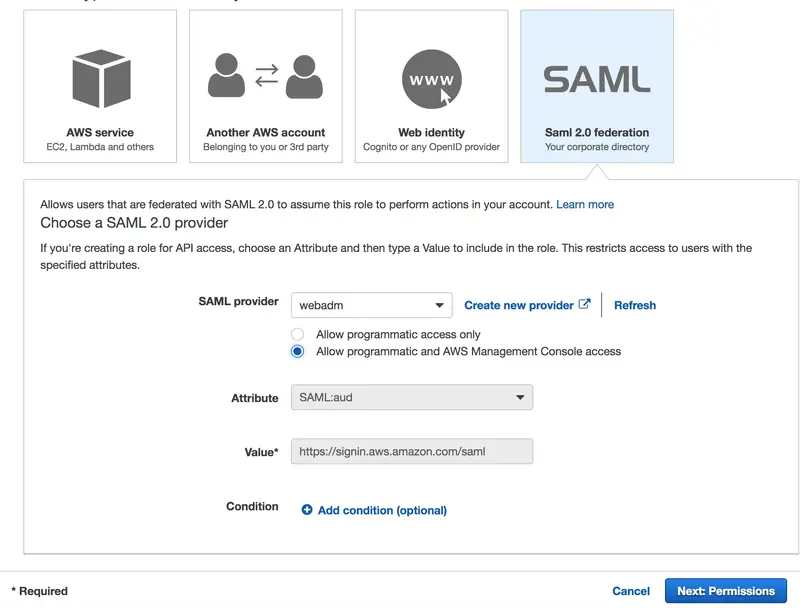
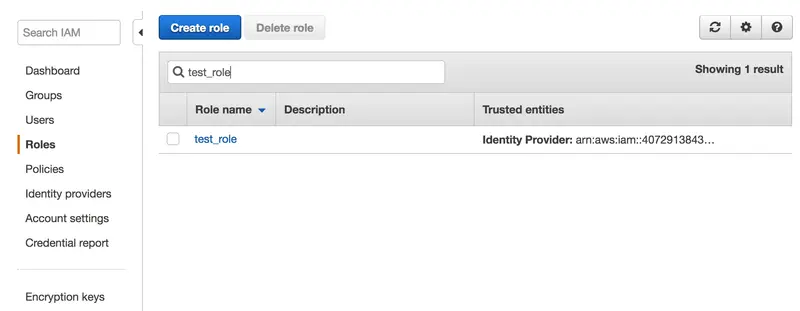
Now, our IdP is added to AWS. We select Roles:
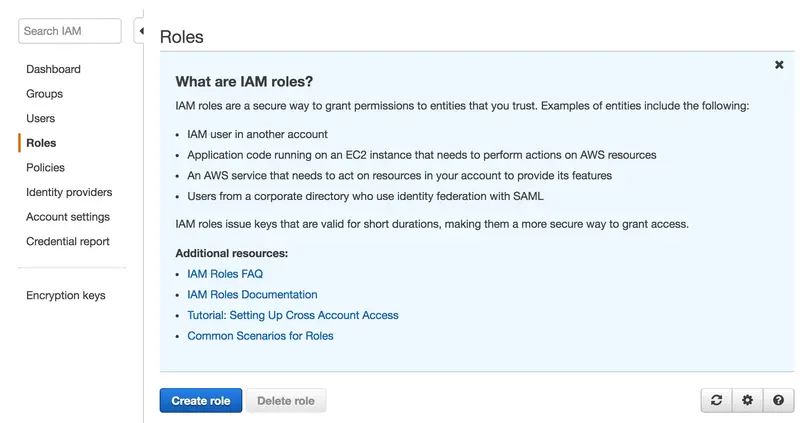
We click on Create Role:
We click on SAML:
We select our SAML provider, select AWS Management Console access and click on Next Permission:
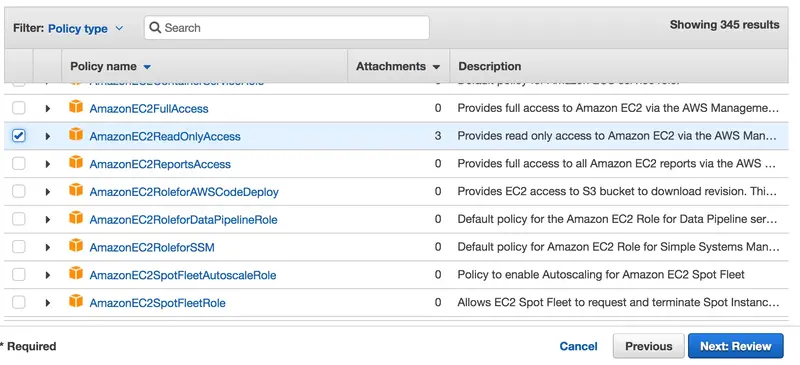
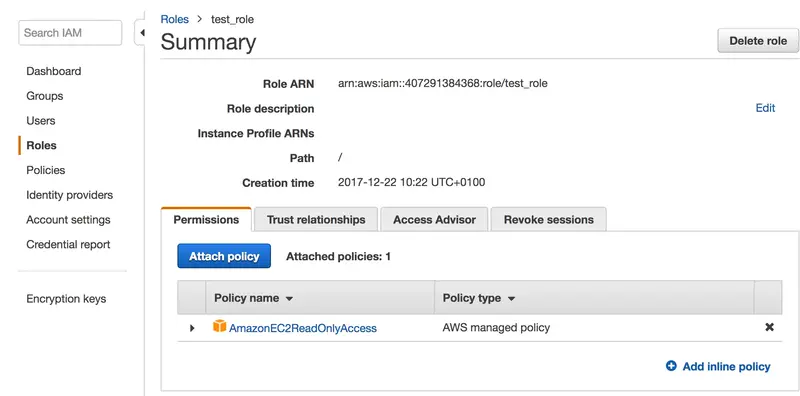
We select a permission policy and click on Next: Review.
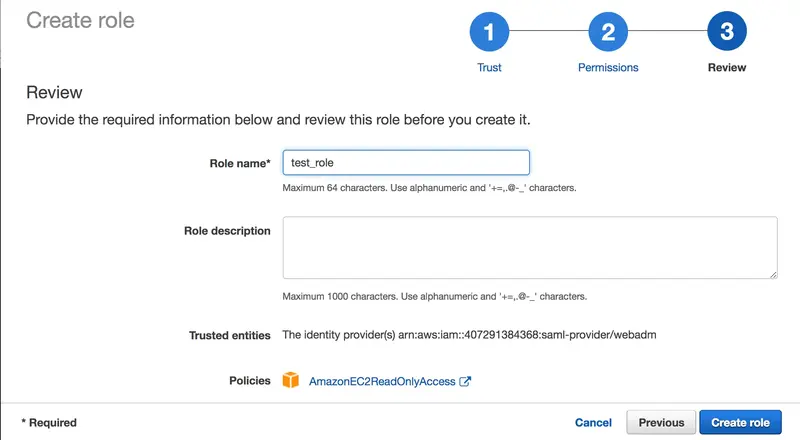
We add a name and click on Create role:
The role is now created, we can select it to see more details.
3.1.1.2 Configure WebADM IDP for AWS
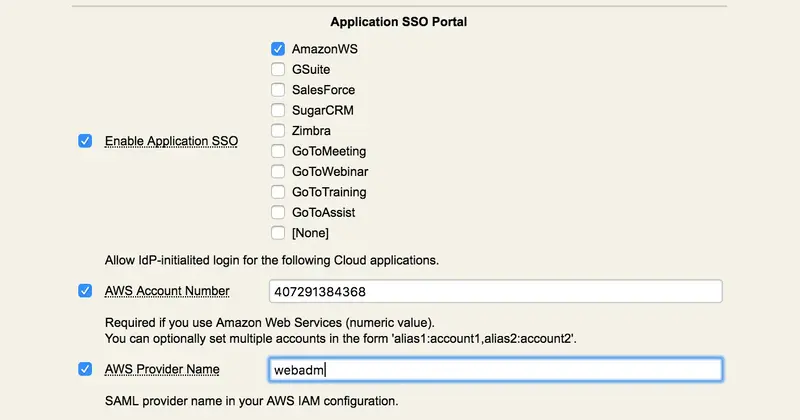
We need to activate IdP initiated authentication for AWS.
We open the configuration in WebADM GUI > Applications > Single Sign-on > CONFIGURE:
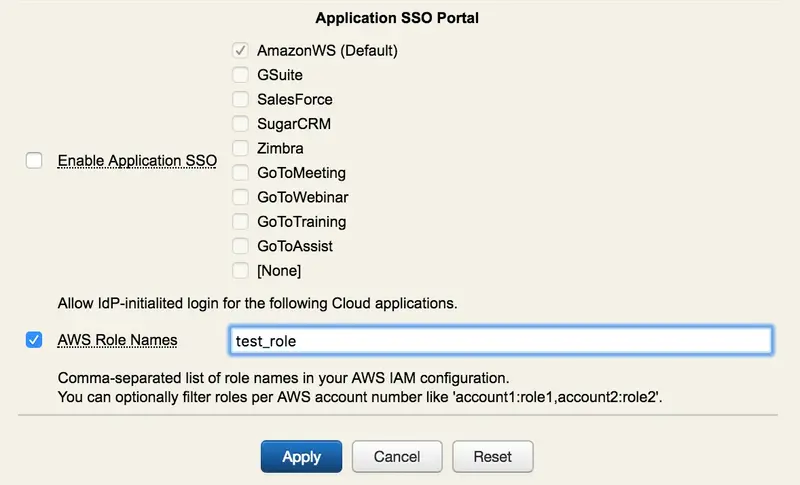
We check Enable Application SSO and AmazonWS, we add AWS Account Number (a numerical value that you can find in the ARN of the AWS role) and AWS Provider Name and apply:
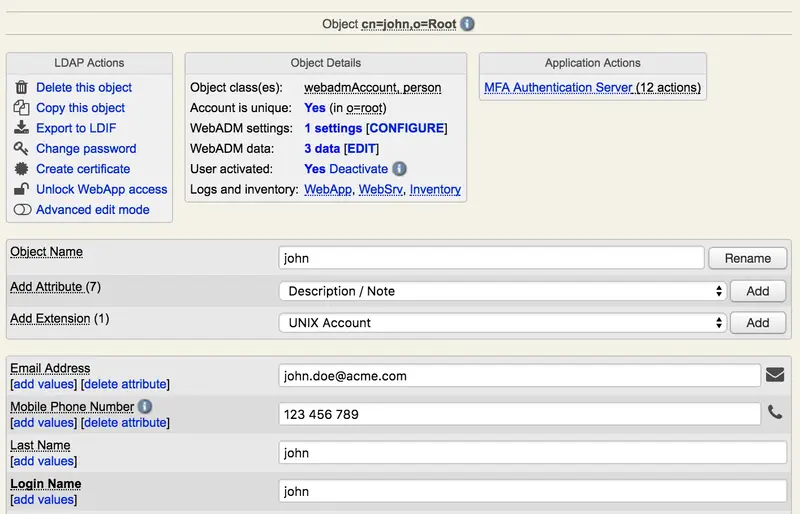
We select the test user and click on WebADM settings: [CONFIGURE]:
We select OpenID, add AWS Role Names and Apply. We can also add the AWS role to an LDAP group:
3.1.1.3 AWS users/groups/clients policies
See more in section 4. How to create and match a client policy per service provider. The example used is with AWS.
3.1.1.4 Testing/Debug
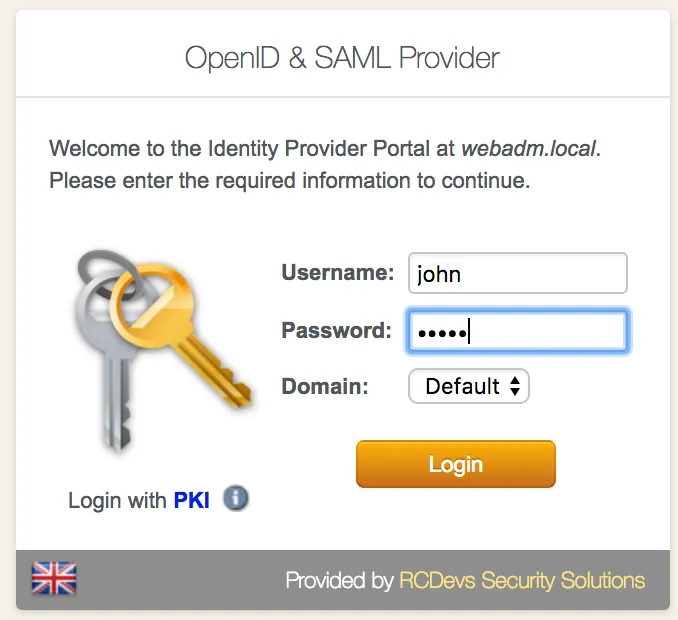
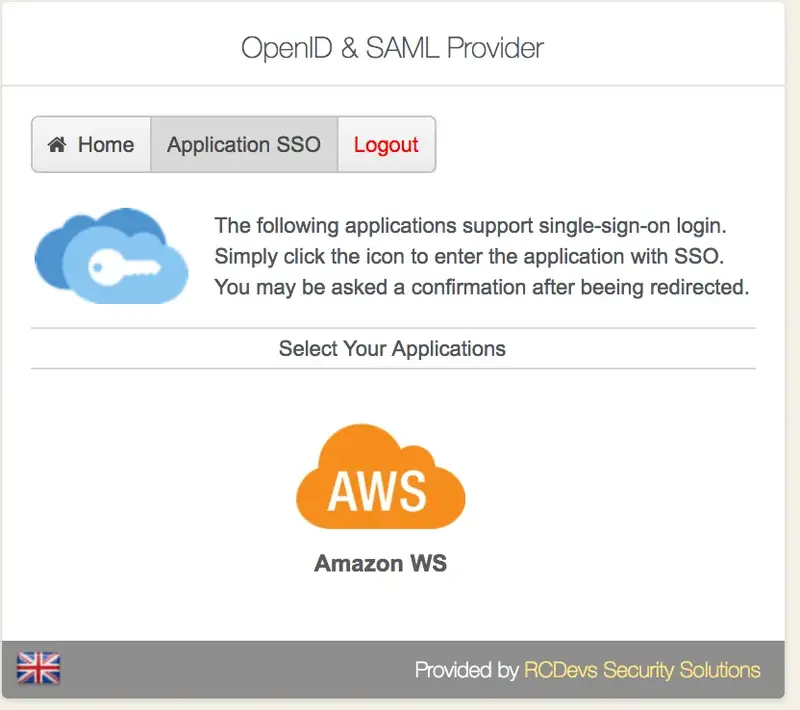
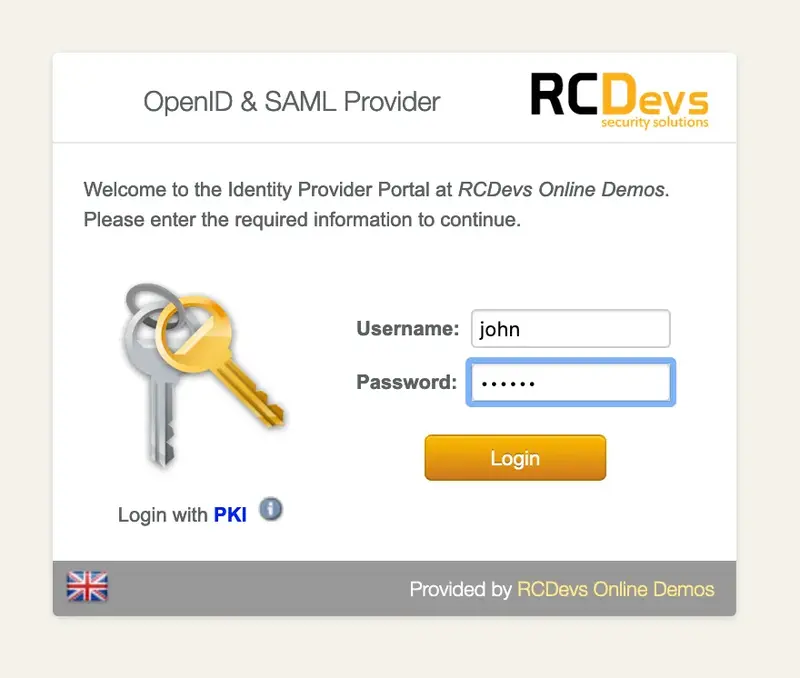
To test, open the web application in https://webadm.local/webapps/openid/ and Login with the user:
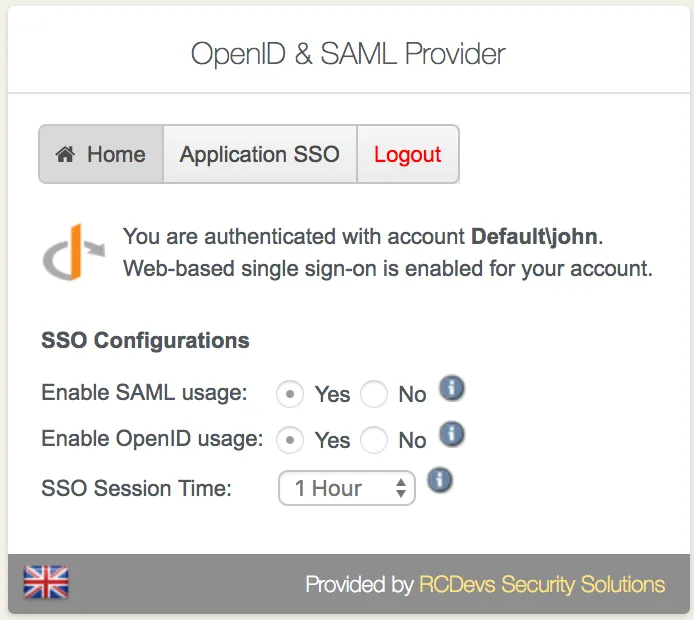
We select Application SSO:
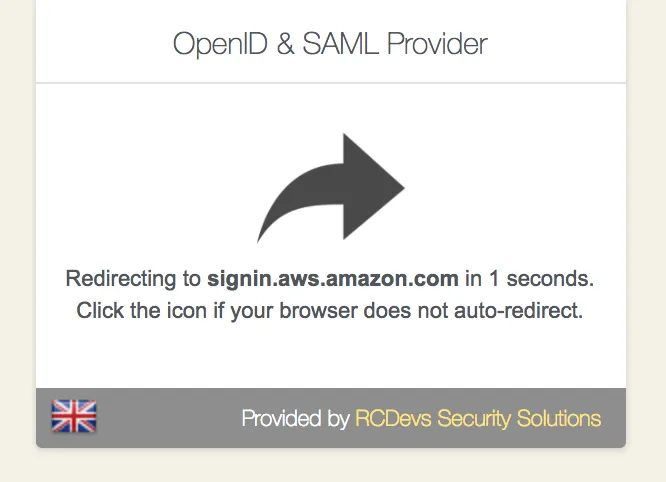
We click on Amazon WS:
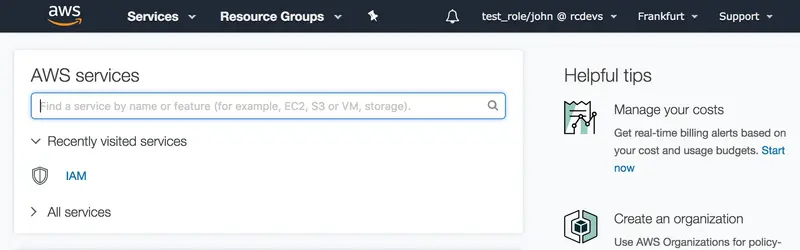
That’s it,we are now connected to AWS:
We can check the log in /opt/webadm/logs/webadm.log:
[2017-12-22 09:35:17] [192.168.1.220] [OpenID:4JGOGC0T] New login request (OpenOTP)
[2017-12-22 09:35:17] [192.168.1.220] [OpenID:4JGOGC0T] > Username: john
[2017-12-22 09:35:17] [192.168.1.220] [OpenID:4JGOGC0T] > Domain: Default
[2017-12-22 09:35:17] [192.168.1.220] [OpenID:4JGOGC0T] > ANY Password: xxxxxxx
[2017-12-22 09:35:17] [192.168.1.220] [OpenID:4JGOGC0T] Sending openotpSimpleLogin request
[2017-12-22 09:35:17] [127.0.0.1] [OpenOTP:FFYIGQ6S] New openotpSimpleLogin SOAP request
[2017-12-22 09:35:17] [127.0.0.1] [OpenOTP:FFYIGQ6S] > Username: john
[2017-12-22 09:35:17] [127.0.0.1] [OpenOTP:FFYIGQ6S] > Domain: Default
[2017-12-22 09:35:17] [127.0.0.1] [OpenOTP:FFYIGQ6S] > Password: xxxxxxx
[2017-12-22 09:35:17] [127.0.0.1] [OpenOTP:FFYIGQ6S] > Client ID: OpenID
[2017-12-22 09:35:17] [127.0.0.1] [OpenOTP:FFYIGQ6S] > Source IP: 192.168.1.220
[2017-12-22 09:35:17] [127.0.0.1] [OpenOTP:FFYIGQ6S] > Context ID: 5cf415099b146265083580f7098f5717
[2017-12-22 09:35:17] [127.0.0.1] [OpenOTP:FFYIGQ6S] Registered openotpSimpleLogin request
[2017-12-22 09:35:17] [127.0.0.1] [OpenOTP:FFYIGQ6S] Resolved LDAP user: cn=john,o=Root (cached)
[2017-12-22 09:35:18] [127.0.0.1] [OpenOTP:FFYIGQ6S] Started transaction lock for user
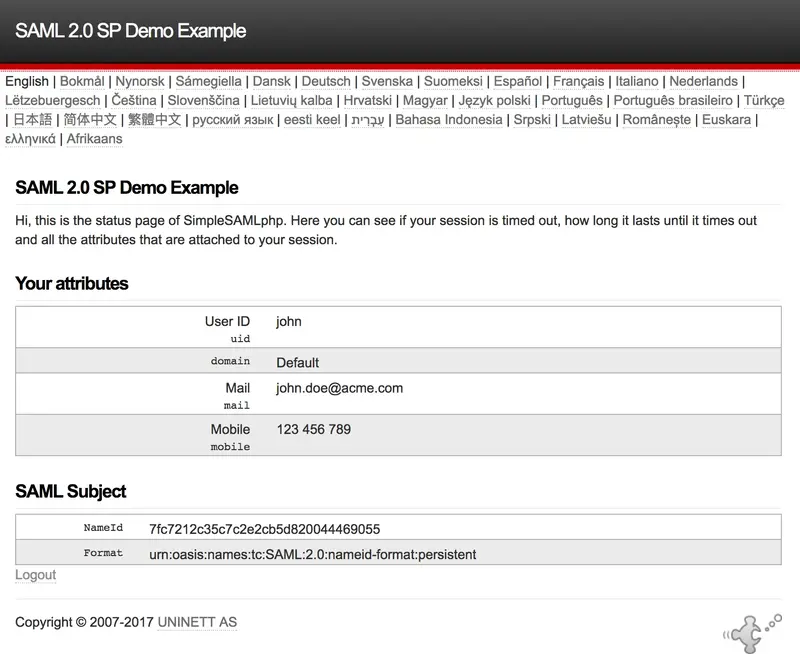
[2017-12-22 09:35:18] [127.0.0.1] [OpenOTP:FFYIGQ6S] Found 1 user mobiles: 123 456 789
[2017-12-22 09:35:18] [127.0.0.1] [OpenOTP:FFYIGQ6S] Found 1 user emails: john.doe@acme.com
[2017-12-22 09:35:18] [127.0.0.1] [OpenOTP:FFYIGQ6S] Found 37 user settings: LoginMode=LDAP,OTPType=TOKEN,OTPLength=6,ChallengeMode=Yes,ChallengeTimeout=90,MobileTimeout=30,EnableLogin=Yes,HOTPLookAheadWindow=25,TOTPTimeStep=30,TOTPTimeOffsetWindow=120,OCRASuite=OCRA-1:HOTP-SHA1-6:QN06-T1M,SMSType=Normal,SMSMode=Ondemand,MailMode=Ondemand,LastOTPTime=300,ListChallengeMode=ShowID
[2017-12-22 09:35:18] [127.0.0.1] [OpenOTP:FFYIGQ6S] Found 2 user data: LoginCount,RejectCount
[2017-12-22 09:35:18] [127.0.0.1] [OpenOTP:FFYIGQ6S] Requested login factors: LDAP
[2017-12-22 09:35:18] [127.0.0.1] [OpenOTP:FFYIGQ6S] LDAP password Ok
[2017-12-22 09:35:18] [127.0.0.1] [OpenOTP:FFYIGQ6S] Updated user data
[2017-12-22 09:35:18] [127.0.0.1] [OpenOTP:FFYIGQ6S] Sent success response
[2017-12-22 09:35:18] [192.168.1.220] [OpenID:4JGOGC0T] OpenOTP authentication success
[2017-12-22 09:35:18] [192.168.1.220] [OpenID:4JGOGC0T] Resolved LDAP user: cn=john,o=Root (cached)
[2017-12-22 09:35:18] [192.168.1.220] [OpenID:4JGOGC0T] Login session started for cn=john,o=Root
[2017-12-22 09:36:50] [192.168.1.220] [OpenID:4JGOGC0T] Sent SAML success response
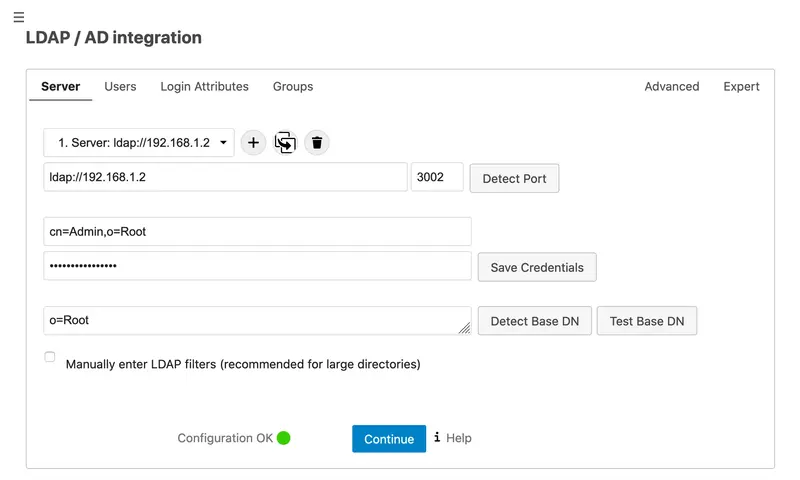
3.2.2.2 Configuration of “LDAP / AD integration” app
Then, you need to configure first the LDAP app to synchronize users stored in your LDAP server.
First, configure the connection to the LDAP server. You can adapt what is showed in the screenshot. You should get a green Configuration OK when settings are well-defined.
Figure 3. LDAP / AD integration (server configuration)
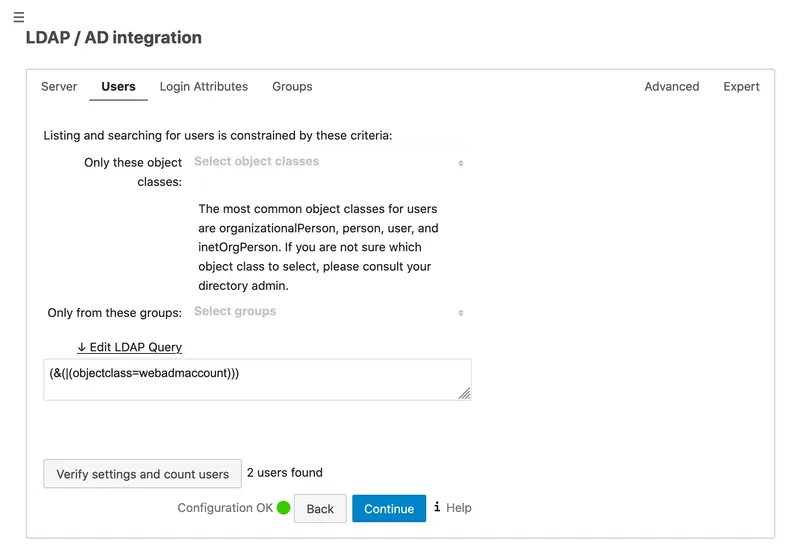
Next, you can adapt the search query in order to get right users from the LDAP.
Figure 4. LDAP / AD integration (user search query configuration)
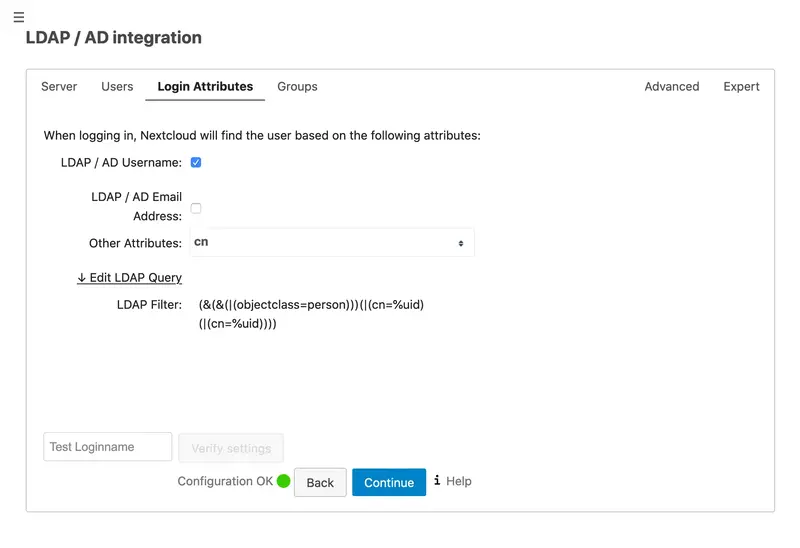
Finally, configure the login attribute used to get the right username of users.
Figure 5. LDAP / AD integration (Login attribute configuration)
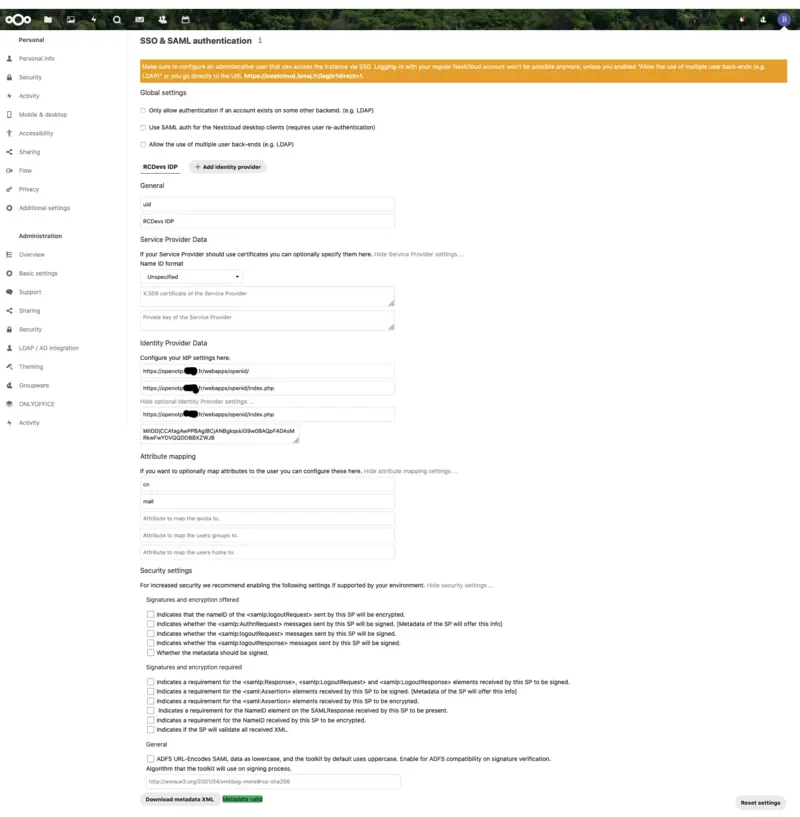
3.2.2.3 Configuration of “SSO & SAML authentication” app
3.2.2.4 Global Settings
On “Global Settings”, it is only required to tick “Allow the use of multiple user back-ends (e.g. LDAP)”, so IdP login initiation can work (See 2.1.2.4).
If you still need to authenticate using a local account of Nextcloud, you can use the following URL to access the direct login mode: https://yournextcloudserver/login?direct=1
3.2.2.5 General
In the General section, you can set the following elements:
Attribute to map the UID to. setting;
Optional display name of the identity provider (default: “SSO & SAML log in”) setting.
3.2.2.6 Identity Provider Data
In the Identity Provider Data section, you have to set the following elements:
Identifier of the IdP entity (must be a URI);
URL Target of the IdP where the SP will send the Authentication Request Message;
URL Location of the IdP where the SP will send the SLO Request.
For these three first settings, you need to set the URL of root of openid (e.g. https://yournextcloudserver/webapps/openid/).
In order to set the Public X.509 certificate of the IdP setting, you can open saml URL (e.g. https://yournextcloudserver/ws/saml/) and copy and paste value contained in X509Certificate anchor.
3.2.2.7 Attribute mapping
Attribute mapping elements can also be set. Here, you can modify the following:
First you need to install the OpenID extension to Apache Guacamole. See Guacamole documentation for instructions.
Please note that the authentication extensions in the GUACAMOLE_HOME/extensions directory are loaded in alphabetical order, so if you have another authentication extension which is alphabetically before the OpenID extension, then the OpenID extension will not be loaded. This is the case for example with guacamole-auth-jdbc-mysql extension. To bypass this issue you can rename the guacamole-auth-openid-1.0.0.jar to for example guacamole-auth-0penid-1.0.0.jar.
Once the extension is installed, you can configure the OpenID settings in GUACAMOLE_HOME/guacamole.properties
Once the configuration is completed, you need to restart tomcat for it to take effect. If you want to log in as an existing Guacamole Admin user (for example guacadmin) while OpenID is enabled, you need to create that user in WebADM as well.
3.3.2 GitLab
This was tested with GitLab Enterprise Edition 13.2.1.
3.3.2.1 Requirements
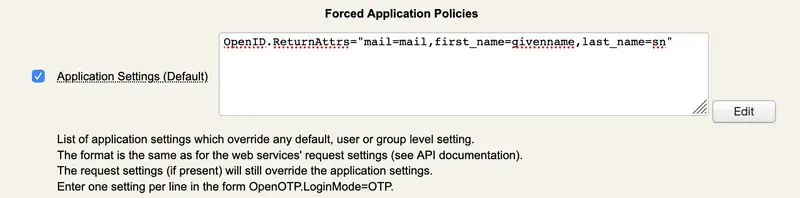
The following LDAP attributes must be returned to SAML assertions to GitLab:
first_name=givenname
last_name=sn
mail=mail
It is recommended to add this OpenID setting in a client policy specific to your GitLab instance.
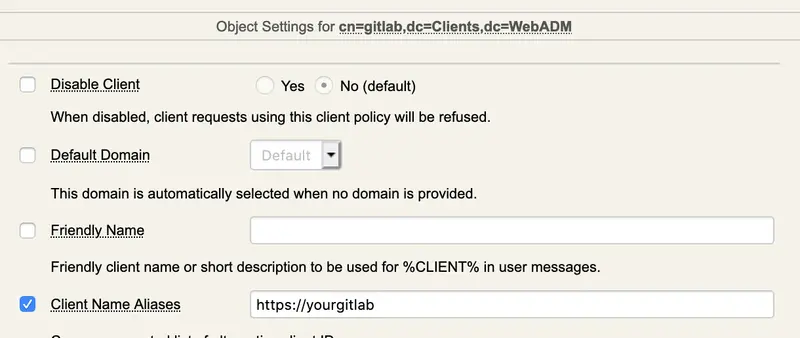
First create a client policy (you can name it GitLab) and put the client ID provided by GitLab (this can be found in the webadm.log file) in the “Client Name Aliases” setting:
Figure 1. GitLab (client policy configuration)
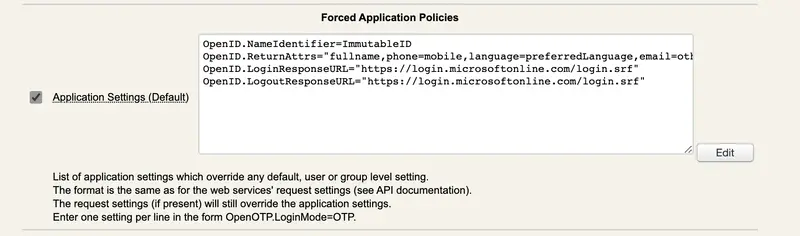
Next, still on the client policy, add to the “Forced Application Policies” setting the following to properly configure the returned attributes for the SAML assertion:
First, create a new or update an existing Client Policy in WebADM > Admin > Client Policies.
The policy name or friendly name must match the client_id defined in Grafana configuration (see below).
In the client policy, configure Application Settings > Edit > OpenID & SAML Provider > Client Secret. This secret must match the client_secret defined in Grafana.
Once these settings are applied, you can configure Grafana to use OpenOTP IdP for SSO login:
This was tested with OnlyOffice Enterprise Edition 10.5.3.
3.3.4.1 Requirements
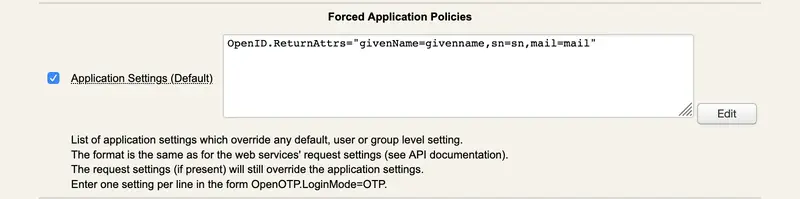
The following LDAP attributes must be returned to SAML assertions to OnlyOffice (Location, Title, and Phone are optional attributes):
givenName=givenname
sn=sn
mail=mail
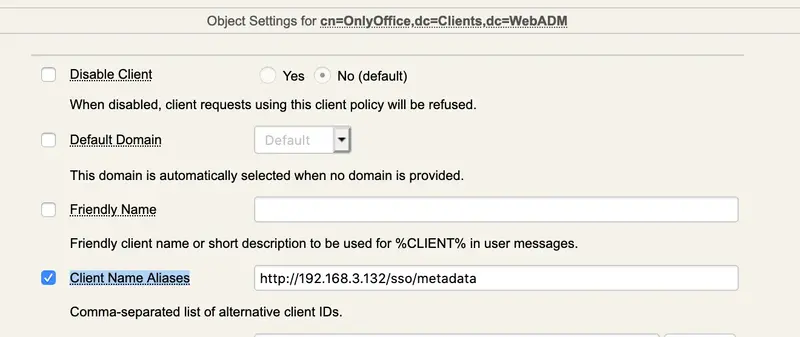
It is recommended to add this OpenID setting in a client policy specific to your OnlyOffice instance.
First create a client policy (you can name it OnlyOffice) and put the client ID provided by OnlyOffice (this can be found in the webadm.log file) in the “Client Name Aliases” setting:
Next, still on the client policy, add to the “Forced Application Policies” setting the following to properly configure the returned attributes for the SAML assertion:
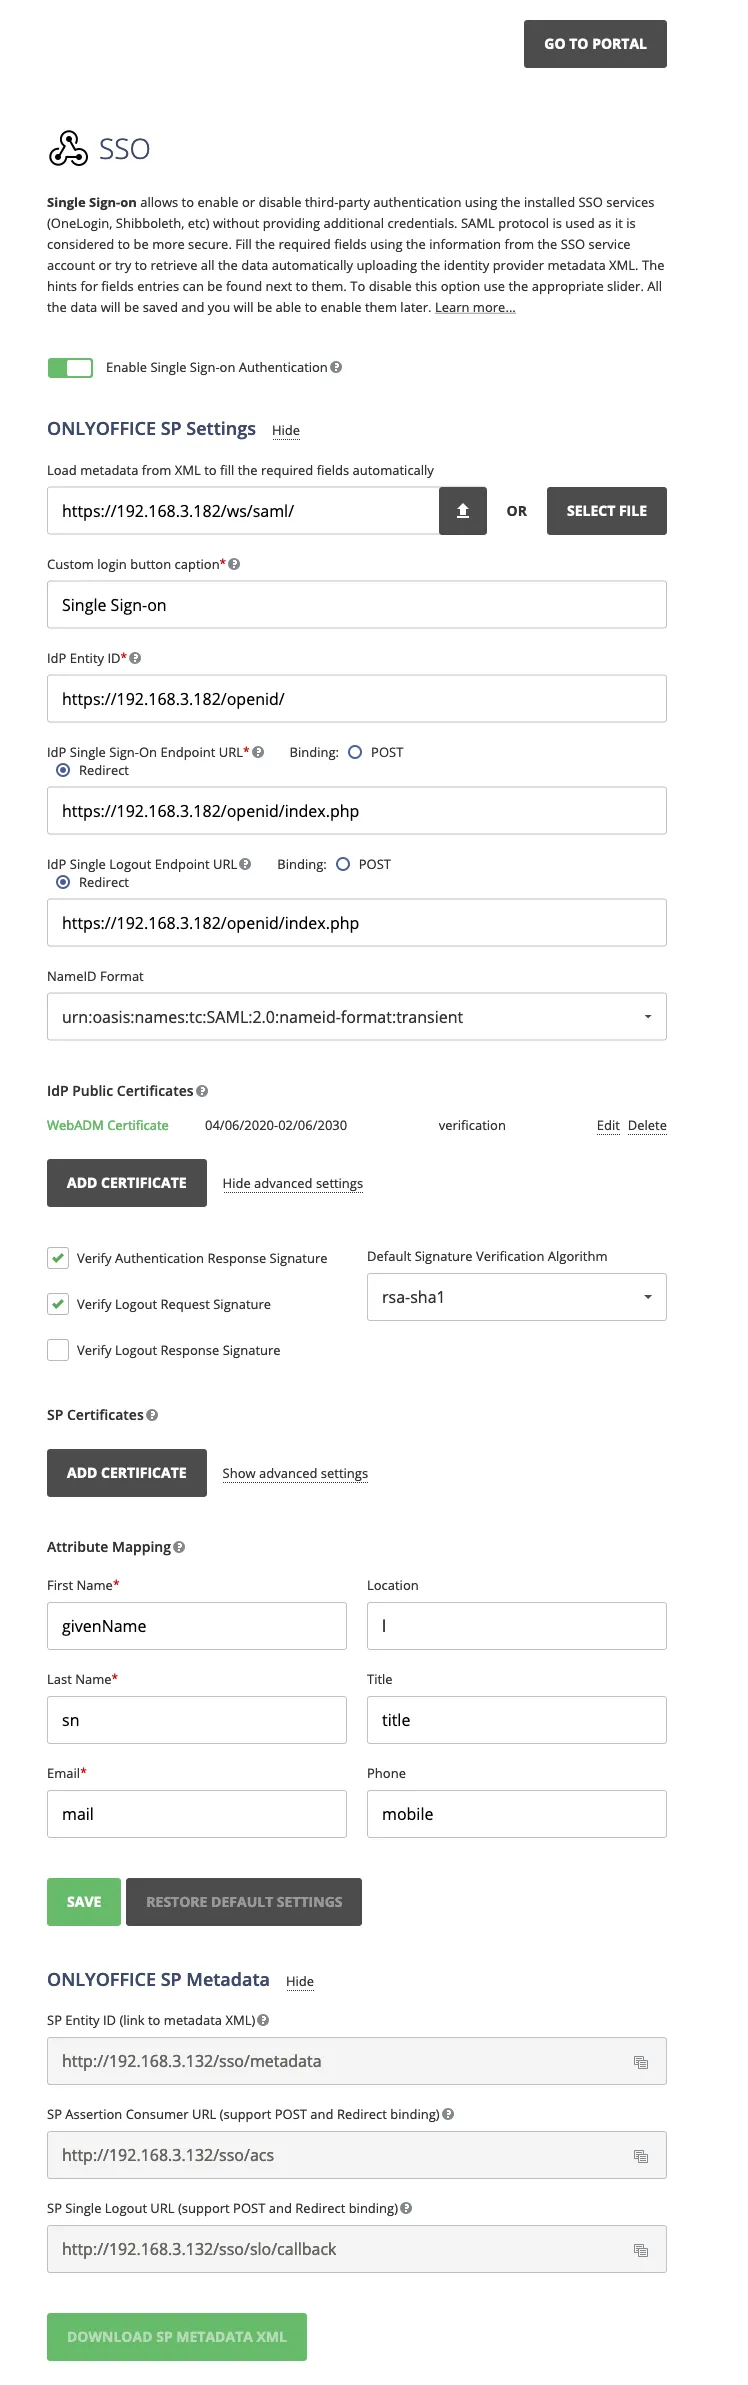
Open the following URL of your OnlyOffice: https://youronlyoffice/controlpanel/sso
Enable SSO, put the URL of your webadm (or waproxy if you have deployed one) in the “URL to IdP Metadata XML” field, and click on Load data button. This will pre-fill other input settings. You can click on the save button.
Figure 9. OnlyOffice (SSO configuration)
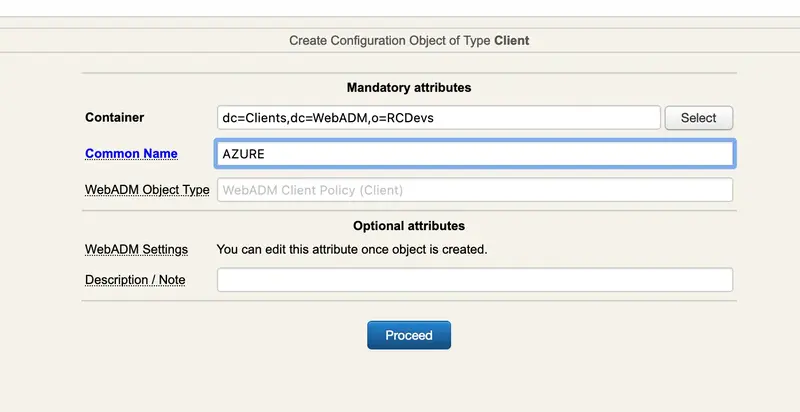
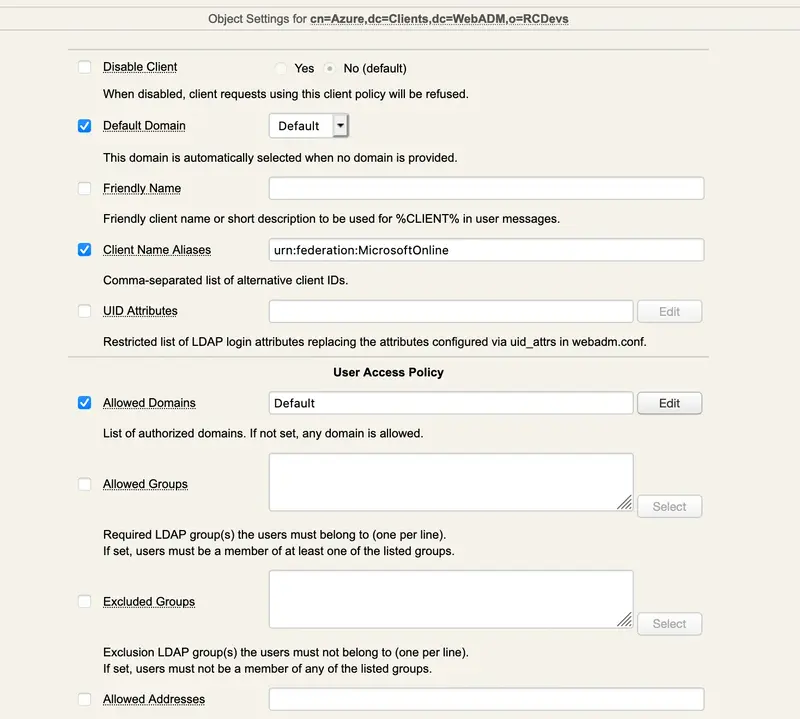
3.3.5 MS Office 365/Azure Integration with an Active Directory Backend
3.3.5.1 Prerequistes
You need an Administrator on the AZURE AD,
You need to install and configure Azure Sync on one of your Domain Controler,
You need at least WebADM 2.0.16 and OpenID 1.4.11 versions.
Important Note
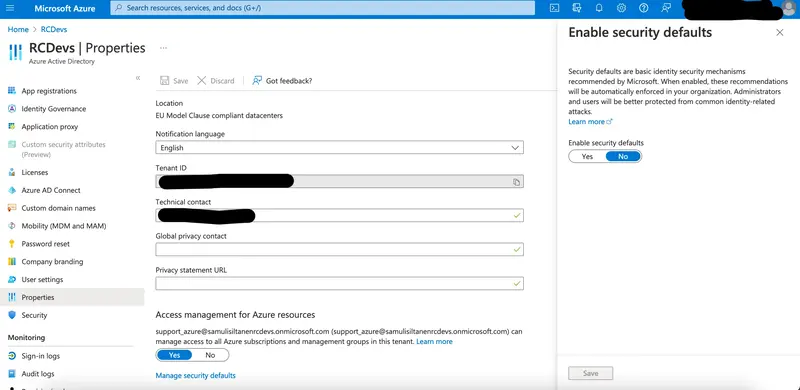
We noticed that if “Default Security policies” are enabled on Azure Active Directory, Azure is expecting an MFA login to access Azure resources. This policy must be disabled else, the redirection to Azure/Office 365 after the authentiation on WebADM IDP will failed because Azure didn’t know that the MFA has been played with OpenOTP. There is maybe the possibility to customize this default policy on Azure to avoid this behavior and the expected 2FA. Please refer to Azure documentation for that part. On our side, we just disabled it. Refer to the screeshot below.
3.3.5.2 Get your configuration of your IDP on WebADM
You will need for the next step
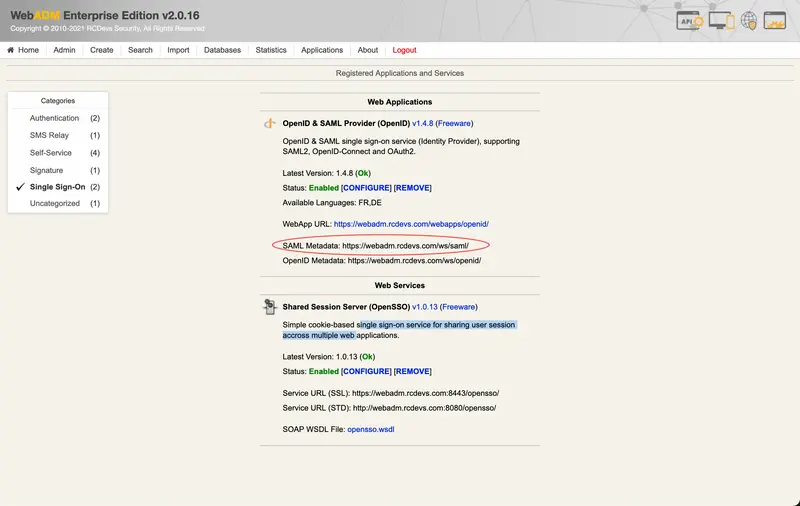
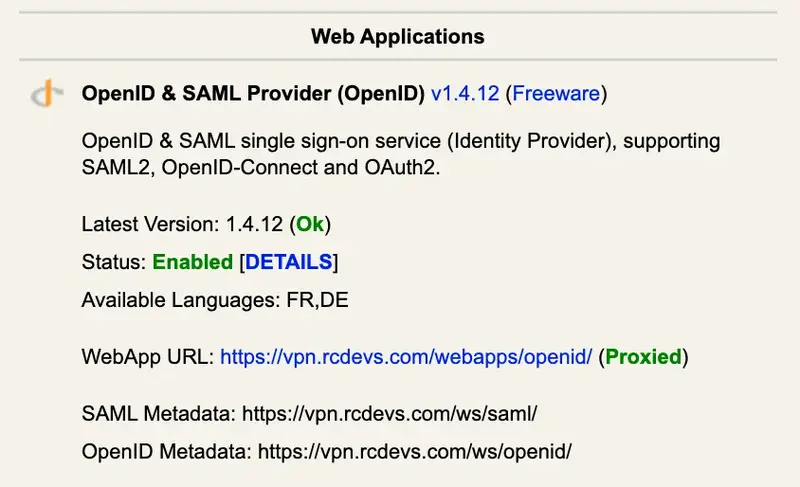
Log on your webadm and go to Applications > Single Sign-On and check the link SAML Metadata
Figure 3.4.2.1 get your SAML Metadata on WebAdm
Open the link in a browser
In the XML File you need to get the:
Now you should be able to log in the Azure page or on the Office 365 page. You can access to Azure of Office 365 login page, provide your email address or UPN. you should be redirected to the WebADM OpenID login page. Provide your credentials to login on the IDP.
After a successful login on the IDP you will be redirected and logged into Azure or Office 365.
3.3.6 MS Office 365/Azure Integration without an Active Directory Backend
3.3.6.1 Prerequites
You need to have a user Administrator on the AZURE AD
You need at least WebADM 2.0.16 and OpenID 1.4.11 versions.
Important Note
We noticed that if “Default Security policies” are enabled on Azure Active Directory, Azure is expecting an MFA login to access Azure resources. This policy must be disabled else, the redirection to Azure/Office 365 after the authentiation on WebADM IDP will failed because Azure didn’t know that the MFA has been played with OpenOTP. There is maybe the possibility to customize this default policy on Azure to avoid this behavior and the expected 2FA. Please refer to Azure documentation for that part. On our side, we just disabled it. Refer to the screeshot below.
3.3.6.2 Get your configuration of your IDP on webadm
You will need for the next step
Log on your webadm and go to Applications > Single Sign-On and check the link SAML Metadata
You will get in return a CNAME DNS record to add to the dns record of foo.bar so Microsoft can verify that you own the domain name.
Add the CNAME record to the DNS records of foo.bar. ( It could take time to be applied so you could have to wait for the next step )
3.3.6.5 Get the ImmutableId of your User and add it to Azure
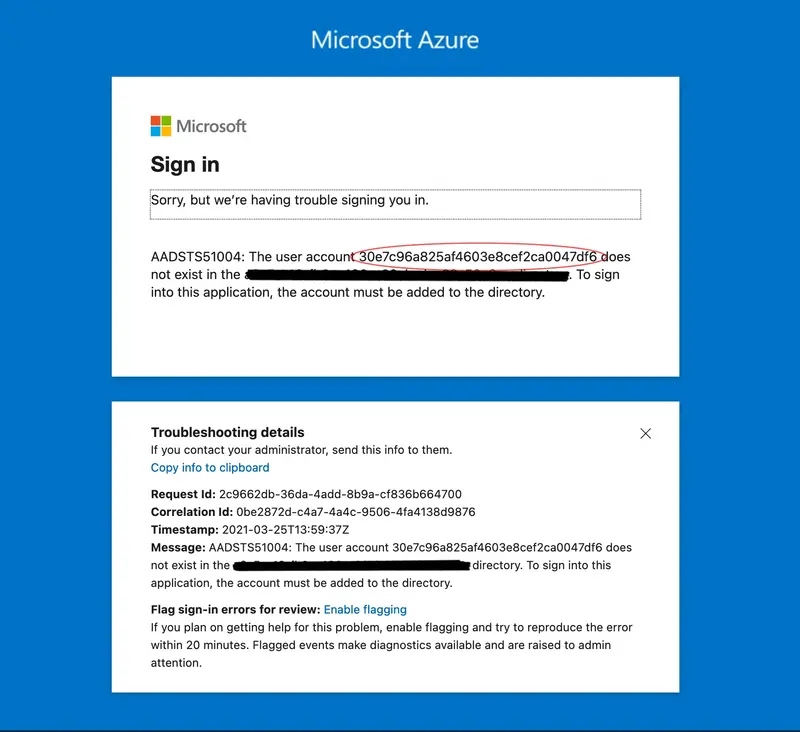
Now you need to add an immutableID for each user in AZURE, but first you need to get this ImmutableId.
(This step is automatic when you use an Active Directory with that is synced with Azure. WebADM/OpenOTP will use your common Object GUID as ImmutableId)
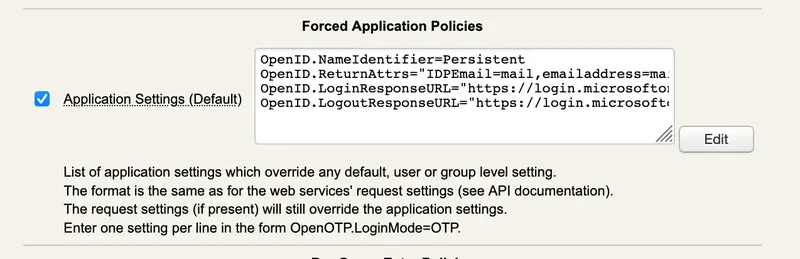
The persistent NameID will be used as ImmutableID. It is generated per domain user for the Issuer URL. It is calculated by the MD5 of the issuer url, followed by /0, followed by the domain, followed by /0 , followed by the username.
You can calculate it in a script or use the following method to get it.
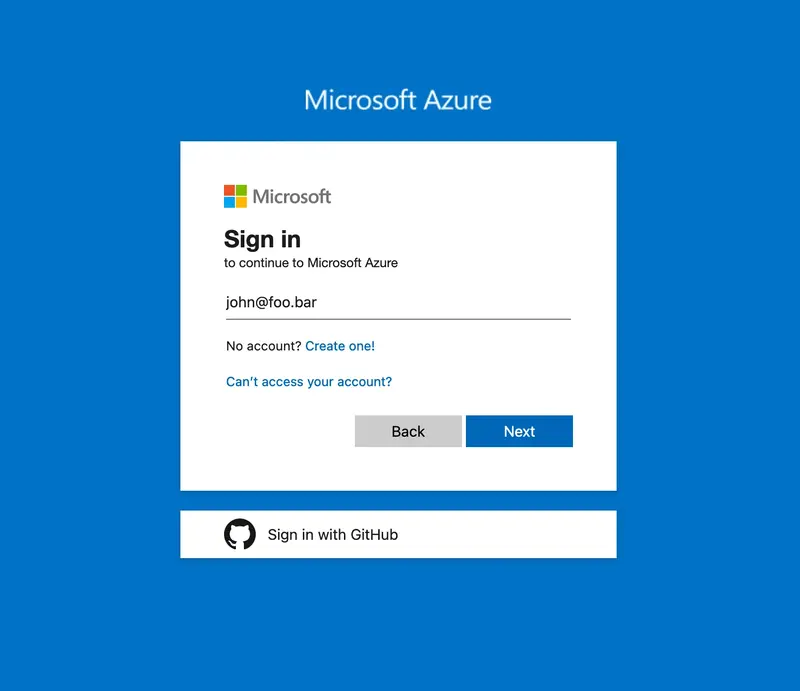
Let’s say that you want to log in with the user john@foo.bar
Go on AZURE and initiate a login with the user john@foo.bar.
Figure 3.4.5.1 login with the user john@foo.bar on AZURE
It should redirect you on the IDP page to log in
Figure 3.4.5.2 login with the user john@foo.bar on AZURE
Login with your IDP Crediantials
After a succesfull login it will redirect you on the Azure page where it will fail
On the Failed login page you will find your user ImmutableId here 30e7c96a825af4603e8cef2ca0047df6
_Figure 3.4.5.3 Failed Login on AZURE where you can find your ImmutableId _
Then you can add your user to AZURE with through PowerShell
PS C:\Users\admin> New-MsolUser -UserPrincipalName john@foo.bar -ImmutableId 30e7c96a825af4603e8cef2ca0047df6 -DisplayName "John Doe" -FirstName John -LastName Doe -AlternateEmailAddresses "john@foo.bar"
Now you should be able to log in on the Azure page again.
After a successful login on the IDP, you should be redirected and logged into Azure.
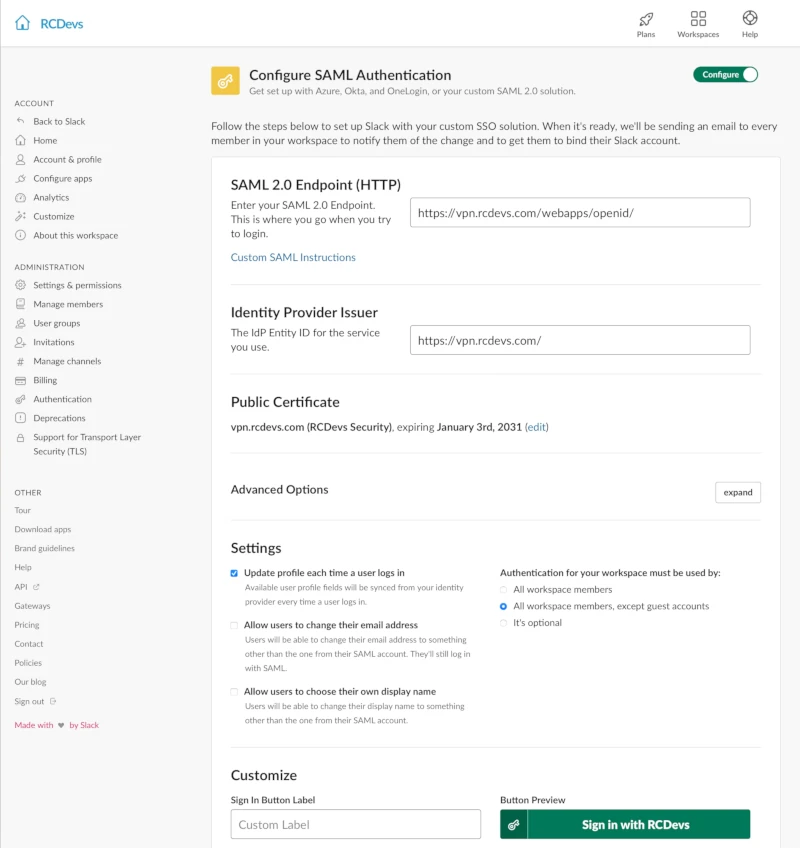
3.3.7.1 Slack configuration to use an WebADM IDP (SP configuration)
Login on Slack web page with your Slack administrator account and in Administration category, click on Authentication and configuration your SAML authentication provider.
On the SAML configuration page, you have only few settings to configure :
SAML 2.0 Endpoint
Identity Provider Issuer
Your SAML 2.0 Endpoint must point to your OpenID application. This information can be found through your WebADM Admin portal > Applications > Signle Sign-On > WebApp URL
The identity provider issuer (Issuer URL) can be found under the OpenID & SAML Provider configuration.
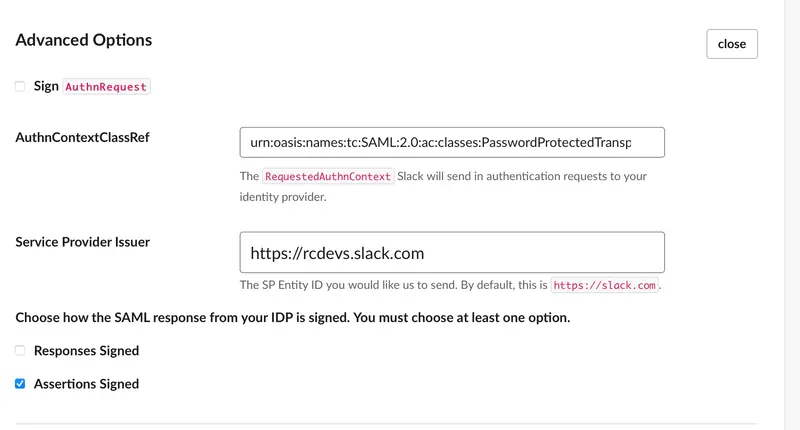
In advanced options on Slack, you musst configure the following :
The Service Provider Issuer should point to https://slack.com or https://your_slack_domain.slack.com, this setting will be used later to match a WebADM client policy. You must enable the setting Assertions Signed.
3.3.7.2 Configure a WebADM client policy for Slack
You can now create a client policy for Slack and apply specific SAML/OpenID or OpenOTP settings inside that policy.
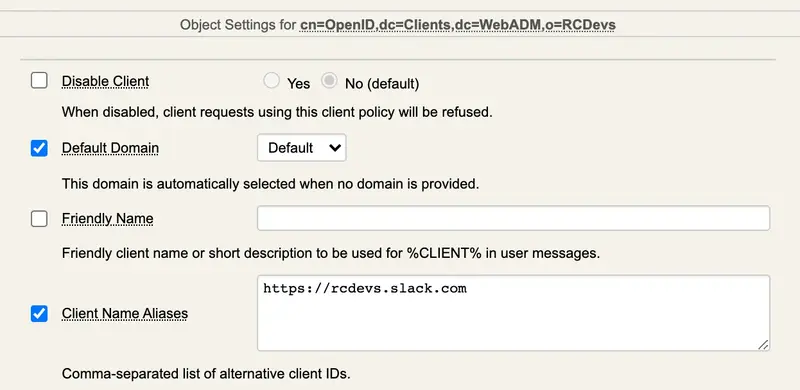
In client name aliases setting of your WebADM client policy, you must configure the value you configure as Service Provider Issuer on Slack admin console.
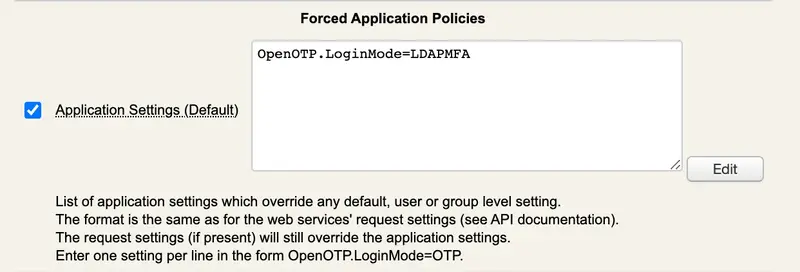
And you configure OpenOTP setting as below :
3.3.7.3 Authentication logs for Slack
[2021-07-22 07:07:41][192.168.3.254:50416][OpenID:OTDHTF8T] Enforcing client policy: OpenID
[2021-07-22 07:07:41][192.168.3.254:50416][OpenID:OTDHTF8T] New login request (OpenOTP)[2021-07-22 07:07:41][192.168.3.254:50416][OpenID:OTDHTF8T] > Client ID: OpenID
[2021-07-22 07:07:41][192.168.3.254:50416][OpenID:OTDHTF8T] > Username: support
[2021-07-22 07:07:41][192.168.3.254:50416][OpenID:OTDHTF8T] > Domain: Default
[2021-07-22 07:07:41][192.168.3.254:50416][OpenID:OTDHTF8T] > ANY Password: xxxxxxxxxxxxxx
[2021-07-22 07:07:41][192.168.3.254:50416][OpenID:OTDHTF8T] Sending openotpSimpleLogin request
[2021-07-22 07:07:41][192.168.3.1:59726][OpenOTP:OTDHTF8T] New openotpSimpleLogin SOAP request
[2021-07-22 07:07:41][192.168.3.1:59726][OpenOTP:OTDHTF8T] > Username: support
[2021-07-22 07:07:41][192.168.3.1:59726][OpenOTP:OTDHTF8T] > Domain: Default
[2021-07-22 07:07:41][192.168.3.1:59726][OpenOTP:OTDHTF8T] > Password: xxxxxxxxxxxxxx
[2021-07-22 07:07:41][192.168.3.1:59726][OpenOTP:OTDHTF8T] > Client ID: OpenID
[2021-07-22 07:07:41][192.168.3.1:59726][OpenOTP:OTDHTF8T] > Source IP: 87.123.192.156
[2021-07-22 07:07:41][192.168.3.1:59726][OpenOTP:OTDHTF8T] Enforcing client policy: OpenID (matched client ID)[2021-07-22 07:07:41][192.168.3.1:59726][OpenOTP:OTDHTF8T] Registered openotpSimpleLogin request
[2021-07-22 07:07:41][192.168.3.1:59726][OpenOTP:OTDHTF8T] Resolved LDAP user: uid=support,ou=Users,o=RCDevs (cached)[2021-07-22 07:07:41][192.168.3.1:59726][OpenOTP:OTDHTF8T] Resolved LDAP groups: staff,support
[2021-07-22 07:07:41][192.168.3.1:59726][OpenOTP:OTDHTF8T] Resolved source location: DE
[2021-07-22 07:07:41][192.168.3.1:59726][OpenOTP:OTDHTF8T] Started transaction lock for user
[2021-07-22 07:07:41][192.168.3.1:59726][OpenOTP:OTDHTF8T] Found user fullname: support
[2021-07-22 07:07:41][192.168.3.1:59726][OpenOTP:OTDHTF8T] Found 2 user emails:support@rcdevs.com
[2021-07-22 07:07:41][192.168.3.1:59726][OpenOTP:OTDHTF8T] Found 48 user settings: LoginMode=LDAPMFA,OTPType=TOKEN,PushLogin=Yes,PushVoice=Yes,ChallengeMode=Yes,ChallengeTimeout=90,OTPLength=6,MobileTimeout=30,EnableLogin=Yes,HOTPLookAheadWindow=25,TOTPTimeStep=30,TOTPTimeOffsetWindow=120,OCRASuite=OCRA-1:HOTP-SHA1-6:QN06-T1M,DeviceType=FIDO2,U2FPINMode=Discouraged,SMSType=Normal,SMSMode=Ondemand,MailMode=Ondemand,PrefetchExpire=10,LastOTPTime=300,ListChallengeMode=ShowID
[2021-07-22 07:07:41][192.168.3.1:59726][OpenOTP:OTDHTF8T] Found 6 user data: AppKeyInit,TokenType,TokenKey,TokenState,TokenID,TokenSerial
[2021-07-22 07:07:41][192.168.3.1:59726][OpenOTP:OTDHTF8T] Found 1 registered OTP token (TOTP)[2021-07-22 07:07:41][192.168.3.1:59726][OpenOTP:OTDHTF8T] User has no FIDO device registered
[2021-07-22 07:07:41][192.168.3.1:59726][OpenOTP:OTDHTF8T] Requested login factors: LDAP & OTP
[2021-07-22 07:07:41][192.168.3.1:59726][OpenOTP:OTDHTF8T] LDAP password Ok
[2021-07-22 07:07:41][192.168.3.1:59726][OpenOTP:OTDHTF8T] Authentication challenge required
[2021-07-22 07:07:42][192.168.3.1:59726][OpenOTP:OTDHTF8T] Sent push notification for token #1 (session z5ilnF3a6d3Iwz06)[2021-07-22 07:07:42][192.168.3.1:59726][OpenOTP:OTDHTF8T] Waiting 27 seconds for mobile response
[2021-07-22 07:07:53][192.168.3.254:50422][OpenOTP:OTDHTF8T] Received mobile login response from 194.31.54.217
[2021-07-22 07:07:53][192.168.3.254:50422][OpenOTP:OTDHTF8T] > Session: z5ilnF3a6d3Iwz06
[2021-07-22 07:07:53][192.168.3.254:50422][OpenOTP:OTDHTF8T] > Password: 16 Bytes
[2021-07-22 07:07:53][192.168.3.254:50422][OpenOTP:OTDHTF8T] Found authentication session started 2021-07-22 07:07:41
[2021-07-22 07:07:53][192.168.3.254:50422][OpenOTP:OTDHTF8T] PUSH password Ok (token #1)[2021-07-22 07:07:53][192.168.3.1:59726][OpenOTP:OTDHTF8T] Updated user data
[2021-07-22 07:07:53][192.168.3.1:59726][OpenOTP:OTDHTF8T] Sent login success response
[2021-07-22 07:07:53][192.168.3.254:50416][OpenID:OTDHTF8T] OpenOTP authentication success
[2021-07-22 07:07:53][192.168.3.254:50416][OpenID:OTDHTF8T] Resolved LDAP user: uid=support,ou=Users,o=RCDevs (cached)[2021-07-22 07:07:53][192.168.3.254:50416][OpenID:OTDHTF8T] Resolved LDAP groups: staff,support
[2021-07-22 07:07:53][192.168.3.254:50416][OpenID:OTDHTF8T] Resolved source location: DE
[2021-07-22 07:07:53][192.168.3.254:50416][OpenID:OTDHTF8T] Login session started for uid=support,ou=Users,o=RCDevs
[2021-07-22 07:07:53][192.168.3.254:50416][OpenID:OTDHTF8T] Returning nameId value 'support'[2021-07-22 07:07:53][192.168.3.254:50416][OpenID:OTDHTF8T] Sent SAML login success response
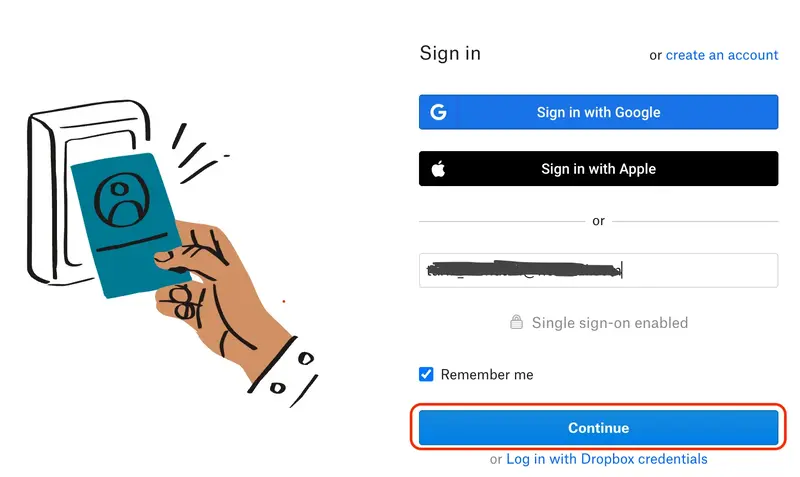
3.3.8 Dropbox
Tested on Dropbox Business.
Note
Firstly for Dropbox side, each user should have their own account. Join the Business team normally and get a license.
Then in Webadm this user must have their Dropbox Email in the attribute : Email Address. For example if I am subscribed to Dropbox with this email address: example@mail.com, I must have this email added in Email Address attribute in Webadm as well.
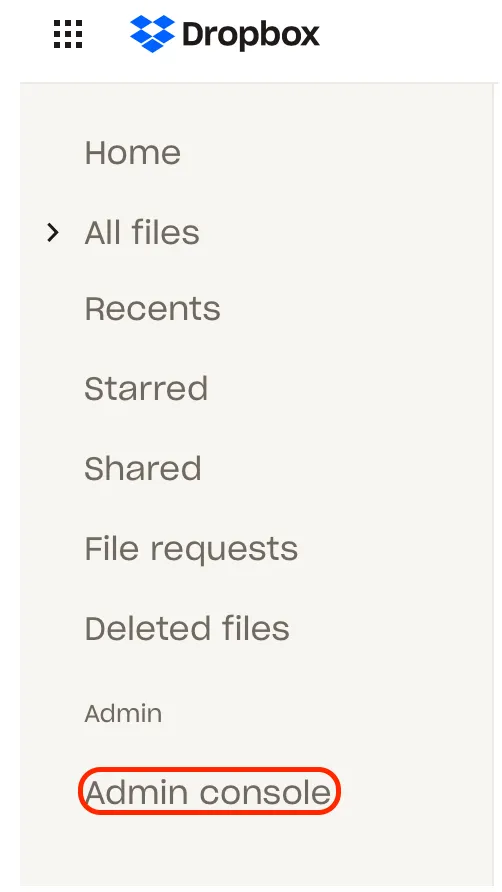
After sign in to Dropbox using your admin credentials, Select Admin console :
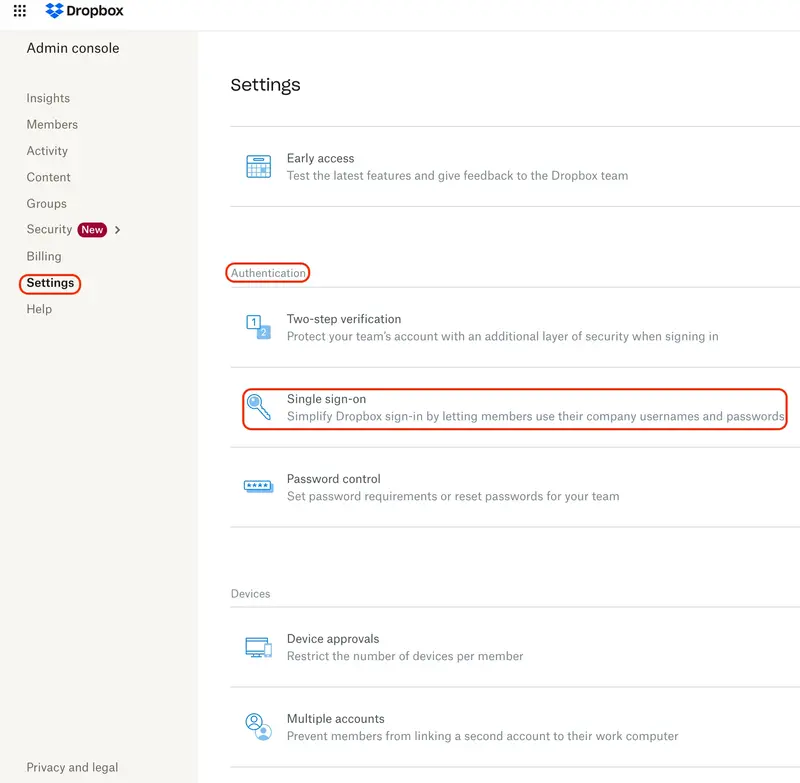
Navigate to Settings > Authentication > Single sign-on :
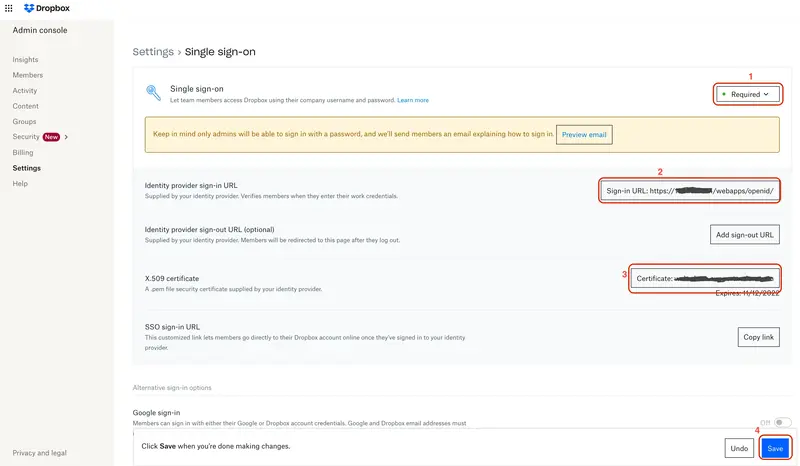
Enter the following information :
1- Single sign-on : Select the appropriate option
2- Identity provider sign-in URL:
This information can be found through your WebADM Admin portal > Applications > Single Sign-On > WebApp URL
3- X.509 certificate : Upload the following: (PEM format)
WebADM Admin portal > Applications > Signle Sign-On > [CONFIGURE] > Common Features > Server Certificate.
4- Click Save.
Configure propely your IDP and your Policy on webadm
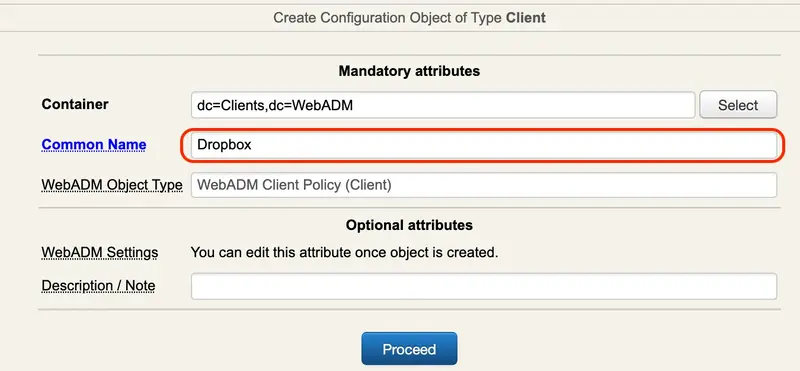
Select Client Policy and go down to click on Add Client :
Give any name in Common Name to your Client Policy ( here we use Dropbox), Click Proceed then Click on Create Object :
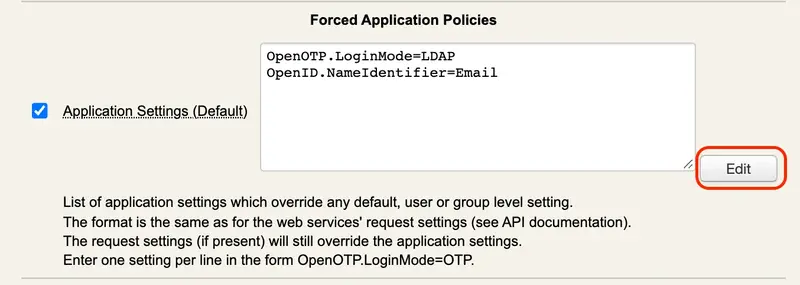
Then click EDIT on Application Settings (Default) :
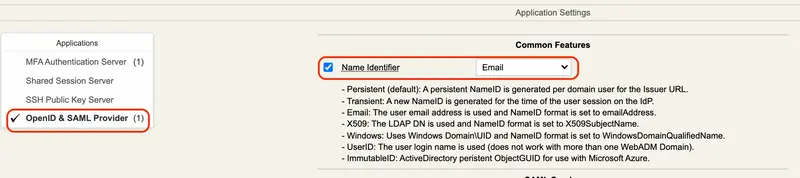
Set Name Identifier to Email :
Your Dropbox user must also be created in webADM with Email address attribute.
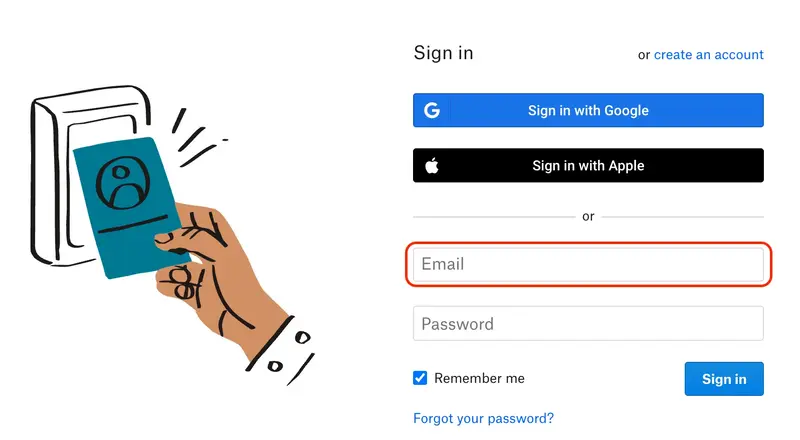
After Successful Authentication you are redirected to the Dropbox SP :
3.3.9 Zabbix
Tested with the following configuration :
We will start by adding a Public Certificate to Zabbix :
In your server uncomment this line :
vi /etc/zabbix/web/zabbix.conf.php
$SSO['IDP_CERT']='conf/certs/idp.crt';
Create a new file idp.crt in this path :
/usr/share/zabbix/conf/certs and put inside the public Certificate which is in :
WebADM > Application > Single Sign-on > Public Certifiate.
Restart Zabbix server and agent processes :
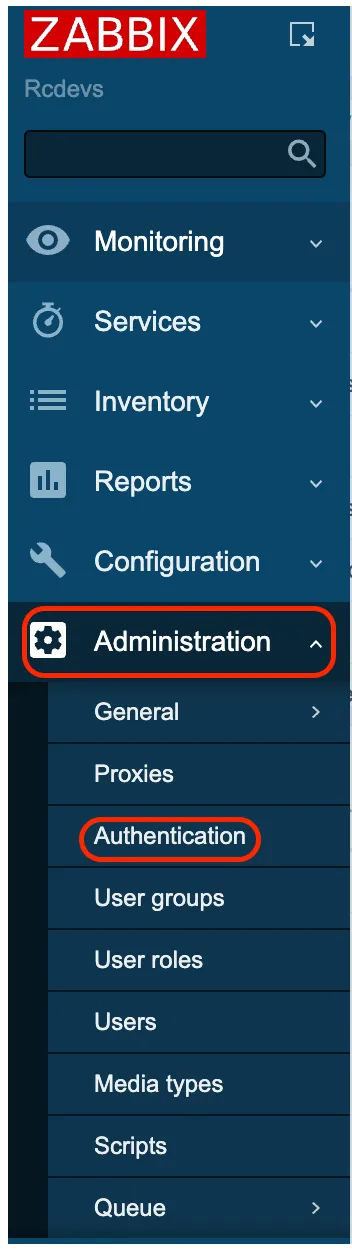
After sign in to Zabbix web interface, Navigate to Administration > Authentication.
Note that a user must exist in Zabbix. If authentication is successful, then Zabbix will match a local username with the username attribute returned by SAML.
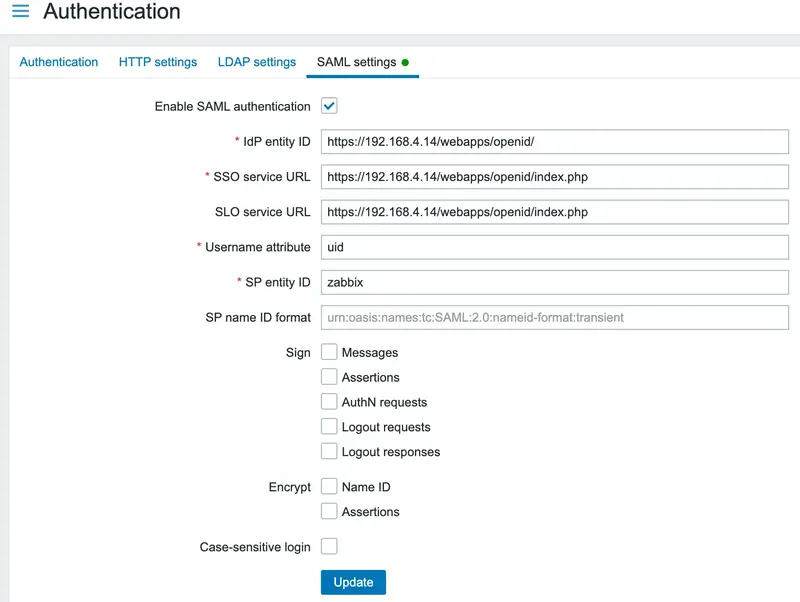
Select the SAML settings tab and Enable SAML authentication check box then Enter the following information:
IdP entity ID, SSO service URL, SLO service URL: Values from WebADM > Applications > Single Sign-On > OpenID & SAML Provider.
Username attribute: uid.
SP entity ID: zabbix (You specify this value when you configure a client Policy in the next step).
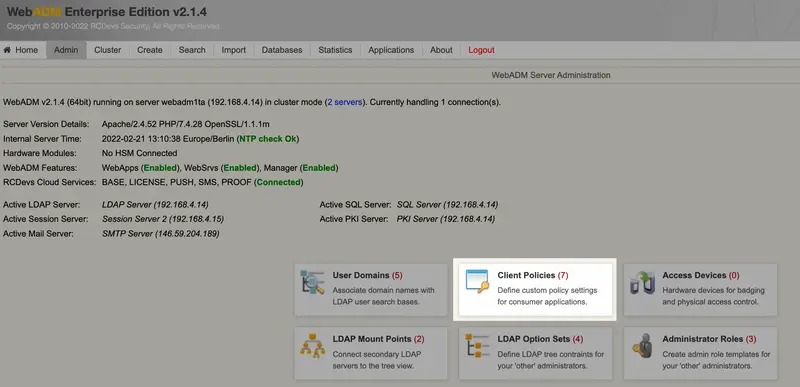
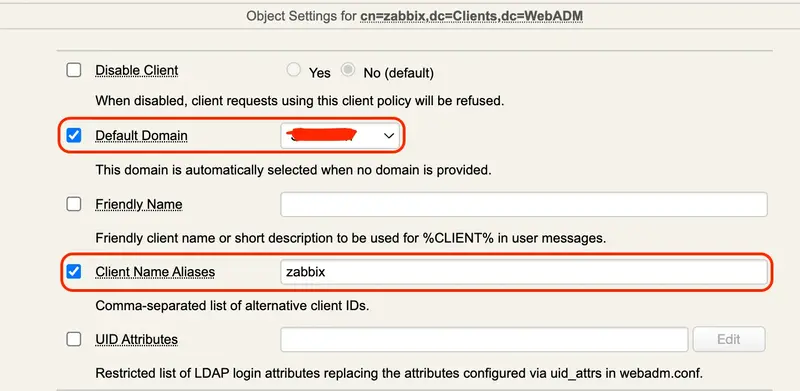
Click Update. Configure your Policy on webadm:
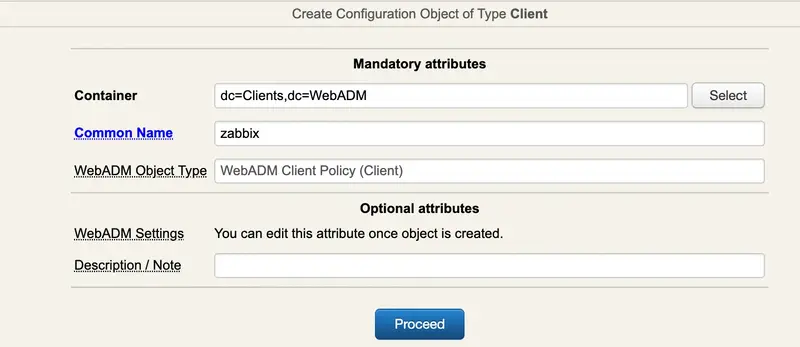
Give any name in Common Name to your Client Policy ( here we use Zabbix), Click Proceed then Click on Create Object :
Set here your Domain, and enter the Client Name Aliases that you configured before in SP entity ID (Zabbix side)
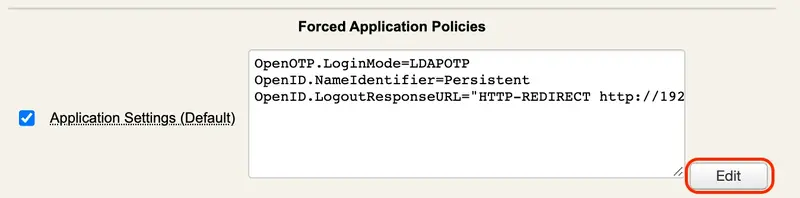
Click EDIT on Application Settings (Default) :
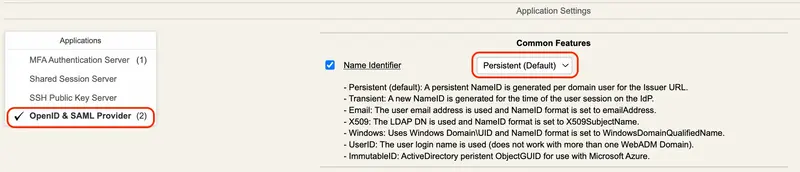
Set Name Identifier to Persistent :
Configure Logout Consumer Service URL to redirect user after successful logout :
SSO Authentication:
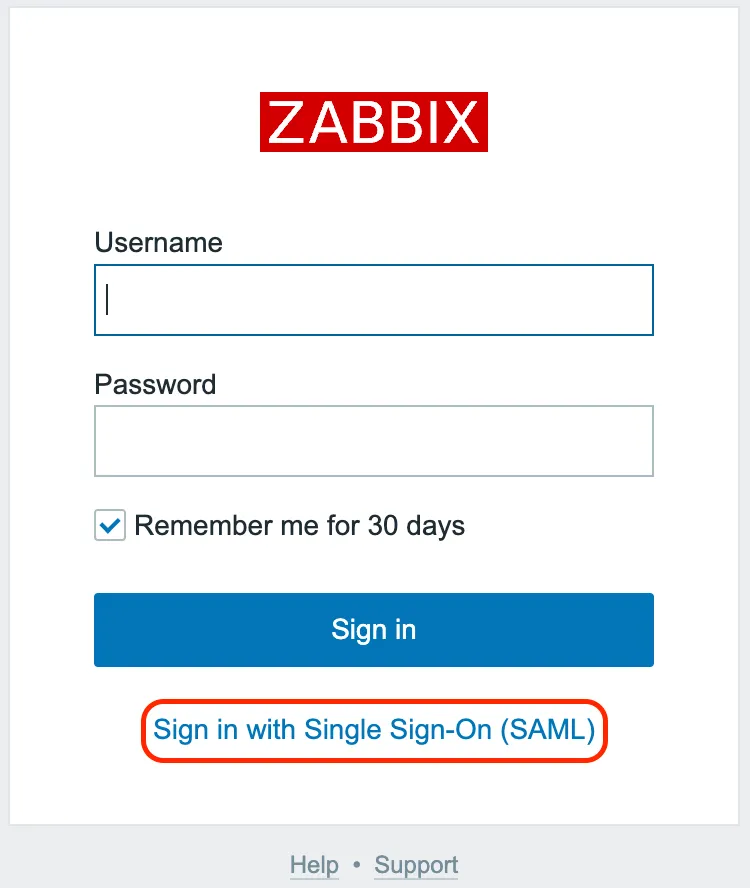
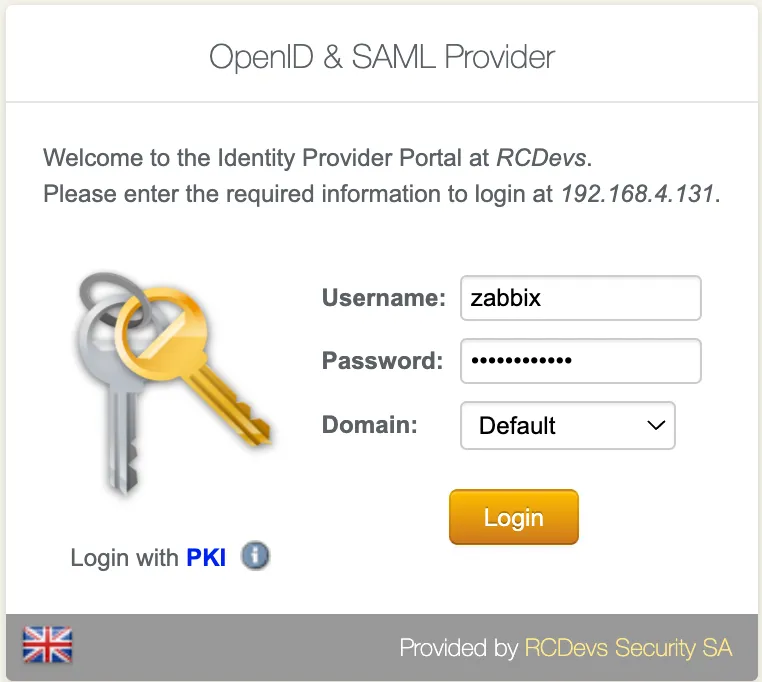
Go to: http://server_ip_or_name/zabbix/
Click on Sign in with Single Sign-On (saml)
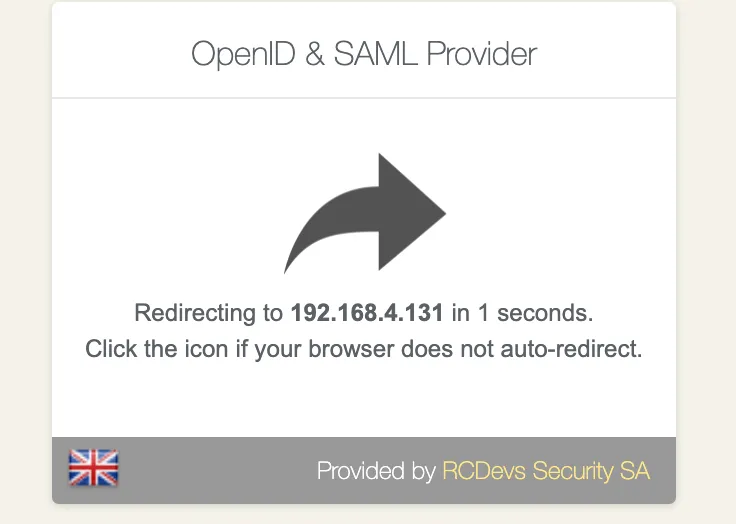
Login with your user created in WebADM/Zabbix :
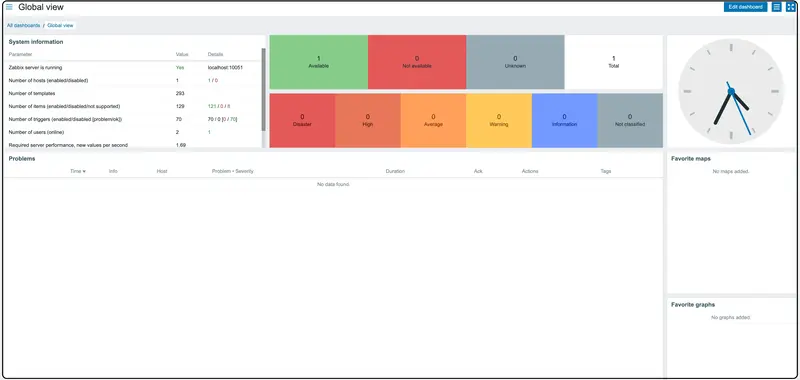
After Successful Authentication you are redirected to the Zabbix SP :
3.3.10 WordPress (OIDC and SAML)
This was tested with WordPress 6.0.
3.3.10.1 Using OIDC
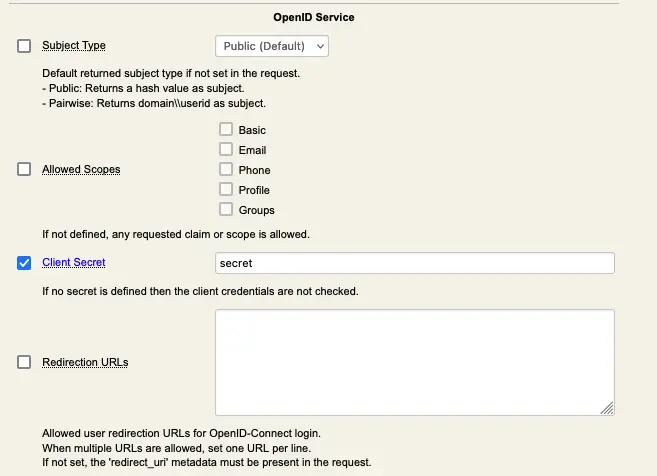
In WebADM, create a client policy named WordPress, and configure a secret for OpenID in OpenID Service settings:
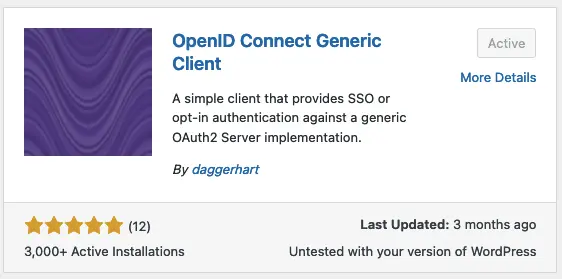
On WordPress, install and activate OpenID Connect Generic Client plugin:
On WordPress, go to Settings->OpenID Connect Client menu, then configure the plugin (replace <WEBADM_SERVER> with actual IP or DNS of your setup):
3.3.10.2 Using SAML
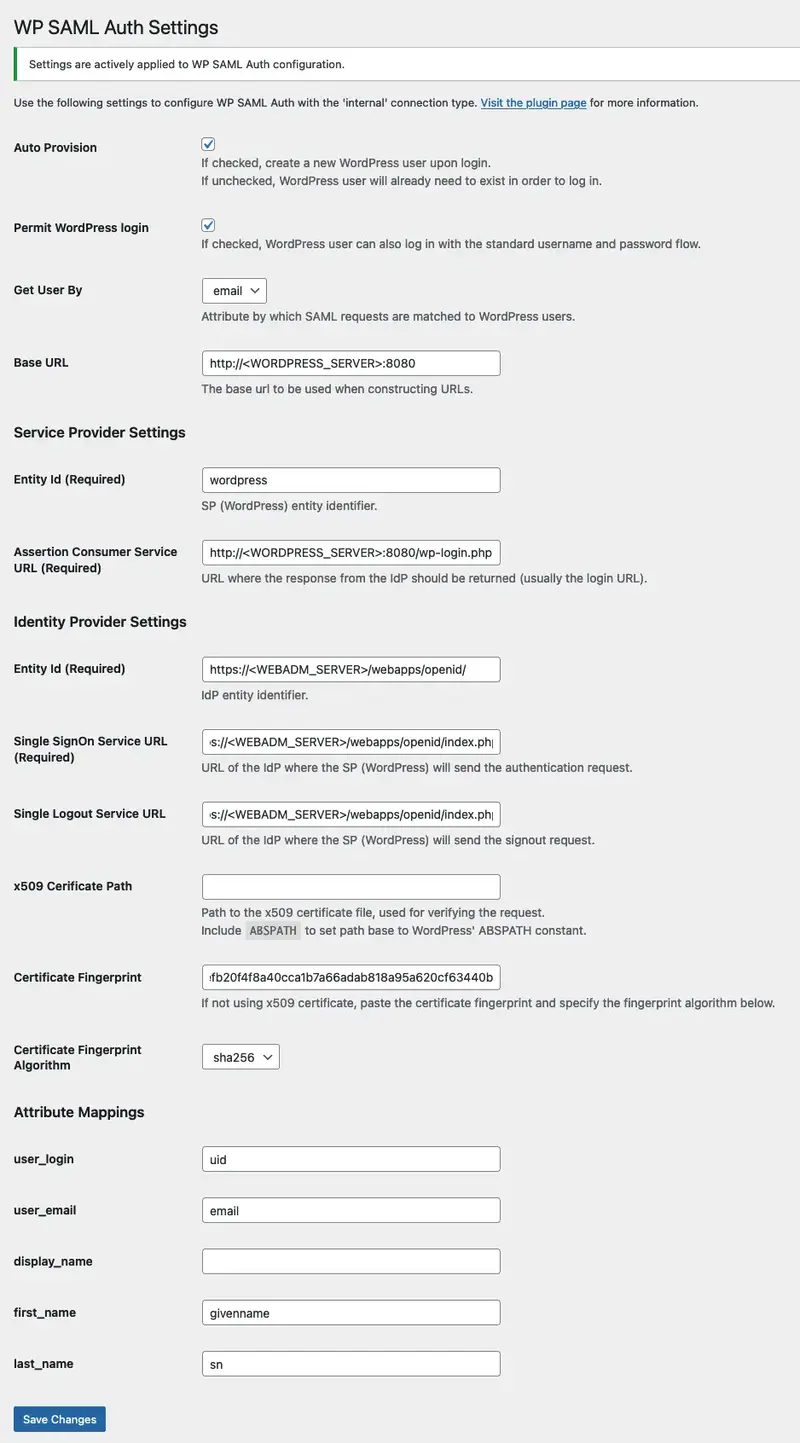
In WebADM, create a client policy named WordPress, and configure following SAML settings (<WORDPRESS_SERVER:8080> must be changed to fit your setup):
On WordPress, install and activate OpenID Connect Generic Client plugin:
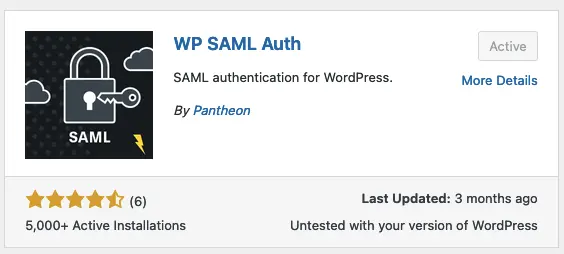
On WordPress, go to Settings->WP SAML Auth menu, then configure the plugin (replace <WEBADM_SERVER> with actual IP or DNS of your setup):
3.3.11 Redmine (SAML)
This was tested with Redmine 5.0.1.
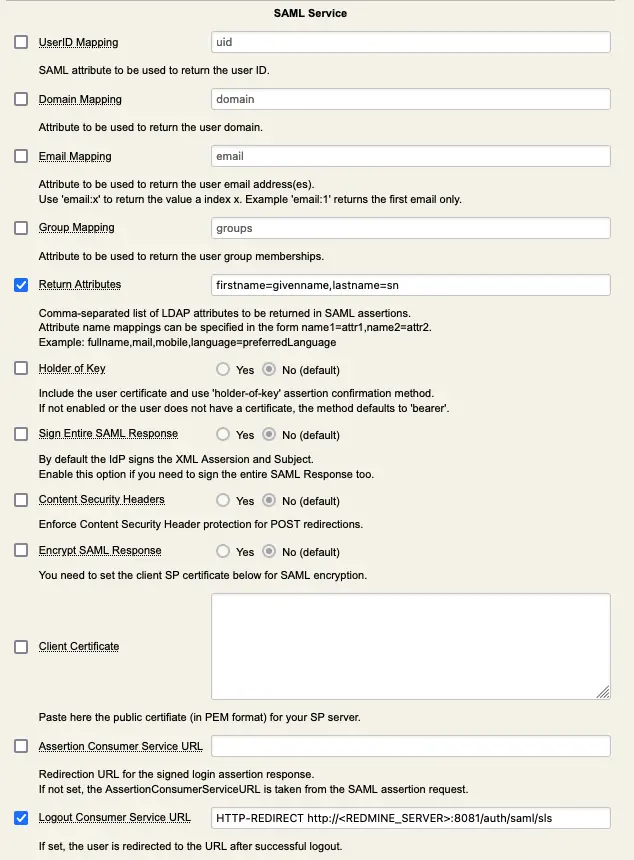
In WebADM, create a client policy named redmine, and configure following SAML settings (<REDMINE_SERVER:8081> must be changed to fit your setup):
In redmine server, follow these steps to install Redmine OmniAuth SAML plugin from AlphaNodes/redmine_saml repository (assumes that you are at the root of your redmine folder):
Restart your Redmine server, then connected as admin in Redmine, go to Administration->Plugins->Configure of Redmine SAML menu, and enable Create users automatically? setting.
3.3.12 Splunk (SAML)
Splunk supports Security Assertion Markup Language (SAML) for single sign-on (SSO) integration.
Here are the general steps to integrate Splunk with SAML :
In WebADM, we need to:
Configure a Client Policies (Splunk).
Download the metadata for use on the Service Provider (SP).
We also need the WebADM CA (Certificate Authority).
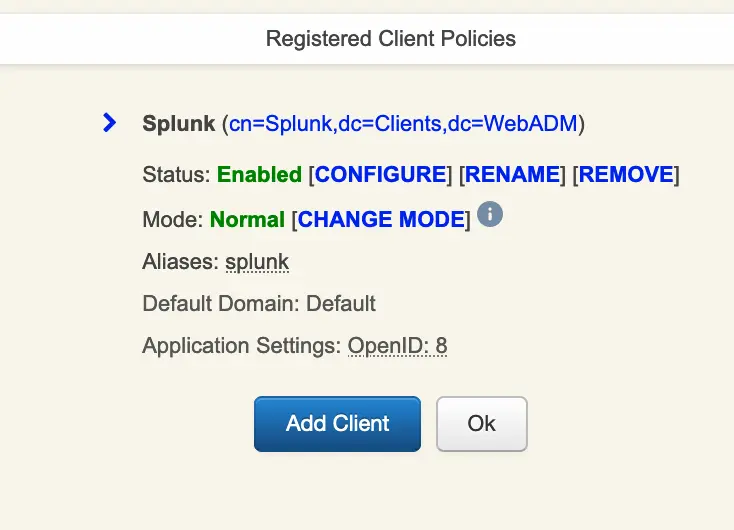
We will name the Client Policies : Splunk
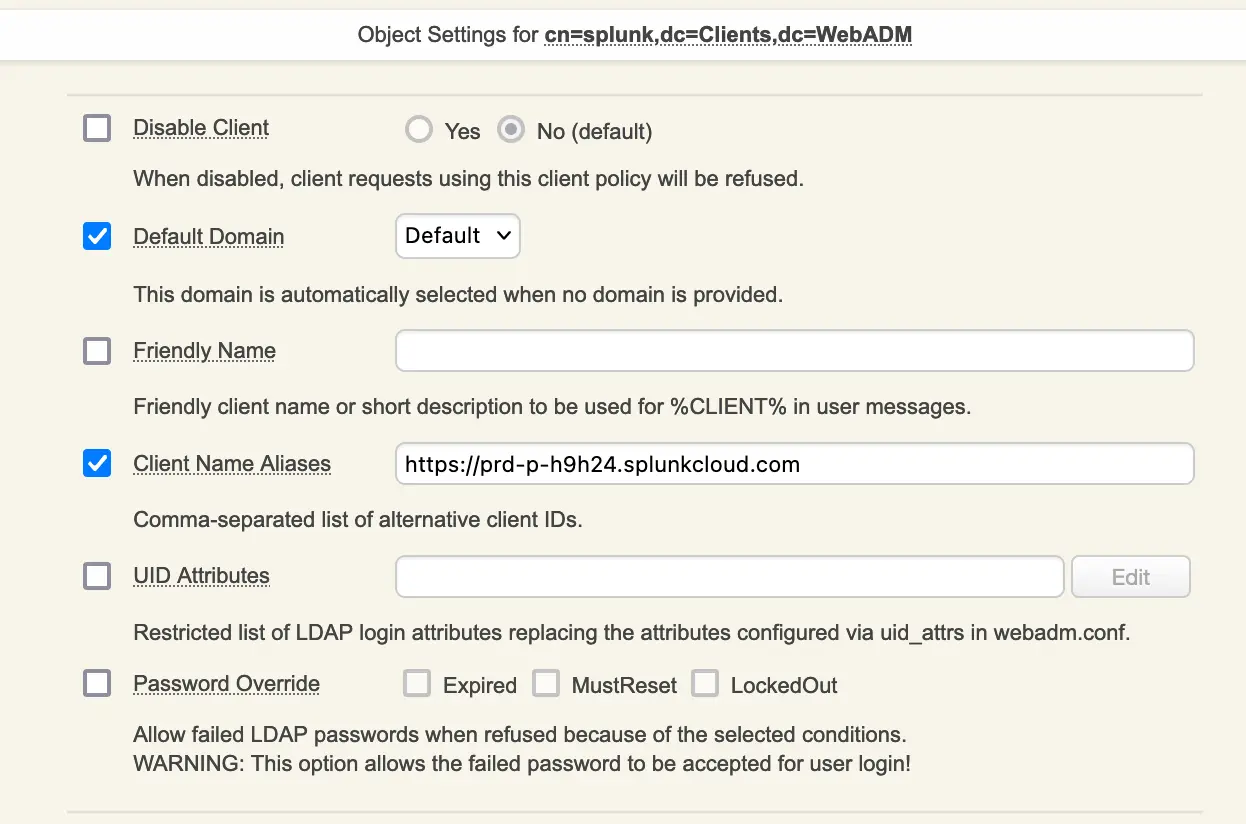
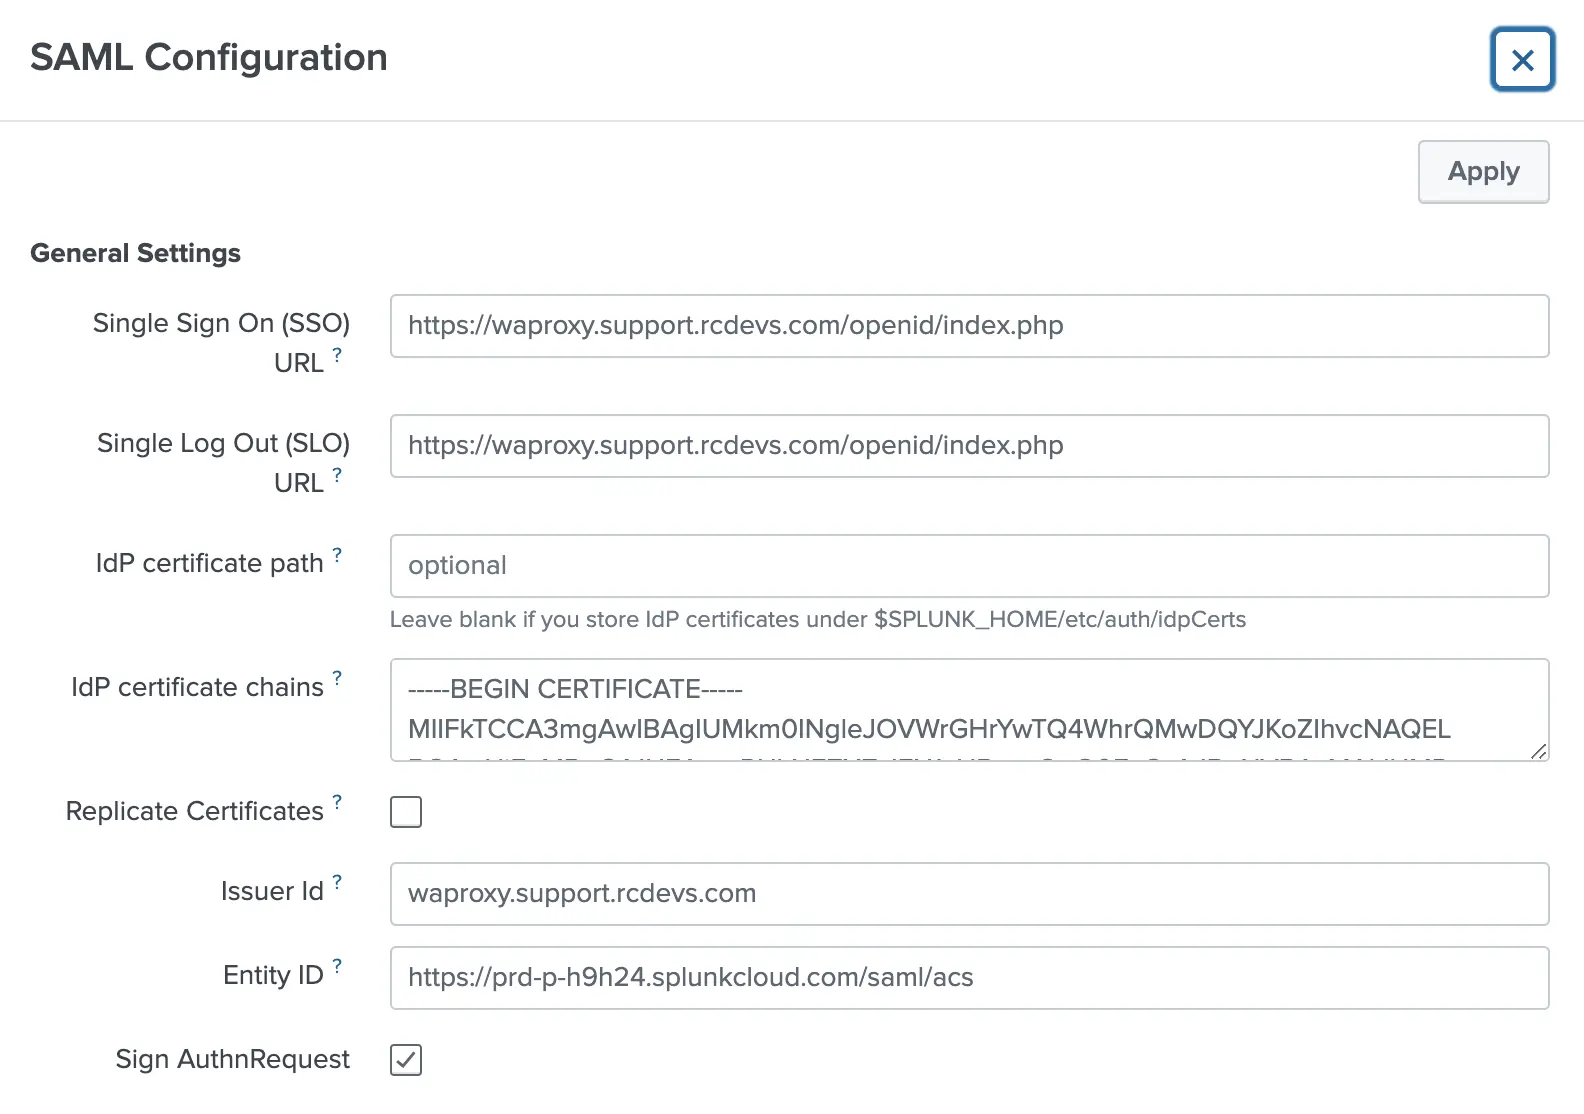
Client Name Aliases, It’s the link with which you connect to SplunkCloud. We will use it later in the SAML configuration for Entity ID(SP).
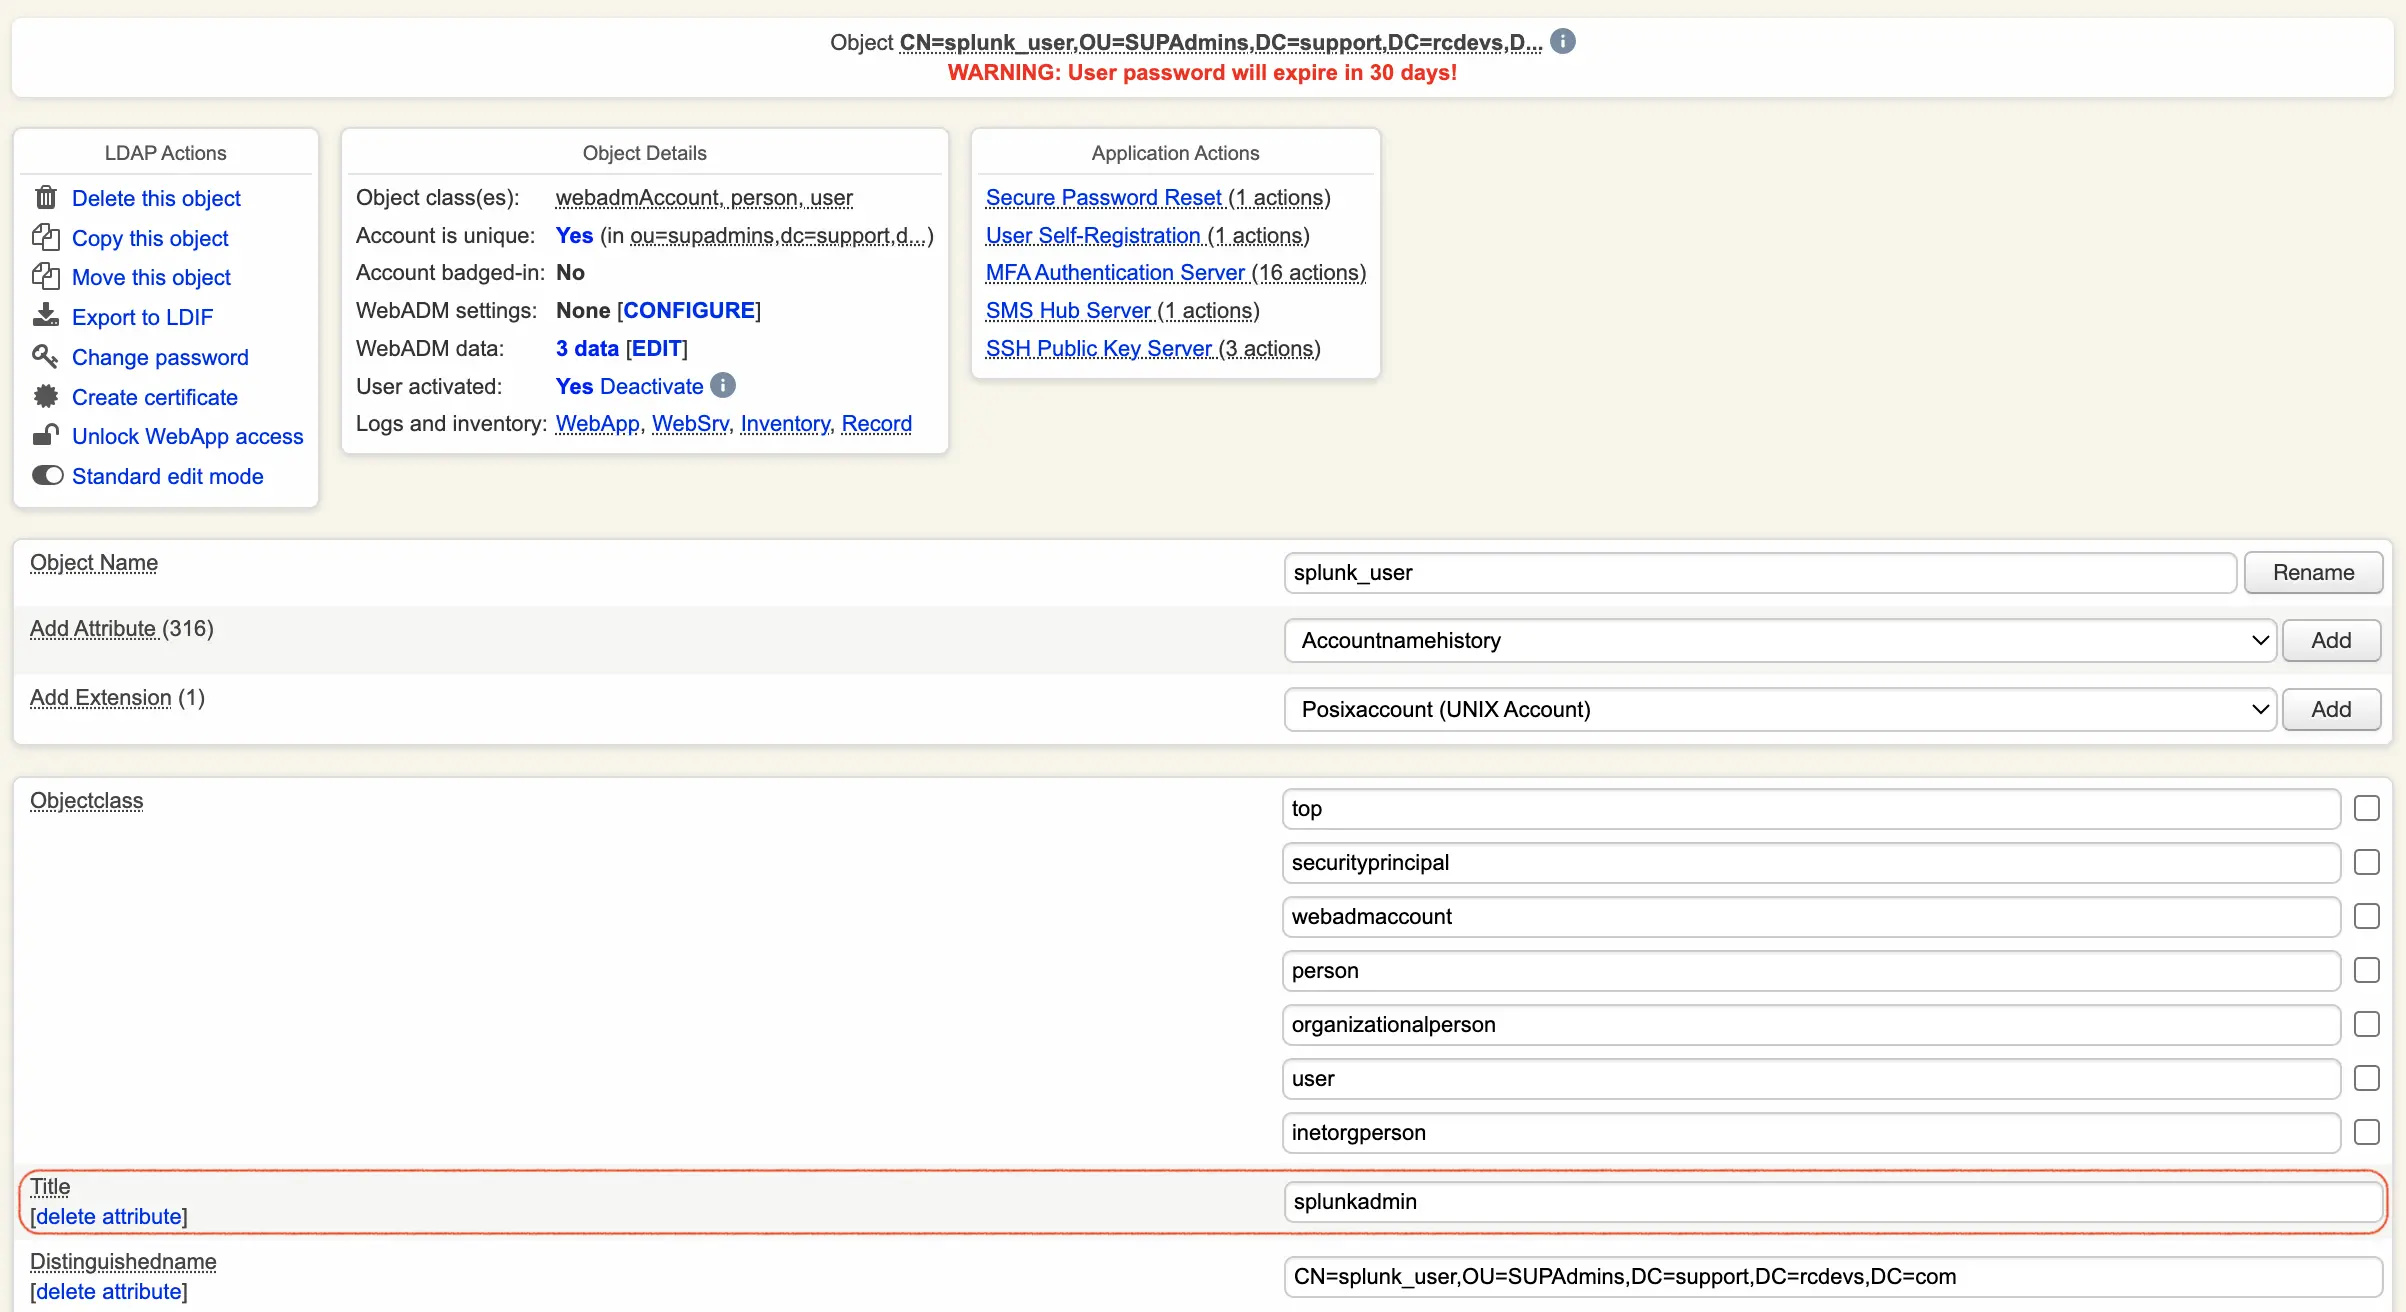
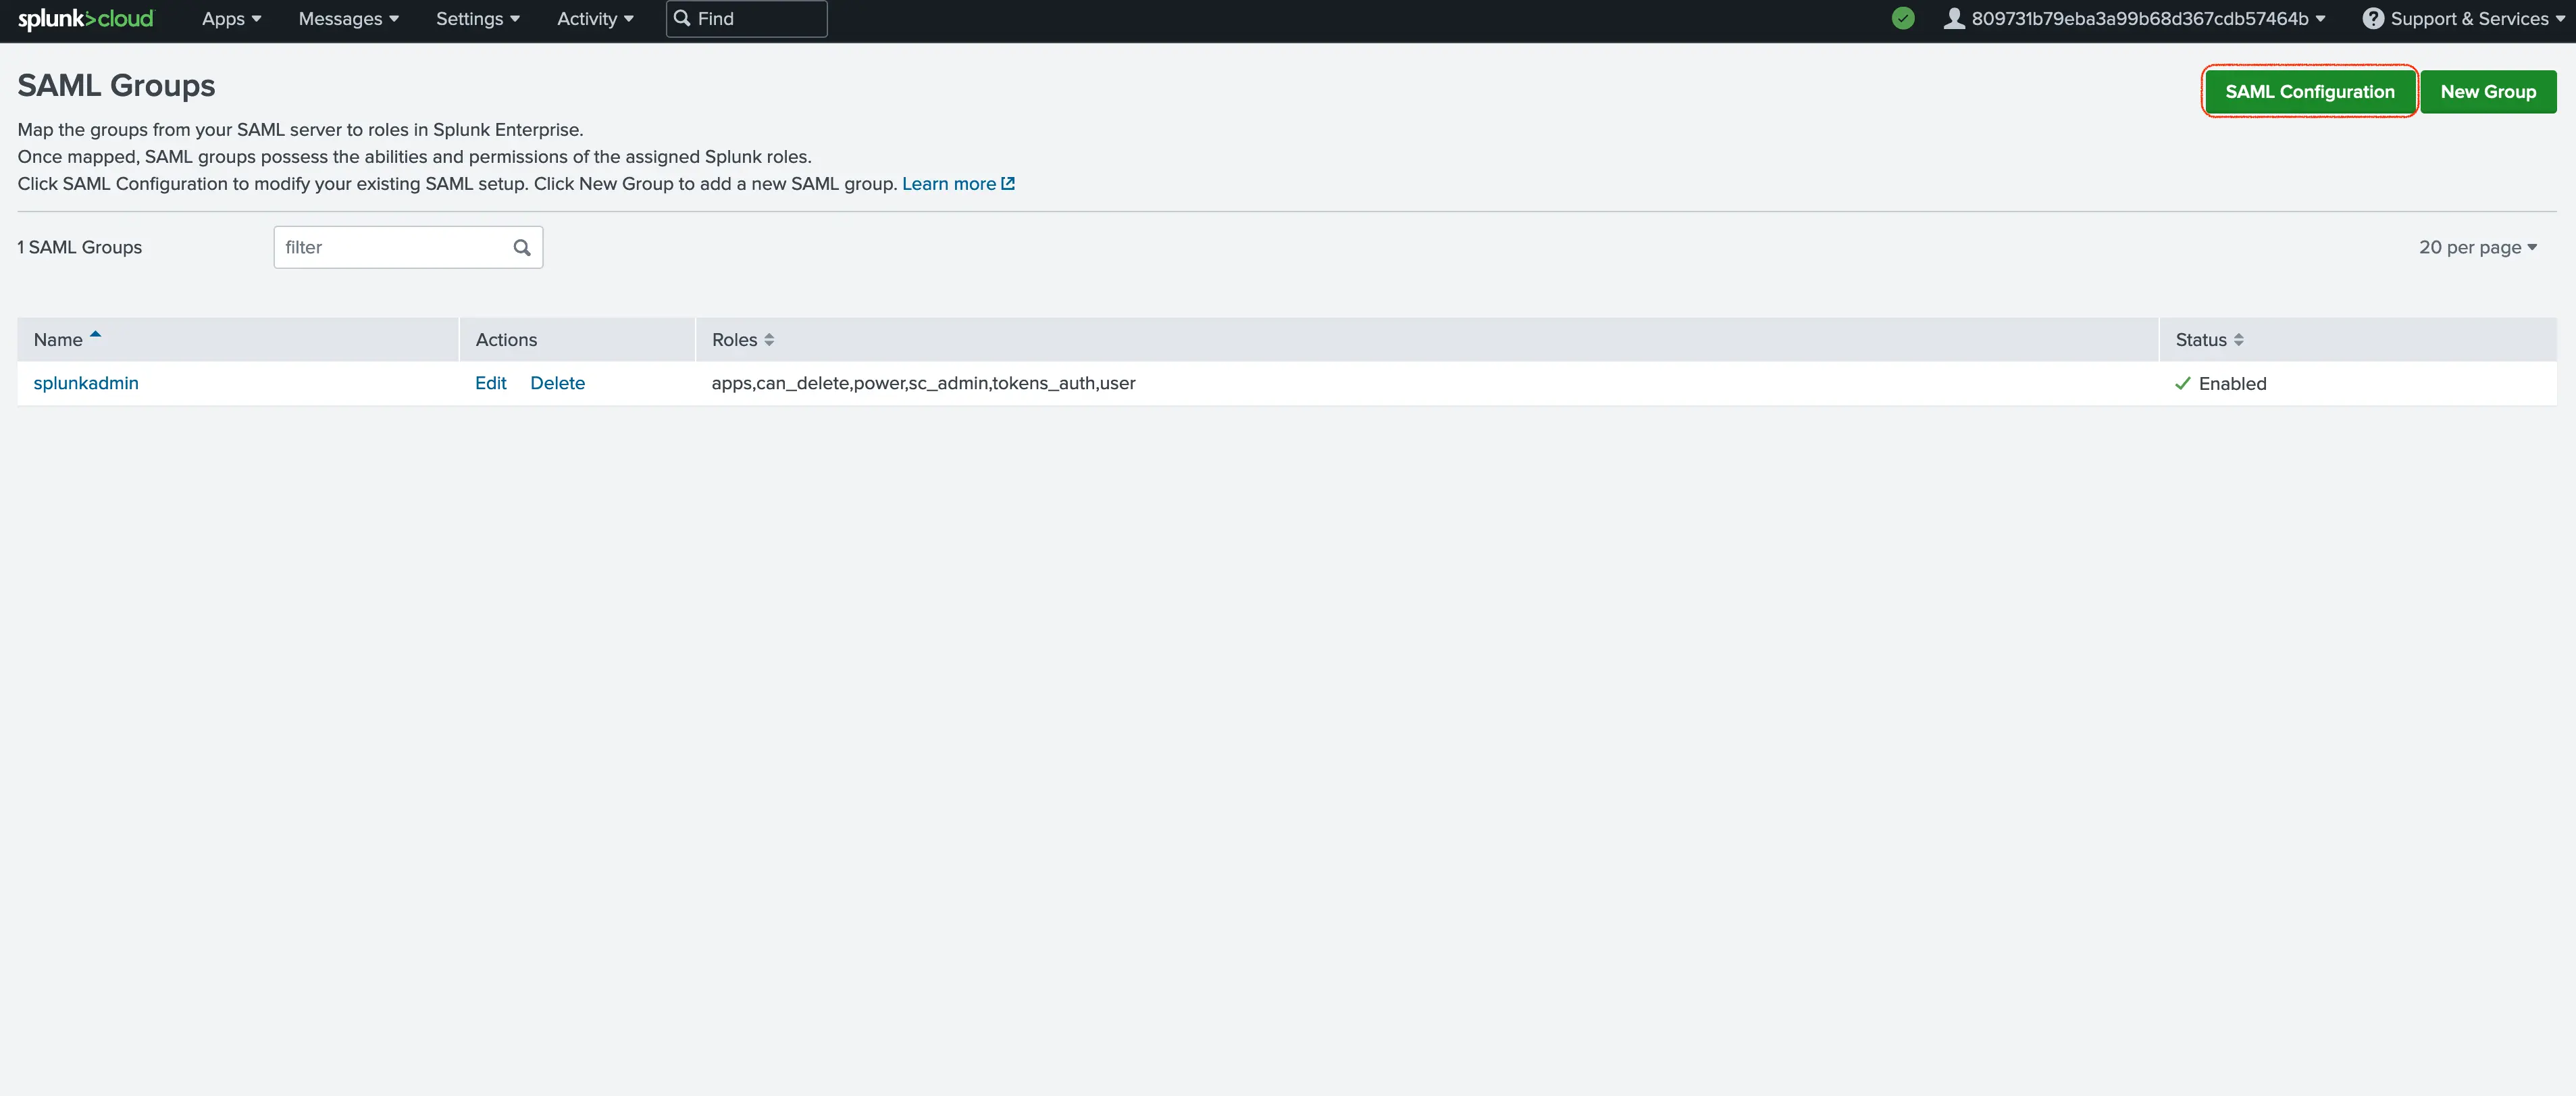
In Splunk, a user must have a role within a group. Therefore, we need to add the Title attribute and assign it the value splunkadmin (which is a group already created in Splunk). You may have noticed that we configured the “Return Attributes” before: role=title. This means that for our user “splunk_user” the “splunkadmin” role will be sent to SP in the SAML response.
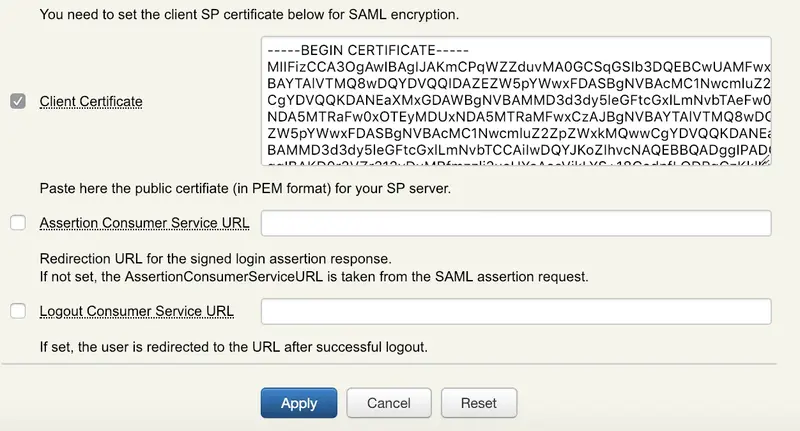
Here, we will put the certificate and other configurations found in the metadata file of the SP. For the certificate, it needs to be in PEM format.
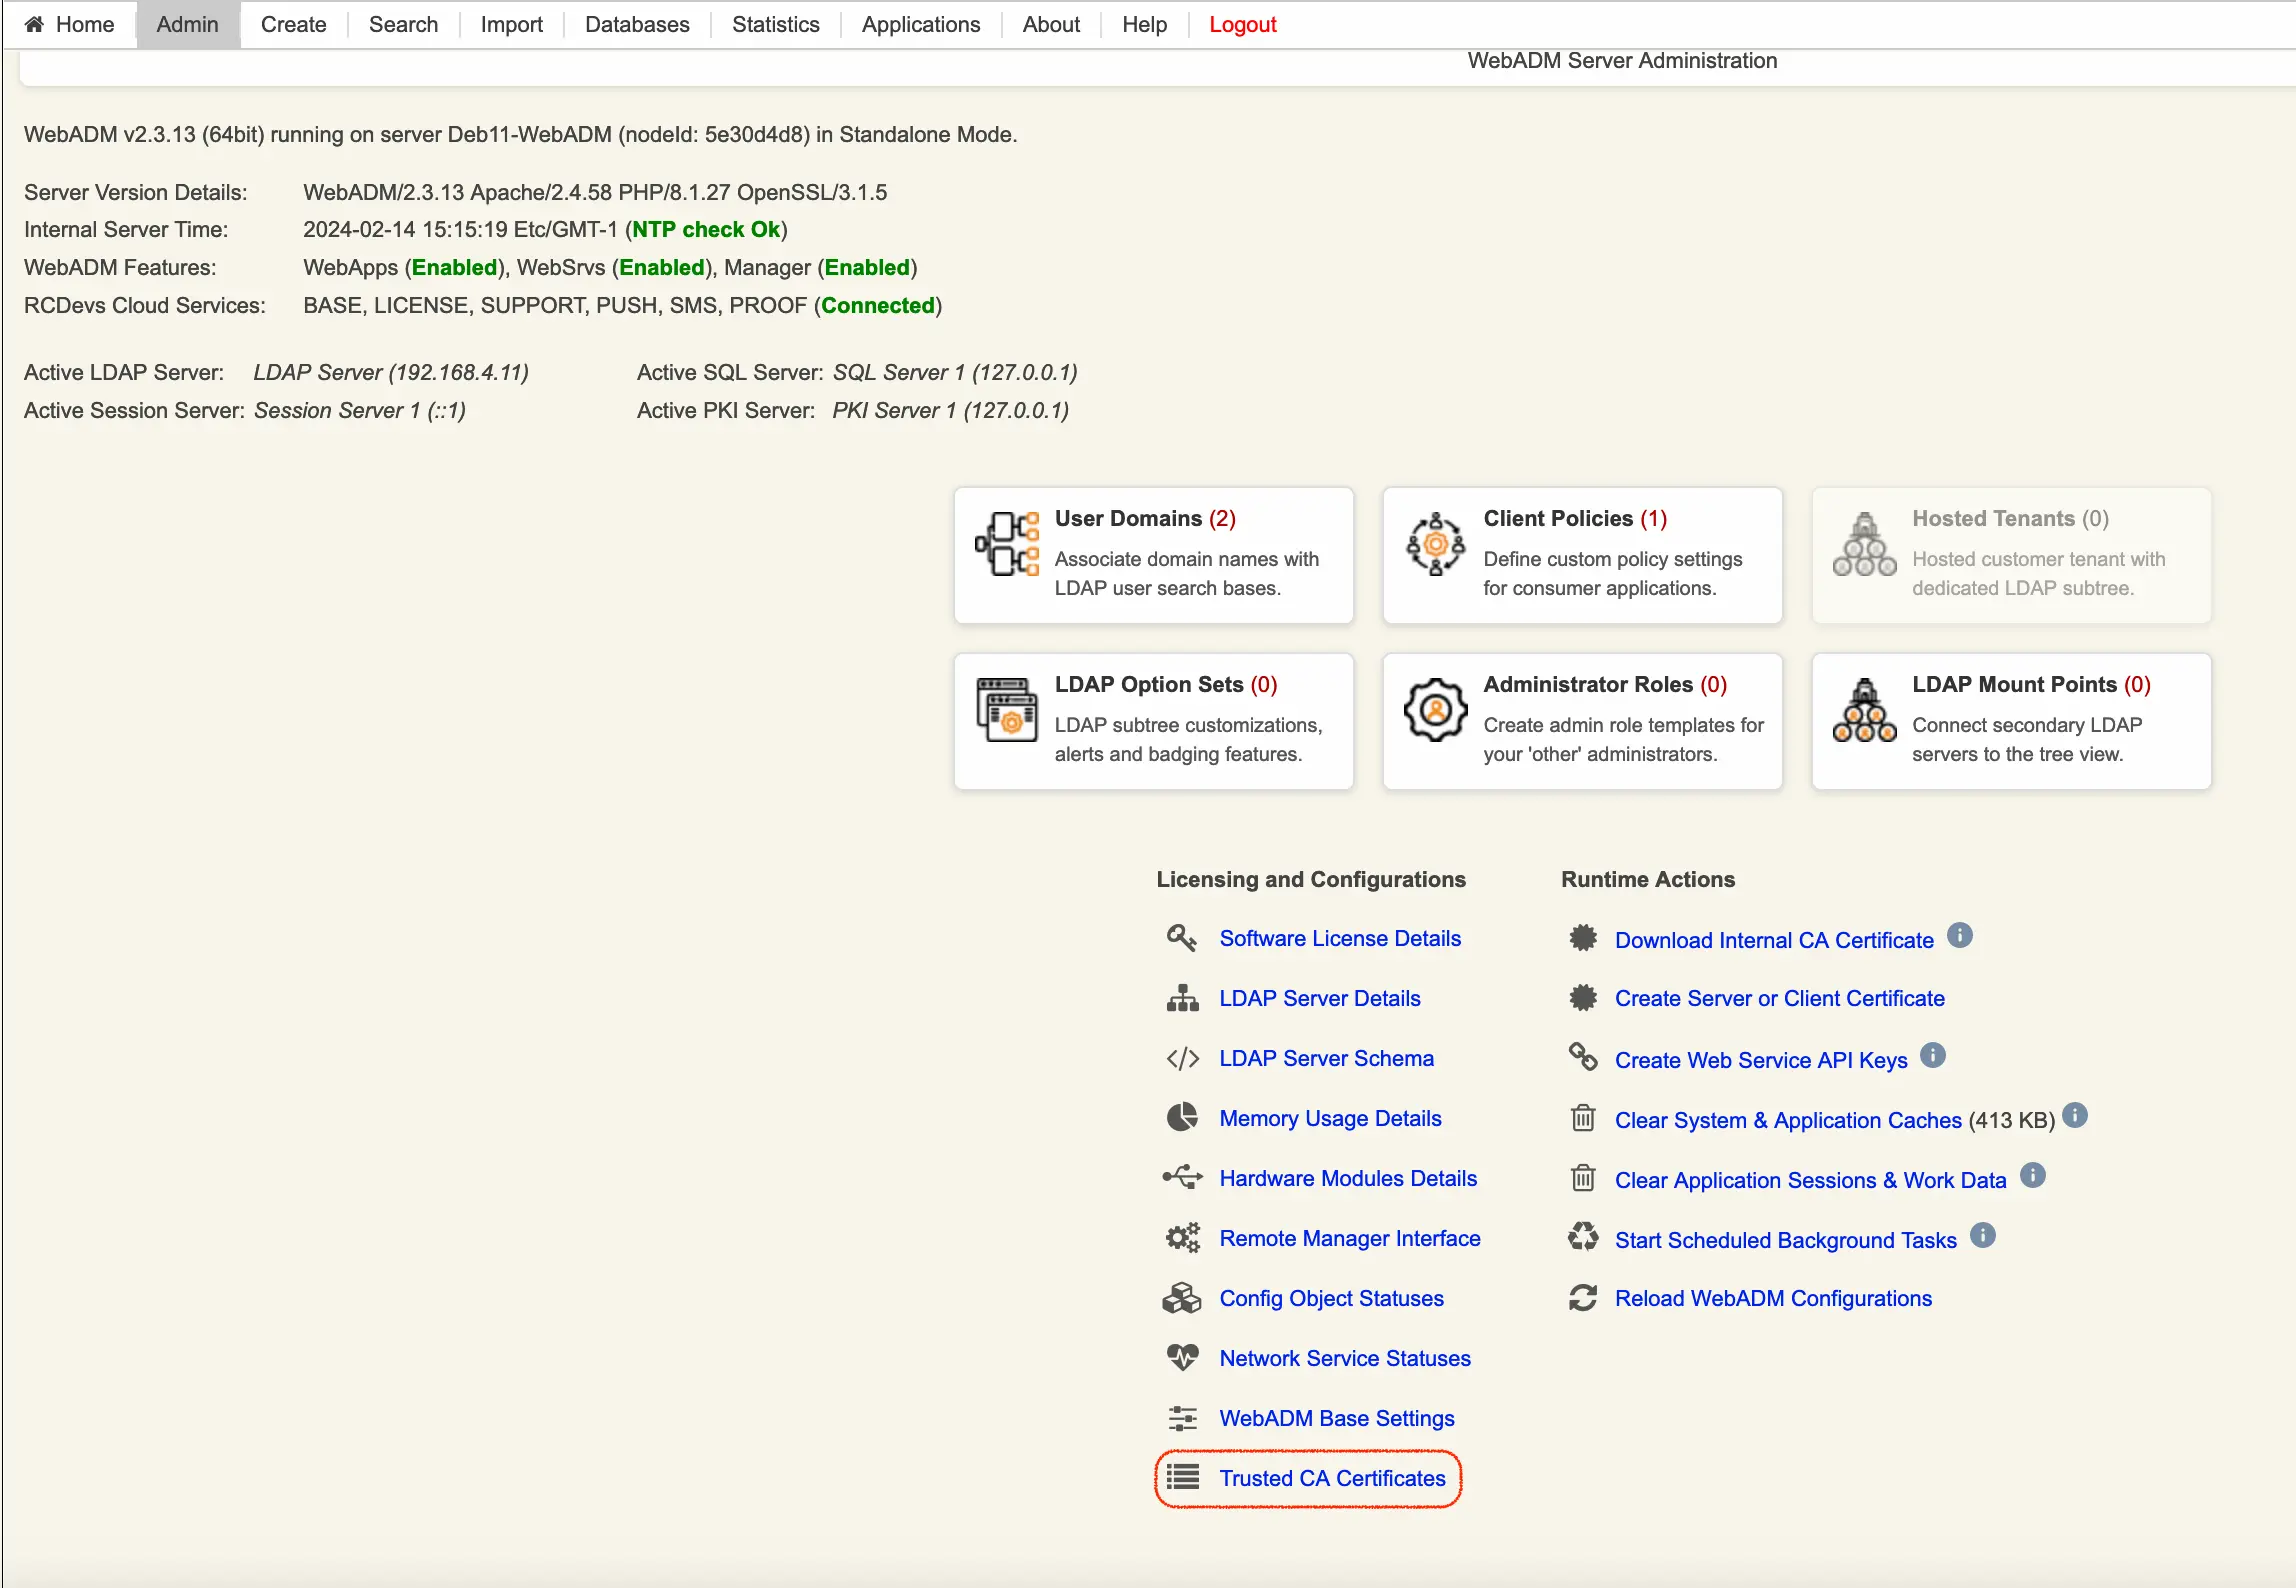
Download the WebDM CA because you will need it later :
Here you can retrieve the SAML metadata of the IDP :
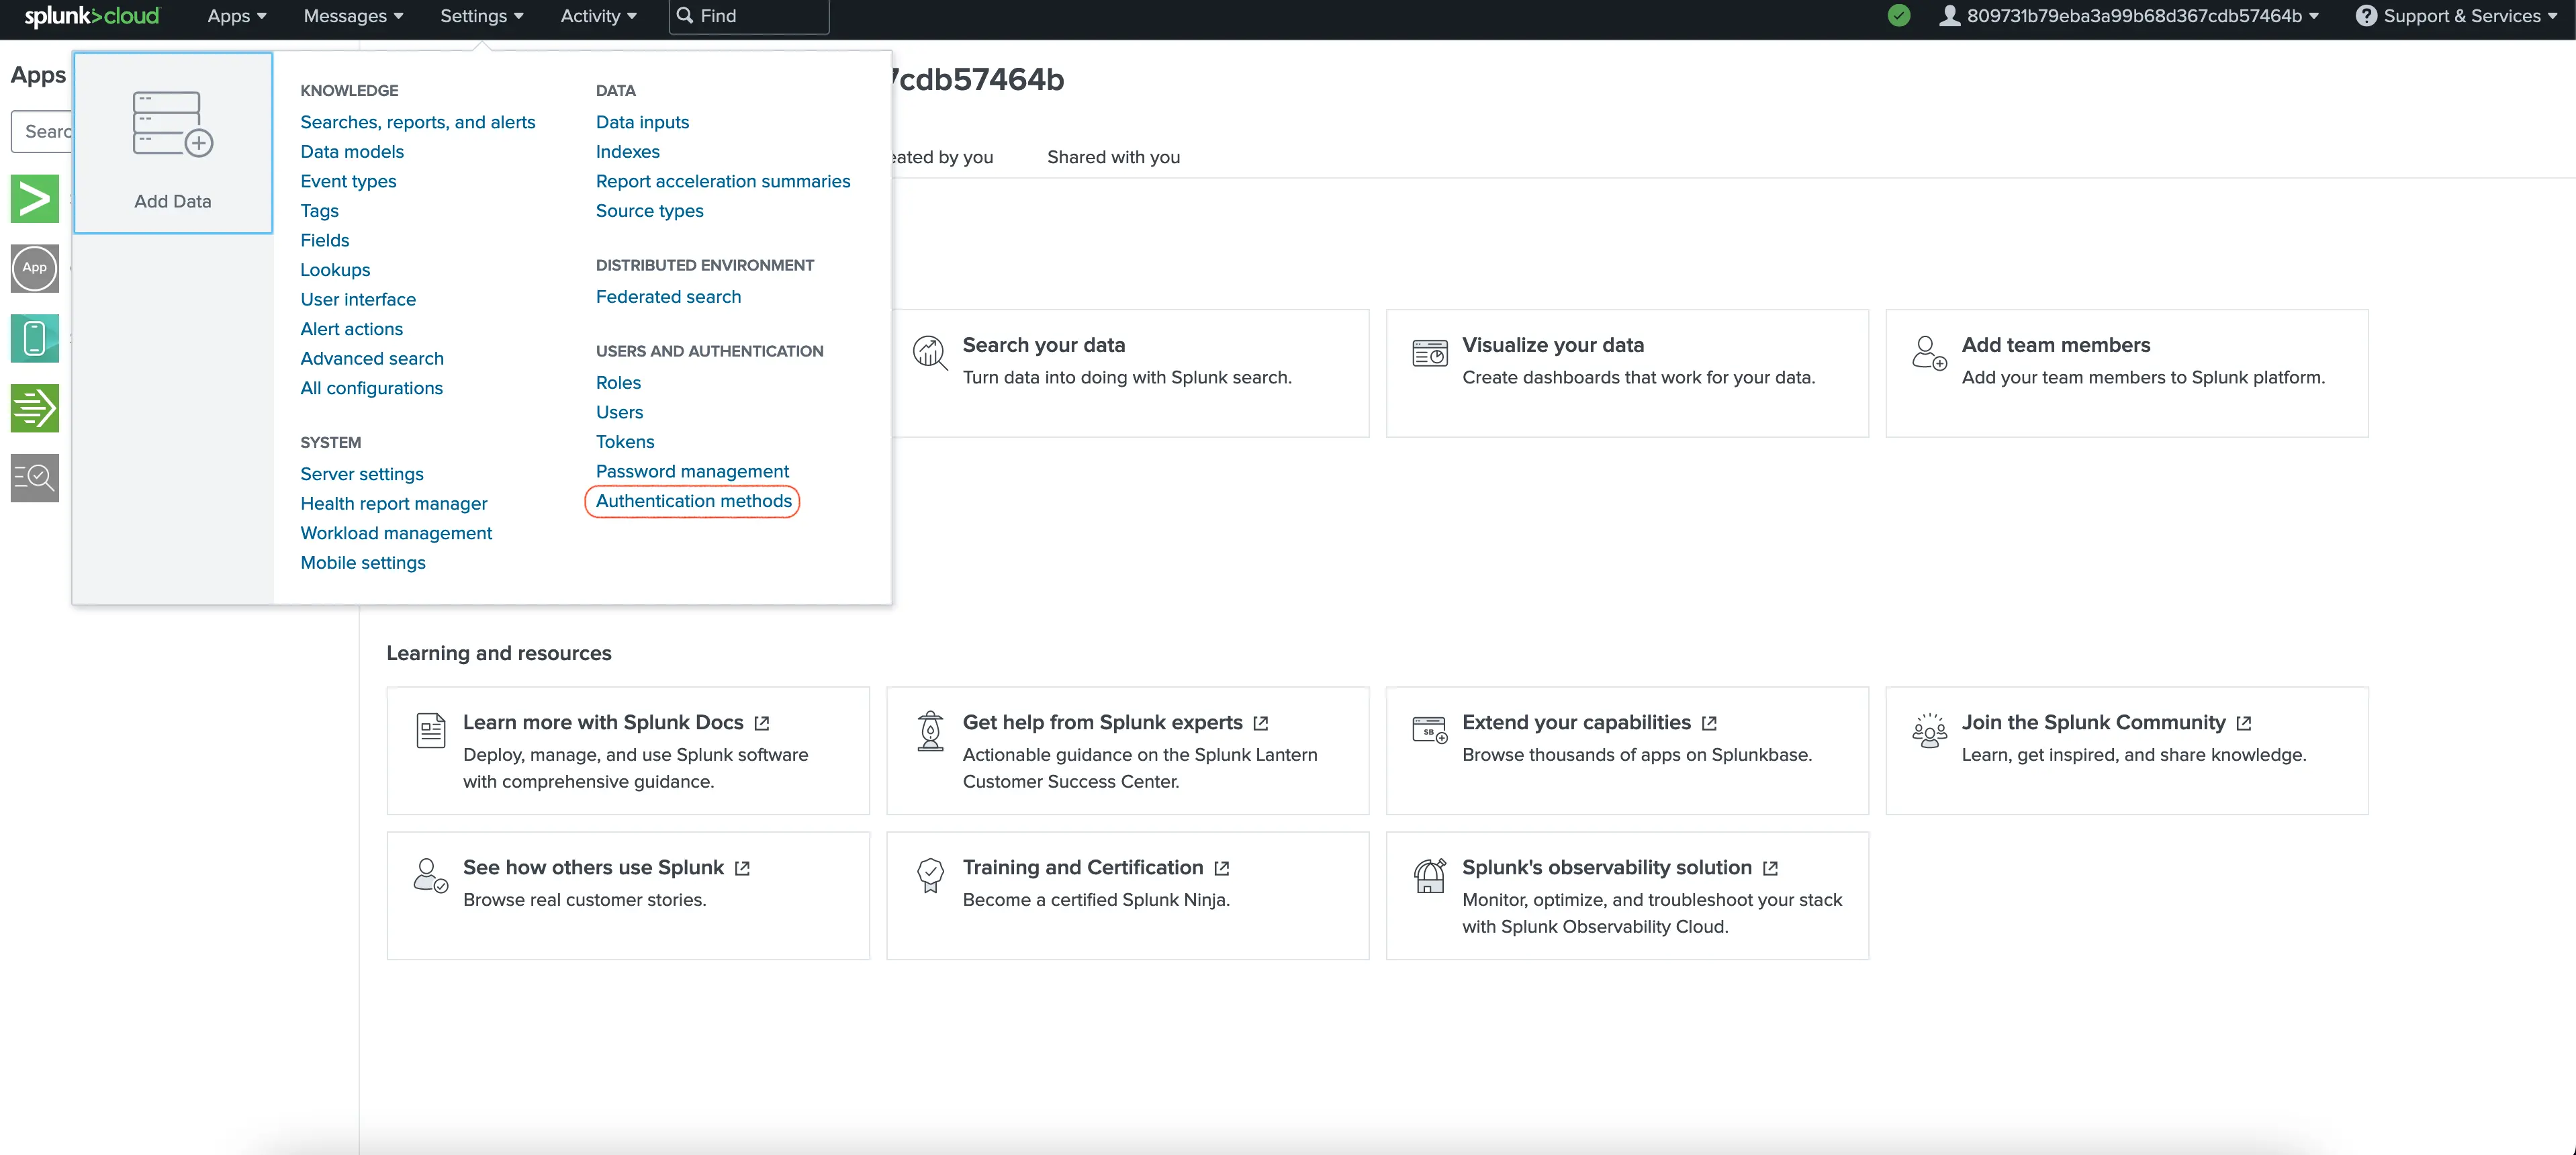
Now it’s time to set up SAML on Splunk Cloud. In the dashboard, click on Settings, then select Authentication Methods.
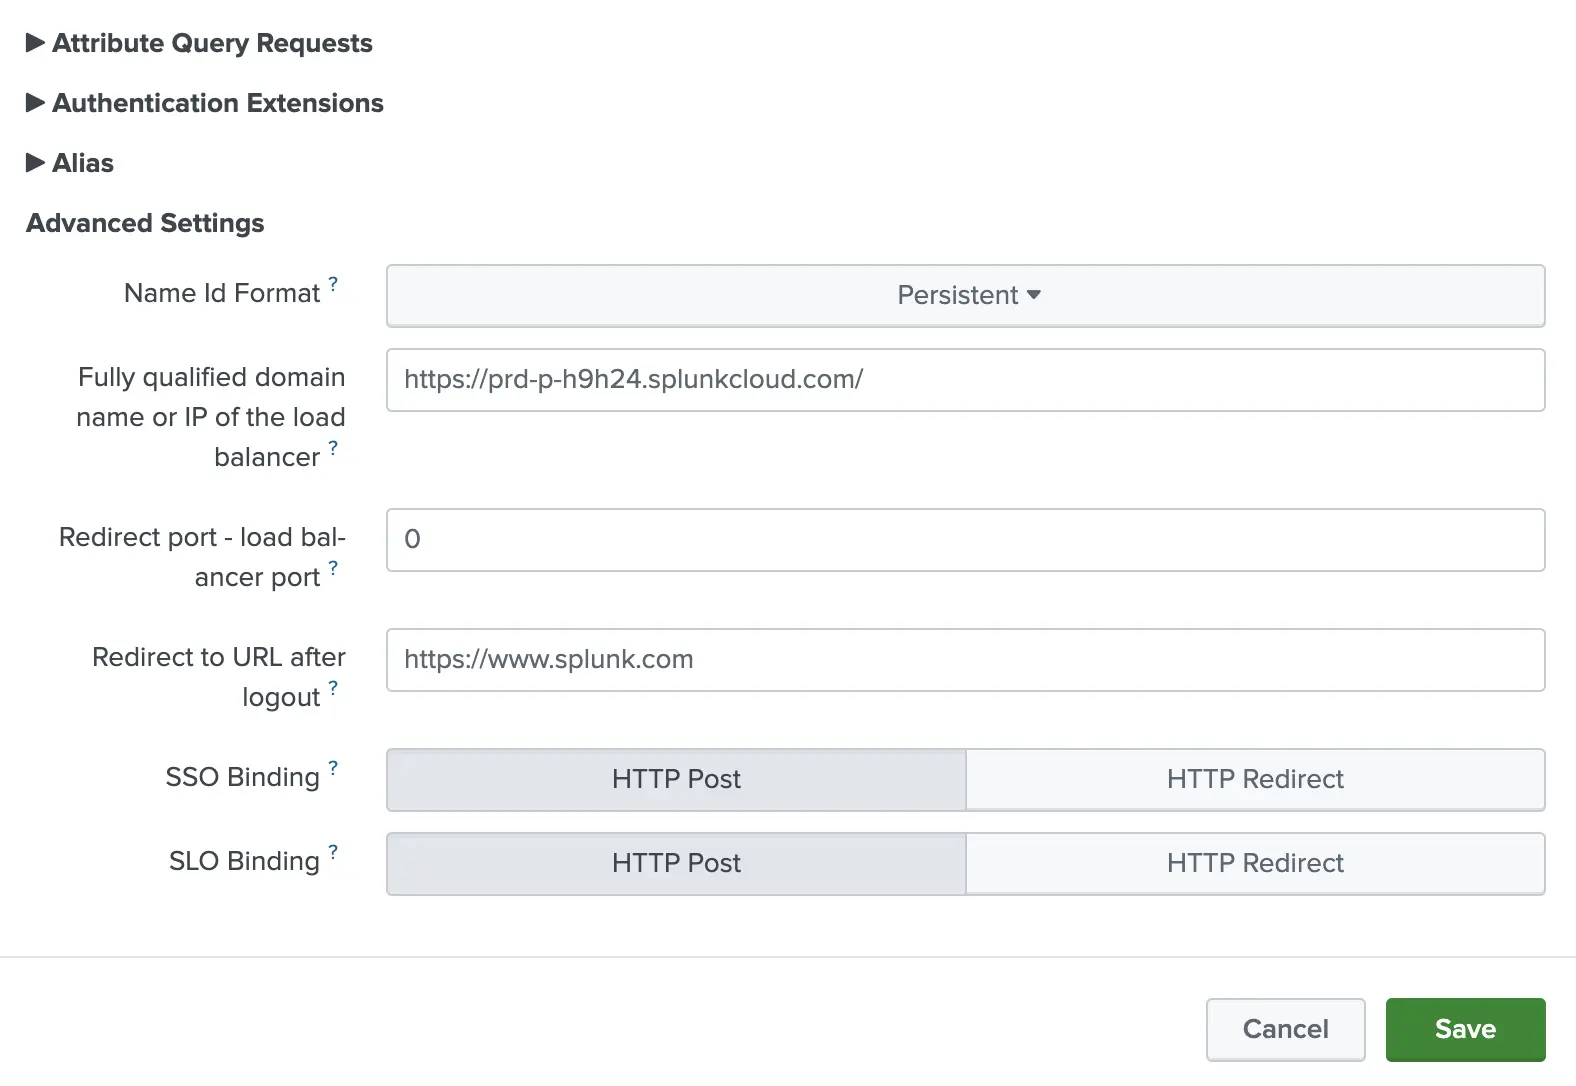
SAML Configuration :
Upload the IDP metadata into Metadata Contents to obtain the following configurations
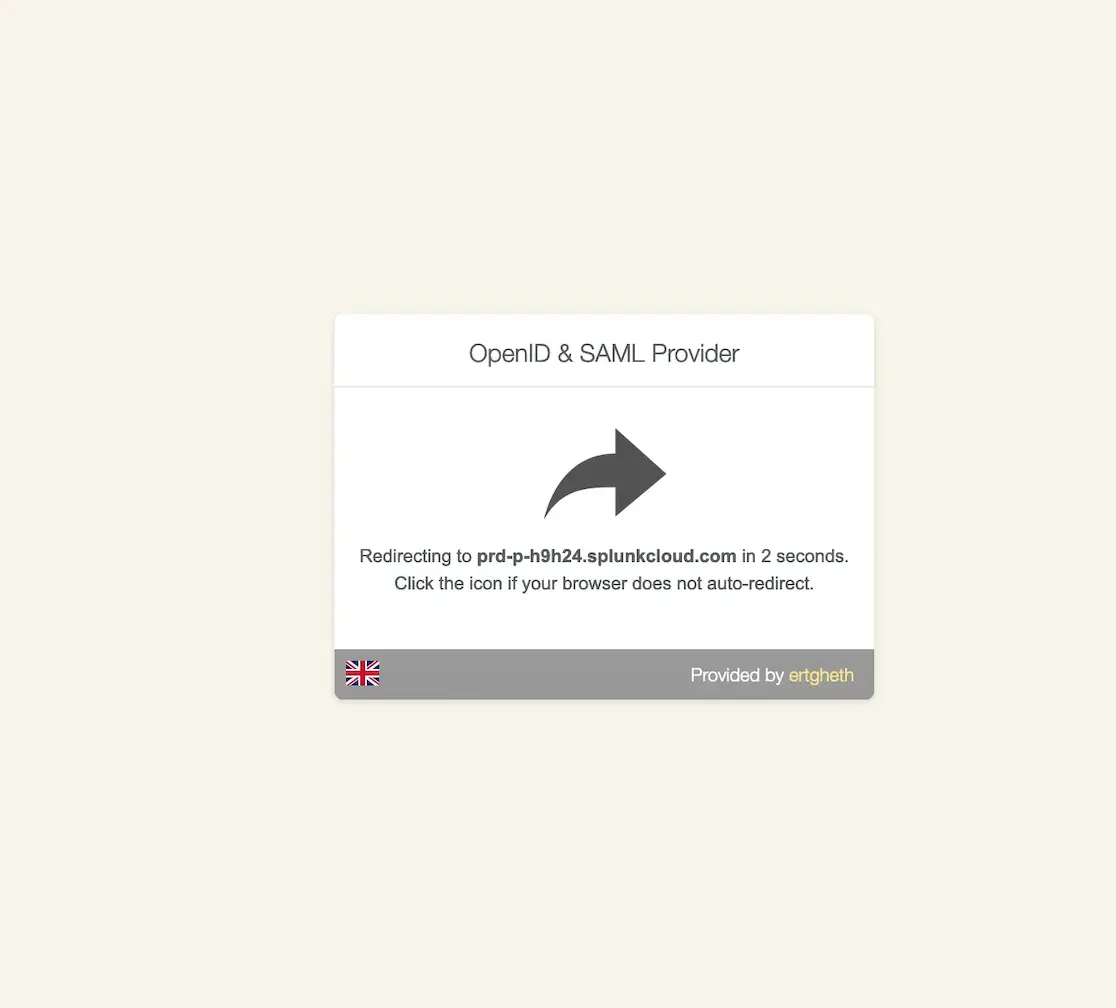
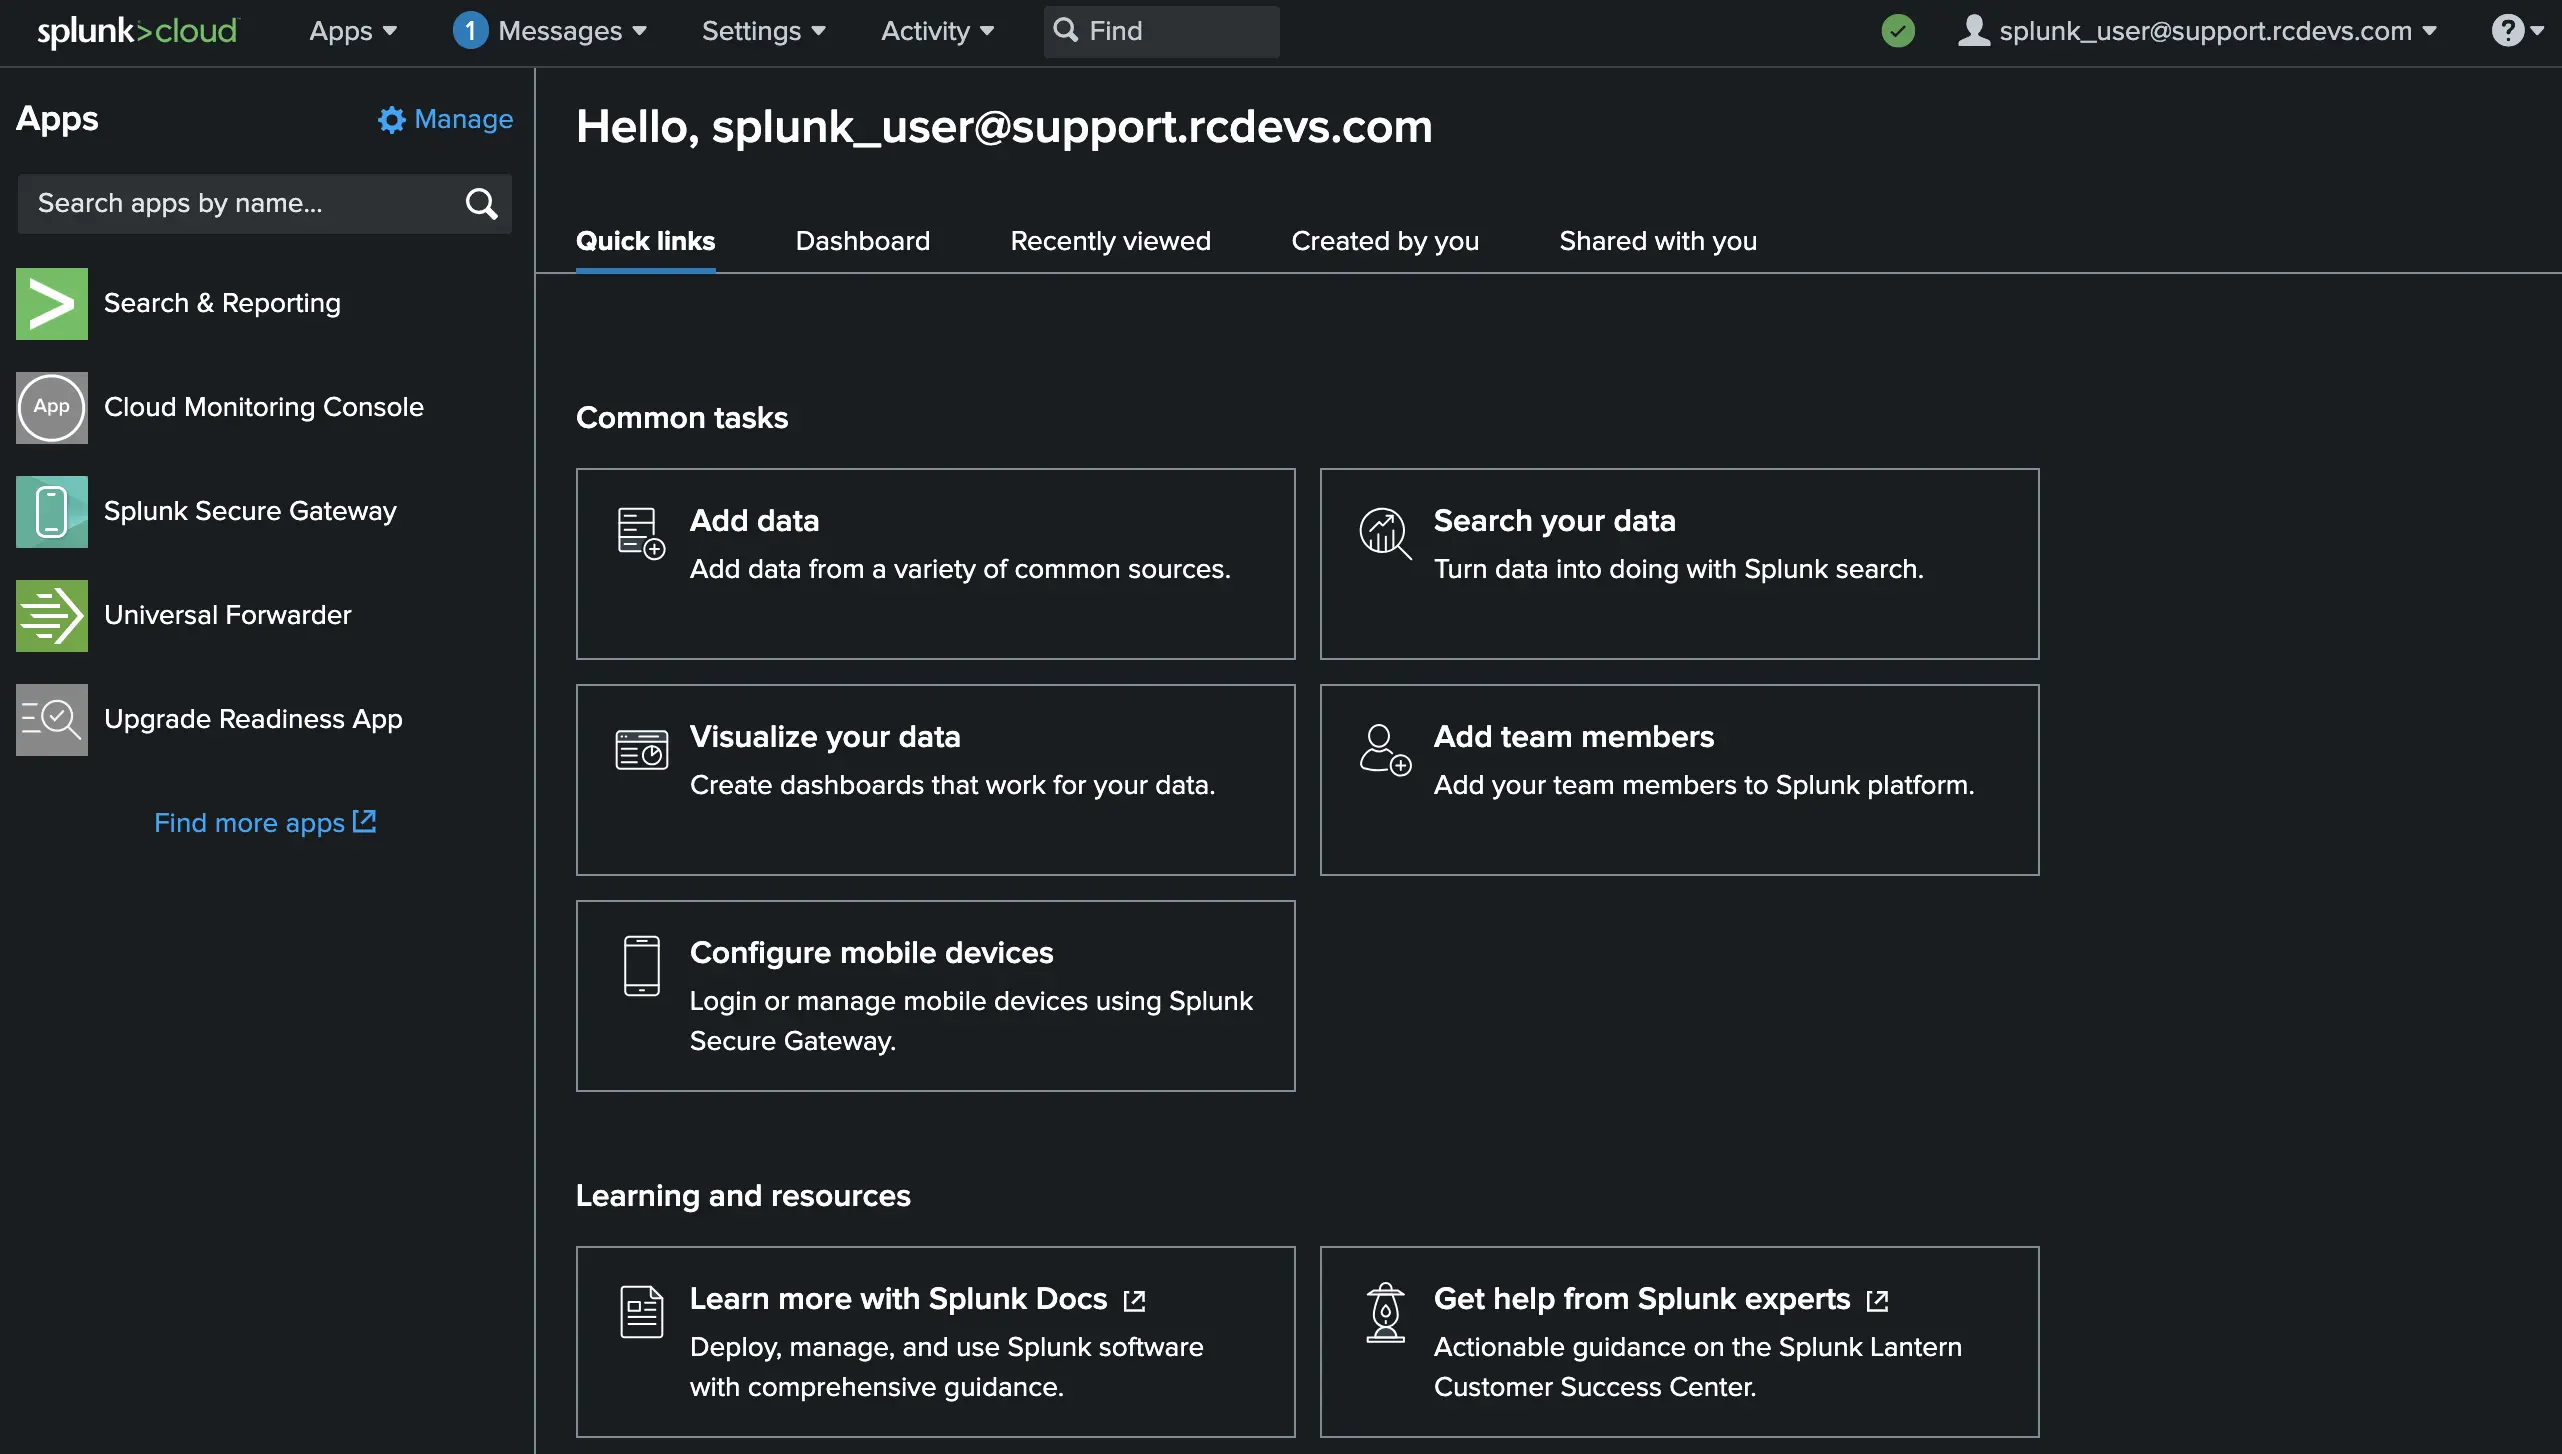
Open the SP link in a private browser and log in with your user account :
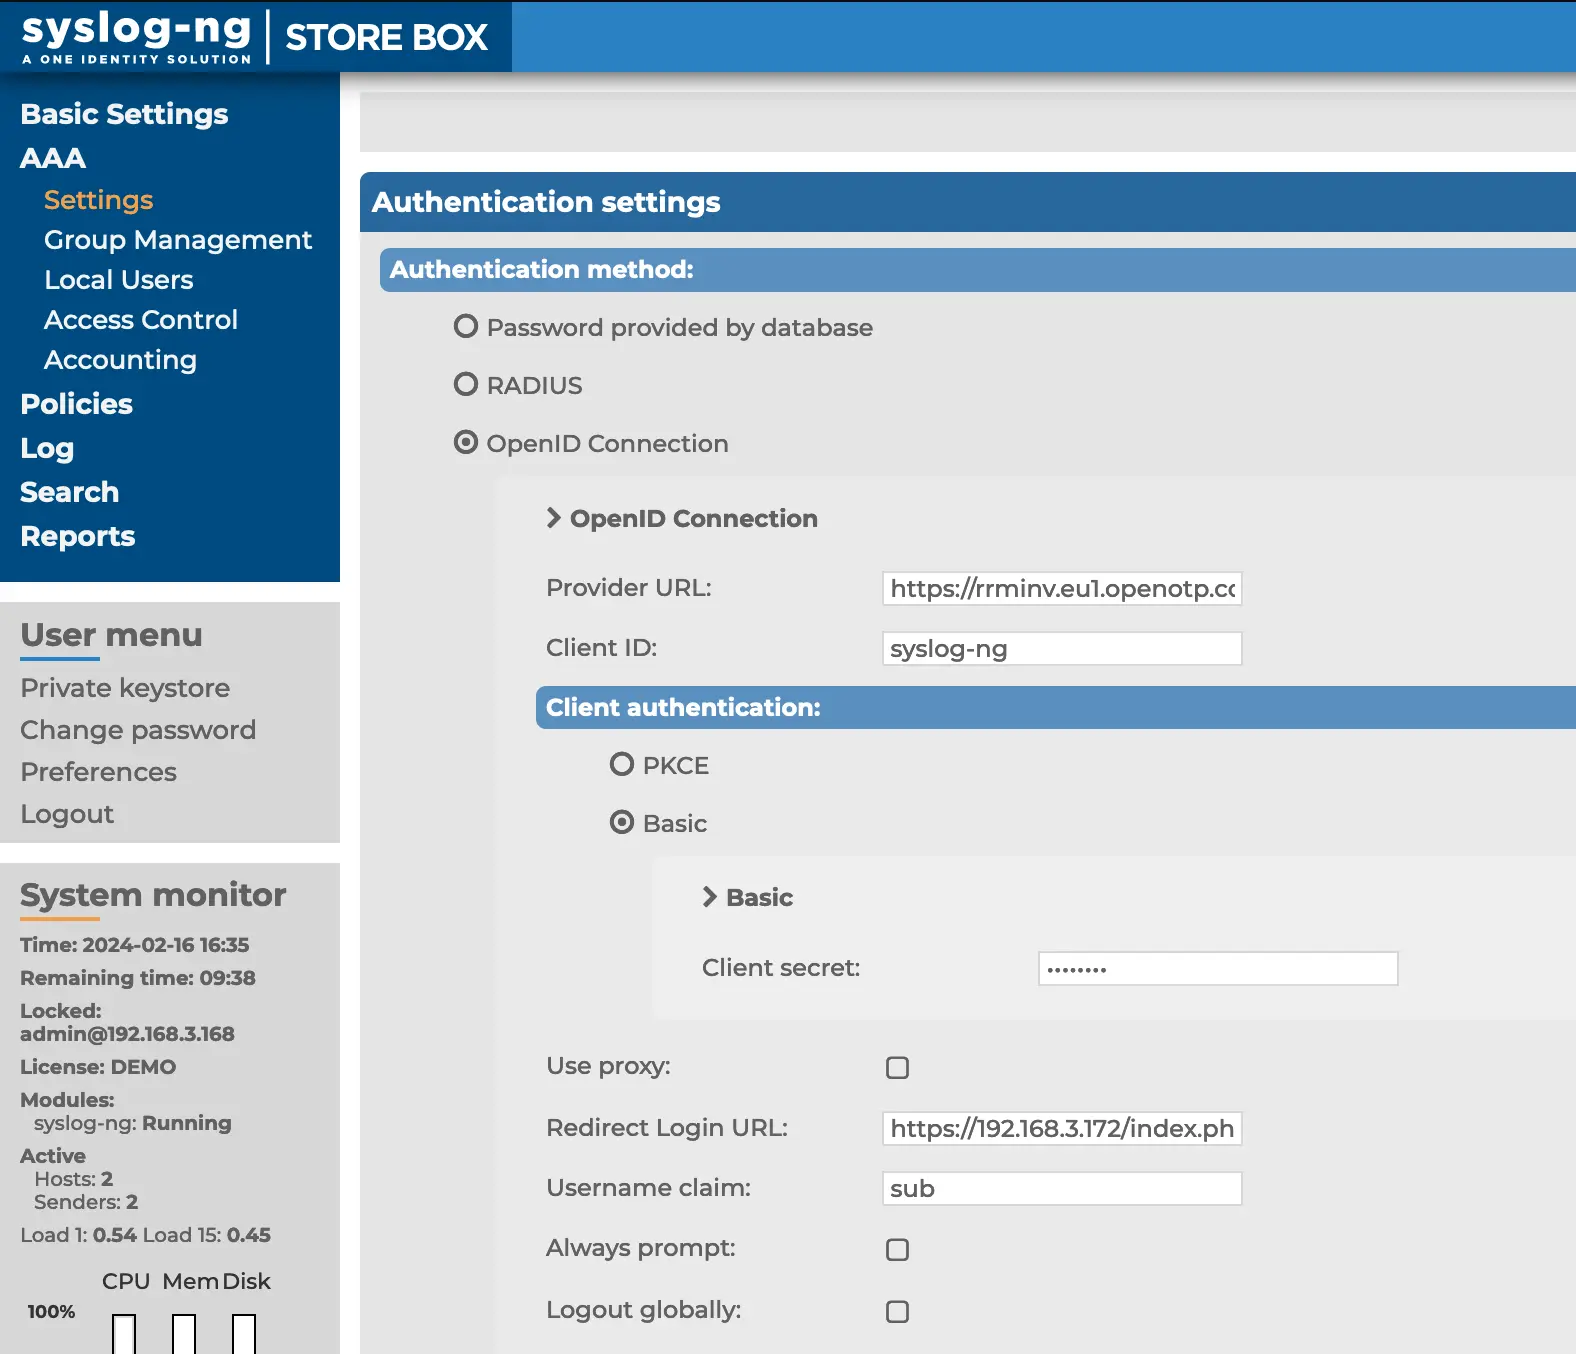
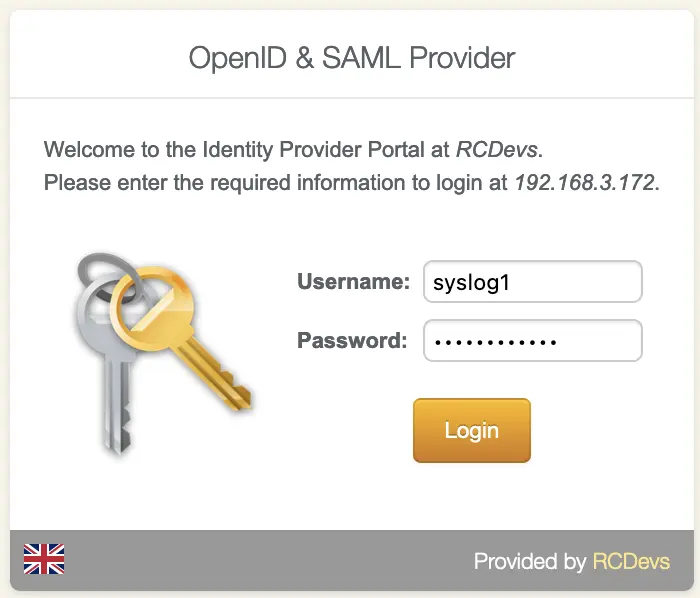
3.3.13 Syslog-ng store box (OpenID)
Note
For this integration, I used a local user that I created in syslog-ng with the necessary permissions. This user also exists in my WebADM. Alternatively, there is the option to use Active Directory as an LDAP backend. To do this, I recommend referring to the syslog-ng Store Box documentation.
To use WebADM as an IDP for Syslog-ng STORE BOX via OpenID, you will need :
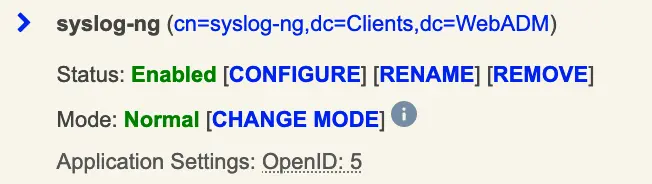
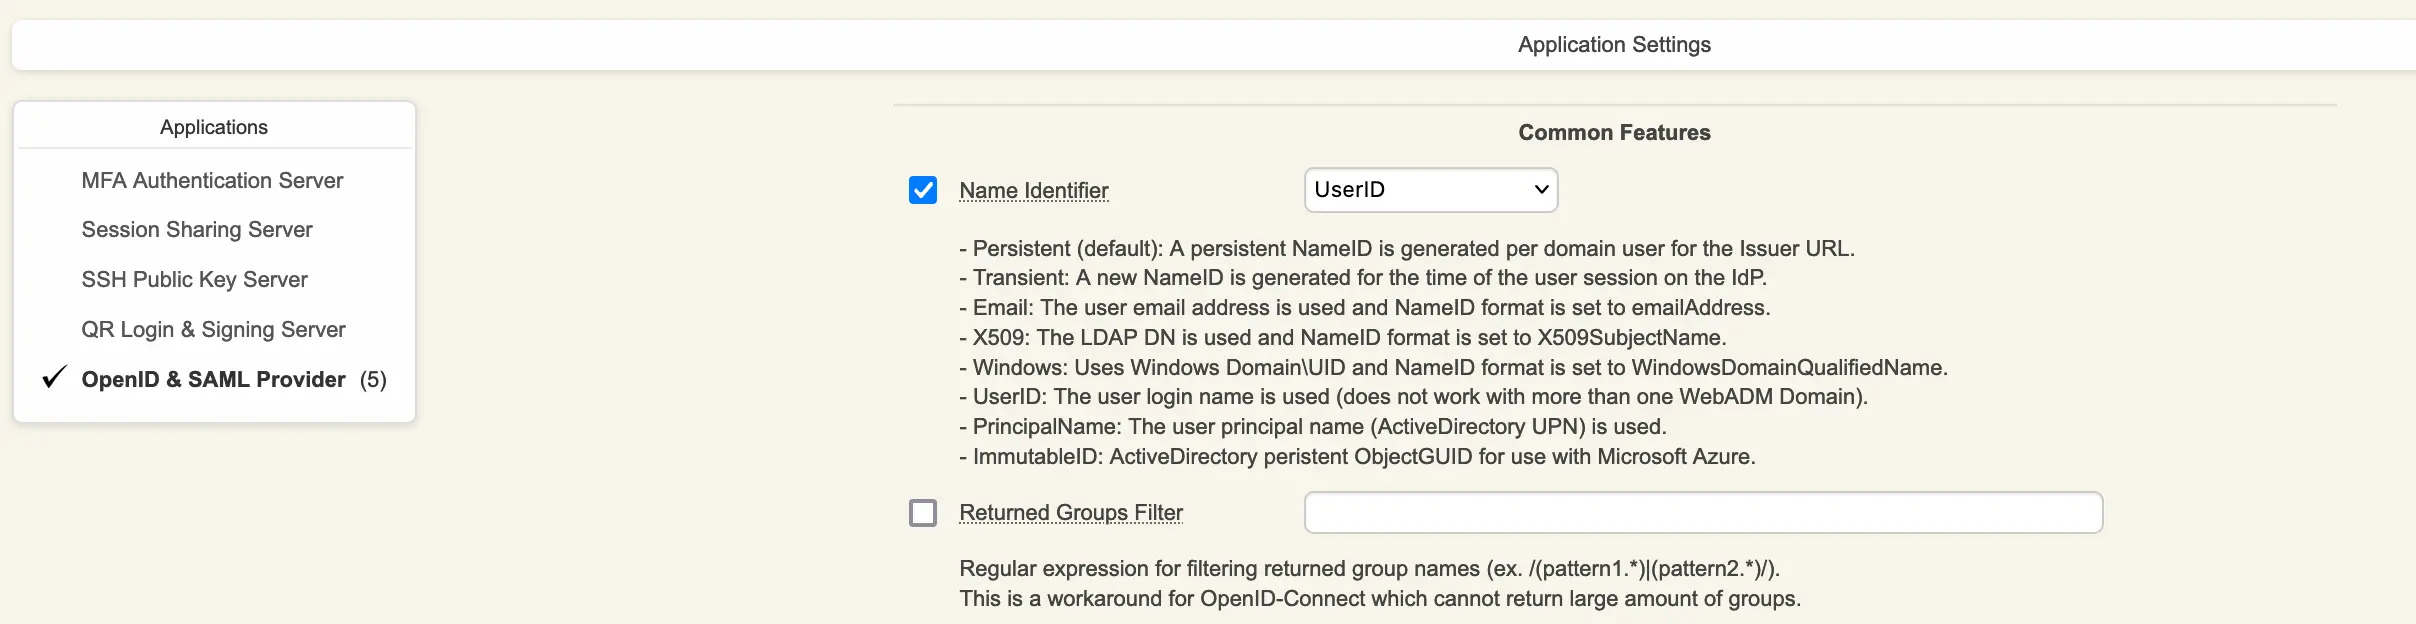
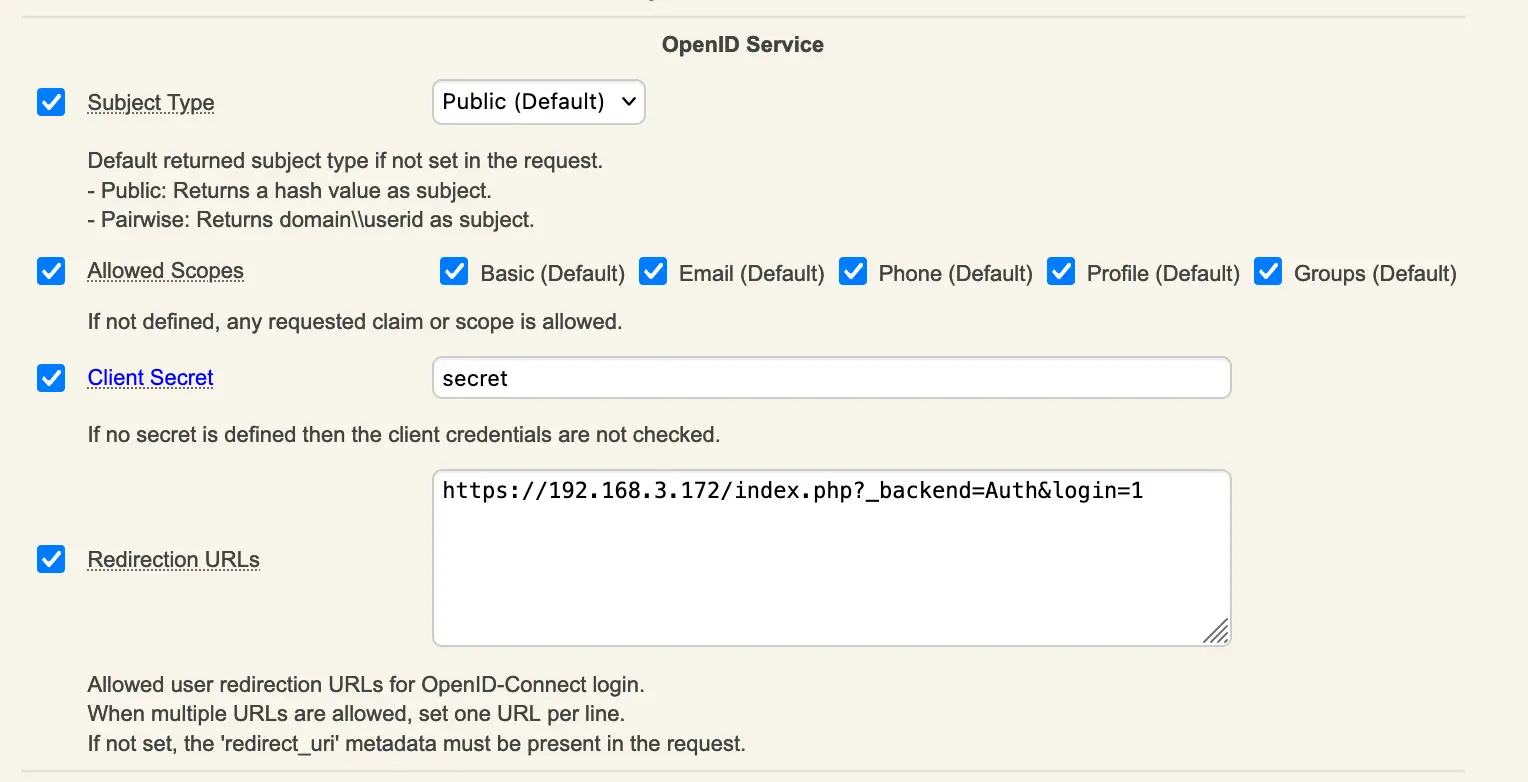
Configure a client policies :
Redirection URLs can be found in the default settings of the Service Provider under the section Redirect Login URL
And now we will configure Syslog-ng Store Box :
The Provider URL is the WebApp URL of OpenID. And the Client secret is the one configured in our client policies
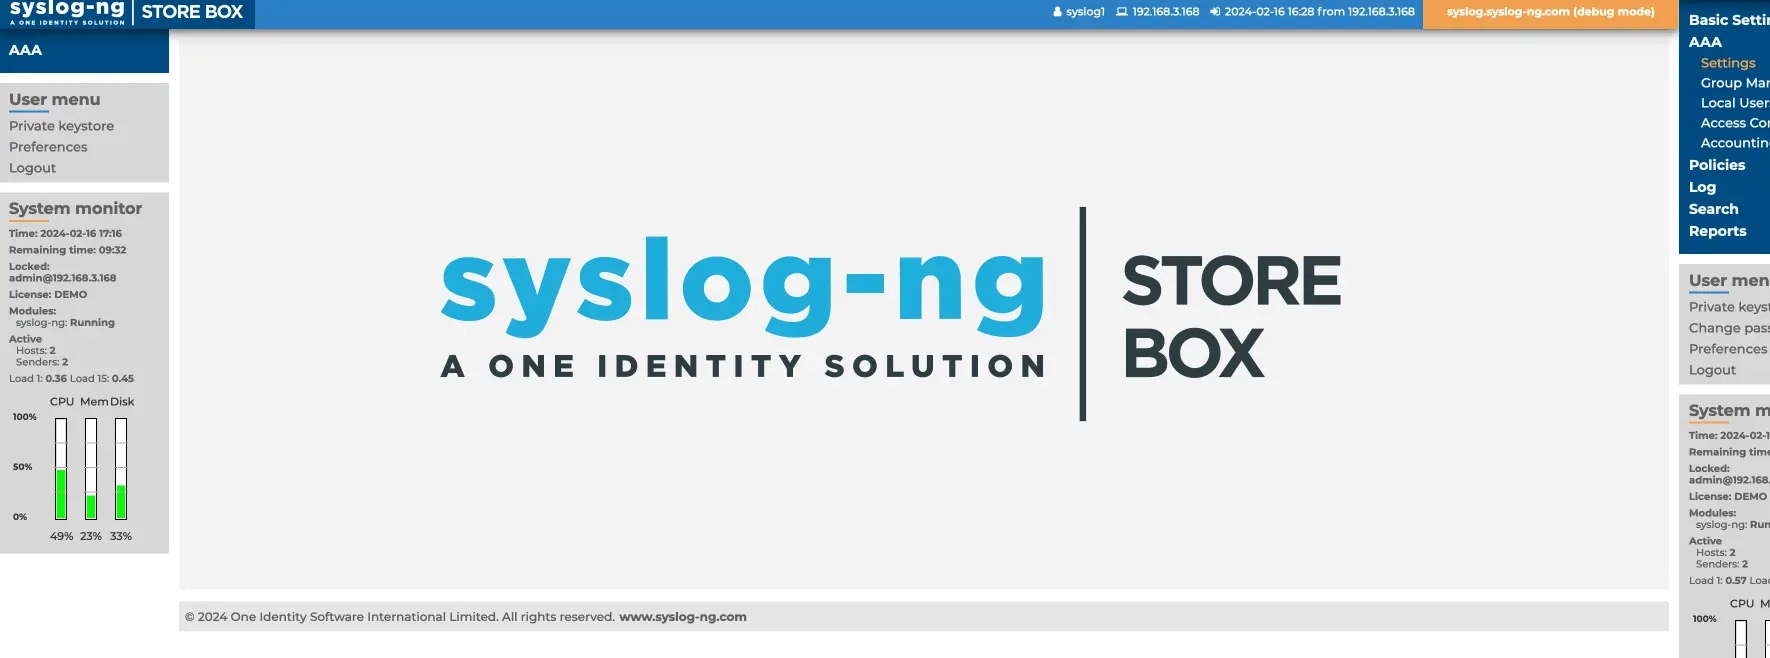
Test login :
4. How to Create and match a client policy per Service Provider
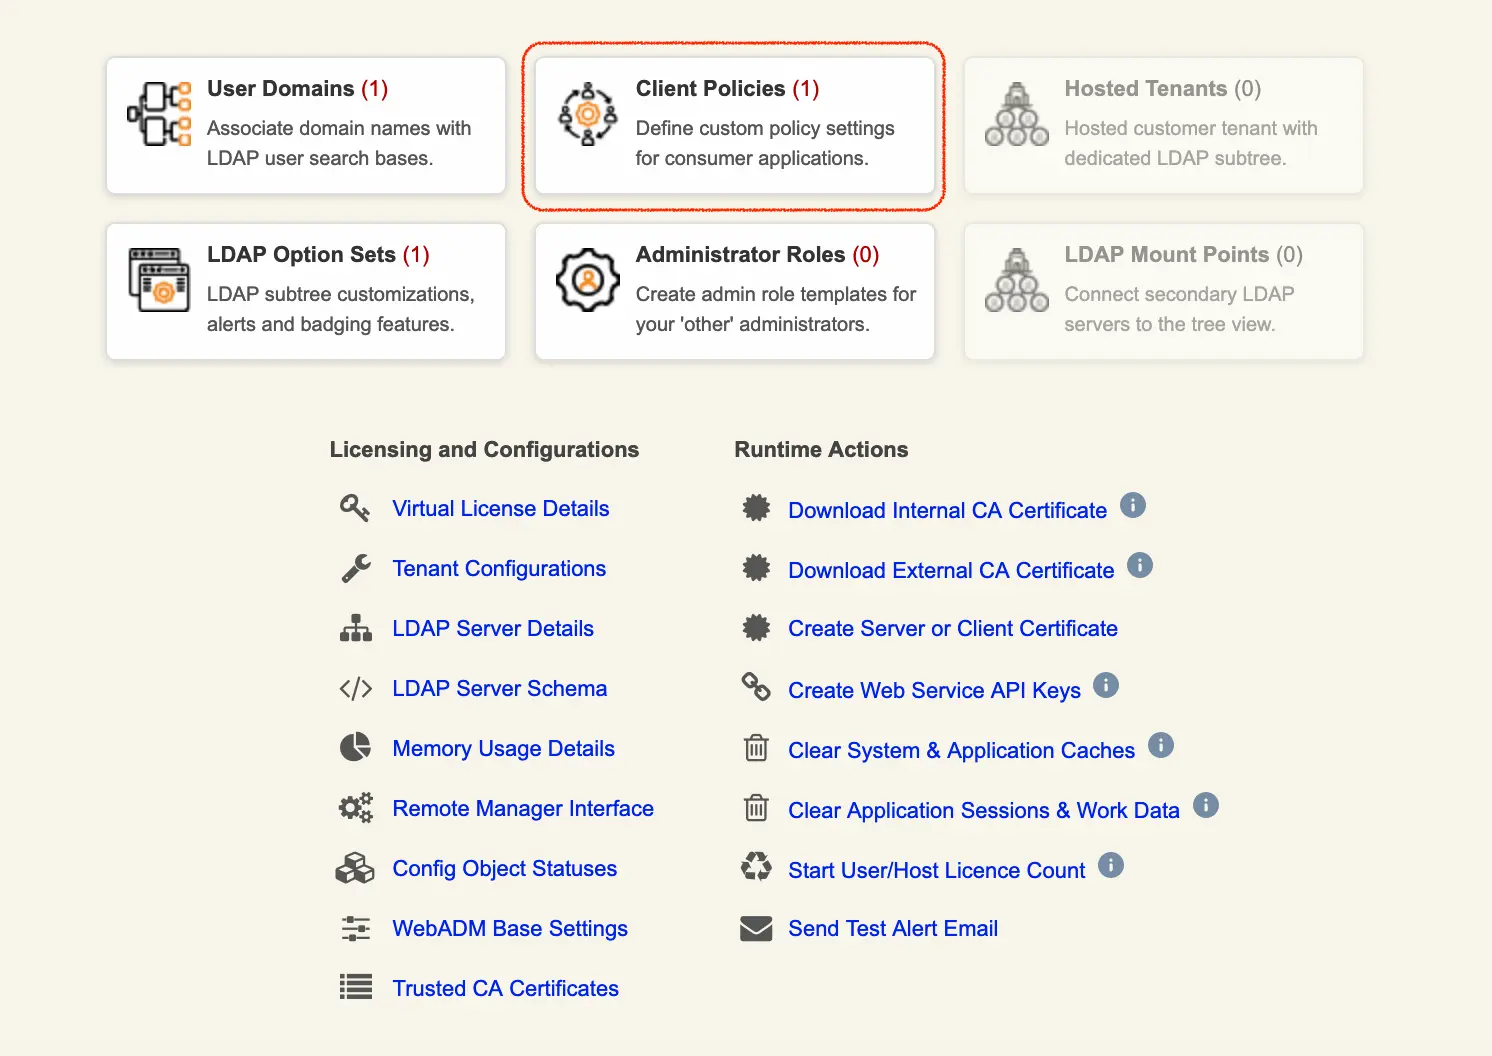
Since the WebADM 1.6.9-x and OpenID/SAML provider 1.3.0, it is possible to create WebADM client policies per Service Provider. That will allow you to return attributes, nameID, attributes mappings, or use a different certificate per client (SP) and not only globally. This feature makes the IDP much more powerful and provide flexibility for each client integrations.
4.1 SP Initiated mode
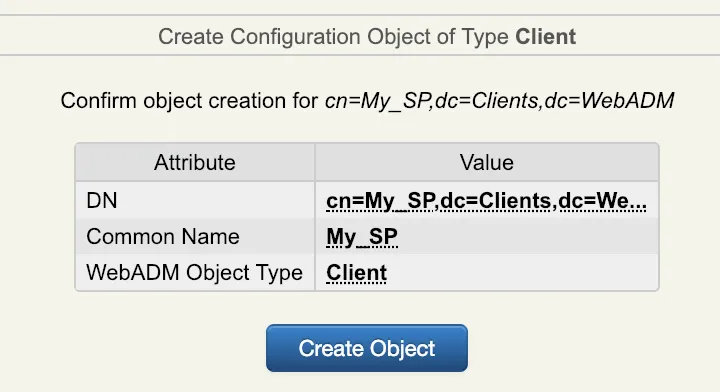
To create a client policy for your SP in SP initiated mode, log in on the WebADM Admin GUI, click on Admin tab, Client Policy and click on Add Client.
Give a name to your Client Policy and then click Proceed and Create Object.
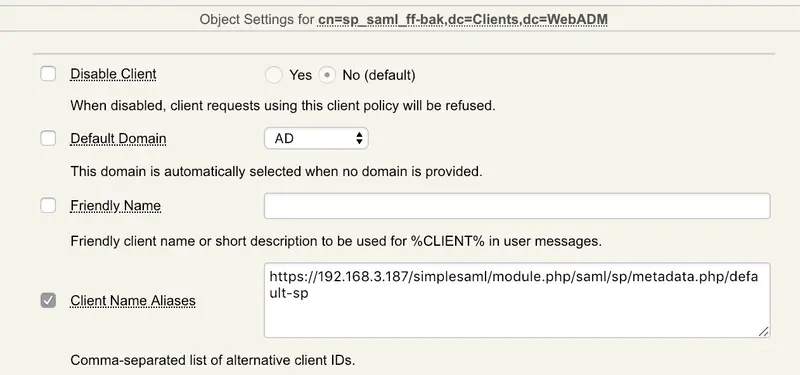
We will now configure the client policy. Many settings can be applied here like which users/groups/networks the client policy will be applied, allowed/excluded hours, which domain… An important setting on this page is the Client Name Aliases which will allow us to do the matching between the client policy and the SP. For this, the client policy must be created with the SP issuer URL (Entity ID) as Client Name Aliases.
The matching is done, we will now configure the SP policy.
If you scroll down a little bit, you will find the setting named Forced Application Policies, click on the Edit button and select OpenID application in the left box.
Configure your client policy with every setting you need for your SP and then save your configuration.
Your client policy for your SP is now configured. Try an authentication from your SP and check the WebADM logs to be sure that your policy is applied correctly.
Note
You can not yet apply any OpenOTP settings in the same OpenID/SAML client policy. That part is in the RCDevs roadmap and will be added in the future.
4.2 IDP initiated mode
The way to create a client policy in IDP initiated mode is similar to SP initiated mode.
The matching is done through the issuer value configured in the app.ini file located in /opt/webadm/webapps/openid/apps/<application>.ini
E.g for Amazon
[root@webadm1 ~]# cat opt/webadm/webapps/openid/apps/amazonws.ini

name   = "Amazon WS"
help   = "Amazon Web Services (AWS)"
method = "HTTP-POST"
source = "https://signin.aws.amazon.com/saml"
issuer = "https://signin.aws.amazon.com"
nameid = "Persistent"
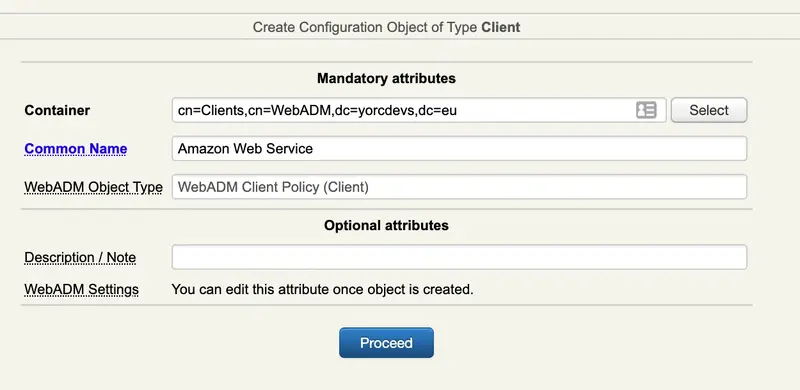
I can then create my policy for AWS like below :
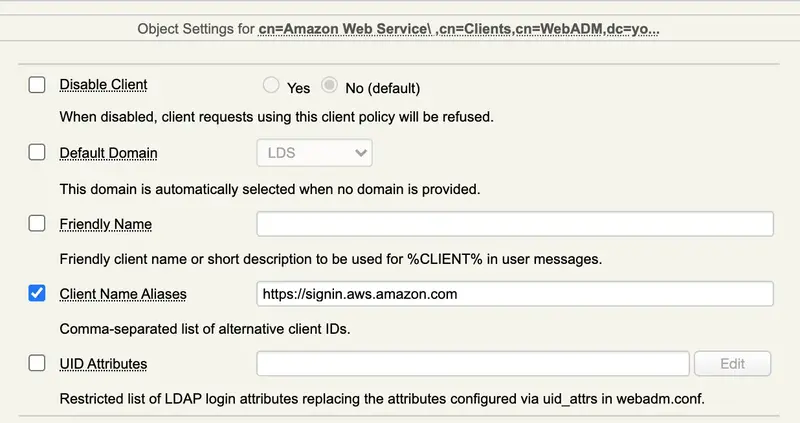
After creating the client policy object, I configure the client name alias for the matching operate :
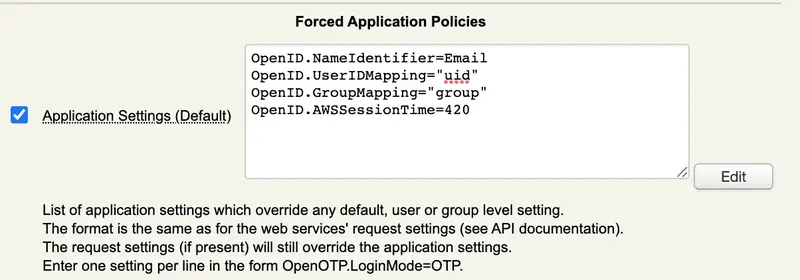
In the next section, we show you how to return attributes for AWS SP.
4.3 Returned attributes and attribut mapping
4.3.1 General attributs
Here, I configured some returned attribute to be returned to AWS :
Note
You can not yet apply any OpenOTP settings in the same OpenID/SAML client policy. That part is in the RCDevs roadmap and will be added in the future.
4.3.2 Group filtering in SAML/OpenID responses
In the general configuration of SAML/OpenID or on a per-SP (Service Provider) client policy basis, you have the option to limit the groups that are included in the SAML assertion or OpenID response. This feature proves especially valuable with OpenID, particularly when users belong to a large number of groups. In such cases, including all these groups in the JWT (JSON Web Token) can lead to issues, such as exceeding the maximum size of HTTP headers.
To address this limitation, RCDevs has implemented a solution that allows you to define regular expressions (regex) to filter and include only those groups that match the specified regex pattern. Below, you will find a few examples of regex expressions:
My AWS service provider is now configured with my WebADM IDP. I can perform a login on OpenID & SAML Provider web application and access to AWS :
After a success login on the IDP, if no other SP are configured with your IDP, you are automatically redirected to AWS page :
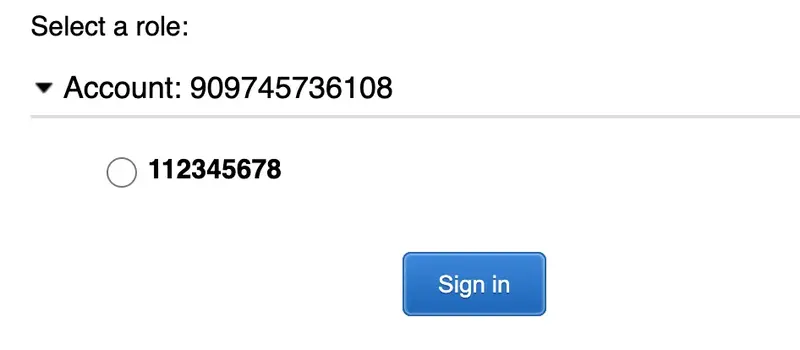
After the redirection to AWS login page, you are prompted to select the role you want to use with your account. If multiple roles are configued under the user or group, then all role allowed by the user are returned and can be choosen by the end user :
Click Sign In button you are now connected to AWS with your account and the associated role.
5. Login debug
5.1 SAML request
To check your configued attributes are well returned by WebADM IDP in the SAML assertion, you can the browser extension SAML Message Decoder available on Chrome. Perform a login request and check the SAML Message Decoder console. You should see something similar :
The first step is the OpenID login request performed on the OpenID & SAML web application :
5.2.1 OpenID
It starts with :
[Mon Oct 26 10:35:53.328922 2020] [192.170.3.23] [OpenID:GTZ09PU0] New login request (OpenOTP)
[Mon Oct 26 10:35:53.328996 2020] [192.170.3.23] [OpenID:GTZ09PU0] > Client ID: OpenID
[Mon Oct 26 10:35:53.329012 2020] [192.170.3.23] [OpenID:GTZ09PU0] > Username: administrator
[Mon Oct 26 10:35:53.329023 2020] [192.170.3.23] [OpenID:GTZ09PU0] > Domain: support
[Mon Oct 26 10:35:53.329035 2020] [192.170.3.23] [OpenID:GTZ09PU0] > ANY Password: xxxxxxxx
[Mon Oct 26 10:35:53.329058 2020] [192.170.3.23] [OpenID:GTZ09PU0] Sending openotpSimpleLogin request
The last line of log indicate the login request is sent to OpenOTP. When OpenID call OpenOTP, the session number is the same for the OpenID request and the OpenOTP request (here GTZ09PU0). That allow you to easily identify different requests and products if you need to troubleshoot.
Then, the next part is the OpenOTP request and OpenID request continu after the OpenOTP request.
OpenOTP logs available in the next section
Below the OpenID session logs after the success login with OpenOTP :
[Mon Oct 26 10:35:59.608951 2020] [192.170.3.23] [OpenID:GTZ09PU0] OpenOTP authentication success
[Mon Oct 26 10:35:59.609206 2020] [192.170.3.23] [OpenID:GTZ09PU0] Resolved LDAP user: CN=Administrator,CN=Users,DC=yorcdevs,DC=eu (cached)
[Mon Oct 26 10:35:59.609399 2020] [192.170.3.23] [OpenID:GTZ09PU0] Resolved LDAP groups: organization management,group policy creator owners,domain admins,enterprise admins,schema admins,administrators,denied rodc password replication group
[Mon Oct 26 10:35:59.609660 2020] [192.170.3.23] [OpenID:GTZ09PU0] Resolved source location: US
[Mon Oct 26 10:35:59.622375 2020] [192.170.3.23] [OpenID:GTZ09PU0] Login session started for CN=Administrator,CN=Users,DC=yorcdevs,DC=eu
[Mon Oct 26 10:35:59.830787 2020] [192.170.3.23] [OpenID:GTZ09PU0] Enforcing client policy: Amazon Web Service
[Mon Oct 26 10:35:59.830849 2020] [192.170.3.23] [OpenID:GTZ09PU0] Returning nameId value: 'support@rcdevs.com'
[Mon Oct 26 10:35:59.847865 2020] [192.170.3.23] [OpenID:GTZ09PU0] Sent SAML login success response
That part of the logs are important. It shows you the matching with the client policy previously created and the NameID value retuned.
5.2.2 OpenOTP
[Mon Oct 26 10:35:53.337483 2020] [192.168.3.64] [OpenOTP:GTZ09PU0] New openotpSimpleLogin SOAP request
[Mon Oct 26 10:35:53.337509 2020] [192.168.3.64] [OpenOTP:GTZ09PU0] > Username: administrator
[Mon Oct 26 10:35:53.337516 2020] [192.168.3.64] [OpenOTP:GTZ09PU0] > Domain: support
[Mon Oct 26 10:35:53.337525 2020] [192.168.3.64] [OpenOTP:GTZ09PU0] > Password: xxxxxxxx
[Mon Oct 26 10:35:53.337531 2020] [192.168.3.64] [OpenOTP:GTZ09PU0] > Client ID: OpenID
[Mon Oct 26 10:35:53.337537 2020] [192.168.3.64] [OpenOTP:GTZ09PU0] > Source IP: 192.170.3.23
[Mon Oct 26 10:35:53.337543 2020] [192.168.3.64] [OpenOTP:GTZ09PU0] > Context ID: 578d78fb7b15a258ea414ffa9db4ebb2
[Mon Oct 26 10:35:53.337601 2020] [192.168.3.64] [OpenOTP:GTZ09PU0] Registered openotpSimpleLogin request
[Mon Oct 26 10:35:53.338238 2020] [192.168.3.64] [OpenOTP:GTZ09PU0] Resolved LDAP user: CN=Administrator,CN=Users,DC=yorcdevs,DC=eu (cached)
[Mon Oct 26 10:35:53.338472 2020] [192.168.3.64] [OpenOTP:GTZ09PU0] Resolved LDAP groups: organization management,group policy creator owners,domain admins,enterprise admins,schema admins,administrators,denied rodc password replication group
[Mon Oct 26 10:35:53.338718 2020] [192.168.3.64] [OpenOTP:GTZ09PU0] Resolved source location: US
[Mon Oct 26 10:35:53.358316 2020] [192.168.3.64] [OpenOTP:GTZ09PU0] Started transaction lock for user
[Mon Oct 26 10:35:53.370983 2020] [192.168.3.64] [OpenOTP:GTZ09PU0] Found user fullname: Administrator
[Mon Oct 26 10:35:53.371005 2020] [192.168.3.64] [OpenOTP:GTZ09PU0] Found user language: EN
[Mon Oct 26 10:35:53.371018 2020] [192.168.3.64] [OpenOTP:GTZ09PU0] Found 1 user mobiles: 123456
[Mon Oct 26 10:35:53.371025 2020] [192.168.3.64] [OpenOTP:GTZ09PU0] Found 1 user emails: support@rcdevs.com
[Mon Oct 26 10:35:53.371467 2020] [192.168.3.64] [OpenOTP:GTZ09PU0] Found 48 user settings: LoginMode=LDAPOTP,OTPType=TOKEN,OTPFallback=MAIL,PushLogin=Yes,ChallengeMode=Yes,ChallengeTimeout=90,OTPLength=6,MobileTimeout=30,EnableLogin=Yes,SelfRegister=Yes,HOTPLookAheadWindow=25,TOTPTimeStep=30,TOTPTimeOffsetWindow=120,OCRASuite=OCRA-1:HOTP-SHA1-6:QN06-T1M,DeviceType=U2F,SMSType=Normal,SMSMode=Ondemand,MailMode=Ondemand,PrefetchExpire=10,LastOTPTime=300,ListChallengeMode=ShowID,ConfirmOptions=[5 Items]
[Mon Oct 26 10:35:53.372017 2020] [192.168.3.64] [OpenOTP:GTZ09PU0] Found 5 user data: TokenType,TokenKey,TokenState,TokenID,TokenSerial
[Mon Oct 26 10:35:53.372085 2020] [192.168.3.64] [OpenOTP:GTZ09PU0] Found 1 registered OTP token (TOTP)
[Mon Oct 26 10:35:53.372112 2020] [192.168.3.64] [OpenOTP:GTZ09PU0] Requested login factors: LDAP & OTP
[Mon Oct 26 10:35:53.382710 2020] [192.168.3.64] [OpenOTP:GTZ09PU0] LDAP password Ok
[Mon Oct 26 10:35:53.383006 2020] [192.168.3.64] [OpenOTP:GTZ09PU0] Authentication challenge required
[Mon Oct 26 10:35:53.564385 2020] [192.168.3.64] [OpenOTP:GTZ09PU0] Sent push notification for token #1
[Mon Oct 26 10:35:53.564427 2020] [192.168.3.64] [OpenOTP:GTZ09PU0] Waiting 28 seconds for mobile response
[Mon Oct 26 10:35:59.598111 2020] [192.168.3.56] [OpenOTP:GTZ09PU0] Received mobile authentication response from 192.170.3.27
[Mon Oct 26 10:35:59.598145 2020] [192.168.3.56] [OpenOTP:GTZ09PU0] > Session: QIO1HmdExVHo9kr1
[Mon Oct 26 10:35:59.598152 2020] [192.168.3.56] [OpenOTP:GTZ09PU0] > Password: 16 Bytes
[Mon Oct 26 10:35:59.598158 2020] [192.168.3.56] [OpenOTP:GTZ09PU0] Found authentication session started 2020-10-26 10:35:53
[Mon Oct 26 10:35:59.598252 2020] [192.168.3.56] [OpenOTP:GTZ09PU0] PUSH password Ok (token #1)
[Mon Oct 26 10:35:59.605533 2020] [192.168.3.64] [OpenOTP:GTZ09PU0] Updated user data
[Mon Oct 26 10:35:59.607544 2020] [192.168.3.64] [OpenOTP:GTZ09PU0] Sent login success response