This document is an installation guide for the OpenOTP Credential Provider for Windows. Hence, the installation or configuration of WebADM, including token registration is not covered in this guide. For installation and usage guides to WebADM refer to the RCDevs WebADM Installation Guide and the RCDevs WebADM Administrator Guide available through the RCDevs online documentation Website.
2. Product Overview
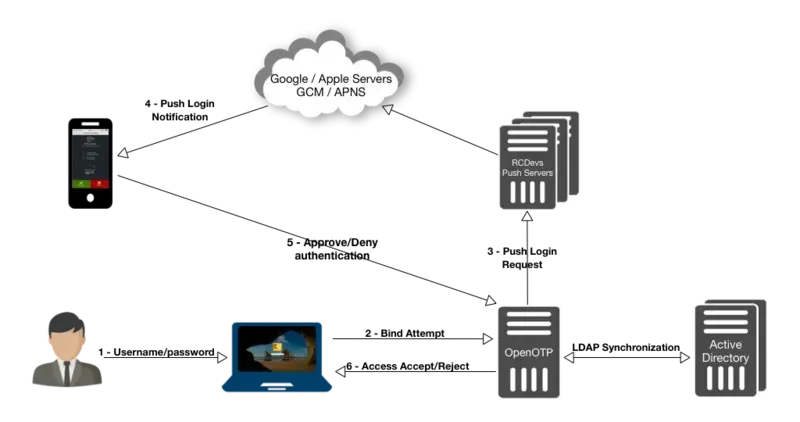
The OpenOTP Credential Provider for Windows is a component that integrates the RCDevs OpenOTP one-time password authentication into the Windows login process. RCDevs OpenOTP Authentication Server is a Web Service that is tightly coupled to the RCDevs WebADM application server.
The OpenOTP Credential Provider runs on any x86/x64 Windows platforms starting with Windows Vista and Windows Server from 2008 versions.
Your environment should fulfill the following requirements:
x86/x64 Windows 2008 Server/Vista or later.
Workstation joined to AD domain or not.
Network access.
An instance of WebADM and OpenOTP running in your network.
Permanent connection to OpenOTP server’s network API (except in Offline mode).
NetBIOS over TCP/IP enabled and resolvable.
DNS suffix set to match your AD domain.
4. Preliminary Information
Administrative/elevated permissions are necessary on any workstation to correctly set up and/or change the OpenOTP Credential Provider’s configuration.
To correctly set up the provider, please gather the following information. You will need to enter during the installation process:
The URI(s)s of the OpenOTP web-service(s) (mandatory)
These URIs are mandatory, due to the client needs to know where the OpenOTP SOAP network API can be reached. They are entered as a comma-separated list. At least one URI is necessary.
Your local domain (optional)
Needed to force a domain, which is not set as default on the OpenOTP side.
A custom login text or tile caption (optional)
A text that is displayed on the Windows login pane.
A client ID (optional)
An ID to identify a particular client on the server-side.
A certificate authority (CA) file (optional)
A certificate file (optional)
The certificate’s password (optional)
SOAP timeout delay (optional)
The login-mode LDAP+OTP must be set at server-side in WebADM, as the Windows Domain Controller (DC) needs the full credential (including LDAP password) to issue a Kerberos ticket.
5. Installation and Configuration
The Credential Provider’s setup and configuration are done in about 5 minutes. The installer is the only utility that is needed to set up and to configure the provider. The provider can be automatically deployed to your clients. This is covered later.
Note
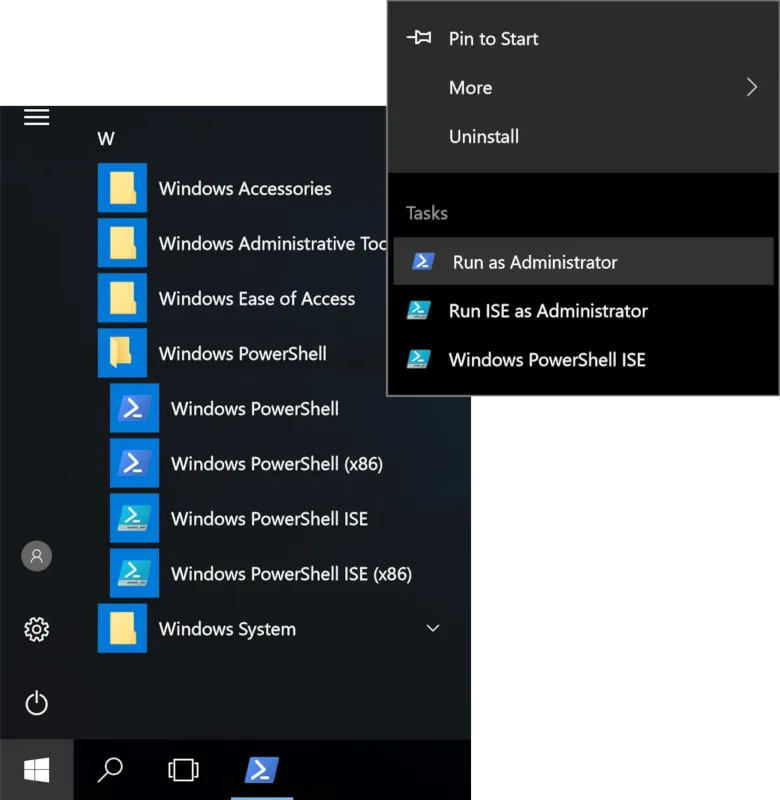
Administrative/elevated permissions are necessary on any workstation to correctly set up and/or change the OpenOTP Credential Provider’s configuration. Please, run Windows PowerShell or command prompt as Administrator. Right click on Windows PowerShell then select Run as Administrator.
5.1 Local Installation
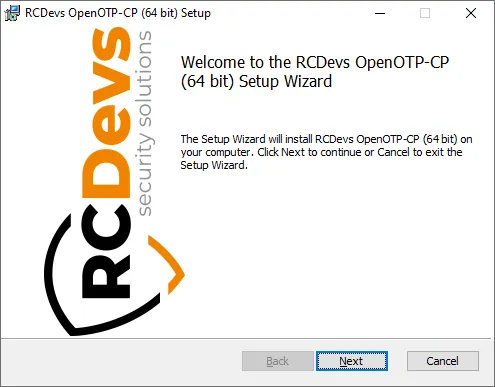
First, you have to download OpenOTP Credential Provider x86 or x64.
Extract files from the archive on your Windows machine(s), run the MSI file and click on Next.
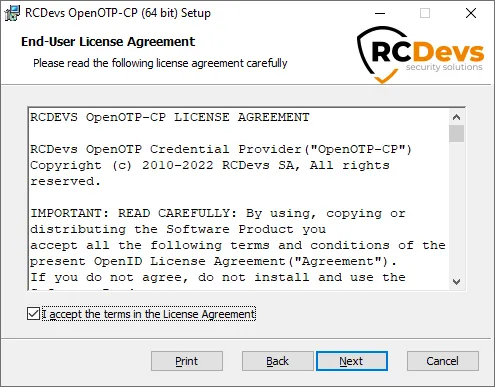
Accept the End-User License Agreement and click on Next.
Now, you have to select which features to install. On top of Core Components (mandatory), you can select to install the Credential Provider as default or Smartcard login. You may also change the default installation directory as you wish.
Note that Smartcard login is only supported beginning with Windows 8 or Windows Server 2012 and on 64 bits systems.
Click Next when you are done.
Note
Installing the provider as default disables all other credential providers on the target system. Only Credential Providers provided by RCDevs will be available for login. If any problem occurs you can still log in with other providers using the Windows failsafe boot. It is possible to force OTP login in failsafe mode. This is covered later. To log in on a Windows Server through RDP client with a One-Time Password, OpenOTP Credential Provider should be installed by default on the remote host to perform an OTP login. While testing: Do not install as default provider! Before choosing OpenOTP Credential Provider as default provider, perform a login test!
On the first configuration page, you have to configure the following elements:
WebADM URL, Server URL, and additional Server URL settings:
if you select Auto, fill WebADM URL with at least one of your WebADM server URL (e.g. https://your-webadm-ip-address-or-dns-name), and click on Configure. This will automatically fill the Server URL, additional Server URL and Certificate Authority file fields. Be careful, if you defined the URL like https://my_webadm_server, it tries to access https://my_webadm_server:443/srvurl/openotp and if you defined the URL like https://my_webadm_server:8443, it tries to access https://my_webadm_server:8443/srvurl/openotp.
if you select Manual, please configure at least Server URL setting with one of your OpenOTP SOAP URL(s). This should be like: https://your-webadm-ip-address-or-dns-name:8443/openotp/.
Loading Text (optional): The text to display during a connection attempt to Webadm. If you are using push login, it could be useful to remind the user here to check his mobile phone.
Login Text (optional): you can also define a login text which will be displayed to the user when authenticating.
Loading Text(optional) : This is the text displayed during a connection attempt to webadm. If using push login, it could be useful to remind the user here to check his mobile phone.
Note : Let it empty to keep the default message.
Client ID (optional): you can also define a Client ID referring to a client policy in WebADM.
Click on Next.
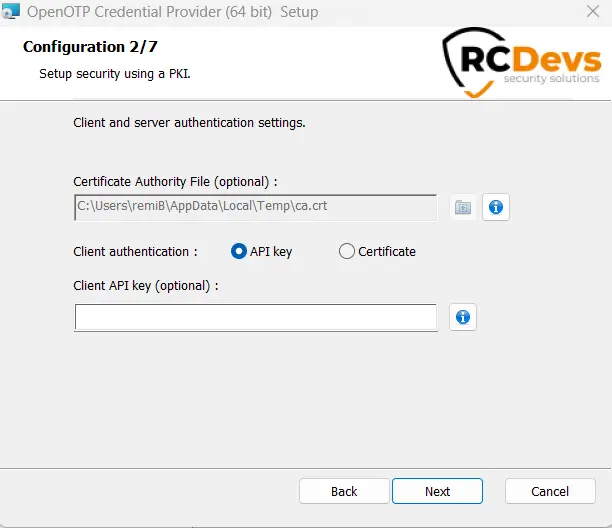
On the second configuration page, you can configure the following elements:
Certificate Authority File (optional): this has to be configured if you configured HTTPS in your Server URL during the previous step. This must contains the CA file of your webadm servers. The file will be automatically copied into the installation folder of OpenOTP Windows Credential Provider.
API Key(optional): if you configured OpenOTP to require an API Key, you can set it with these settings.
Note
Certificate File, Certificate Password, and Confirm Password(optional): if you configured OpenOTP to require a client certificate, you can set it with these settings.
OpenOTP Credential Provider will automatically download the CA certificate on the default WebADM server port if you are using the automatic configuration. You can also obtain it manually with https://mywebadmserver/cacert.
Click on Next.
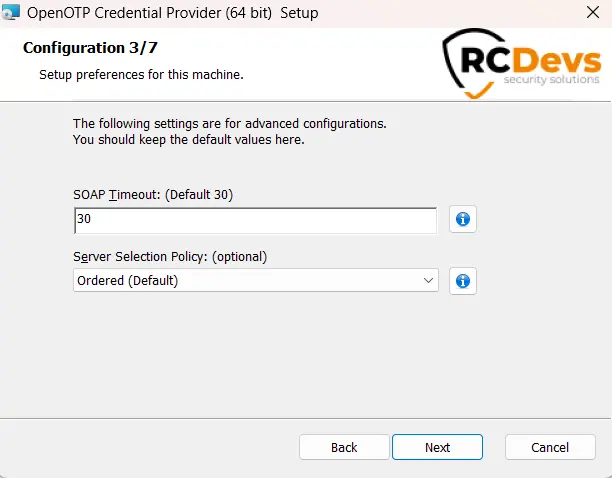
On the third configuration page, you can configure the following elements:
SOAP Timeout (Default to 30) : this is the timeout for connection to the Server URL.
Server Selection Policy (Default to Ordered) : If you have more than one webadm server, this is the way the Windows OpenOTP Credential Provider will contact them.
Ordered : the first server is always preferred
Balanced : the server is chosen randomly for each request
Consistent : the server selection depends on the user ID
Click on Next.
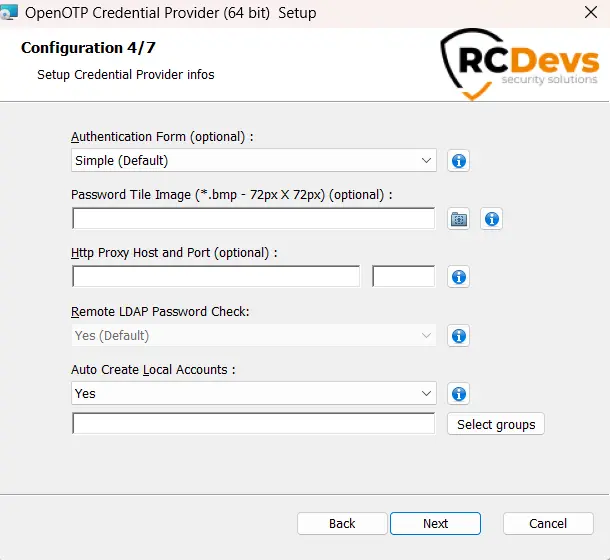
On the fourth configuration page, you can configure the following elements:
Authentication form (Default to Simple). You have 2 choices:
Simple: On the Windows login page, you will have 2 fields in the first step (Username and Password LDAP), after pressing login, you will have a second screen with the OTP field.
Normal: With this option, you will have 3 fields on the login page, one for the Username, one for the LDAP password and the last one for the OTP.
Login Tile Image (optional) : the path of the image on the filesystem displayed on the login page (must be a 128x128px 24 bit bitmap file)
Http Proxy Host and Port (optional) : this config is for HTTP proxy. If you are running OpenOTP behind an HTTP proxy you need to set the host and the port of the proxy.
Remote LDAP Password Check (Default to Yes) : enable this option if your OpenOTP server does not use your AD or if this host is not connected to the Windows Domain.
Auto Create Local Accounts (optional): this can be enabled when the host is not connected to a Windows domain, and you want the Credential Provider to create user accounts at first login. See this page for more information. You can also select local groups to be populated by these auto-created local accounts.
Click on Next.
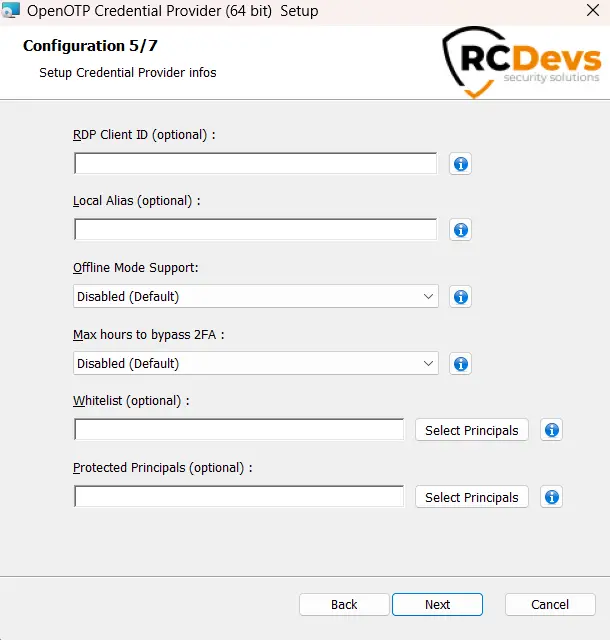
On the fifth configuration page, you can configure the following elements:
RDP Client ID (optional). RDP client ID can be used if you want to match a different client policy for RDP sessions.
Local Alias (optional): when attempting a local login, the domain part of the username will be automatically replaced by the local alias before sending the OpenOTP request.
Offline Mode Support (Default to Yes): enable this option if you want to use the offline mode of Windows Credential Provider. This will permit you to authenticate to your machine even if webadm is not reachable.
Max hours to bypass MFA (Default to Disabled): this setting can be used to define for how much time the OpenOTP Windows Credential Provider will not ask for a MFA since the last login.
Whitelist (optional) : List of user SID separated by ; that won’t be asked for 2FA/MFA to login, skipping any OpenOTP calls.
Protected Principals (optional): List of security principals SID (users and groups) separated by ; which for the OpenOTP call will be enforced. This is basically the opposite of the above whitelist setting, and is only useful if you have whitelisted groups.
Tip : You can get a user SID using this command from a cmd prompt :
wmic useraccount where (name='Username' and domain='Domain') get sid
Click on Next.
If you selected the Credential Provider Filter feature, you will be presented a sixth page.
Credential Providers Filter Whitelist : (optional): If you are installing OpenOTP Credential Provider as default, no other providers will be available during login. Use this setting to override this behavior and allow specific credential providers to be used.
Please keep in mind that the login process will only be as secure as the least secure of the available credential providers!
This is a list of the allowed Credential Providers CLSID separated by “;”, a CLSID is of the form {60b78e88-ead8-445c-9cfd-0b87f74ea6cd}.
All the CLSID of the registered Credential Providers on your machine can be found in the following registry location :
This will change depending on your Windows version and if you have installed other third party Credential Providers.
Use the Credential Provider Filter in CREDUI (optional): this option is to force or bypass the MFA check using RDP from the machine when the OpenOTP Windows Credential Provider is installed as the default credential provider. That means when this setting is disabled, you are able to select the default Windows credential provider during an RDP authentication.
Important
The setting Credential Provider Filter in CREDUI includes all other scenarios different from the local login.
For example RunAsDifferentUser or RunAsAdministrator on a program or on an installer will trigger the RDP scenario.
If that setting is enabled, and you use Windows Remote Desktop tool to log in on a remote machine, then the OpenOTP Credential Provider will be triggered locally during the login process. If the OpenOTP-CP is also installed on the remote host as default provider, then it will also be triggered on the remote host during the login purpose. So in that scenario, the OpenOTP call will happens twice and 2 authentications will be performed with OpenOTP.
In RDP login scenario, the domain value is not automatically passed to Windows like for local logins scenario. Windows will then refuse the login if no domain value is passed in RDP scenario. This behavior is the expected behavior. If the domain value was automatically retrieved then we would encountered issues to login on a remote host which is not in the same domain.
In that scenario, you must use DOMAIN\username in username field to perform the login and target the correct domain according to where your are trying to login.
Click on Next.
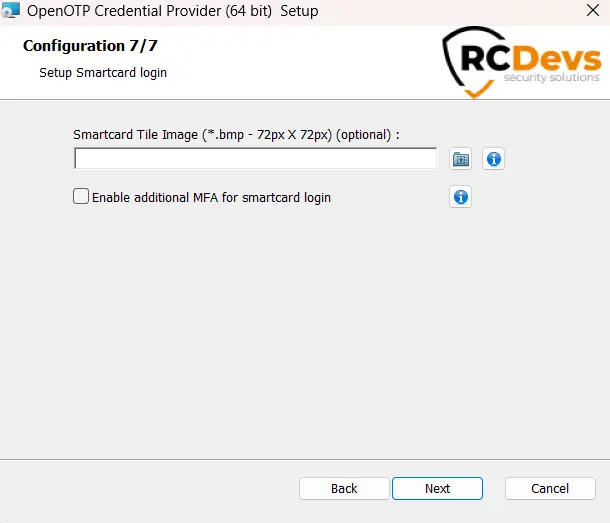
If you selected the Smartcard login feature, you will be presented a seventh page.
Enable additional MFA for smartcard login (Default to false). Specify whether you want an additional second factor authentication after a successful smartcard login
Click on Next.
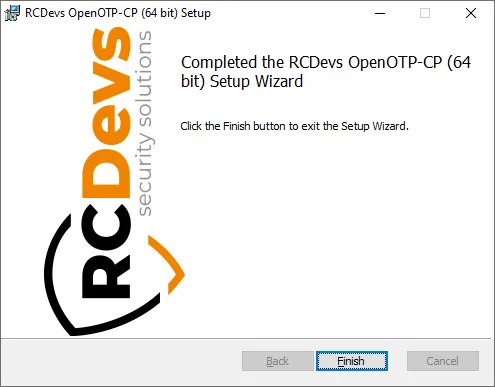
Configuration is done, you can click on Install and Finish after the installation.
5.2 Configuration for Smartcard logins
Requirements :
Windows 8 and later for workstations or Windows Server 2012 and later
64 bits architecture
Important
To achieve smartcard login with maximum compatibility, the OpenOTP Credential Provider is actually wrapping the builtin Microsoft Smartcard Credential Provider. Therefore, you should check first you are able to log in with the builtin smartcard CP before using the OpenOTP CP Smartcard Login feature.
5.2.1 With Microsoft PKI
You can use certificates generated by Windows, to configure all the Windows PKI infrastructure please refer to the following Microsoft documentation.
Before continuing, make sure you are able to log with the Microsoft Smartcard Credential Provider.
In order to use the OpenOTP Credential Provider with smartcard you will need some additional configuration :
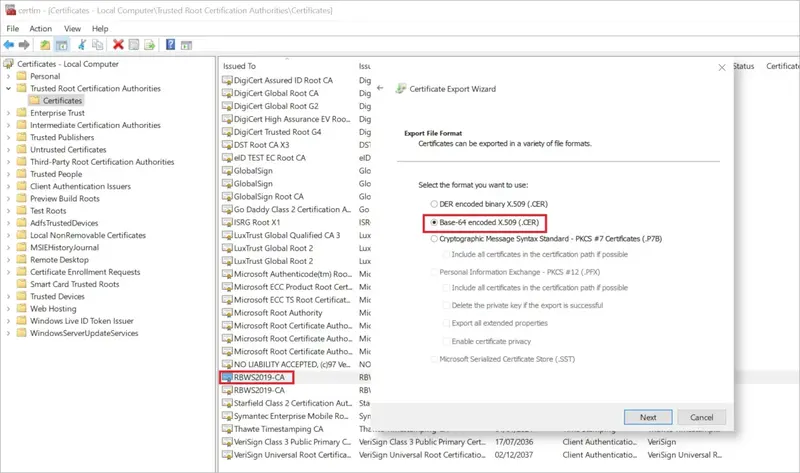
If you look into your user object, you should notice WebADM automatically detected your certificate, but the CA is not trusted.
To resolve this, first you will have to export your CA certificate into a base64 encoded X509 certificate.
This can be done via certlm, Right click > All Tasks > Export. Select the second format option.
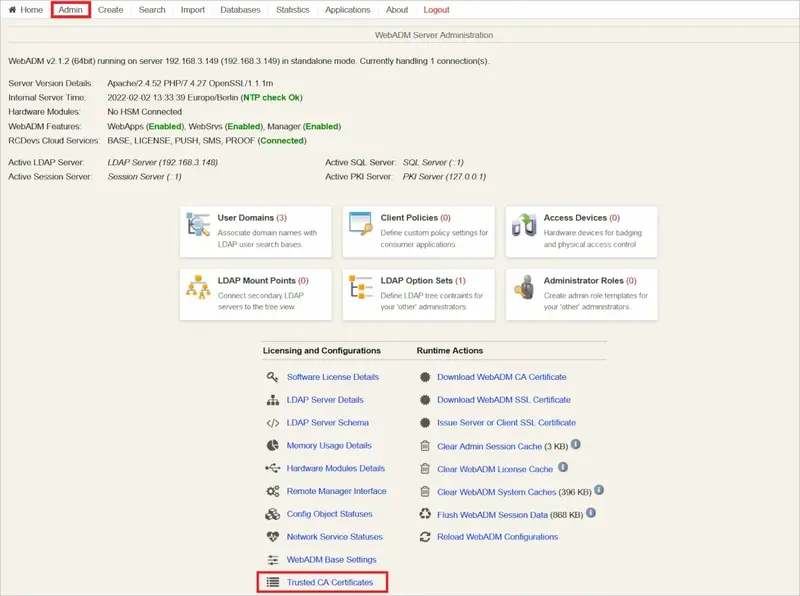
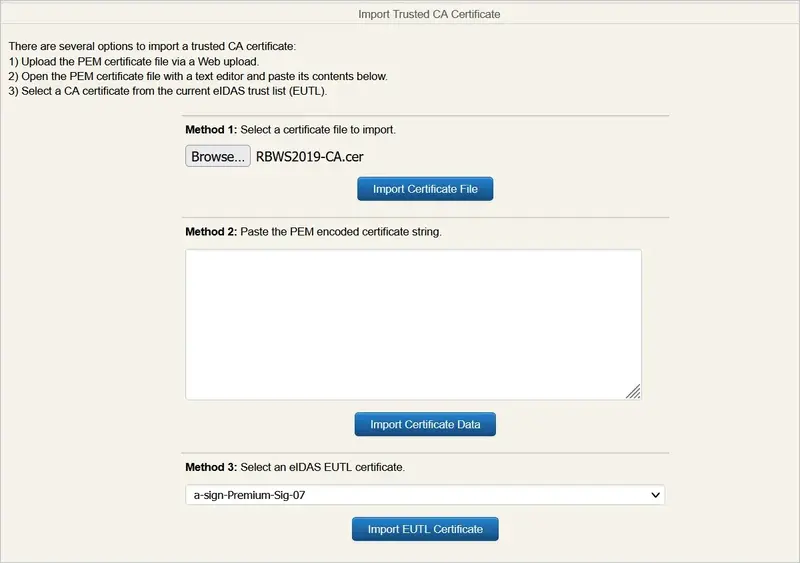
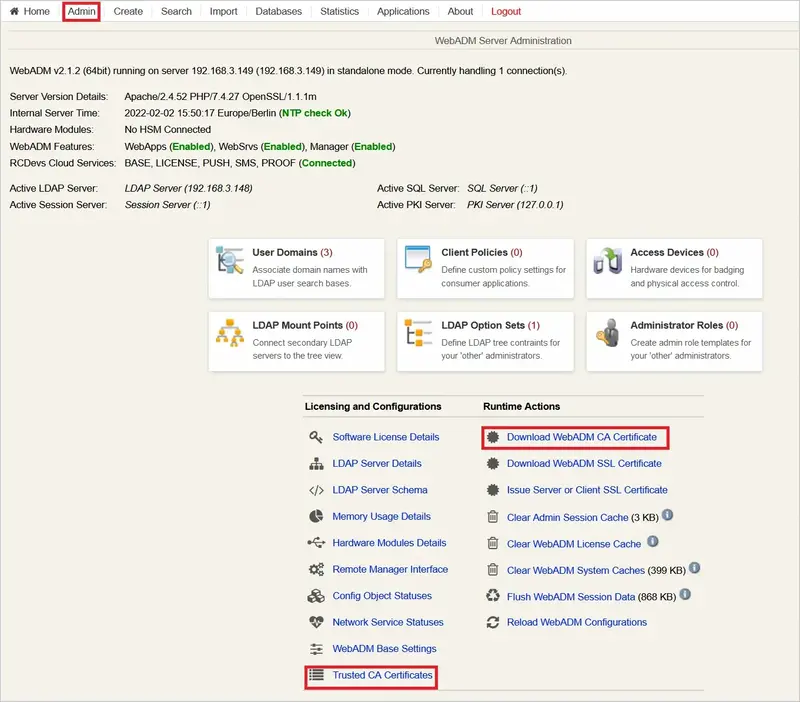
Once done, in your WebADM Admin tab, click on Trusted CA Certificates
Click Import CA Certificate, select your file and import it (You can also paste its content with the method 2)
The CA is now trusted and your user object should reflect this
You should now be able to log in with the OpenOTP Credential Provider and a smartcard.
5.2.2 With WebADM PKI
You can also generate user certificates directly with WebADM and then transfer them on your smartcard. The generated certificate meet by default all the requirements to be used with the Microsoft smartcard logon workflow, so you should not have to override them in a GPO.
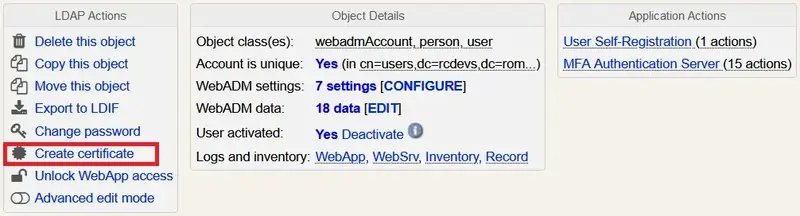
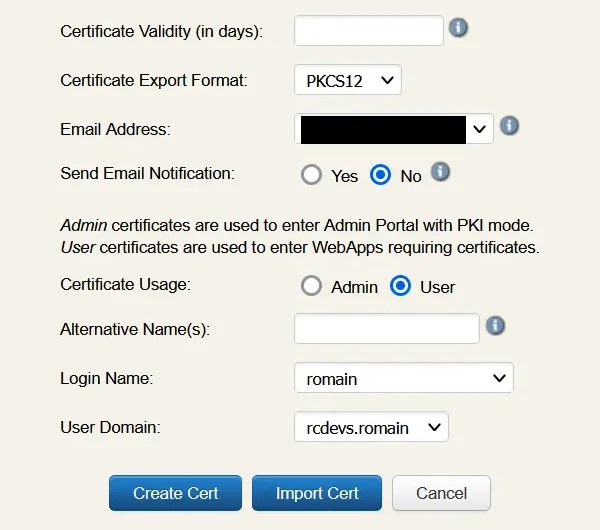
On your user object, click on Create certificate, select User usage and fill the information then click Create Cert.
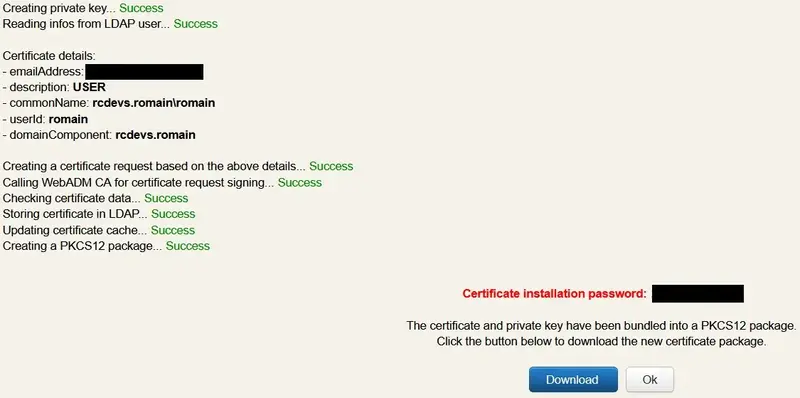
You will then be prompted to download the certificate, do it. Note the password, you will need it to store the private key.
You will now have to store this certificate with its private key on your smartcard. The method to do so depends of your smartcard manufacturer so please consult their technical documentation.
You should now be able to see your newly generated certificate on your user object.
You will now need your WebADM CA certificate. It can be retrieved in your Admin tab, with the Download WebADM CA certificate link or in the Trusted CA Certificates section.
Lastly you will need some additional configuration on Windows side. Please follow those Microsoft configuration instructions, at this point you should only have to do steps 2 and 3.
In summary the WebADM CA certificate should be in the Trusted Root Certification Authorities store of all workstations (this can be automated via a Group Policy) and in the NTAuth store of Active Directory.
This link provides additional information for the latter.
If everything is correctly configured you should now be able to log in with a smartcard with the builtin Microsoft Smartcard Credential Provider. Please make sure this is the case and then you can install the OpenOTP Credential Provider with the smartcard login feature.
5.3 Modifying the Configuration
5.3.1 If you are under Testing
To configure the OpenOTP Credential Provider, navigate to the “Windows Control Panel” and select “Programs and Features”. Search for “RCDevs OpenOTP-CP Credential Provider for Windows” and click “Change”. Now the installer shows up. Select “Change” and modify the provider’s configuration as you need.
5.3.2 If OpenOTP Credential Provider is running in Production
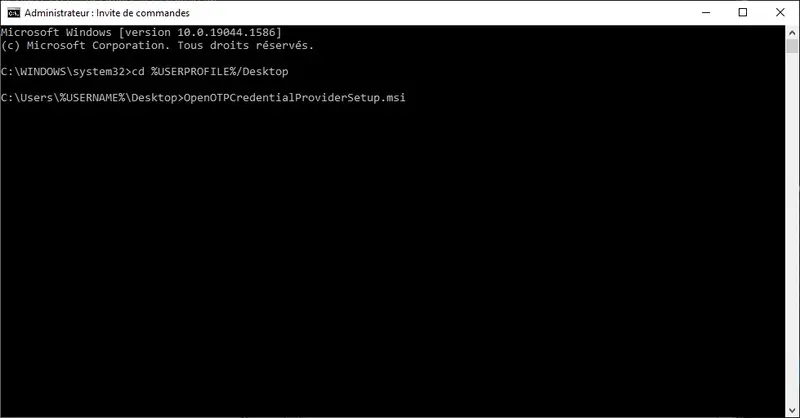
To configure the OpenOTP Credential Provider, you must get the MSI installer file, for the example on your Desktop. Run command line as administrator:
Click Start, click All Programs, and then click Accessories.
Right-click Command prompt, and then click Run as administrator.
If the User Account Control dialog box appears, confirm that the action it displays is what you want, and then click Continue.
Run the installer, and click “Change” to update settings.
5.4 Automatic Deployment / Quiet Installation
The MSI installer package is prepared to take all configuration parameters that can be set during local installation for auto-deployment in quiet mode. Hence, you can deploy the setup to any clients and automatically install the Credential Provider without user interaction.
URI pointing to the second node of your OpenOTP cluster. Optional.
USER_IDENTIFIER_TYPE
This option defines what the Credential Provider sends as the username to OpenOTP.
1: UPN: Combination of username and domain (username@domain.com) is sent. This must correspond to the users userPrincipalName attribute.
2: Username (Default): Username is sent separately and should correspond to users samAccountName attribute.
Note : Depreciated. Prefer using the ‘UPN Mode’ WebADM setting
LOADING_TEXT
The text to display during a connection attempt to Webadm. If you are using push login, it could be useful to remind the user here to check his mobile phone. Default syntax : `"Insert Message`".
LOGIN_TEXT
A text that is displayed on the Windows login page. Default (Empty) : `"OpenOTP Login`".
CLIENT_ID
Client ID which is sent to OpenOTP in the login requests. This client ID will appear in the WebADM audit database. Optional.
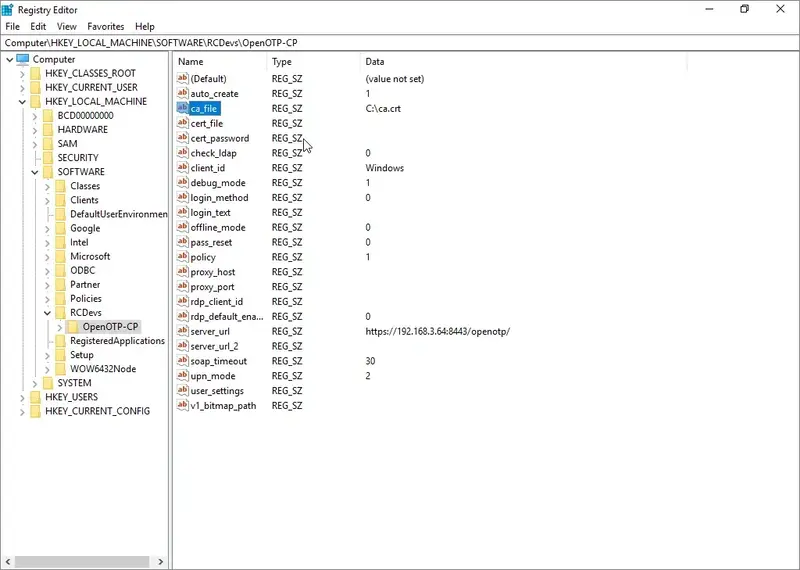
CA_FILE
The file-system path to a Certificate Authority (CA) file. Mandatory. Example: c:\ca.crt
CERT_FILE
The file-system path to a user certificate. Optional.
CERT_PASSWORD
The user certificate’s password. Optional.
API_KEY
Allow to provide an API Key value issued from WebADM when client authentication is required in your policies. Optional.
SOAP_TIMEOUT
Request timeout when connecting to OpenOTP Authentication Server URL. The default is 30 seconds (If empty it will be the 30s). Optional.
LOGIN_METHOD
There are two login methods available:
0: simple (Default): Only username and password inputs are displayed during login, and if needed a Challenge appears on a next step.
1: Normal: Username, password and OTP inputs are displayed during login.
Simple mode uses the OpenOTP SimpleLogin method where the semantic of the password input is handled by the OpenOTP server and based on the user login policy. Optional.
V1_BITMAP_PATH
The path of the image on the filesystem displayed on the login page. Valid for versions 2.x Optional.
V2_BITMAP_PATH
The path of the image on the filesystem displayed on the login page. Valid for versions 3.x Optional.
CHECK_LDAP
Enable this option if your OpenOTP server does not use your AD or if this host is not connected to the Windows Domain. By default, the LDAP password is checked by OpenOTP first and checked by the credential provider at session start. When disabled, the LDAP check is performed locally only.
0: disabled
1: enabled (Default)
AUTO_CREATE
You can enable this option when this host is not connected to the Windows Domain and you want the Credential Provider to create users accounts at first login. The local LDAP password is transparently reset at each login.
0: disabled (Default)
1: enabled
Note: This option is only available if the Remote LDAP Password Check Option is enabled.
LOCAL_ALIAS
You can enable this option when the host is not part of the Windows Domain and you want that the OpenOTP Credential Provider send a static value (WORKGROUP name) in order to match a WebADM domain. Sometime, the Windows API is returning the hostname which is sent as Domain value in the OpenOTP call. Configure that setting will prevent that behavior.
POLICY
Routing Policy. If two server URLs are defined in server URL, you can configure a request routing policy (ie. the server selection policy). There are three policies available:
1: Ordered (Default): The first server is always preferred. When it does not respond, the second server is used.
2: Balanced: The server is chosen randomly for each request. When it does not respond, the other is used.
3: Consistent: The server selection depends on the user ID. A request for one specific user is also always routed to the same server. If it does not respond, the other server is used.
PROXY_HOST PROXY_PORT
This config is for HTTP proxy. If you are running OpenOTP behind an HTTP proxy you need to set the host and the port of the proxy.
OFFLINE_MODE
According to this option OpenOTP will permit users to log in when server/network is not reachable, using the OpenOTP Token mobile Application.
0: disabled (Default)
1: enabled
PS: this mode requires at least one online login using push service to fetch its offline information.
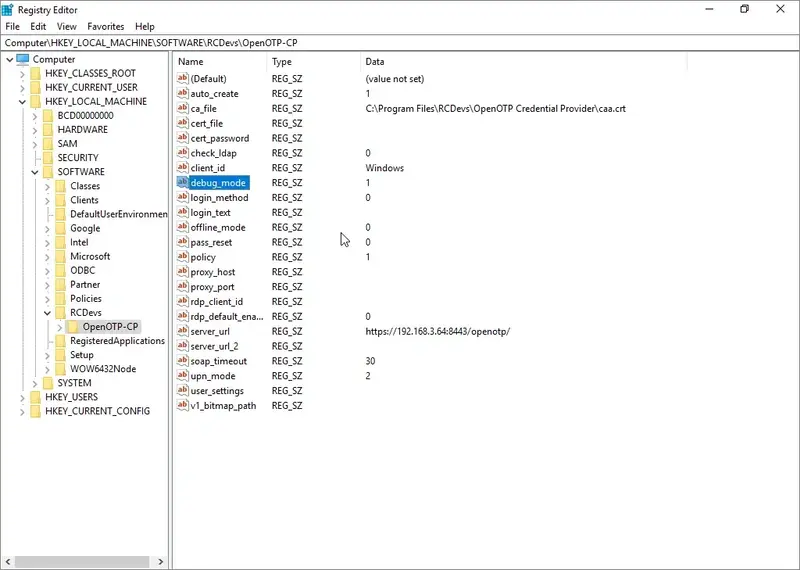
DEBUG_MODE
This setting enables or not the debug logs of the OpenOTP Credential Provider for Windows, and how verbose it should be
0: disabled (Default)
1: Error
2: Warning
3: Infos
4: Debug
F2A_BYPASS_TIMER
This setting can be used to define for how much time in seconds the OpenOTP Windows Credential Provider will not ask for MFA since the last login, Max : 86400 (24h).
Set a positive integer in seconds (e.g. 3600, 7200)
0: disabled (Default)
RDP_CLIENT_ID
RDP client ID can be used if you want to match a different client policy for RDP sessions.
RDP_DEFAULT_ENABLED
This option is to force or bypass the MFA check using RDP from the machine when the OpenOTP Windows Credential Provider is installed as the default credential provider. That means when this setting is disabled, you are able to select the default Windows credential provider during an RDP authentication.
0: disabled (Default)
1: enabled
WHITELIST (optional) :
List of user SID separated by ; that won’t be asked for 2FA/MFA to login, skipping any OpenOTP calls.
PROTECTED_PRINCIPALS :
List of security principals SID (users and groups) separated by ; which for the OpenOTP call will be enforced. This is basically the opposite of the above whitelist setting, and is only useful if you have whitelisted groups
CP_FILTER_WHITELIST (optional) :
Only relevant if you have selected the InstallAsDefault feature. List of the credential providers CLSID separated by ‘;’ that should still be enabled, overriding the filter. All the CLSID of the registered Credential Providers on your machine can be found in the following registry location : HKEY_LOCAL_MACHINE\SOFTWARE\Microsoft\Windows\CurrentVersion\Authentication\Credential Providers
SMARTCARD_MFA :
Only present if you have installed the SmartcardLogin feature. If enabled, an additional authentication factor will be required after a successful smartcard login.
In order to set the OpenOTP Windows Credential Provider as the default credential provider in case of silent or remote deployment, the option ADDLOCAL=InstallAsDefault must be added to the msiexec command line:
You can also specify the SmartcardLogin feature, e.g. ADDLOCAL=SmartcardLogin or ADDLOCAL=InstallAsDefault,SmartcardLogin.
5.5 Windows FailSafe Mode
In order to force the use of the OpenOTP Credential Provider even in Windows failsafe mode, some registry changes need to be made.
Important
In case of failure during the provider configuration or unreachable network, even failsafe mode will not help you to log in to a workstation that is set-up to force the use of the Credential Provider.
To register the Credential Provider enforcement, copy the following text to a new text file, name it register.reg and execute it.
Windows Registry Editor Version 5.00[HKEY_LOCAL_MACHINE\SOFTWARE\Microsoft\Windows\CurrentVersion\Authentication\Credential Providers]
"ProhibitFallbacks"=dword:1
To disable and unregister the failsafe enforcement copy the following text.
Windows Registry Editor Version 5.00[HKEY_LOCAL_MACHINE\SOFTWARE\Microsoft\Windows\CurrentVersion\Authentication\Credential Providers]
"ProhibitFallbacks"=-
6. Online Authentication Test
6.1 With OTPs/Push
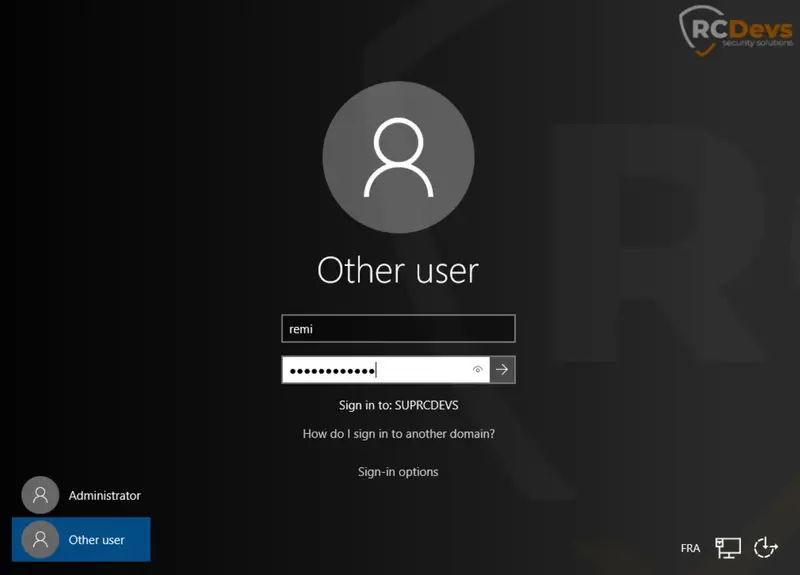
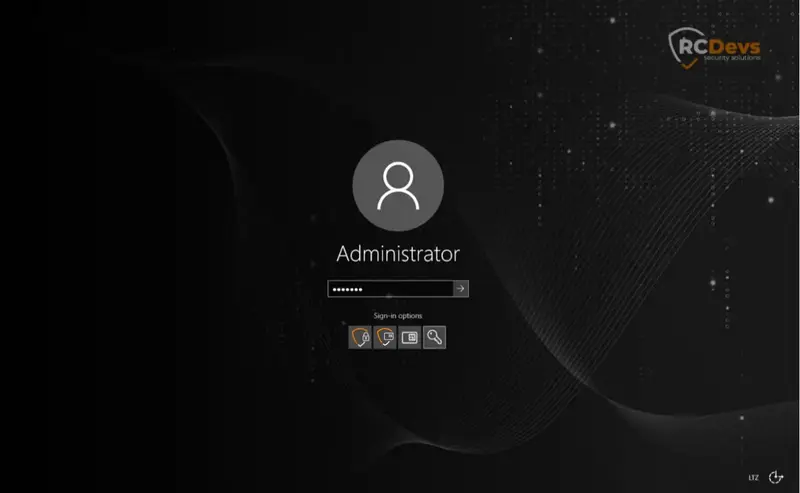
You are now able to log in your Windows machine in MFA. Please log out and enter your LDAP Credentials on the first screen.
Note
You should have a WebADM account activated and an OTP Token enrolled on your account. Follow this documentation to do this: User Activation & Token Enrollment.
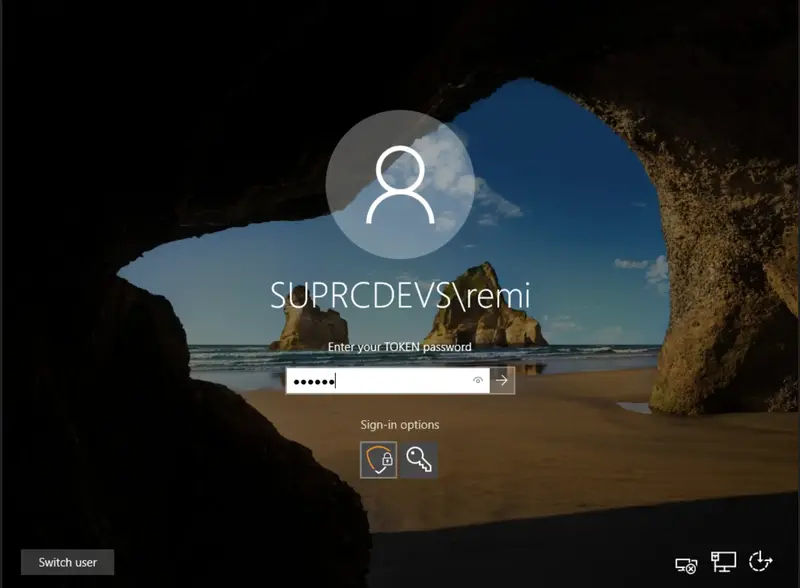
On the next screen, your OTP is asked to finish the authentication.
Enter your OTP and you are logged in.
6.2 With Smartcards
Insert your smartcard. If it is detected and the stored certificate can be used for logon, you will now have a new credential tile for smartcard logon.
Select it and enter your PIN code.
If you have enabled the additional MFA authentication during installation, you will then be prompted for the configured additional factor (OTP/Push/FIDO etc). Enter what is required.
You are now logged in.
6.3 With Fido
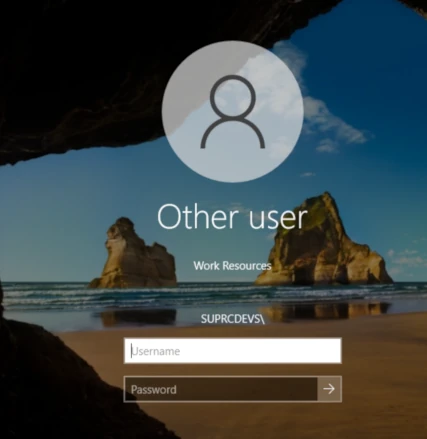
Please enter your LDAP Credentials :
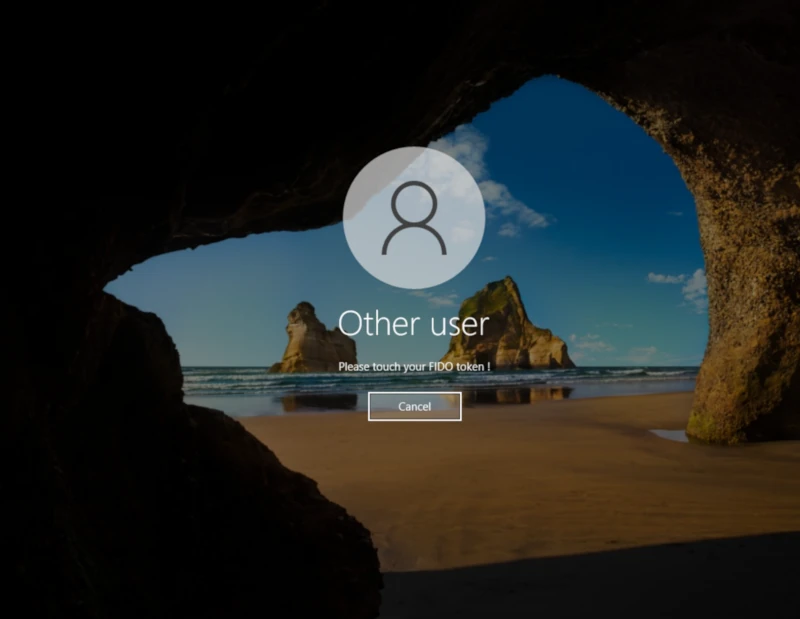
Please touch your FIDO token :
Note
Offline mode Authentication is similar to online mode. Another point is that one online login is required to enable offline mode!
7. Offline Authentication Test
Important information for offline logins
One online login with OTP or FIDO is required to enable offline login mode! This is specific to the user and computer where the login is made, which means, if computers are shared in the company, all users needs to perform an online login on a specific machine to enable the offline logins for their accounts on this computer.
Procedure must be repeated on all machines they want to enable the offline login mode.
Compatible token must be registered first on the user account in order to be able to use that feature (OpenOTP Token application or FIDO key).
Push login infrastructure is mandatory to use the offline mode with OpenOTP Token application.
If both kind of tokens (OTP with OpenOTP Token app and FIDO keys) are registered on the user account before the online login, OpenOTP will send back information to the OpenOTP Credential Provider for the 2 types of devices and after one online login you will be able to login offline with all compatible devices registered on the user account.
With OpenOTP token application, ONLY THE FIST TOKEN REGITERED ON THE USER ACCOUNT IS USABLE IN OFFLINE MODE!!!
With FIDO keys, all registered FIDO keys will work in offline mode but only one key must be plugged to the Windows machine during the authentication process.
Note
If you activated the options KeyUpdate or Token Expiration Time in the OpenOTP configuration, the offline mode won’t work anymore once the token key has been rotated by the server.
To resolve this issue you need to perform an online login in order to renew the Offline state on the concerned machines and for all concerned users.
7.1 With OTPs/QRCode
Note
Offline authentication is available for Windows and macOS login, and requires at least the following versions: WebADM 1.6, OpenOTP 1.3.6, OpenOTP Token 1.4 and OpenOTP Credential Provider 1.2.
When your laptop is offline, you are now able to log in with an OTP or a fido key. So for this test, I disable the network adapter to simulate the offline mode.
Like above, enter your LDAP Credentials on the first screen.
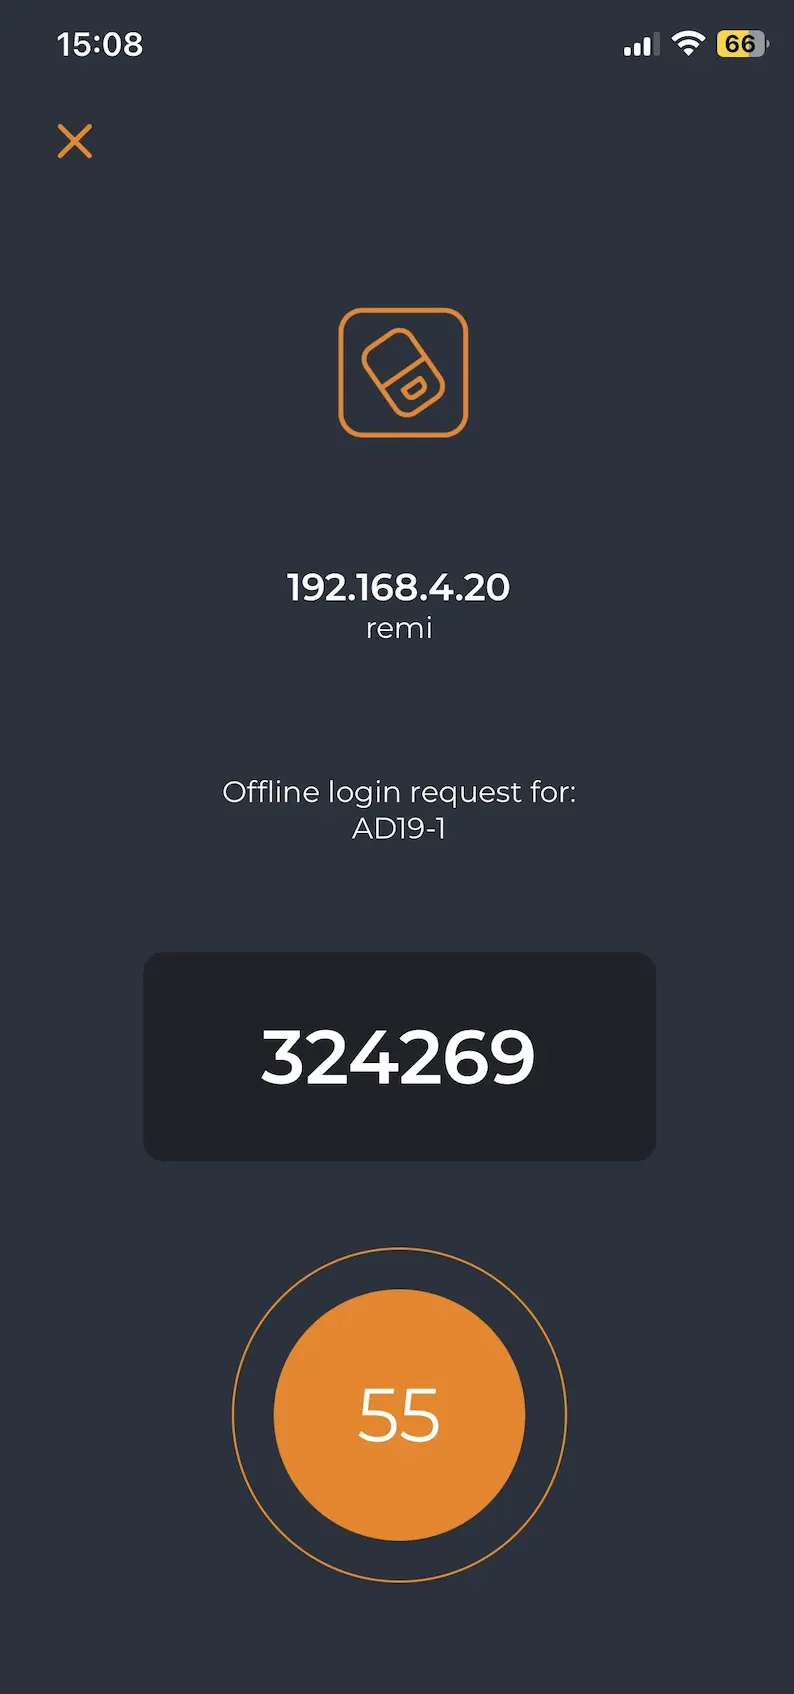
OpenOTP Credential Provider is not able to contact OpenOTP server so, it will switch automatically to the offline mode. The offline mode will prompt you a QRCode if using an OTP or to touch your fido key.
You have to scan the QRCode with the OpenOTP Token application.
Open your OpenOTP Token application, press on the camera button and scan the QRCode.
After scanning the QRCode, a window with an OTP is displayed on your smartphone like below:
Enter your OTP and you are logged in.
Note
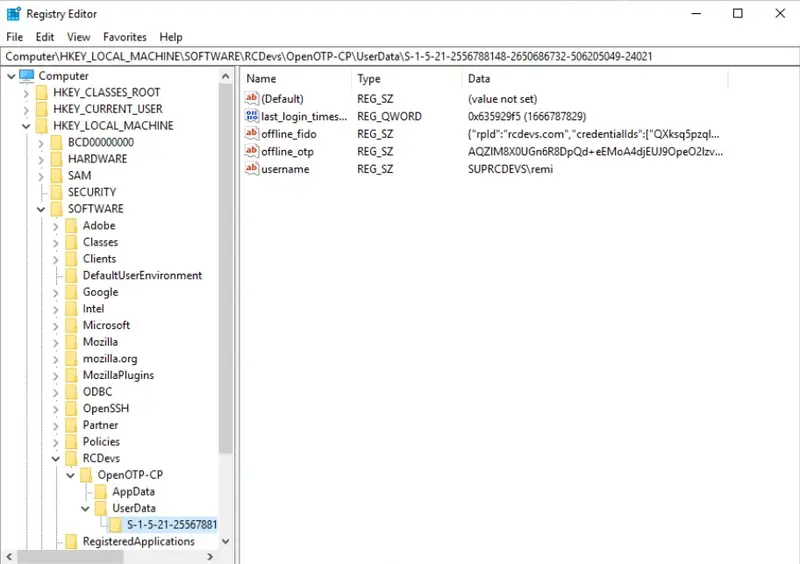
To be sure that you are in offline mode, you can check in your Registry Editor if there is an offline_otp string.
In your AD, it should be possible to find this offline_otp string in the file of the user concerned by going in the Registry Editor and following this path : HKEY_LOCAL_MACHINE/SOFTWARE/RCDevs/OpenOTP-CP/UserData.
7.2 With Smartcards
Smartcard login is currently not supported in offline mode.
7.3 With Fido
Offline mode Authentication is similar to online mode.
Note
To be sure that you are in offline mode, you can check in your Registry Editor if there is an offline_fido string.
In your AD, it should be possible to find this offline_fido string in the file of the user concerned by going in the Registry Editor and following this path : HKEY_LOCAL_MACHINE/SOFTWARE/RCDevs/OpenOTP-CP/UserData.
8. Troubleshooting
Troubleshooting steps depend on the specific issue you are facing. Please consult the following chapters for instructions.
8.1 Authentication Issues
In case of failed authentication, the first check should be the webadm.log on the OpenOTP/WebADM server. This can be found on the server at /opt/webadm/logs/webadm.log or in the WebADM web-interface under Databases > WebADM Server Log Files.
This log should have a trace of the OpenOTP authentication and its result. In case the OpenOTP authentication is successful, but the Windows login fails, the reason is typically a missing local account or wrong local Windows password.
If the login fails and there is no trace of it in the webadm.log, then the installation is not correct. Please see chapter 8.3
8.2 Offline Authentication Issues
Offline authenticate requires a successful online login using mobile push-based authentication and RCDevs OpenOTP mobile soft token. This login must be done on the same Windows machine and with the same user account. If this prerequisite is not complete then you will receive error message: “Offline login is not available for this user.”
Windows settings and permissions can cause the installation to fail for a various reason. While debugging your installation and OpenOTP environment have a look at the Windows Event Viewer.
In case the installation is completed but CP is not working, please check the following items:
You should have an entry in the registry at Computer\HKEY_LOCAL_MACHINE\SOFTWARE\RCDevs\OpenOTP-CP. If not please check that the user you are running the installer as has got write permissions to the registry folder: Computer\HKEY_LOCAL_MACHINE\SOFTWARE\.
You should also have these two files, if not then check the effective access of the installation user to the System32 folder:
In case you have installed the OpenOTP Credential Provider as the default credential provider and are unable to login at all, you stil have the following options to gain access to the machine again:
8.4.1 Remote registry modification
If you can manage the registry of the machine in question remotely, for example in case of a domain joined machine, you can remove the default credential provider registration. Remotely access the registry of the server in question and delete the below registry key:
Windows Registry Editor Version 5.00

[HKEY_LOCAL_MACHINE\SOFTWARE\Microsoft\Windows\CurrentVersion\Authentication\Credential Provider Filters\{5AE8C610-7541-4FF8-9845-C363410D574C}]
@="OpenOTPCredentialProviderFilter"
8.4.2 Boot to Windows “Safe mode”
As long as you have not enabled CP also for safe mode and can boot to it, you can use it to remove or modify credential provider Please refer to Microsoft documentation on how to boot to Safe Mode. Once in safe mode, rename or remove the two below files and reboot to log in with the regular Windows login.
In case Safe Mode boot is not available (for example on cloud deployed Windows), you need to shut down the machine, mount the C: drive and rename/remove the two DLL files in previous step. After that you should be able to boot into regular login.
8.5 Push Login issue
If you have increased the Mobile response timeout setting under OpenOTP configuration, then you also have to increase the Windows 10 lock screen timeout and the RDP login timeout on the Windows machine.
The SOAP timeout value at the OpenOTP Credential Provider level must be also configured in adequation of the mobile response timeout.
E.g : If my mobile response timeout under OpenOTP is configured to 45 seconds, then I have to configure the SOAP timeout and Windows timeouts to 60 seconds.
For the Windows lock screen timeout, you have to create a new registry key in the following container :
Simply add a new DWORD value named IdleTimeout in that container and configure the timeout value in milliseconds. If your push timeout is configured to 45 seconds, then the value of the new IdleTimeout key must be at least 60 seconds.
60 seconds is equal to 60000 ms in decimal and EA60 in hexadecimal.
For the Windows RDP timeout, you have to create a new registry key in the following container only if NLA is enabled on the Windows side for RDP login :
Simply create a new DWORD key named LogonTimeout, containing the timeout value in seconds. Restart the Terminal Services service to changes takes effect.
8.6 Could not be authenticated
8.6.1 Server Sent No Response
Error example
Possible reasons/Solutions :
OpenOTP URL/port configured during Credential Provider installation are invalid or not reachable from the Windows machine.
CA file is missing or incorrect.
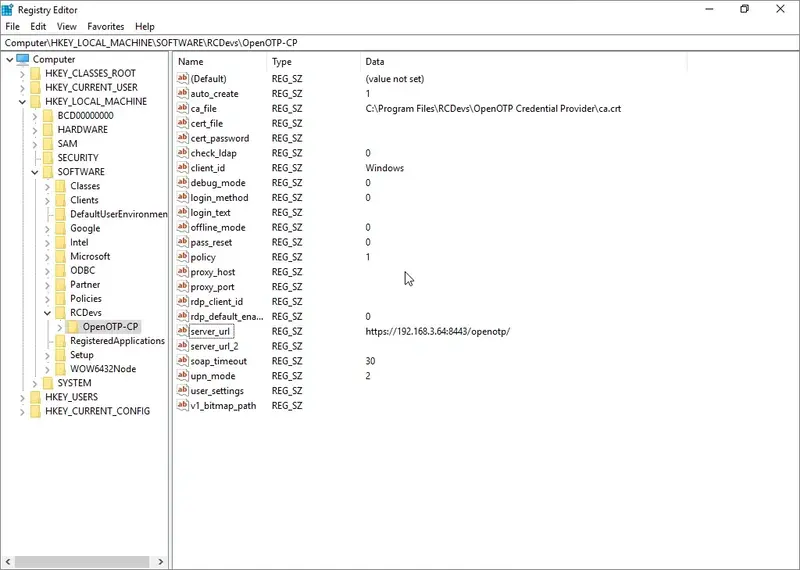
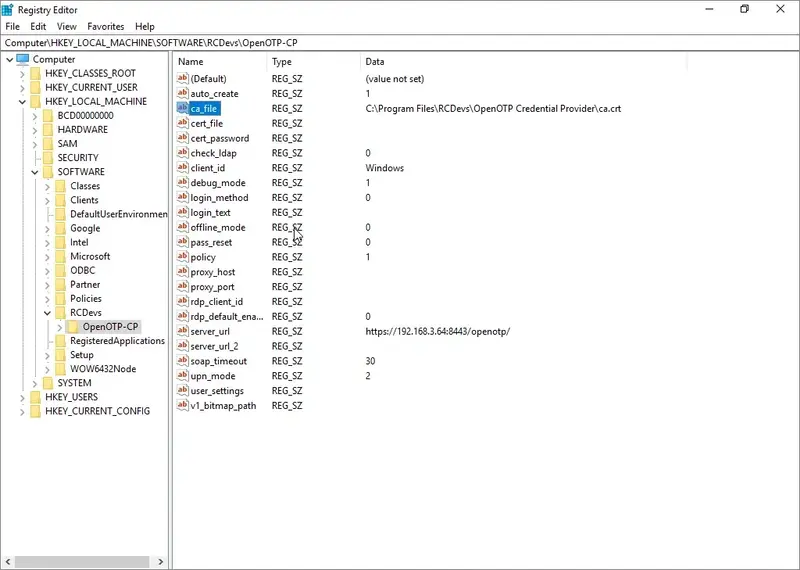
Check server URL and CA path through Windows registry Computer\HKEY_LOCAL_MACHINE\SOFTWARE\RCDevs\OpenOTP-CP.
8.6.2 Wrong Username or Password?
error example
Double check that the username and password are correct.
Check WebADM logs, if you can see the authentication request in logs with the following error :
[2020-04-21 10:48:09] [192.168.3.68] [OpenOTP:386DCN2T] Domain 'yorcdevs.eu' not existing
OpenOTP Credential Provider for Windows is not able to read the CA file.
Double check if CA file configured is the correct one and coming from your WebADM server. WebADM CA file can be downloaded from a web browser by accessing the following addresses :
https://webadm_server/cacert
https://webadm_server:8443/cacert
If you have multiple WebADM servers configured in cluster mode, the CA must be identical on all nodes. If for any reasons you have different CA certificates within the same WebADM cluster, then your WebADM setup is incorrect and you have to re-do WebADM slave setup on node(s) where the CA is incorrect.
Check the CA path. Here the CA name configured in the registry is wrong, and it prevents the CP to read it.
Normally, the CA file is automatically downloaded during the Credential Provider setup. If not, you can manually download and configure it.
The CA file must be accessible by OpenOTP Credential Provider that is why it is advised to move the CA file in the installation folder of OpenOTP Credential Provider after CP installation.
The default OpenOTP Credential Provider installation folder is :
This is required ONLY if CA file is not automatically downloaded. Registry key for CA file location must also be adapted through the registry after CA file has been moved to installation folder :
Warning
CA file can not be stored and used through shared folder/path like :
\\STORAGE\ca.crt
8.7 Disable auto-reconnect bypassing OpenOTP
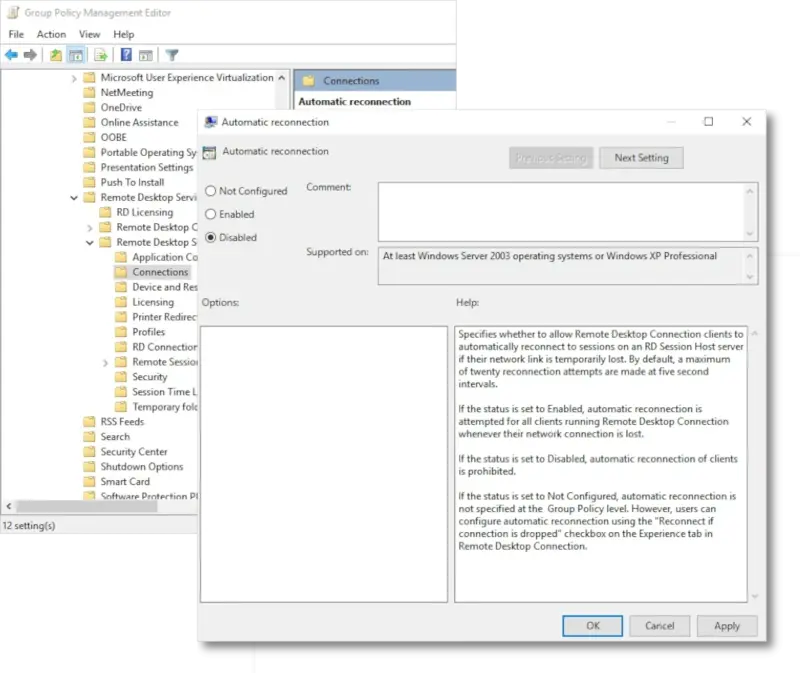
Starting from Windows 10 version 1803 and Windows server 2019, Microsoft introduced usage of local client cache for credentials when reconnecting to a locked RDP session.
This behaviour does not permit Credential Provider to re-authenticate the user as it would do in previous versions of Windows 10 and Windows Server.
The solution is to disable the automatic reconnection setting in the registry of the machine. This can be done using Group policy feature of Windows (either Edit group policy if machine are not part of the domain, or Group policy management if machines are part of the domain)
Open the following path in the policy edition:
Computer Configuration->Administrative Templates->Windows Components->Remote Desktop Services
->Remote Desktop Session Host->Connections, and double-click on Automatic reconnection, then switch to Disabled, press “OK”, and close all group policy windows.
You may have to restart the machine, or update GPO on remote machines so the setting is applied.
9. Video Tutorial for Windows 10 and Server 2012R2