OpenOTP Electronic Signatures and Secure Transactions Approval
1. Overview and Requirements
RCDevs offer now an easy way to sign any documents at anytime to all third party signatories. OpenOTP signature is a solution which is deployed on premise or in the cloud. Integrate OpenOTP signature in your infrastructure will allow electronic signatures for your company users (LDAP users). If you want to extend your signature processes to external users (users not part of your LDAP directory/directories configured with your WebADM), you have to integrate OpenOTP with YumiSign platform which requires a YumiSign API Key configured in OpenOTP settings. This YumiSign API Key is under YumiSign licensing and must be requested to RCDevs sales team. On premise signature with OpenOTP is under OpenOTP licensing. For more information regarding OpenOTP Signature and YumiSign licensing, contact RCDevs sales team.
The requirements to implement on premise electronic signature with RCDevs solutions are the following:
- Have WebADM and OpenOTP v2 installed and configured in your infrastructure,
- Communications allowed between your WebADM/OpenOTP infrastructure and https://cloud.rcdevs.com,
- Push mechanisms configured with your WebADM/OpenOTP infrastructure,
- OpenOTP Token mobile application. This application is used to authenticate the user and to provide him the documents/transactions who needs to be signed.
- OpenOTP License supporting signature features. (CONFIRM for PSD2 and SIGN for Advanced/Qualified signature).
- For qualified signature, a qualified signature creation device (QSCD) is required to achieve the signature.
RCDevs provides different ways to easily integrate electronic signature in your infrastructure:
-
Mail integration: RCDevs provides a mail integration with a postfix server designed to work with OpenOTP signature backend. This functionality allows you to send an email to anybody part of your company and submit him a document for signature. This integration is user-friendly and very simple to use.
-
Plugins integrations: Simply download, install and configure signature plugins developed by RCDevs in your system like Nextcloud, EDM, SharePoint, Git and more coming soon.
-
User Self-Service Desk application: The web application User Self-Service Desk provides a new functionality which allows you to submit a document for signature to yourself simply by drag and drop that document on a dedicated SelfDesk web page.
-
Custom integrations through APIs: Integrate OpenOTP signature APIs anywhere you need by implementing REST API calls part of your website, web banking, intranet, extranet, e-commerce website or even create a custom signature portal dedicated for that purpose and much more. This is the most flexible, powerful and customizable integration. To have an idea of what is possible with OpenOTP APIs Signature, visit and test YumiSign which is based on OpenOTP signature backend.
2. Signatories scenarios
We identified 3 common signing scenarios in the world of the signature to cover the different needs:
- Submit a document for signature to yourself,
- Submit a document for signature to someone or to multiple collaborators part of your company,
- Submit a document for signature to someone else not part of your company (External signatures require the easy to use YumiSign platform).
For items 1 and 2 we will talk about “Corporate Signatories” scenarios. Corporate scenarios involve that the signatories are part of LDAP directories configured with WebADM/OpenOTP.
For item 3 we will talk about “External signatories” scenario. External signatories scenario involves a signatory user which is not part of your LDAP directory configured with OpenOTP. The bridge between your on premise OpenOTP Signature integrations and external users is YumiSign platform. YumiSign will orchestrate the external accounts creation and the signature requests which is triggered from your OpenOTP backend. A subscription to YumiSign platform is required when YumiSign is involved. Licensing is based on who initiated the signature request. It is always free for the signatory for a request initiate by someone else.
These 3 scenarios are covered by RCDevs Signature solutions.
3. Signature levels
According to European Commission and electronic signatures regulation, there are 3 levels of electronic signature:
-
Simple electronic signatures: “An electronic signature is defined as “data in electronic form which is attached to or logically associated with other data in electronic form and which is used by the signatory to sign”. Thus, something as simple as writing your name under an e-mail might constitute an electronic signature.”
-
Advanced electronic signatures (AdES): An advanced electronic signature is an electronic signature which is additionally:
- uniquely linked to and capable of identifying the signatory;
- created in a way that allows the signatory to retain control;
- linked to the document in a way that any subsequent change of the data is detectable.
-
Qualified electronic signatures (QES): A qualified electronic signature is an advanced electronic signature which is additionally:
- created by a qualified signature creation device (QSCD);
- is based on a qualified certificate for electronic signatures;
- it is equivalent to a handwritten signature.
RCDevs is providing Standard, Advanced and Qualified signatures which meet the criteria of European Commission. See below, how it works with RCDevs solutions.
4. RCDevs transaction and signature solutions
RCDevs provides 3 kinds of electronic transactions/signatures (Simple, Advanced and Qualified Signatures) and also extra features like document sealing and timestamping. For the signature appears in Green in Adobe Reader, everything is related to what Adobe Reader is trusting. For more information regarding the Trust in Adobe Reader, have a look on the section 5 of this documentation.
The difference between a Transaction and an Electronic signature with RCDevs solutions is the fact that a document is attached to the request or not. Both types of request are using the same APIs. In the 2 types of requests, a signature is performed but at different levels/layers. When a document is attached, the document itself is signed, this is the scenario of electronic document signing. When there is no document attached to the request, it becomes a transaction and what is signed is the data attached to the transaction. Both kind of request can be signed in Standard, Advanced or Qualified mode.
4.1 Electronic Transactions
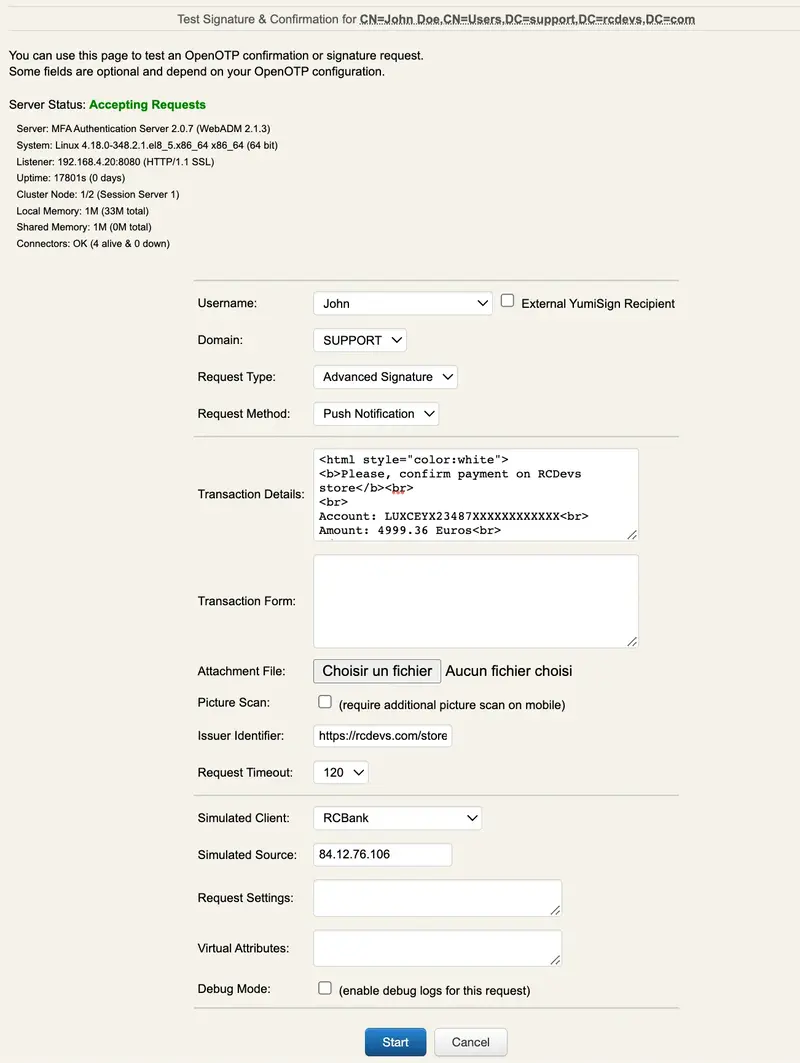
- Standard Transaction Signing: This integration can be deployed for corporate signatories only. The user beforehand registered a Token on his LDAP account and his mobile. Electronic transaction can be used to validate a payment, a bank transfer, be involved for hierarchy approval for a particular action… everything that needs to be securely approved before an event occurs. Found below, an example of electronic transaction built with the Transaction tester of WebADM:
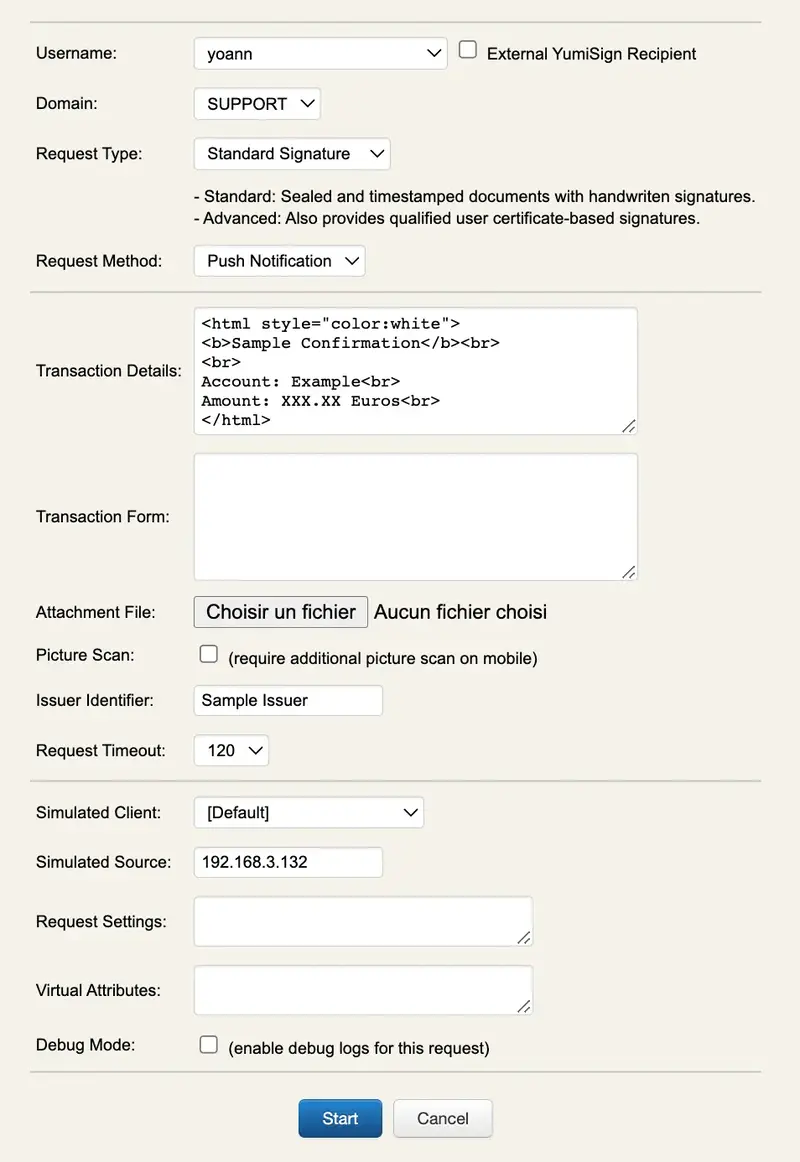
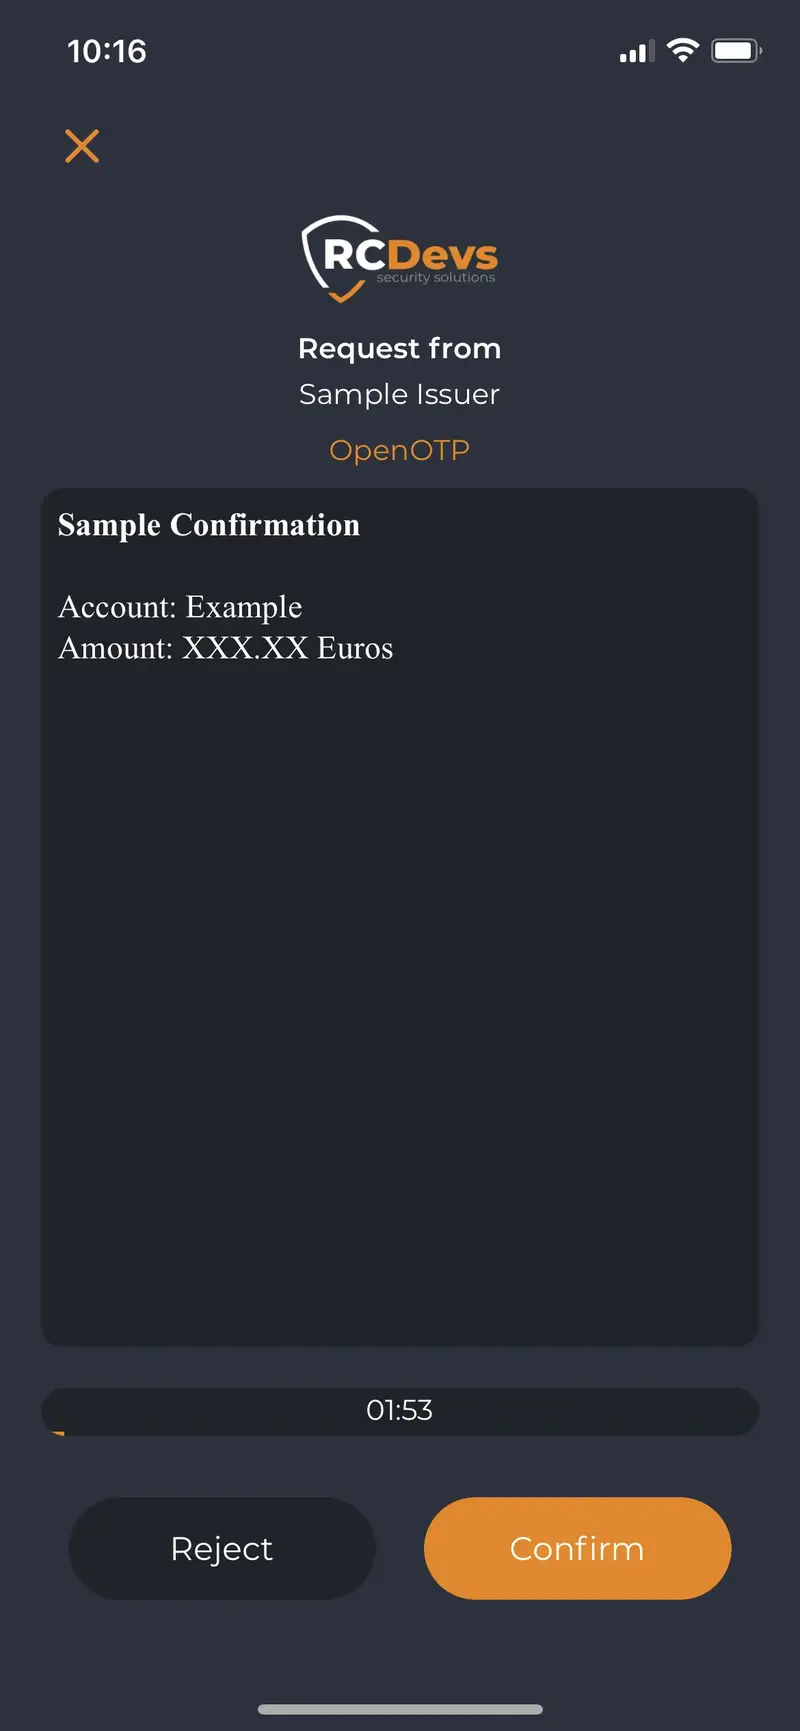
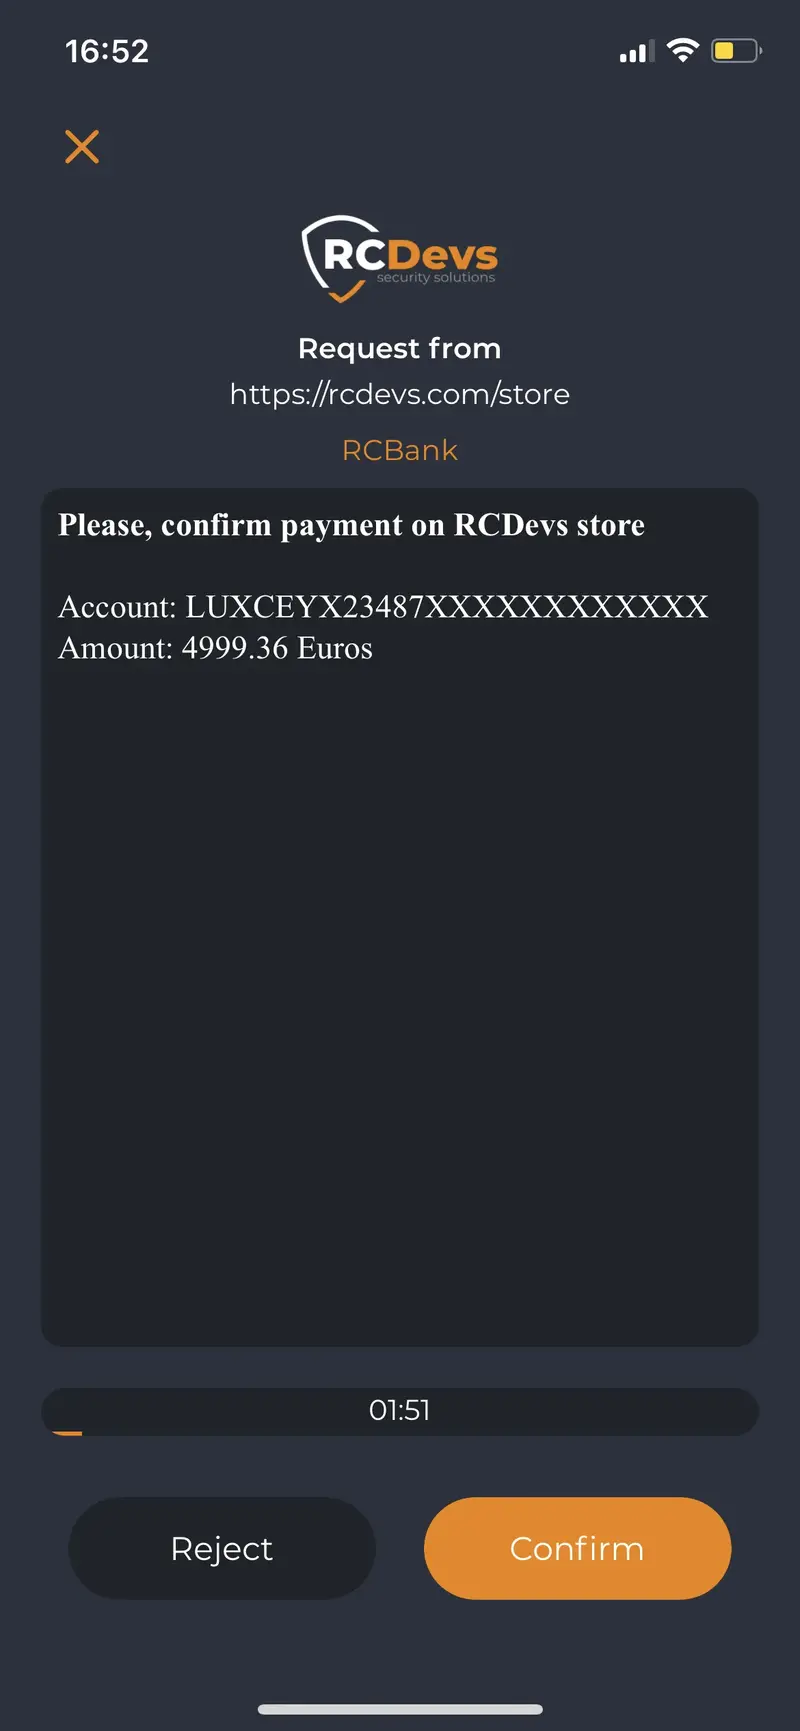
Once submitted, the request is prompted on the user mobile. User can review the transactions details and optional the form attached. Then he approves or deny the request.
Proof of the transaction generated on the backend :
Mobile Transaction Confirmation

Started: 2022-06-03 10:16:35
Stopped: 2022-06-03 10:16:42
User DN: CN=yoann traut,OU=SUPAdmins,DC=support,DC=rcdevs,DC=com
User IP: 192.168.3.132
Client ID: OpenOTP
Client IP: 192.168.4.20

Hash Data: ff620fda9bde137f50f18173ded2b8f343f92c49 (Nonce + Data)
OTP Token: Token #1 (TOTP)
OTP Algo: SHA1
OTP Key: 3275721181 (CRC32)
OTP Nonce: f3abeb492249b93f5d14c642b9ef3a359807c57b
OTP Result: 718173DE (OATH)

Transaction Details (Base64)
PGh0bWwgc3R5bGU9ImNvbG9yOndoaXRlIj4NCjxiPlNhbXBsZSBDb25maXJtYXRp
b248L2I+PGJyPg0KPGJyPg0KQWNjb3VudDogRXhhbXBsZTxicj4NCkFtb3VudDog
WFhYLlhYIEV1cm9zPGJyPg0KPC9odG1sPg==
These methods can be used to have a secure confirmation of a transaction to meet PSD2 regulation.
- Advanced Transaction Signing: This integration can be deployed for corporate signatories only. Corporate signatories (users part of your LDAP backends connected to your OpenOTP suite), can use WebADM or Corporate user certificates: SignScope=Local (WebADM can be configured as Standalone CA or Subordinate CA of your existing enterprise CA). The user beforehand registered a Token on his LDAP account and his mobile. The Transaction signing is performed with user’s certificate. Technically, this level of Advanced confirmation is equivalent to Qualified signature in terms of cryptography operations. The difference is that the Advanced Transaction Signing do not use a Qualified Signature/Seal Creation Device (QSCD). Instead, it uses a company user certificate (SignScope=Local) or a certificate issued by RCDevs root CA (SignScope=Global).
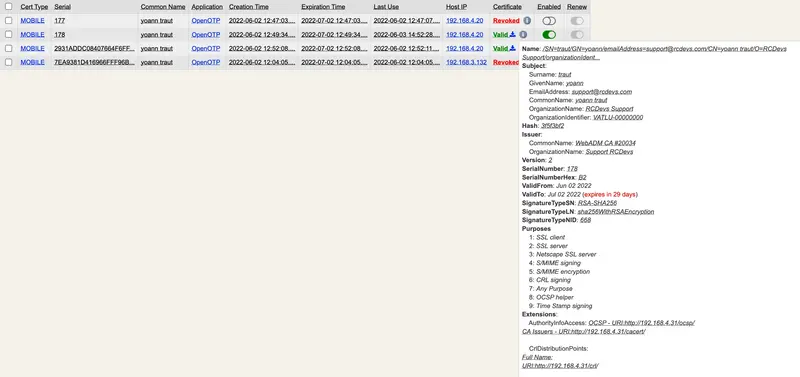
The user will be prompted on his mobile to create a new certificate (user-friendly CSR prompt). The CSR and the key will be generated on the mobile based on information provided by WebADM PKI service. Once generated, the CSR will be sent from the mobile to your WebADM PKI service (Rsignd) and signed by the WebADM CA. That certificate will be then sent back to the mobile and registered in WebADM SQL database. The certificate will be stored in the keychain of the mobile. Transaction will then be signed by the freshly generated key that never left the mobile and the signed transaction will be sent back to the OpenOTP/Yumisign backend. Certificates issued by WebADM for signing purpose are valid for 1 month. After 1 month, the certificate is expired and will needs to be renewed. This renewal operation is done automatically in signature workflow. Certificate issued on mobiles can be revoked at any time through WebADM Admin GUI > Databases > Client, Server and Mobile Certificates. Found below, the certificate issued for that user in the Client, Server and Mobile Certificates database :
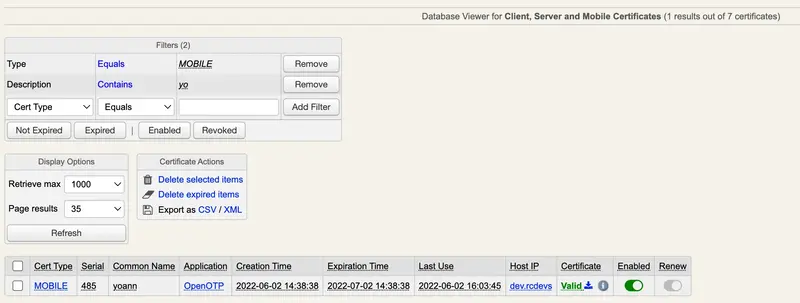
Corporate Certicate issued by WebADM PKI are listed here (SignScope=Local).
Certificates issued by RCDevs Root CA are also under your control as they are stored in your WebADM SQL database. Then you can revoke a user certificate issued by RCDevs CA at anytime by clicking Enabled button on the corresponding certificate. When a certificate has been revoked by a WebADM administrator, the concerned user can not sign document anymore.
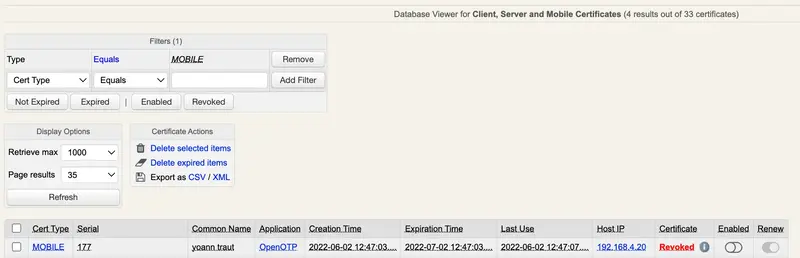
Revocation can be cancelled at some point by clicking again Enabled button on the appropriate certificate.
Found below, details of Transaction signed with a Corporate issued certificate (SignScope = Local). A P7M file is returned by the API for each transaction. That file is a Cryptographic Message Syntax (CMS) and can be read with the following OpenSSL command :
openssl version
OpenSSL 3.1.0 14 Mar 2023 (Library: OpenSSL 3.1.0 14 Mar 2023)
openssl cms -inform DER -in signed.p7m  -verify -cades -CAfile ca_local.pem
...
Which result with the following :
CAdES Verification successful
What has been signed (the transaction details) and the information related to the user certificate are contained in the CMS output. For more information regarding CMS, have a look on the rfc5652
Details of the certificate used for the previous transaction on the WebADM backend:
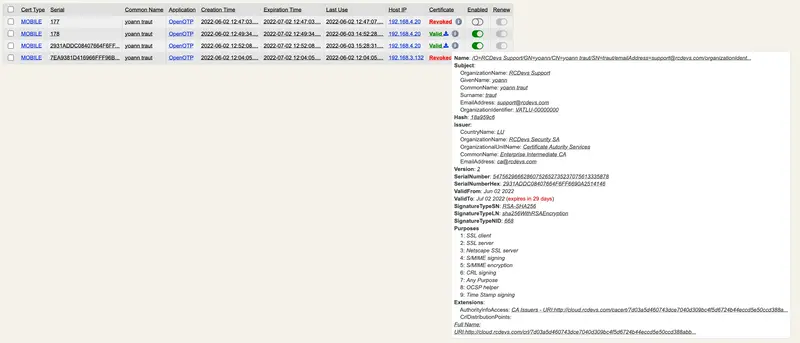
Found below, details of Transaction signed with a certificate issued by RCDevs CA (SignScope = Global). A P7M file is returned by the API for each transaction. That file is a Cryptographic Message Syntax (CMS) and can be read with the following OpenSSL command :
openssl cms -inform DER -in signed.p7m -verify -cades -CAfile ca.pem
CAdES Verification successful
For more information regarding CMS, have a look on the rfc5652 Details of the certificate issued by RCDevs CA on the WebADM backend:
- Qualified Transaction Signing: This integration can be deployed for corporate signatories only. It allows collaborators to submit transaction requests to anybody part of the company. That kind of transaction requires a qualified signature/seal creation device (QSCD) like electronic ID cards, passport… from the signatories. Please, refer to European Commission website for more information about QSCD. Transaction will then be signed by the users’ QSCD. Signing and Login certificates of the QSCD can be stored on the LDAP user account for login purposes in other integrations.
4.2 Electronic Signature
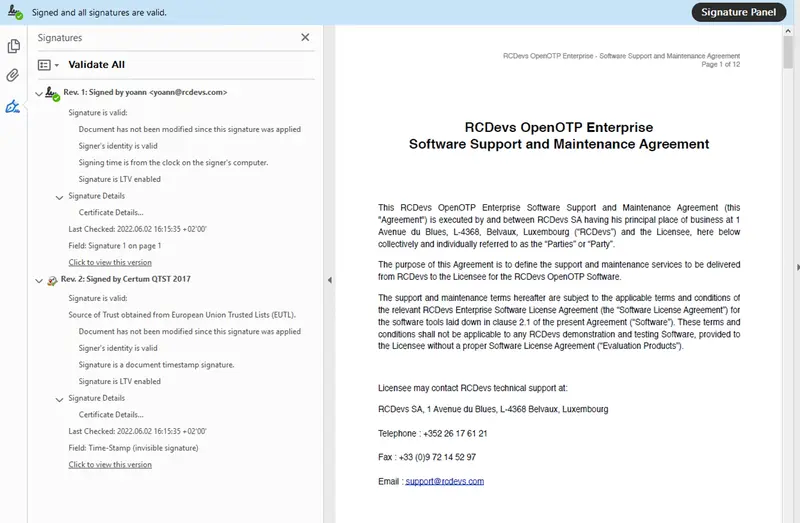
- Standard Signature: This integration can be deployed for corporate signatories. The user beforehand registered a Token on his LDAP account and his mobile.Manual signature and paraph can be alternatively asked, in that case the user will be prompted to draw his signature and paraphs from his mobile after the document review. These metadata will be added to the final document by RCDevs microservices. This kind of signature method can be used to meet Simple Electronic Signature of European Commission regulation (it is even much more secure than what European Commission qualified as “Simple Signature”).
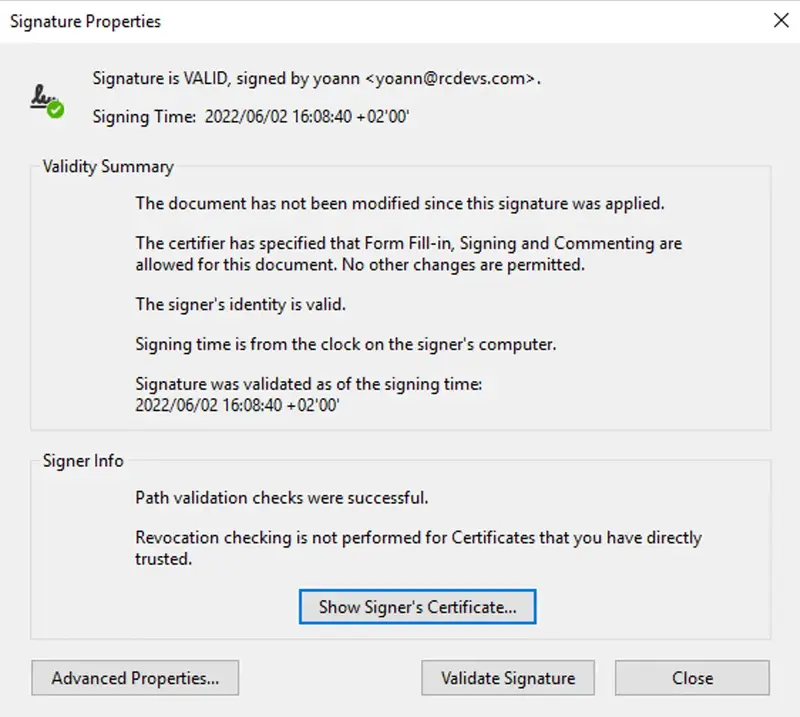
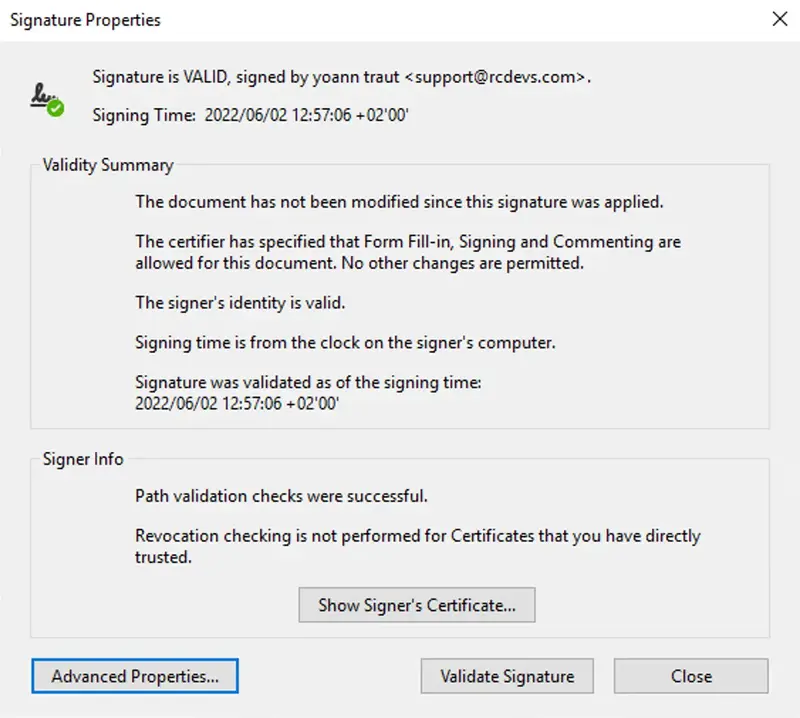
Found below, a document signed in Standard mode.
Here, you can see that the paraphs has been added at the bottom of the first page.
On the top, you can found the watermark which include the VAT number of the company .
RCDevs provides the seal functionality in Signature processes in order to prevent document alteration after signature.
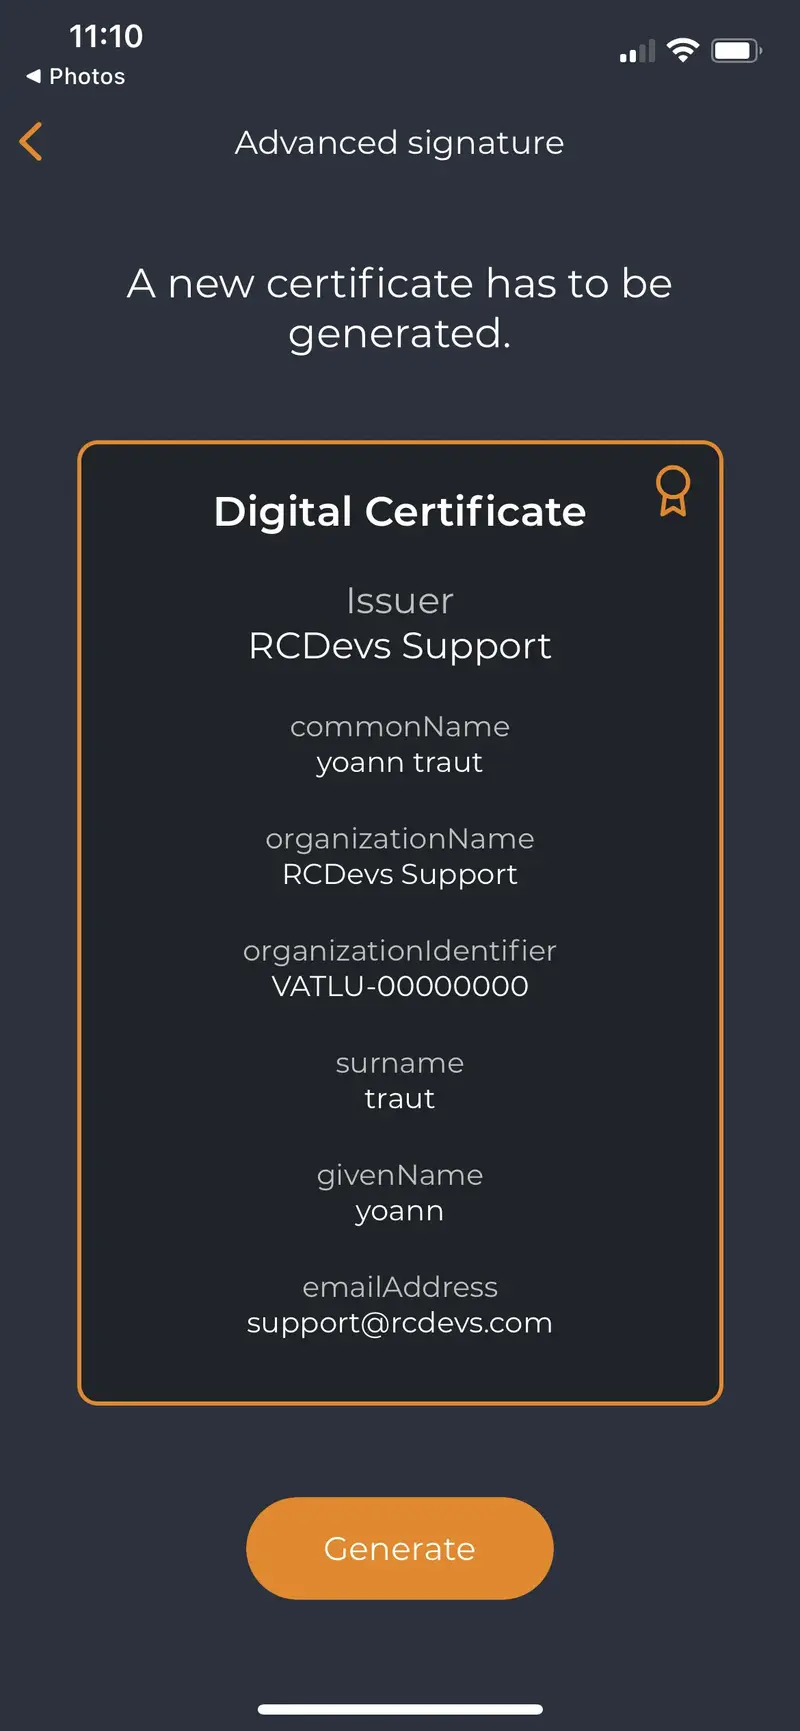
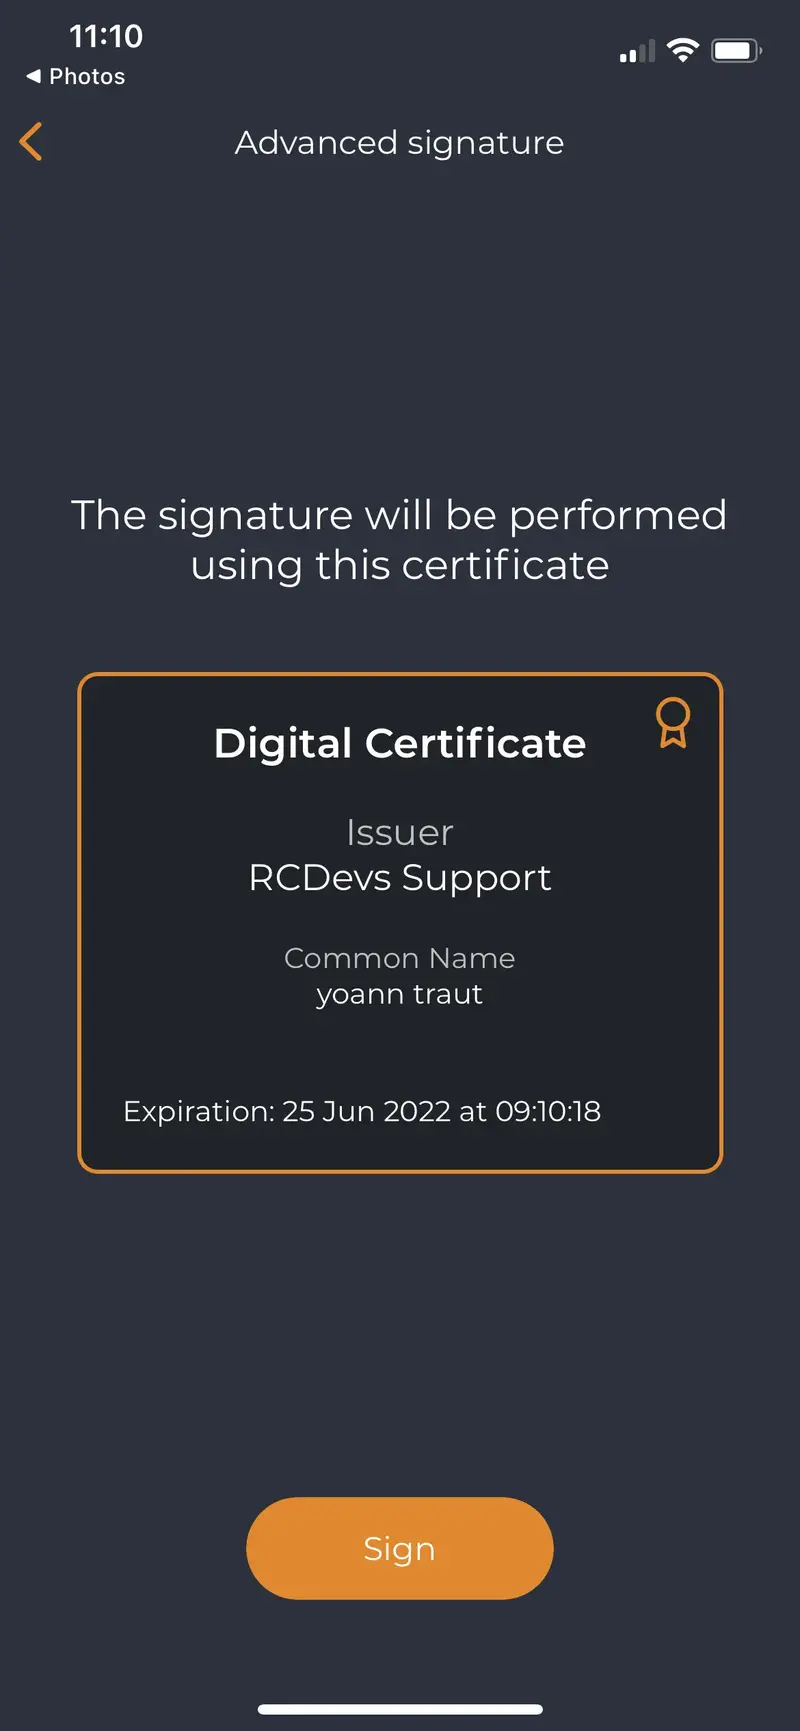
- Advanced signature: This integration can be deployed for corporate and external signatories. Corporate signatories (users part of your LDAP backends connected to your OpenOTP suite), can use WebADM or Corporate user certificates (WebADM can be configured as Standalone CA or Subordinate CA of your existing enterprise CA). External users will use certificate issued by RCDevs root CA through YumiSign platform Signatures with users not part of your LDAP servers will always require YumiSign as bridge between your integrations and the signatories. Technically, this level of signature is equivalent to Qualified signature in terms of cryptography operations. The difference is that Advanced Signature do not use Qualified Signature/Seal Creation Device, it uses a company user certificate or a certificate issued by RCDevs root CA. If the user do not has any certificate registered on his mobile issued by WebADM PKI or RCDevs root CA for signing purposes, then during the first Advanced Signature request sent to that user, he will be prompted on his mobile to create a new certificate (user-friendly CSR prompt). The CSR and the key will be generated on the mobile based on information provided by WebADM PKI service (RSignd). Once generated, the CSR will be sent to your WebADM PKI service (Rsignd) and signed by the WebADM CA or by RCDevs Root CA according to the chosen scope. That certificate will be then sent back to the mobile and registered in the SQL database of WebADM. The certificate will be stored on the mobile. Document will then be signed by the freshly generated key that never left the mobile and sent back to the OpenOTP/Yumisign backend once signature is completed. Certificates issued by WebADM for signing purpose are valid for 1 month. After 1 month, the certificate is expired and will needs to be renewed. This is done automatically. Certificate issued on mobiles can be revoked at any time through WebADM Admin GUI > Databases > Client, Server and Mobile Certificates.
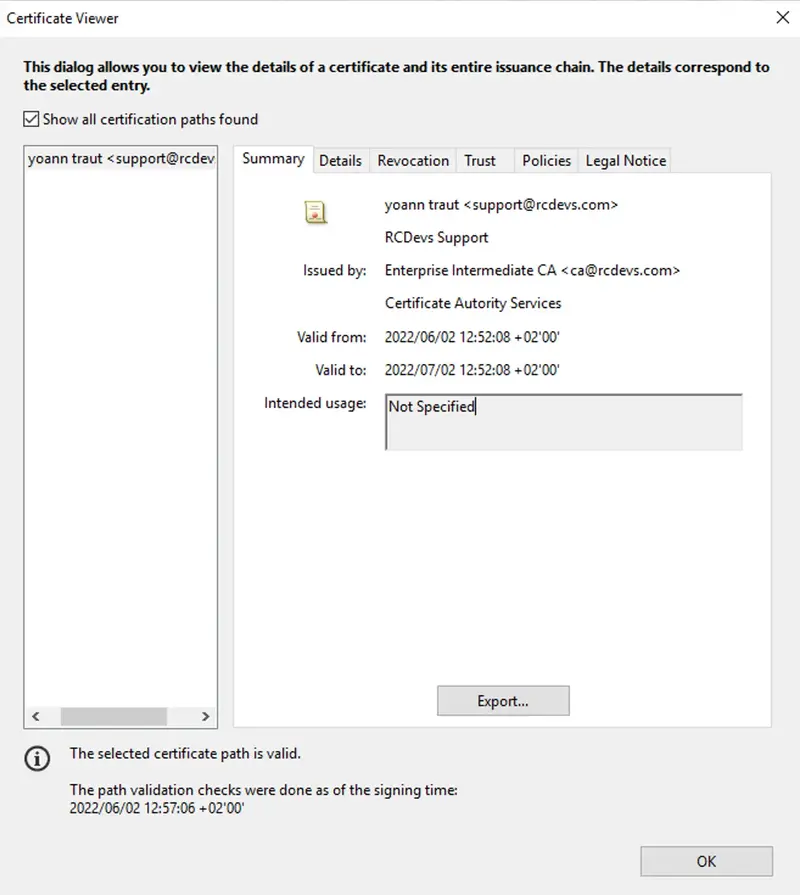
Found below, a document signed with a Corporate issued certificate (SignScope = Local) :
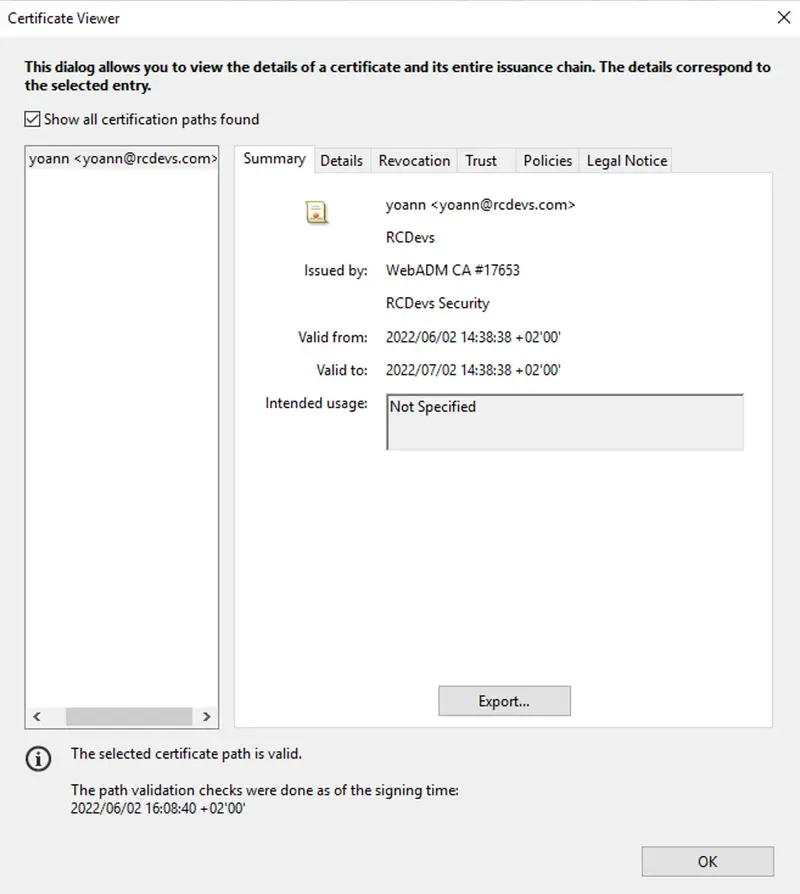
Found below, the certificate issued for that user in the Client, Server and Mobile Certificates database :
Found below, a document signed by a certificate issued by RCDevs Root CA (SignScope = Global) :
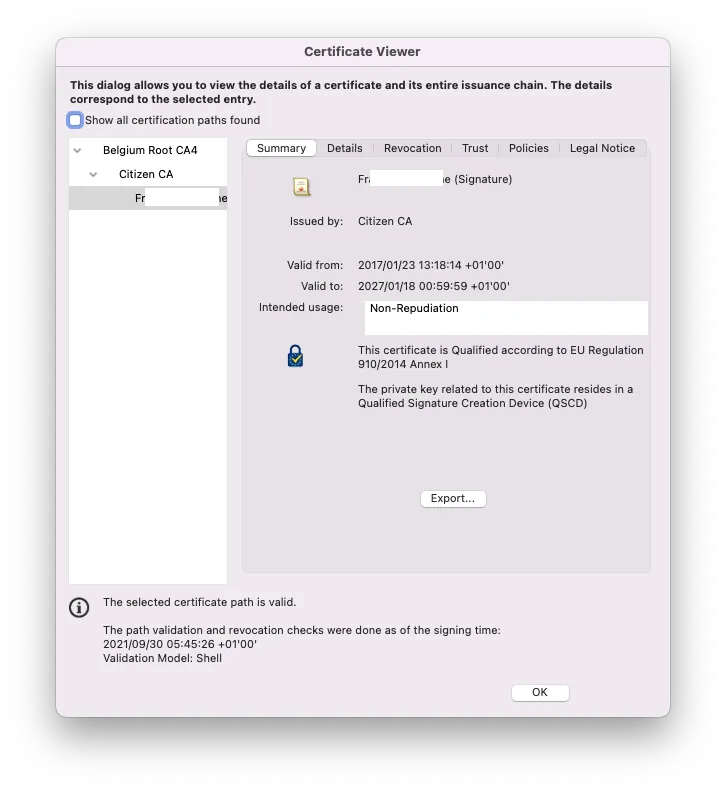
- Qualified Signatures: This integration can be deployed for corporate and external signatories. It allows collaborators to submit signature requests of any documents to anybody part of the company or involve external signatories through YumiSign platform. It requires a qualified signature/seal creation device (QSCD) like electronic ID cards, passport… from the signatorie(s). Please, refer to European Commission website for more information about QSCD.
The certificate used for the signature can be optionally registered on the user account for login purpose in other integrations.
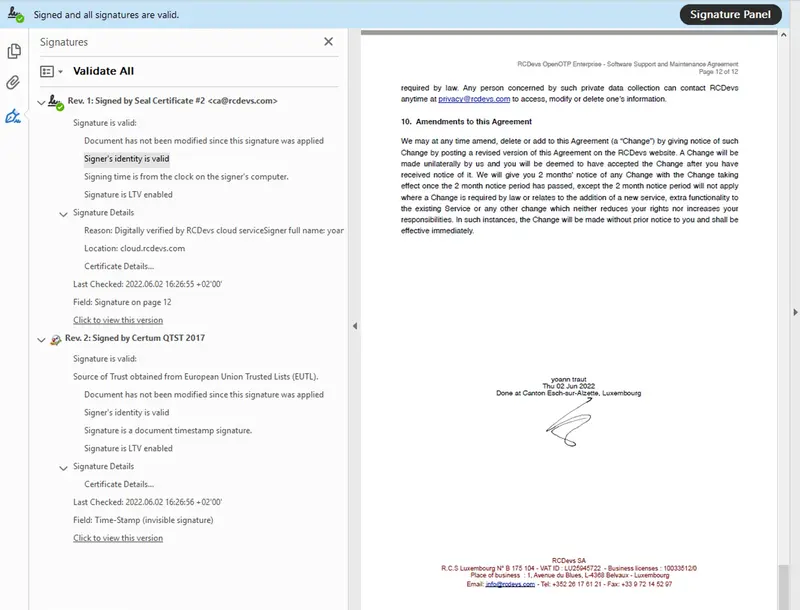
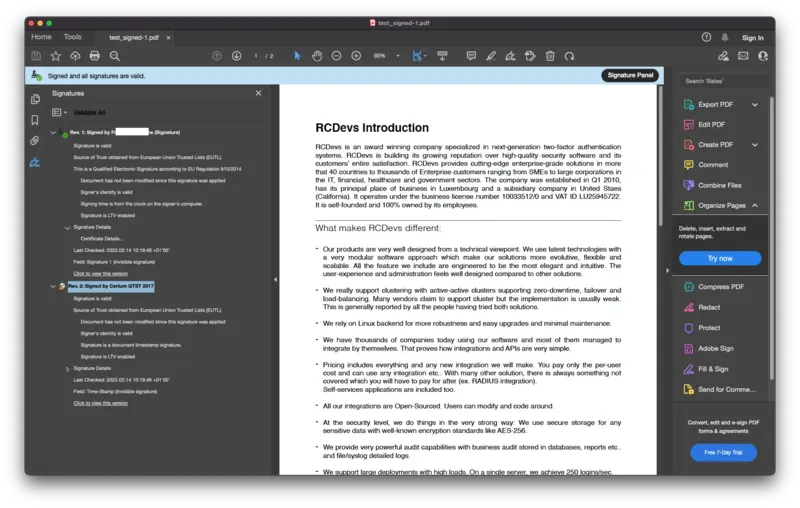
Found below, an example of Qualified signed document.
Other options provided by RCDevs using RCDevs cloud services are :
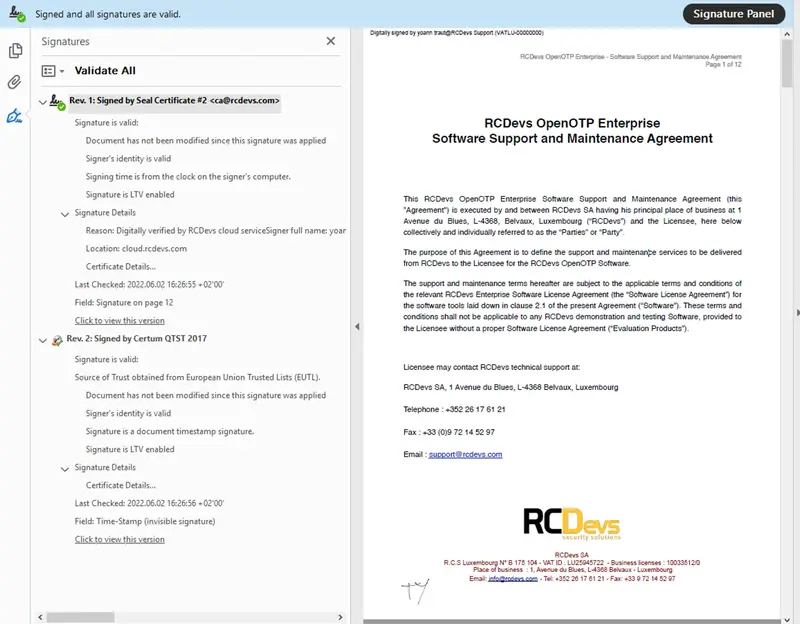
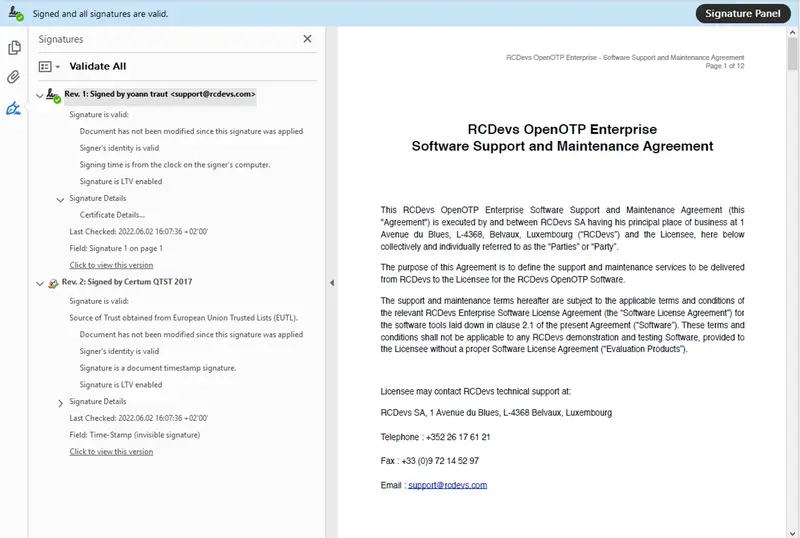
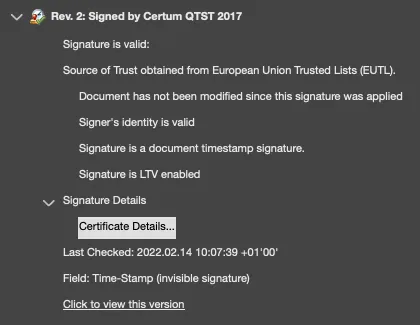
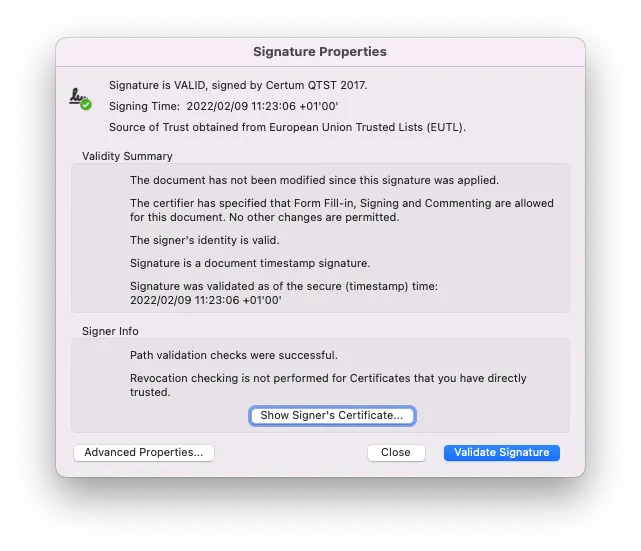
- Timestamping: RCDevs provides timestamping functionality. In all signature workflow including a document and involving RCDevs microservices, a timestamping is applied to the document which is signed and prepared by RCDevs microservices. The timestamping of documents is done by a Certum QTST 2017 Certificate which can be visualized through Adobe Reader. Trusted timestamping is the process of securely keeping track of the creation and modification time of a document. The owner of the document should not be able to change it once it has been recorded.
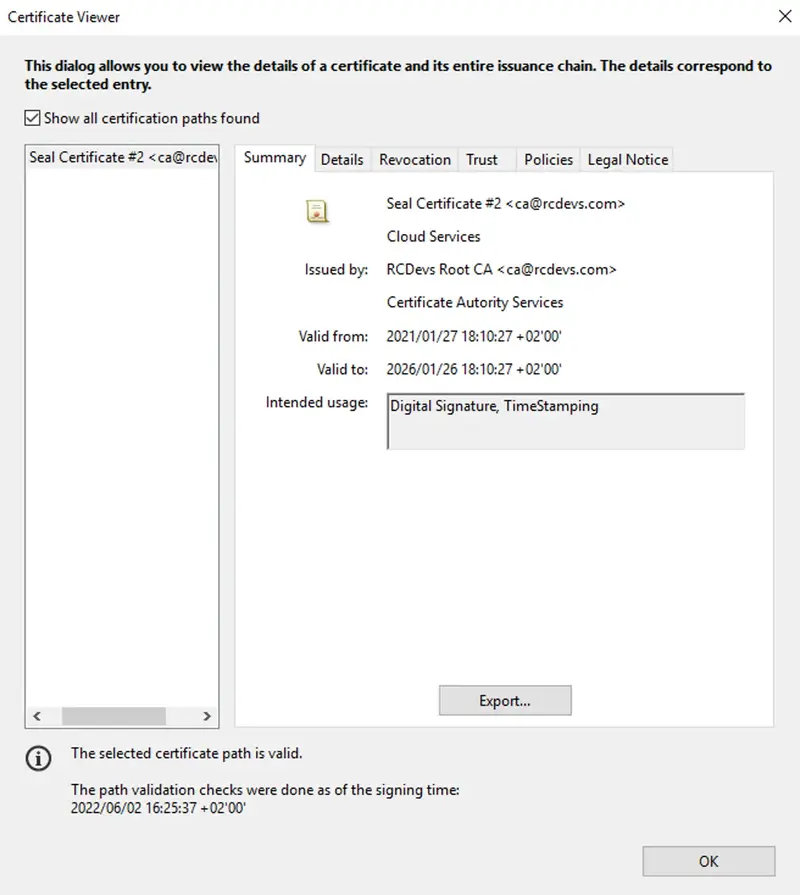
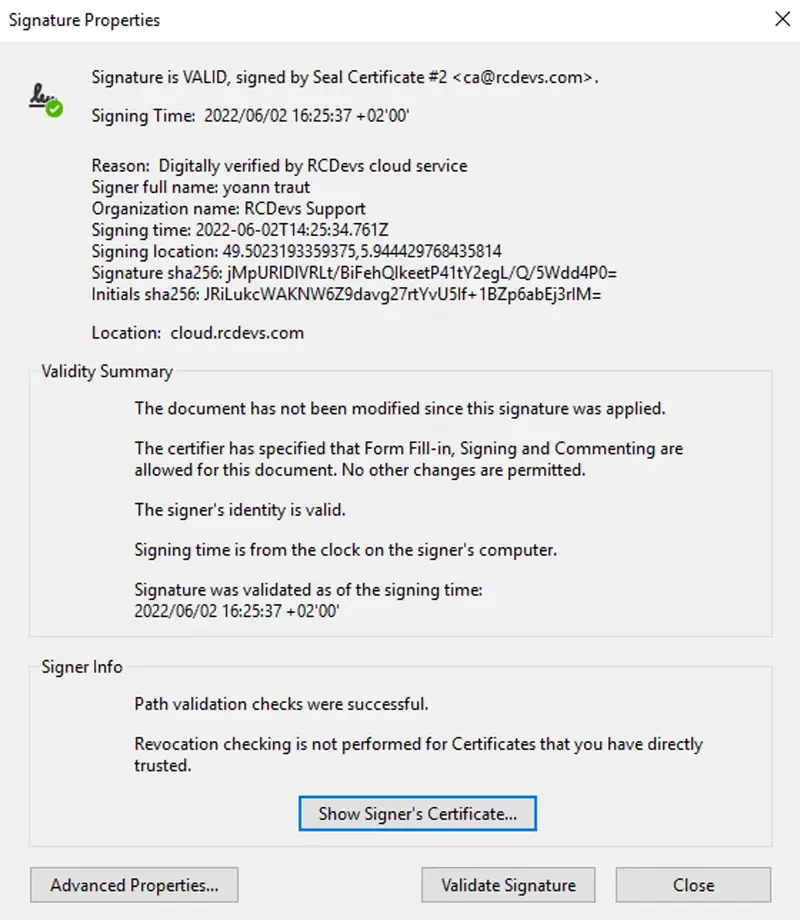
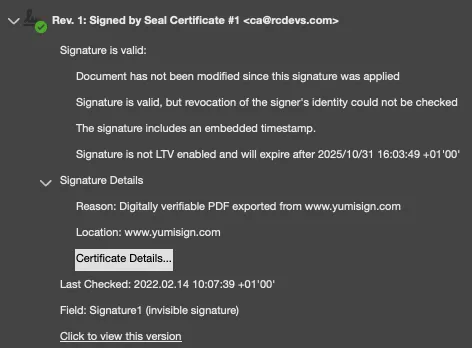
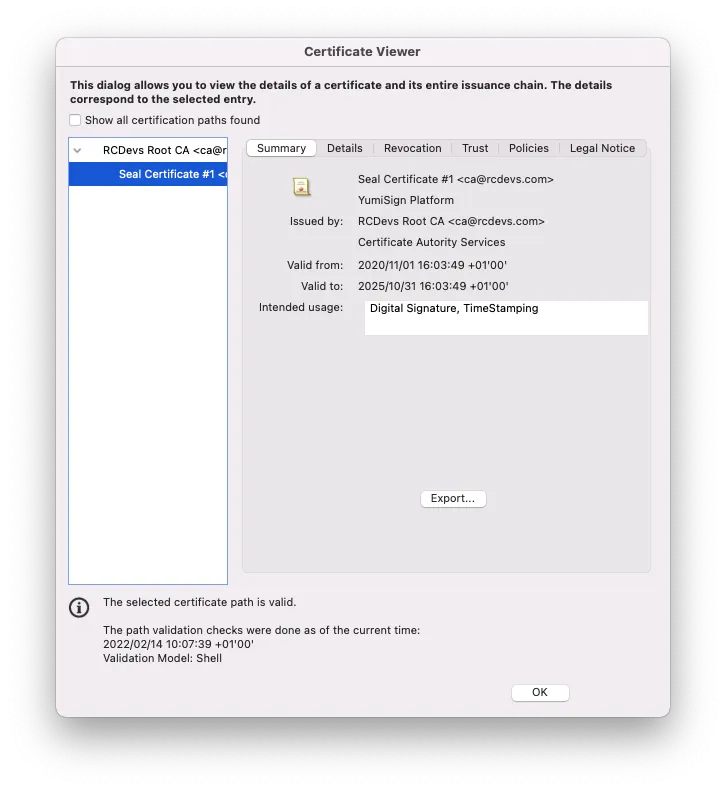
- Seal: RCDevs provides electronic sealing functionality. That functionality is a stamp linked to a legal person like a firm. It guarantees the identity of the issuer and the integrity of the document. Sealing performed by RCDevs are done by a Seal certificate issued by RCDevs Certificate Authority. You need to Trust the CA certificate of RCDevs in order to see the sealing without any trust issue in Adobe Reader (green status). If you do not trust it, then it will appear in orange in Adobe Reader.
5. Issued Identities Trusts and Know Your Customer (KYC)
There is different level of Trust according to the kind of signature you are going to implement/use because different third parties can be involved. As you probably understood, digital certificates can be issued by your Organization CA (WebADM CA/SignScope=local), by RCDevs Root CA (SignScope=Global) and by Public CAs issuing QSCD identitie.
5.1 Simple signature Trust
For mobile, no user certificate is involved in the signature processes. When a document is attached to the request, handwritten signature and optionally the paraphs (when multiple pages are contained in the document) are asked to the signatory when the signature request is prompted on their mobile. Paraphs and Handwritten signature are afterward added to the document (if any) through RCDevs Micro Services. Once the handwritten signature and paraphs has been added, a seal is applied by RCDevs with a Seal certificate issued by RCDevs CA. RCDevs CA in that scenario needs to be Trusted.
Then, a timestamping is applied by a Certum timestamping certificate by RCDevs Micro Services.
5.2 Advanced signature Trust
If the SignScope is Global, then identities are issued by RCDevs Root CA. From RCDevs point of view, an issued certificate is always linked to a company. Information of the company like VAT number, will always be attached to every certificates issued for users of that company in order to identify the user and the company. The KYC of the company is then done by RCDevs each time a new customer choose RCDevs solutions. A dedicated page will be available soon to explain how new customers are onboarded by RCDevs, discribing identity validation process of the company made by RCDevs.
5.3 Qualified signature Trust
If the SignScope is eidas, then you have to trust the public CAs that issues QSCD identities. It is the highest level of Trust and this method must be used for any legal document. The KYC here is achieved by public CAs, governments, QSCD issuers.
6. Signatures and Transactions Requests Delivery methods
With RCDevs solutions, the end-users mobiles are the key point to achieve an electronic signature or transaction. We deported this feature to the mobiles because the phones goes with your users wherever they are. That way they can sign any document at anytime from anywhere with their mobile and OpenOTP Token application without login on a third party system to review and sign a document. The user’s mobile must be beforehand linked to the user account through a Token enrollment. This is the RCDevs philosophy applied to electronic signature world. The request delivery are then linked to an OATH Token registered on the user account and mobile.
RCDevs provides 2 different ways to deliver a signature/transaction request which needs to be signed or approved:
-
By a push notification: With that method, the user is instantaneously notified when a transaction or a signature request is in pending by receiving a push notification on his mobile. Once the request is arrived on the mobile, the user can press the notification and then the signature workflow is starting from end-user/signatory perspective. Document attached to a signature request are not transiting in the push notification. The Push request received is a Signature ticket which refer to a transaction on the OpenOTP backend. The OpenOTP Token application will then contact the Mobile Endpoint URL of your WebADM/OpenOTP infrastructure and fetch the document.
-
By scanning a QRCode: With that method, the signing request/transaction is fetched by scanning a transaction QRCode with OpenOTP Token. Only the user for whom the signature transaction QRCode has been generated can scan the QRCode with his mobile and fetch the signature request from the server. All exchanges between OpenOTP backend and OpenOTP Tokens applications are 2 ways signed. If signatures mismatch with one of them, the transactions can not be decrypted or proceeded.
Both methods are very secure and are based on OTP validations, asymmetric encryption/decryption processes in background to proceed any requests. On top of that, each exchange between OpenOTP backends and mobiles are signed. If one condition mismatch, the request can not be proceeded or completed.
In both scenario, when a document is attached, the document is downloaded on mobiles from your OpenOTP backend. Documents are never transiting through push notification.
These 2 delivery methods can be synchronous or asynchronous.
The difference between these both delivery methods is the fact that the third party system that triggered the signature request will actively wait the response of the signatory in synchronous mode. In asynchronous mode, the third party system (initiator of the signature request) will regularly pull the status of pending transactions on the backend. Once the transaction is done on the backend, the third party system will be notify and the workflow can continue from third party system perspective.
In synchronous mode, the third party system initiator of the signature request is actively waiting the end of the transaction previously initiated. The maximum timeout of synchronous requests is 5 minutes. This mode is more relevant for short delay transaction like a payment, secure approval to access a resource or to immediately sign a document which has been already reviewed. Once the 5 minutes timeout is exceeded, the transaction is cancelled on the backend and the initiator of the signature request is notified. If you choose those methods, please configure the timeout of third party integrations accordingly.
The asynchronous mode is the preferred one for document signing and long time transactions. Third party system initiator of the signature/transaction request is not actively waiting for the response. Instead, a record is maintained and the tird party system will regularly pull the OpenOTP signature system to be notified when a transaction has been done by the user. If a the 3rd party system is notified that a transaction/signature process is done, then it will ask to the signature system to return the data related to a transaction/signature (the signed document/transaction). The maximum timeout of asynchronous requests is up to 30 days. Once the timeout is exceeded, the transaction is cancelled and the initiator of the signature request is notified.
Signature/Transaction requests are stored in the Redis database of WebADM
If you clear the WebADM Session Data from WebADM GUI > Admin tab, all pending transaction/signature requests will be destroyed on the backend and will not be recoverable!!
7. API Methods
7.1 API Settings description
Found below, descriptions of parameters of the different methods and possible values:
7.1.3 Requests parameters
- username: To which user you want to send the signature request. Can be a username, UPN, email address according to your WebADM configuration.
- domain: WebADM domain name where the user/signatory must be searched.
- recipient: email address of an external user where YumiSign platform will be involved.
- data: Can contain a description of the coming operation prompted to the user on the mobile:
- file: base64 encoded of the file going to be signed.
- mode: auto, CaDES, PaDES or XaDES (beta).
- async: true or false -> asynchrone or synchrone request.
- settings: e.g CaDESMode=embedded or CaDESMode=detached.
- issuer: Who issued the signature request.
- client: Who triggered the signature request.
- source: User IP which can be retrieved and passed to the API.
- setting: Can be used to pilote the API calls on the fly to change various settings. E.g : CaDESMode=embedded
- Virtual: Allow to override a user attribute value by another. E.g: mail=user_other_mail@mail.com.
- qrFormat: Format of the QRCode containing the request. Can be PNG or JPEG.
- QrSizing: Define the size of the generated QRcode. Default value is 5.
- QrMarging: Define the size of the QRcode margin. Default value is 3.
- addCert: 1, 2 or 3.
1=Register the signing certificate only. When signing certificate will be used or generated through OpenOTP Token Application, it will be registered on the LDAP user account in userCertificate attribut. That certificate will be flagged by OpenOTP backend as signing certificate in WebADM User Data and will afterward be required for next signature requests. (Applicable to Advanced and Qualified Signature).
2=Register Login certificate. This is useful for PKI logins. You can register the authentication certificates of electronic ID card for example to use it for login purpose in other integrations.
3=Register Signin and Login certificates. Many signature devices like electronic ID card comes up with 2 certificates. One is for signature purpose and the other for authentication.
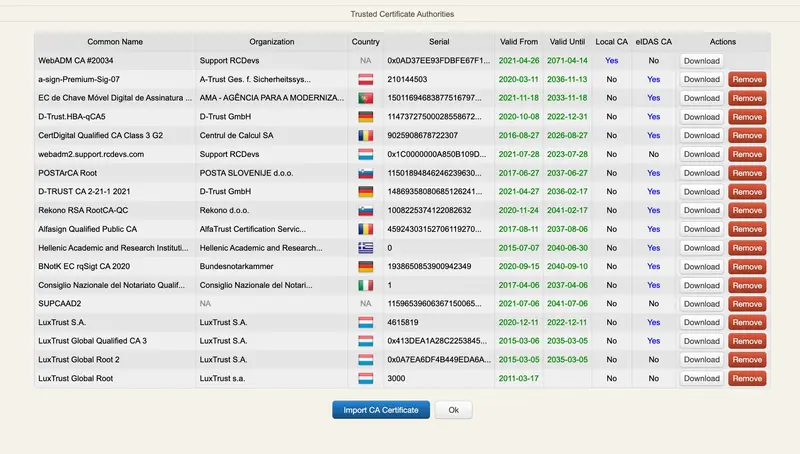
For signature or PKI authentication works with OpenOTP suite, the user certificate must be set on the user account in your LDAP backend and valid. We provide an easy way to achieve the certificate enrollment by API piloting. By default, 1 will be requested. Also note that the Certificate Authorities that issued the user signing certifiate must be trusted by OpenOTP. To check or add a CA trust, login on your WebADM Admin portal, click Admin tab > Trusted CA Certificates. Import the CA certificate(s) you need for signing or Trust the public eiDas list fetched from RCDevs cloud services on your OpenOTP backend. That way, you limit the perimeter of allowed certificates/country used for signature purposes.
- timeout: Define the timeout of the confirm/signature requests. For async=true, max value is 5min. For async=false, the maximum value is 1 month.
- scan: Trigger the camera of the user for a picture of him before confirm/signing request/document.
- form: Attach a HTML form which must be completed by the user before he can continue the confirmation/signature workflow. Form responses is returned in the response.
7.1.2 Responses parameters
- session: ID of a session started on the backend.
- sendPush: True of False. Send a push or not.
- code: Status code returned for a request. 0=error, 1=success, 2=session started and in pending,
- error: Details of the error if any
- message: Details of the code returned.
- comment: If request refused by the user, a reject message can be asked to the end user and the response is returned in that parameter.
- file: Return the signed file in base64 binary.
- jsonData: Return the jsonData of pending transactions.
- cert: Return the certificate which has been used for signature purposes.
7.2 Standard Signature/Transactions approval (PSD2)
Transactional confirmation (PSD2) and mobile signature are using the same API methods of OpenOTP.
The difference between both is the fact that a document is attached to the request or not.
If a document is attached, then you will enter in mobile signature scenario.
If no document is attached, then you will enter in Transactions approval (PSD2) scenario.
Found below, the different API methods and an example.
7.2.1 Mobile signature methods
Mobile signature API methods are called CONFIRM and the related API methods are the following one:
Build Mobile signature with the 2 following methods :
- openotpNormalConfirmRequest (Internal user signatory) :
<message name="openotpNormalConfirmRequest">
    <part name="username" type="xsd:string"/>
    <part name="domain" type="xsd:string"/>
    <part name="data" type="xsd:string"/>
    <part name="file" type="xsd:base64Binary"/>
    <part name="form" type="xsd:base64Binary"/>
    <part name="scan" type="xsd:boolean"/>
    <part name="async" type="xsd:boolean"/>
    <part name="timeout" type="xsd:integer"/>
    <part name="issuer" type="xsd:string"/>
    <part name="client" type="xsd:string"/>
    <part name="source" type="xsd:string"/>
    <part name="settings" type="xsd:string"/>
    <part name="virtual" type="xsd:string"/>
</message>
- openotpExternConfirmRequest (External user signatory). This request requires YumiSign platform. Communications between OpenOTP and YumiSign require a YumiSign API key that must be configured under OpenOTP configuration.
Method use for the response of the 2 previous methods:
- openotpConfirmResponse (Response to previous request, that kind of request is done by the mobile to OpenOTP) :
<message name="openotpConfirmResponse">
    <part name="code" type="xsd:integer"/>
    <part name="error" type="xsd:string"/>
    <part name="message" type="xsd:string"/>
    <part name="session" type="xsd:string"/>
    <part name="timeout" type="xsd:integer"/>
    <part name="comment" type="xsd:string"/>
    <part name="file" type="xsd:base64Binary"/>
    <part name="form" type="xsd:base64Binary"/>
</message>
- openotpCheckConfirmRequest
In order to check the status of a confirmation request, a Check method is available. You can check the status of any transactions by providing the session ID returned in the API response for a transaction you are looking for the result.
<message name="openotpCheckConfirmRequest">
    <part name="session" type="xsd:string"/>
</message>
- openotpOfflineConfirmRequest
This method generates a QRCode for an associated transaction and is only available for corporate usage. It is not available for external signatories because for the external signatory, the signature workflow will be initiated on YumiSign and the signatory will have the choice to receive the transaction/signature request by Push notification or by QRCode through YumiSign.
<message name="openotpConfirmQRCodeRequest">
    <part name="username" type="xsd:string"/>
    <part name="domain" type="xsd:string"/>
    <part name="data" type="xsd:string"/>
    <part name="file" type="xsd:base64Binary"/>
    <part name="form" type="xsd:base64Binary"/>
    <part name="scan" type="xsd:boolean"/>
    <part name="async" type="xsd:boolean"/>
    <part name="timeout" type="xsd:integer"/>
    <part name="issuer" type="xsd:string"/>
    <part name="client" type="xsd:string"/>
    <part name="source" type="xsd:string"/>
    <part name="settings" type="xsd:string"/>
    <part name="qrFormat" type="xsd:string"/>
    <part name="qrSizing" type="xsd:integer"/>
    <part name="qrMargin" type="xsd:integer"/>
    <part name="virtual" type="xsd:string"/>
</message>
- openotpConfirmQRCodeResponse
Return related information to previous request.
The response for the previous request is the following
<message name="openotpConfirmQRCodeResponse">
   <part name="code" type="xsd:integer"/>
   <part name="error" type="xsd:string"/>
   <part name="message" type="xsd:string"/>
   <part name="session" type="xsd:string"/>
   <part name="timeout" type="xsd:integer"/>
   <part name="qrImage" type="xsd:base64Binary"/>
</message>
- openotpTouchConfirmRequest
This methods can be used to re-send or convert (Push to QRCOde or QRCode to Push) a request base on the session number :
- openotpTouchConfirmResponse
This provides the response of the previous request.
7.2.2 Transaction Confirmation/Mobile Signature example
7.2.2.1 Request
OpenOTP will build a transaction request based on information provided to the API.
The hash of this transaction will be calculated. A random nonce is generated per transaction and then added to the previous hash. We then have a “Hash Data” containing hashed Nonce and Data.
Found on next section, an example of a transaction and the report generate by the system when transaction has been completed by the end user.
Transaction request built through OpenOTP signature tester:
7.2.2.2 Request prompted on the mobile
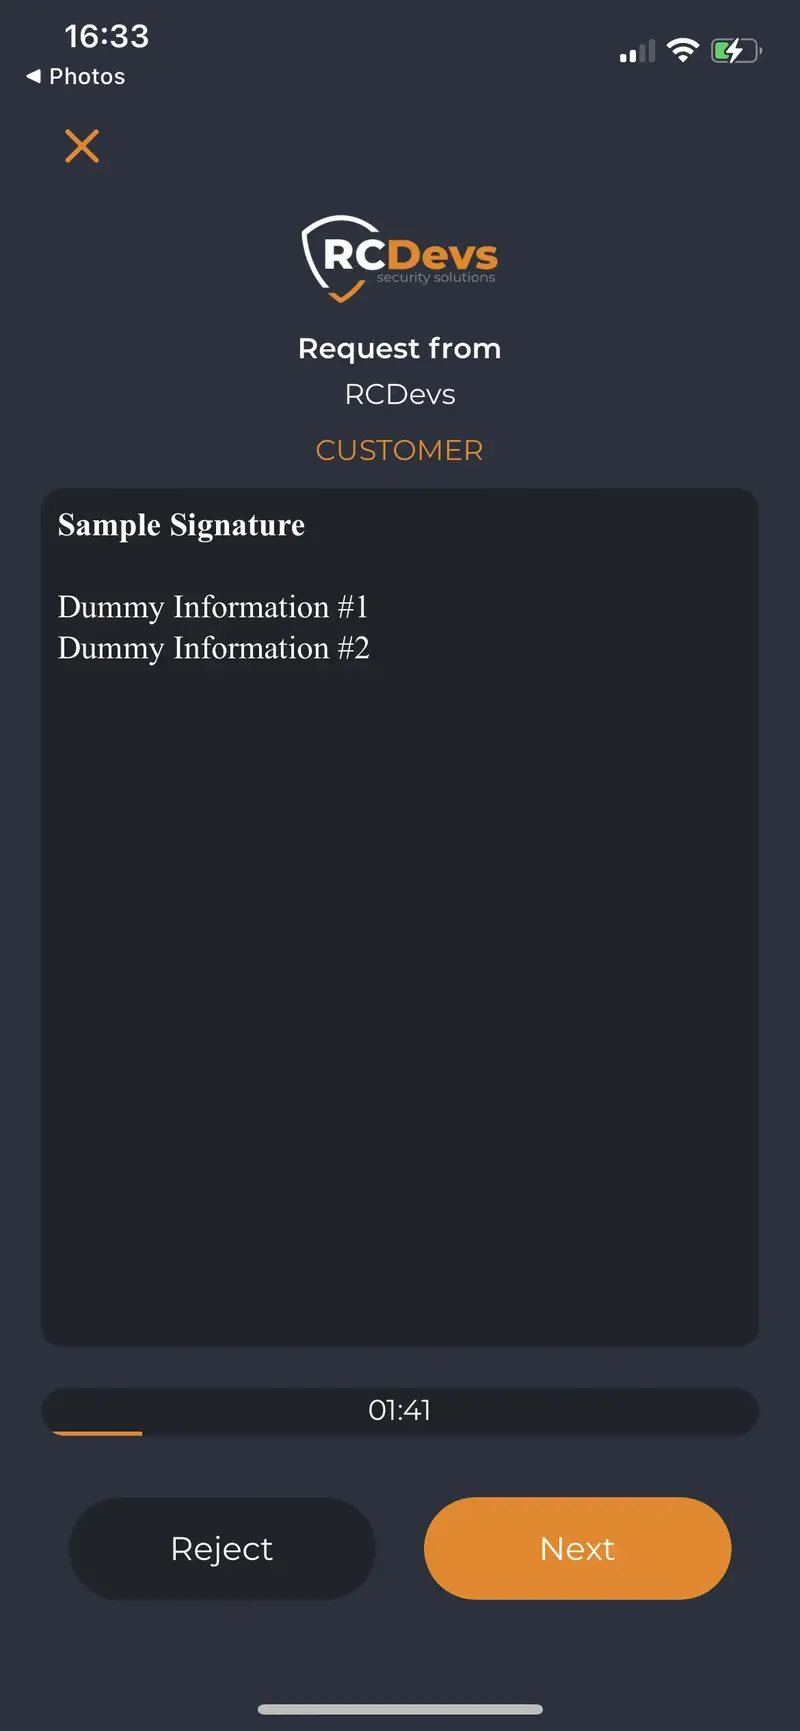
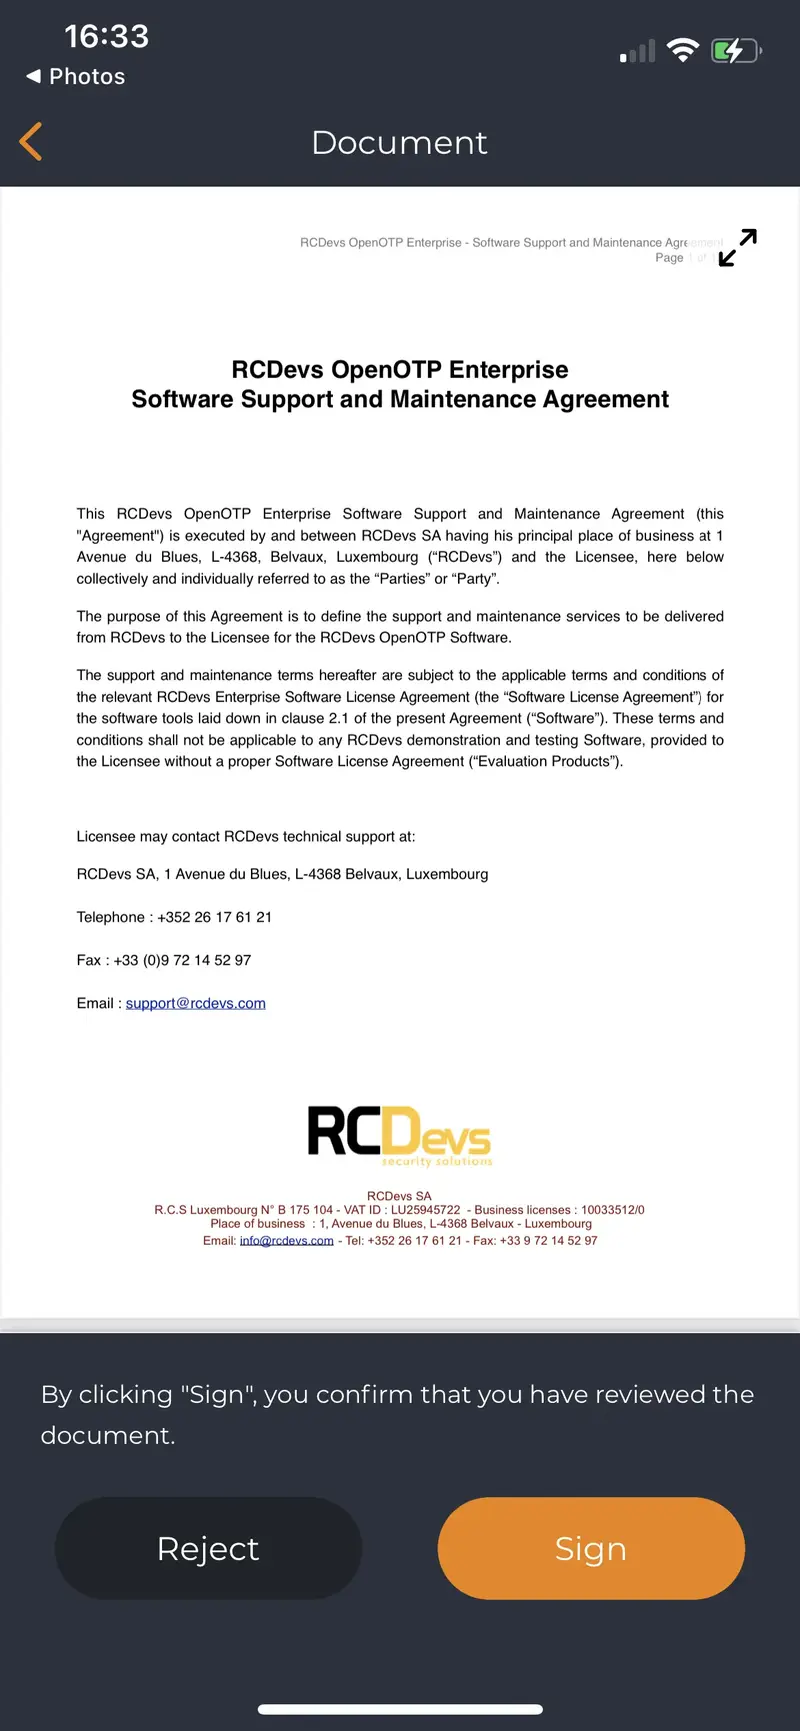
Found below, the details and mobile view of the transaction previously built and started:
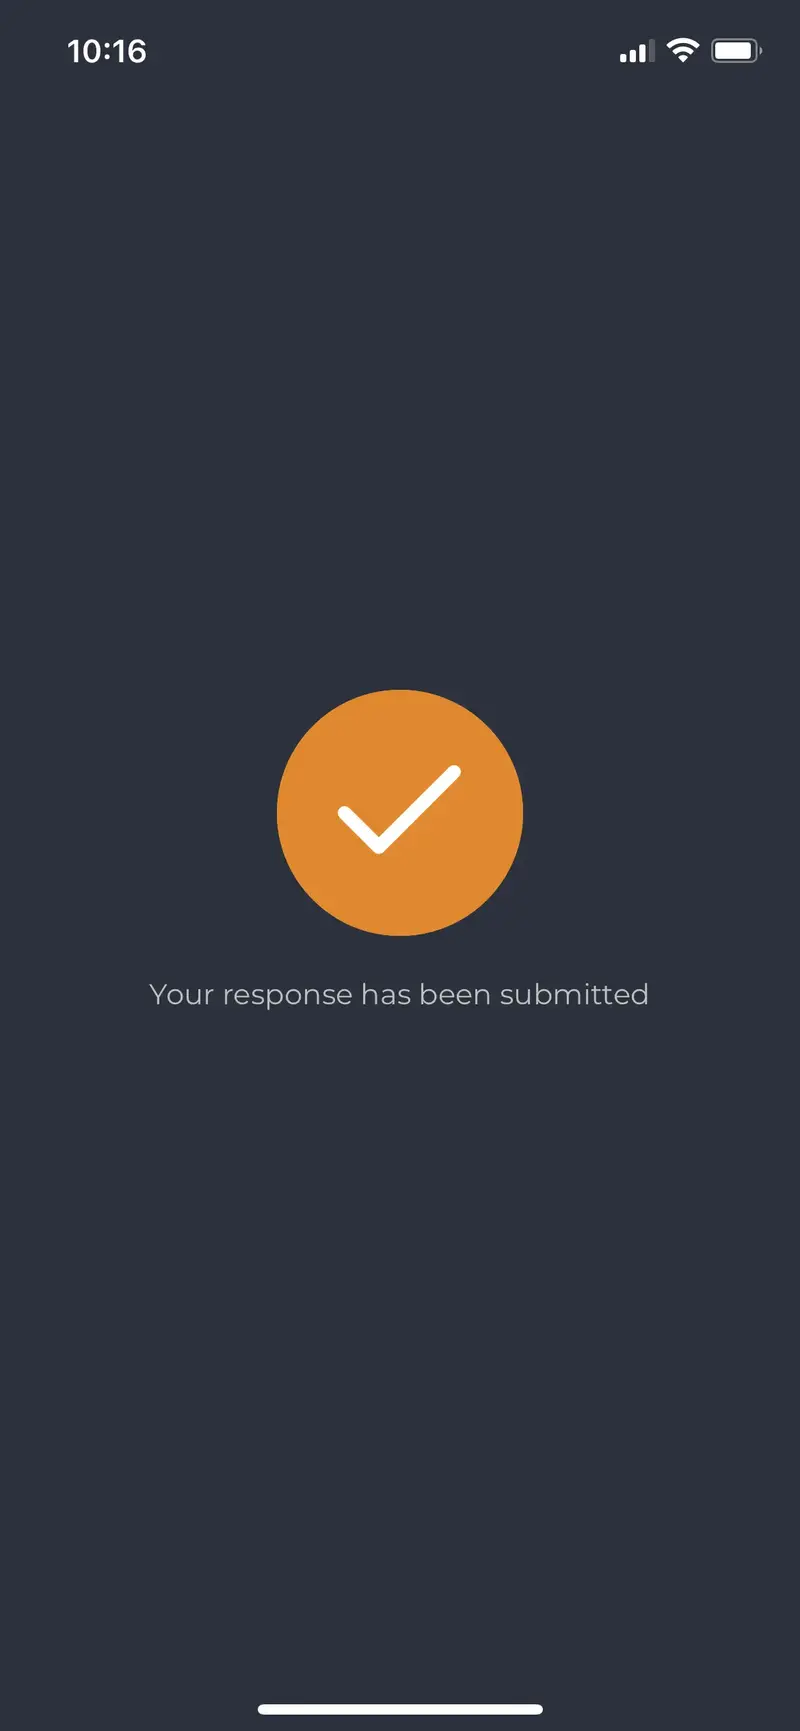
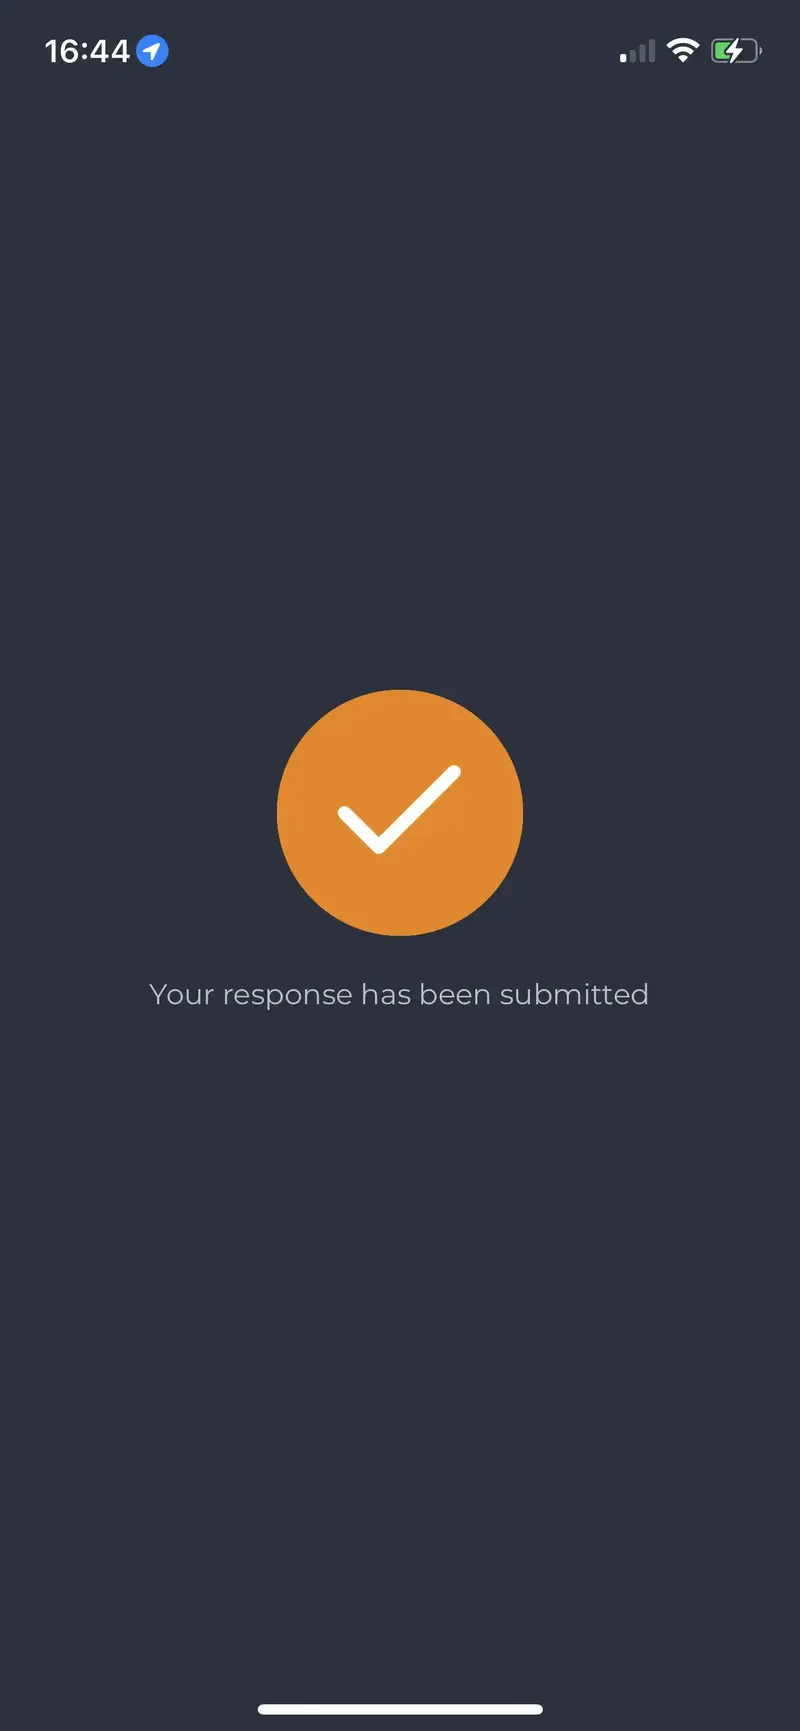
Request approved by the user:
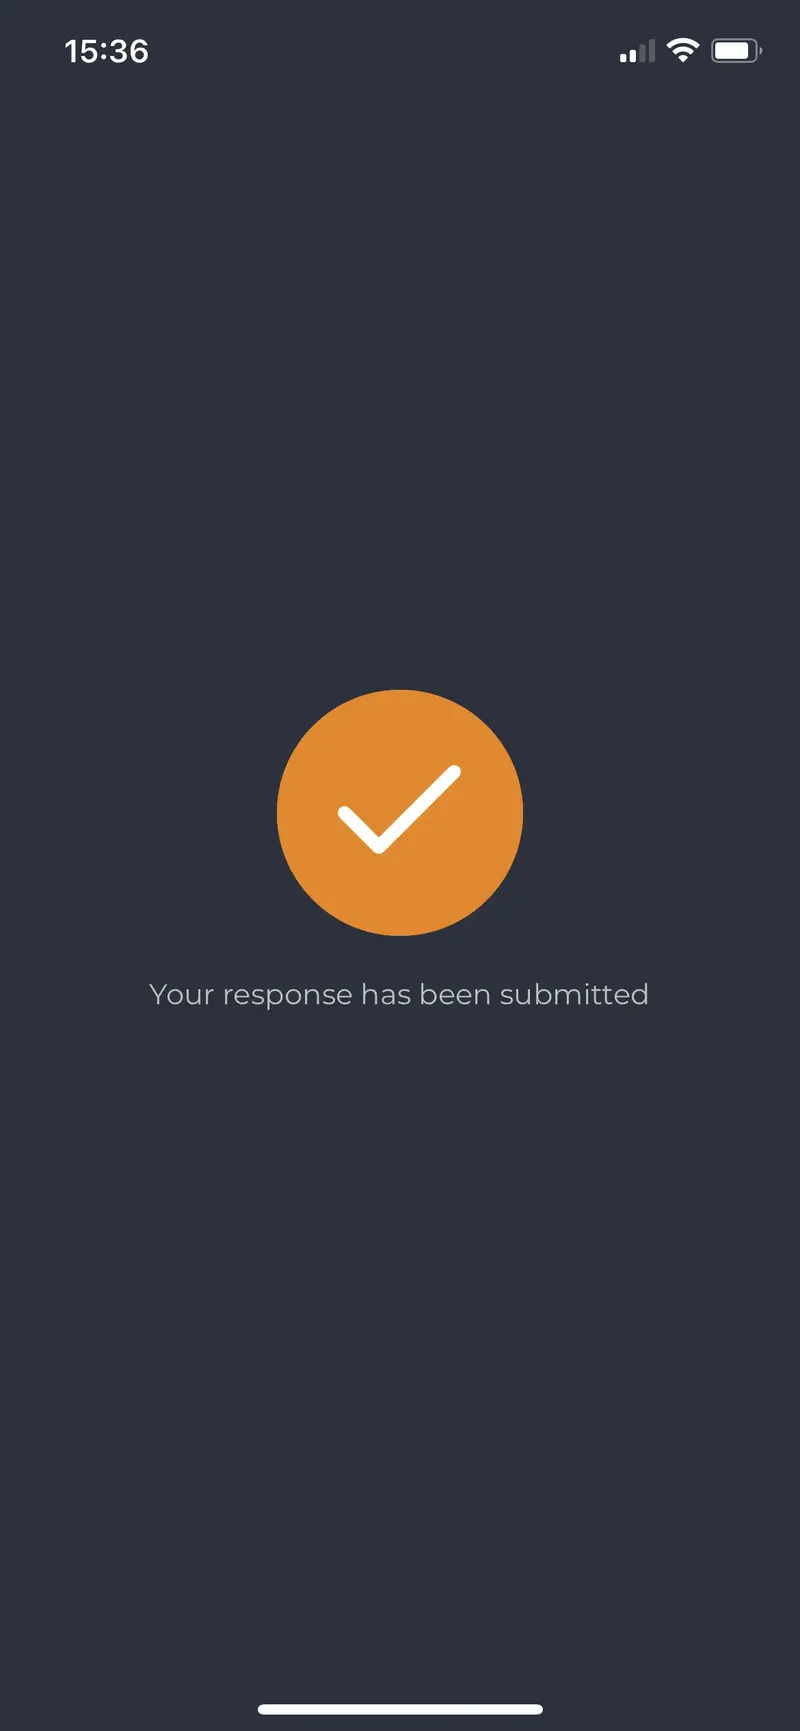
Response has been successfully submitted to the signature backend.
7.2.2.4 Cryptographic report of the transaction
Once the transaction has been completed successfully, a report of that transaction is generated by OpenOTP signature system. Below, the report details:
Secure Transaction

Started: 2022-02-10 16:51:55
Stopped: 2022-02-10 16:52:04
User DN: CN=John Doe,CN=Users,DC=support,DC=rcdevs,DC=com
User IP: 84.12.76.106
Client ID: RCBank
Client IP: 192.168.4.20

Hash Data: d5ec3a4660de1ebc429ed8f7f4e946e706b76cd3 (Nonce + Data)
OTP Token: Token #1 (TOTP)
OTP Algo: SHA1
OTP Key: 1015170774 (CRC32)
OTP Nonce: 46a4feffcad38af3c972521c4c3d0d61995e7d7a
OTP Result: 4660DE1E (OATH)

Transaction Details (Base64)
PGh0bWwgc3R5bGU9ImNvbG9yOndoaXRlIj4NCjxiPlBsZWFzZSwgY29uZmlybSBw
YXltZW50IG9uIFJDRGV2cyBzdG9yZTwvYj48YnI+DQo8YnI+DQpBY2NvdW50OiBM
VVhDRVlYMjM0ODdYWFhYWFhYWFhYWFg8YnI+DQpBbW91bnQ6IDQ5OTkuMzYgRXVy
b3M8YnI+DQo8L2h0bWw+
Details of data report:
Date of transaction start:
Started: 2022-02-10 16:51:55
Date of transaction stop:
Stopped:2022-02-10 16:52:04
Who perform the transaction:
User DN: CN=John Doe,CN=Users,DC=support,DC=rcdevs,DC=com
User IP Address retrieved by a third party system:
User IP: 84.12.76.106
Client system identifier. Allow WebADM administrator to identify which client system perfomed the signature request.
Client ID: RCBank
Client system IP which performed the confirmation request.
Client IP: 192.168.4.20
Concatenation of Nonce and data hashes.
Hash Data: d5ec3a4660de1ebc429ed8f7f4e946e706b76cd3 (Nonce + Data)
Token ID and type of OATH token used for that transaction.
OTP Token: Token #1 (TOTP)
OTP algorithm used for that transaction:
OTP Algo: SHA1
OTP key (CR32) used for the transaction. (Hash of the real key)
OTP Key: 1015170774 (CRC32)
Nonce generated and used in Hash Data. Mandatory to make any transaction unique. Even if the “same” transaction is replayed on the server, the nonce will change.
OTP Nonce: 46a4feffcad38af3c972521c4c3d0d61995e7d7a
Important to verify the transaction afterward.
OTP Result: 4660DE1E (OATH)
Base64 encoded of content retrieved by OpenOTP sent by API client in data parameter.
Transaction Details (Base64)
PGh0bWwgc3R5bGU9ImNvbG9yOndoaXRlIj4NCjxiPlBsZWFzZSwgY29uZmlybSBw
YXltZW50IG9uIFJDRGV2cyBzdG9yZTwvYj48YnI+DQo8YnI+DQpBY2NvdW50OiBM
VVhDRVlYMjM0ODdYWFhYWFhYWFhYWFg8YnI+DQpBbW91bnQ6IDQ5OTkuMzYgRXVy
b3M8YnI+DQo8L2h0bWw+
7.2.2.5 Report validation
The following PHP algorithm allows you to verify the cryptographic report generated by the signature system. To check a report, you need to provide 3 input data:
- the base64_decode value: it refers to the Transaction Details.
- the nonce value: it refers to the OTP Nonce value.
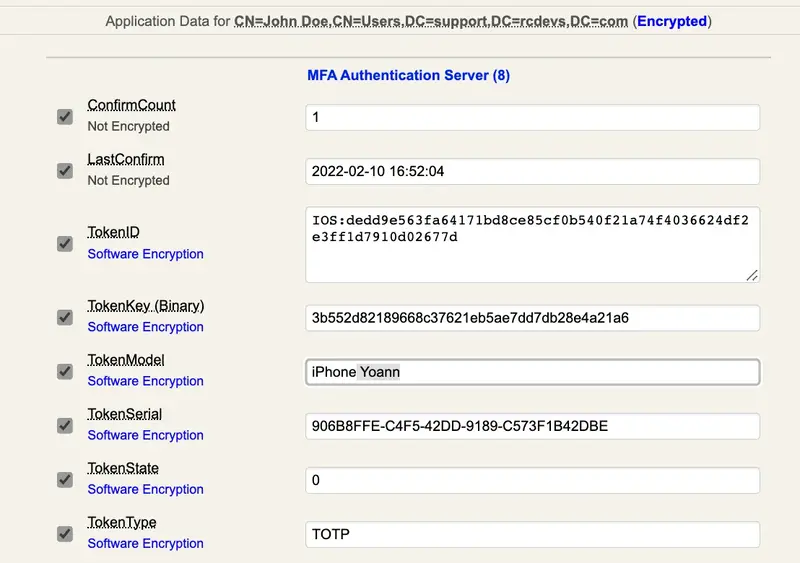
- the key value: it refers to the user TokenKey value available in the WebADM user’s data on the user account:
Based on input data and if everything is correct and has not been altered, the algorithm should return you the OTP Result available in the transaction details. If it returns the same value, then everything is correct.
<?php

$data = base64_decode("PGh0bWwgc3R5bGU9ImNvbG9yOndoaXRlIj4NCjxiPlBsZWFzZSwgY29uZmlybSBw
YXltZW50IG9uIFJDRGV2cyBzdG9yZTwvYj48YnI+DQo8YnI+DQpBY2NvdW50OiBM
VVhDRVlYMjM0ODdYWFhYWFhYWFhYWFg8YnI+DQpBbW91bnQ6IDQ5OTkuMzYgRXVy
b3M8YnI+DQo8L2h0bWw+");
$nonce = hex2bin("46a4feffcad38af3c972521c4c3d0d61995e7d7a");
$key = hex2bin("3b552d82189668c37621eb5ae7dd7db28e4a21a6");

echo push_check_otp($nonce.$data, $key);


function push_check_otp ($xxx, $key) {
    if (strlen($xxx) < 20 || $key == NULL) return -1;

    switch (strlen($key)) {
     case 32:
        $algo = 'SHA256';
        break;
     case 64:
        $algo = 'SHA512';
        break;
     default:
        $algo = 'SHA1';
        break;
    }

    // HMAC
    if (!$hash = hash_hmac($algo, $xxx, $key)) return -1;

    // convert to dec
    $hmac_result = array();
    foreach (str_split($hash, 2) as $hex) $hmac_result[] = hexdec($hex);

    // find offset
    if ($algo == 'SHA1') $offset = $hmac_result[19] & 0xf;
    elseif ($algo == 'SHA256') $offset = $hmac_result[31] & 0xf;
    elseif ($algo == 'SHA512') $offset = $hmac_result[63] & 0xf;
    else return -1;

    // algorithm from RFC
    $otp = ((($hmac_result[$offset] & 0x7f) << 24) |
            (($hmac_result[$offset+1] & 0xff) << 16) |
            (($hmac_result[$offset+2] & 0xff) << 8) |
            ($hmac_result[$offset+3] & 0xff));

    $otp = strval(base_convert($otp, 10, 16));
    $otp = str_pad($otp, 8, '0', STR_PAD_LEFT);
    return $otp;
}
Result returned:
[root@webadm1 ~]# php confirmation_validator.php
4660de1e
[root@webadm1 ~]#
It is a match.
If a document is attached to the request, then the document will be prompted on the user mobile. The final document can optionally be prepared by RCDevs micro-services in order to add handwritten signature, paraphs, timestamp and document sealing.
7.3 Advanced and Qualified Signatures
Advanced and Qualified signatures are using the same API methods described below. The fact that an Advanced signature or a Qualified signature is requested is related to an OpenOTP to a SOAP setting named “Signature Validity scope (SignScope)”. That setting is controllable by the client system sending the signature request to OpenOTP SOAP API or by client policy and can have 3 values:
- Local: Advanced signature with user certificates issued by internal WebADM CA. This should be used for internal signatories.
- Global: Advanced signature with user certificates issued by RCDevs Root CA. This should be used when external users are involved in a signature workflow with Yumisign.
- eIDAS: Qualified signature with external eIDAS signing devices (ex. eID Cards).
The SignScope must be passed in settings parameter of the SOAP request as the below example:
<soapenv:Envelope xmlns:soapenv="http://schemas.xmlsoap.org/soap/envelope/" xmlns:urn="urn:openotp">
<soapenv:Header/>
<soapenv:Body>
<urn:openotpNormalSign>
<username>John</username>
<domain>support</domain>
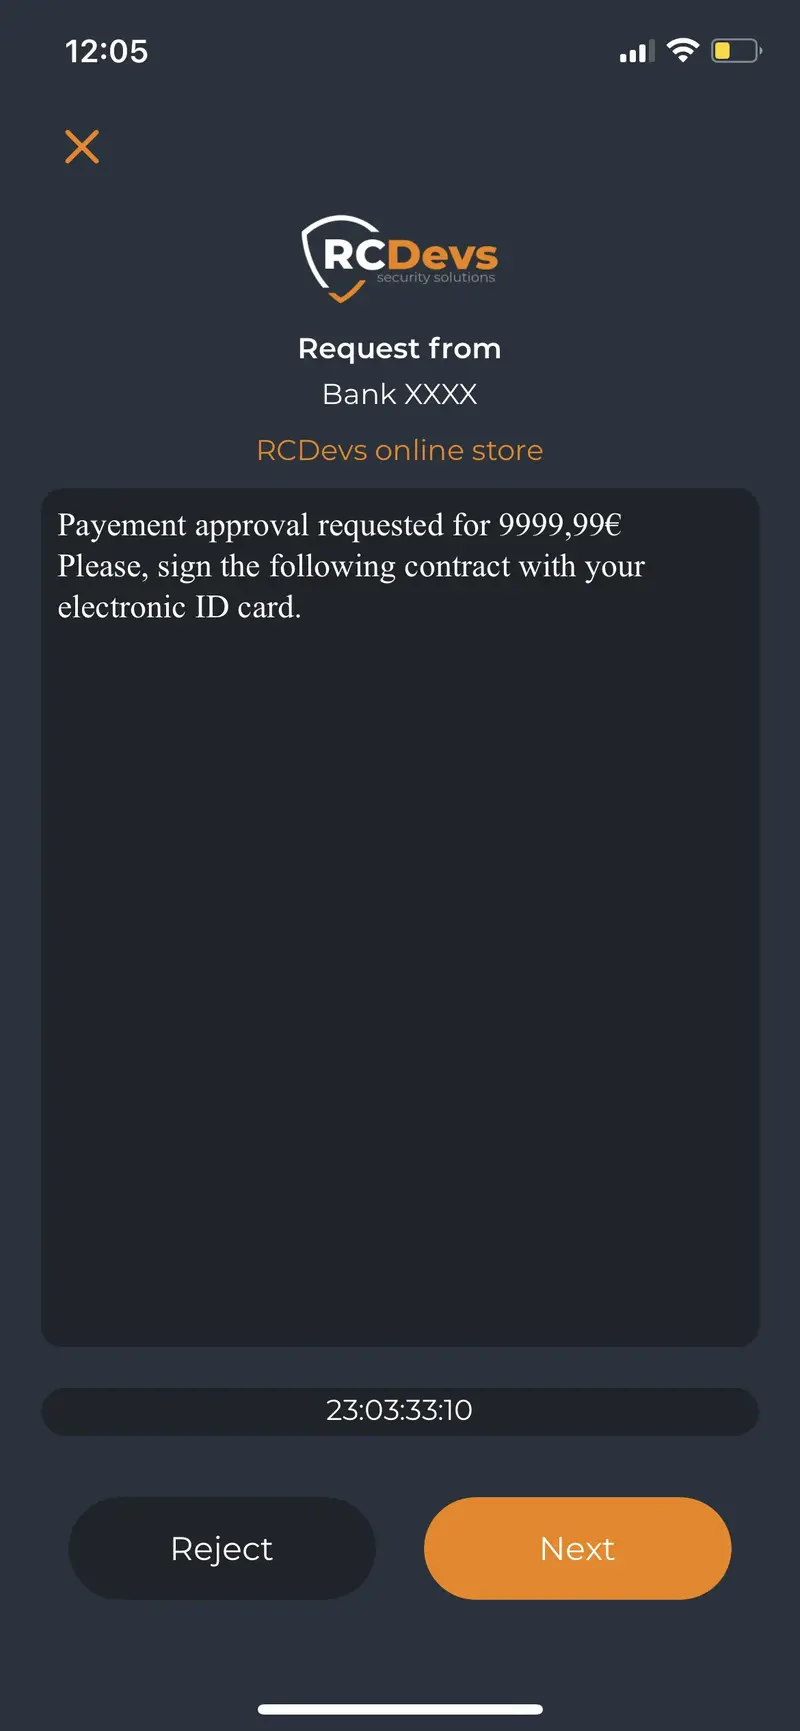
<data>Payement approval requested for 9999,99€
Please, sign the following contract with your electronic ID card.
</data>
<file>XXXXXXXXXXXXXX</file>
<mode>cades</mode>
<async>true</async>
<timeout>2000000</timeout>
<issuer>Bank XXXX</issuer>
<client>RCDevs online store</client>
<source>x.x.x.x</source>
<settings>SignScope=eIDAS</settings>
<virtual></virtual>
<addCert>1</addCert>
</urn:openotpNormalSign>
</soapenv:Body>
</soapenv:Envelope>
This will result to the following logs on the backend :
[2022-05-30 18:42:39] [10.2.3.3:62199] [OpenOTP:CUCX30IC] New openotpNormalSign SOAP request
[2022-05-30 18:42:39] [10.2.3.3:62199] [OpenOTP:CUCX30IC] > Username: john
[2022-05-30 18:42:39] [10.2.3.3:62199] [OpenOTP:CUCX30IC] > Domain: support
[2022-05-30 18:42:39] [10.2.3.3:62199] [OpenOTP:CUCX30IC] > Client ID: RCDevs online store
[2022-05-30 18:42:39] [10.2.3.3:62199] [OpenOTP:CUCX30IC] > Source IP: x.x.x.x

[2022-05-30 18:42:39] [10.2.3.3:62199] [OpenOTP:CUCX30IC] > Settings: SignScope=eIDAS

[2022-05-30 18:42:39] [10.2.3.3:62199] [OpenOTP:CUCX30IC] > Data: 127 Bytes
[2022-05-30 18:42:39] [10.2.3.3:62199] [OpenOTP:CUCX30IC] > File: 1130303 Bytes
[2022-05-30 18:42:39] [10.2.3.3:62199] [OpenOTP:CUCX30IC] > Add Cert: Yes
[2022-05-30 18:42:39] [10.2.3.3:62199] [OpenOTP:CUCX30IC] > Async Mode: Yes
[2022-05-30 18:42:39] [10.2.3.3:62199] [OpenOTP:CUCX30IC] > Mode: CADES
[2022-05-30 18:42:39] [10.2.3.3:62199] [OpenOTP:CUCX30IC] > Timeout: 2000000
[2022-05-30 18:42:39] [10.2.3.3:62199] [OpenOTP:CUCX30IC] > Issuer: Bank XXXX
[2022-05-30 18:42:39] [10.2.3.3:62199] [OpenOTP:CUCX30IC] Enforcing client policy: RCDevs online store (matched client ID)
[2022-05-30 18:42:39] [10.2.3.3:62199] [OpenOTP:CUCX30IC] Registered openotpNormalSign request
[2022-05-30 18:42:39] [10.2.3.3:62199] [OpenOTP:CUCX30IC] Resolved LDAP user: CN=yoann traut,OU=SUPAdmins,DC=support,DC=rcdevs,DC=com (cached)
[2022-05-30 18:42:39] [10.2.3.3:62199] [OpenOTP:CUCX30IC] Resolved LDAP groups: otp,wifi_users (cached)
[2022-05-30 18:42:39] [10.2.3.3:62199] [OpenOTP:CUCX30IC] Resolved source location: US
[2022-05-30 18:42:39] [10.2.3.3:62199] [OpenOTP:CUCX30IC] Found user language: EN
[2022-05-30 18:42:39] [10.2.3.3:62199] [OpenOTP:CUCX30IC] Found 1 user mobiles: +33 658506140
[2022-05-30 18:42:39] [10.2.3.3:62199] [OpenOTP:CUCX30IC] Found 1 user emails: john@xxx.com
[2022-05-30 18:42:39] [10.2.3.3:62199] [OpenOTP:CUCX30IC] Found 26 user settings: MaxTries=3,BlockNotify=MAIL,ExpireNotify=MAIL,GeoFence=Yes,MobileTimeout=30,EnableConfirm=Yes,ChallengeTimeout=90,SelfRegister=Yes,PasswordReset=Yes,HOTPLookAheadWindow=25,TOTPTimeStep=30,TOTPTimeOffsetWindow=120,RejectComment=Yes,FileUpload=Yes,ConfirmOffline=Yes,SignVerify=No,SignScope=Local,CaDESMode=Embedded
[2022-05-30 18:42:39] [10.2.3.3:62199] [OpenOTP:CUCX30IC] Found 5 user data: TokenType,TokenKey,TokenState,TokenID,TokenSerial
[2022-05-30 18:42:39] [10.2.3.3:62199] [OpenOTP:CUCX30IC] Found 1 registered OTP token (TOTP)
[2022-05-30 18:42:39] [10.2.3.3:62199] [OpenOTP:CUCX30IC] Signature session required
[2022-05-30 18:42:39] [10.2.3.3:62199] [OpenOTP:CUCX30IC] Sent push notification for token #1 (session e0AwDDtHqGcFLEn9)
[2022-05-30 18:42:39] [10.2.3.3:62199] [OpenOTP:CUCX30IC] Started Push signature session of ID e0AwDDtHqGcFLEn9 valid for 2000000 seconds
[2022-05-30 18:42:39] [10.2.3.3:62199] [OpenOTP:CUCX30IC] Sent pending session response
7.3.1 Corporate Signatories requests
7.3.1.1 Push Delivery
Allow you to submit a signature request through Push notification.
<message name="openotpNormalSignRequest">
    <part name="username" type="xsd:string"/>
    <part name="domain" type="xsd:string"/>
    <part name="data" type="xsd:string"/>
    <part name="file" type="xsd:base64Binary"/>
    <part name="mode" type="xsd:string"/>
    <part name="async" type="xsd:boolean"/>
    <part name="timeout" type="xsd:integer"/>
    <part name="issuer" type="xsd:string"/>
    <part name="client" type="xsd:string"/>
    <part name="source" type="xsd:string"/>
    <part name="settings" type="xsd:string"/>
    <part name="virtual" type="xsd:string"/>
    <part name="addCert" type="xsd:integer"/>
</message>
7.3.1.2 QRCode delivery
Allow you to submit a signature request through QRCode.
<message name="openotpSignQRCodeRequest">
    <part name="username" type="xsd:string"/>
    <part name="domain" type="xsd:string"/>
    <part name="data" type="xsd:string"/>
    <part name="file" type="xsd:base64Binary"/>
    <part name="mode" type="xsd:string"/>
    <part name="async" type="xsd:boolean"/>
    <part name="timeout" type="xsd:integer"/>
    <part name="issuer" type="xsd:string"/>
    <part name="client" type="xsd:string"/>
    <part name="source" type="xsd:string"/>
    <part name="settings" type="xsd:string"/>
    <part name="qrFormat" type="xsd:string"/>
    <part name="qrSizing" type="xsd:integer"/>
    <part name="qrMargin" type="xsd:integer"/>
    <part name="virtual" type="xsd:string"/>
    <part name="addCert" type="xsd:boolean"/>
</message>
7.3.2 Signature Response
<message name="openotpSignResponse">
    <part name="code" type="xsd:integer"/>
    <part name="error" type="xsd:string"/>
    <part name="message" type="xsd:string"/>
    <part name="session" type="xsd:string"/>
    <part name="timeout" type="xsd:integer"/>
    <part name="comment" type="xsd:string"/>
    <part name="file" type="xsd:base64Binary"/>
    <part name="cert" type="xsd:base64Binary"/>
</message>
7.4 Relaunch transaction/signature invitation
For asynchronous transactions, it is possible to relaunch a transaction/signing request based on the transaction session’s id. This will have the effect of send a new push notification on the user’s phone if you perform this call to resend a push. It also allows you to generate the QRCode related to a specific transaction if you want to fall back to QRCode method once the transaction flow is already started. The QRcode can afterward be provided to the concerned user.
7.4.1 Request
<message name="openotpTouchConfirmRequest">
    <part name="session" type="xsd:string"/>
    <part name="sendPush" type="xsd:boolean"/>
    <part name="qrFormat" type="xsd:string"/>
    <part name="qrSizing" type="xsd:integer"/>
    <part name="qrMargin" type="xsd:integer"/>
</message>
7.4.2 Response
<message name="openotpTouchConfirmResponse">
    <part name="code" type="xsd:integer"/>
    <part name="error" type="xsd:string"/>
    <part name="message" type="xsd:string"/>
    <part name="timeout" type="xsd:integer"/>
    <part name="qrImage" type="xsd:base64Binary"/>
</message>
7.5 Sealing
Allow you to seal a document.
7.5.1 Request
<message name="openotpSealRequest">
    <part name="file" type="xsd:base64Binary"/>
    <part name="mode" type="xsd:string"/>
    <part name="client" type="xsd:string"/>
    <part name="source" type="xsd:string"/>
    <part name="settings" type="xsd:string"/>
</message>
7.5.2 Response
<message name="openotpSealResponse">
    <part name="code" type="xsd:integer"/>
    <part name="error" type="xsd:string"/>
    <part name="message" type="xsd:string"/>
    <part name="file" type="xsd:base64Binary"/>
</message>
7.6 List requests
Allow you to list all pending (confirmation and sign) requests.
7.6.1 Request
<message name="openotpListRequest" />
7.6.2 Response
<message name="openotpListResponse">
    <part name="code" type="xsd:string"/>
    <part name="error" type="xsd:string"/>
    <part name="message" type="xsd:string"/>
    <part name="jsonData" type="tns:string"/>
</message>
8. OpenOTP Signature server configuration
There is only few settings under OpenOTP configuration which allow you to cutomize your signature and confirmation workflow. Found settings and explanation below:
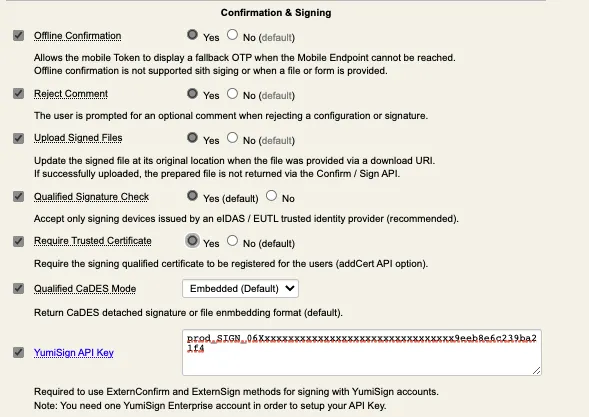
-
Offline confirmation: Only usable for Advanced signatures;
-
Reject comment: Ask the signatory to provide a comment if he rejects the signature request. The reject comment appears on the mobile after clicking Reject button when signature request is received on the mobile.
-
Upload Signed Files: The signed file is uploaded afterward at its original place (share, redis, Couchbase…)
-
Qualified Signature check: The device used to sign must be issued by eIDAS/EUTL trusted identity provider. If not, then the signature is rejected.
-
Require Trusted Certificate: If enabled, the certificate used for signature purpose must be registered on the user account. Enrollment of the user certificate can be requested to the user through the API and is automatically enrolled on the user account if requested. Registered signing certificates are stored on user account in attribut used for WebADM data storage.

-
Qualified CaDES mode: Embedded or Detached. Please, refer to european regulation for more information regarding CaDES modes.
-
YumiSign API Key: Required to involve external signatories.
That is all for OpenOTP Signature settings, most of the settings are controlled by the requests performed to the API.
9. End-users enrollments needed to achieve a signature
In every scenario, a push Token needs to be registered on the user’s account and mobile with OpenOTP Token application.
9.1 Mobile signatures
For mobile signatures, only a Push Token needs to be registered on the user’s account and mobile.
9.2 Advanced Signatures
For Advanced Signatures, a Push Token and a user certificate is involved in the signature process. If the user do not have any certificate registered on his LDAP account and mobile which can be used for this purpose, then during the first Advanced Signature request, he will be prompted on his mobile to create it (user-friendly CSR prompt). The CSR will be sent to your WebADM Rsignd service (PKI service) and signed by the WebADM CA. That certificate will be then sent back to the mobile and registered on the user LDAP account. Document will then be signed by the freshly generated key that never left the mobile and sent back to the OpenOTP/Yumisign backend once signature is completed. Found below, few screenshot of automatic certificate enrollment when no certificate is registered on OpenOTP Token application:
Signature request prompted on the mobile:
Document attached to the request prompted on the mobile:
No certificate registered on the mobile, user is prompted to generate one :
The user must click on Generate button, the CSR is going to be submitted to your WebADM-RSignd service.
Document signed and submitted to the backend.
The certificate is generated for a short period. When certificate is expired it will be automatically renewed. The mobile certificate are stored in the SQL database. You can access the certificates database by accessing WebADM Admin portal > Databases tab > Client, Server and Mobile Certificates menu.
9.3 Qualified Signatures
When qualified signature is requested, the user must use a QSCD device to perform the signature. The user will be invited on his mobile to plug a card reader in order to insert his eID card. RCDevs also provides the possibility to use NFC which do not require any external reader. In that case, the user will be prompted to put his eID card close to the NFC reader of his phone.
See below, screenshots from the mobile application for a qualified signature:
Signature request prompted on the mobile:
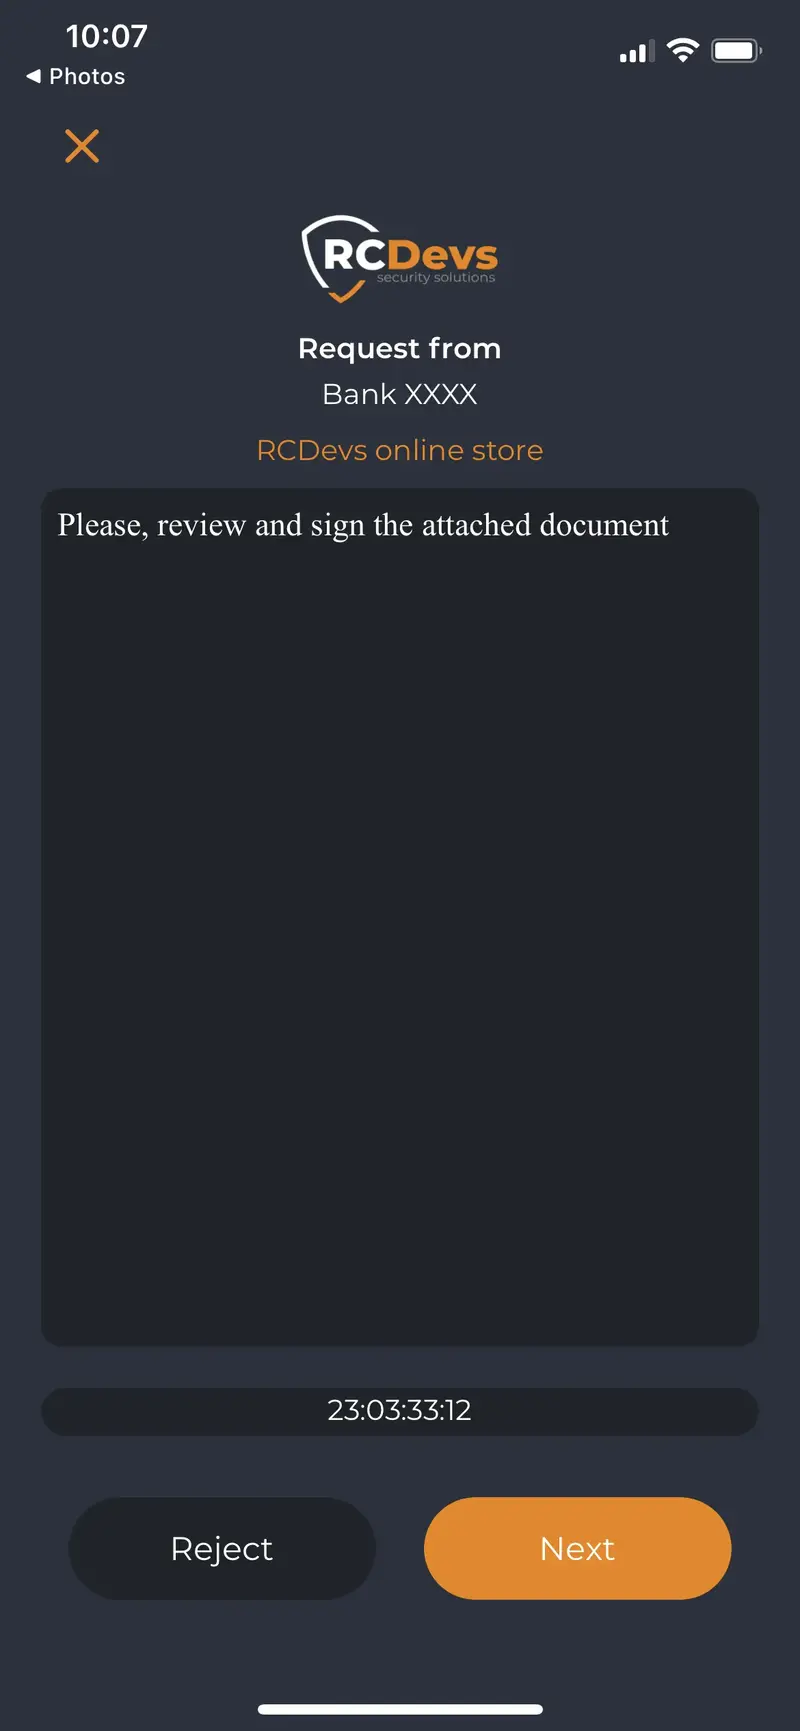
Document attached to the request prompted on the mobile:
User is prompted to plug his eID reader on the phone:
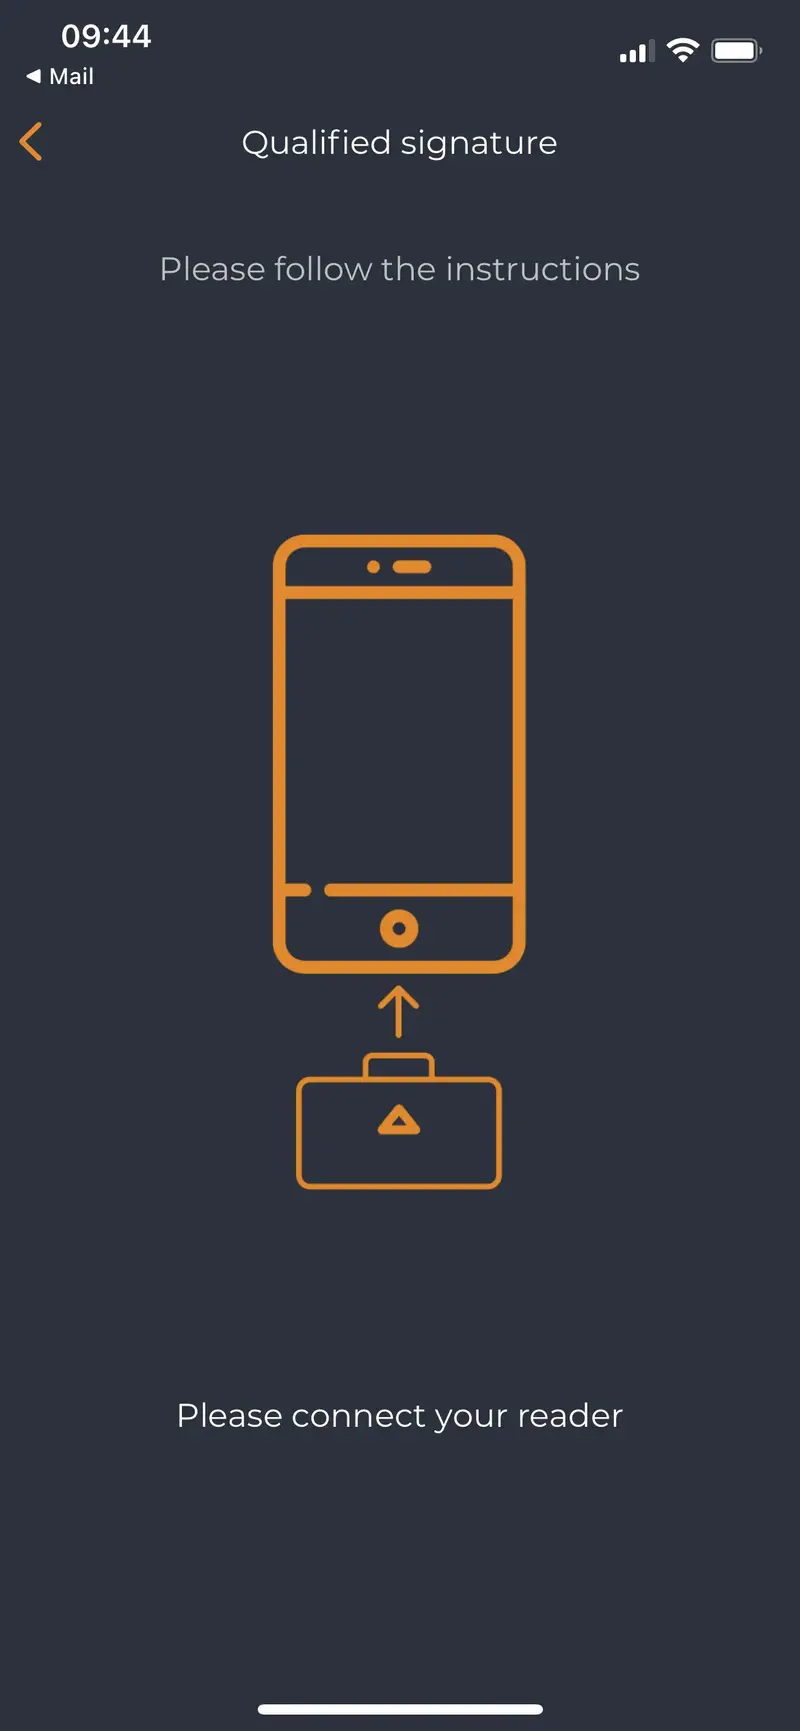
Reader is detected, user is invited to plug is electronic ID card in the reader:
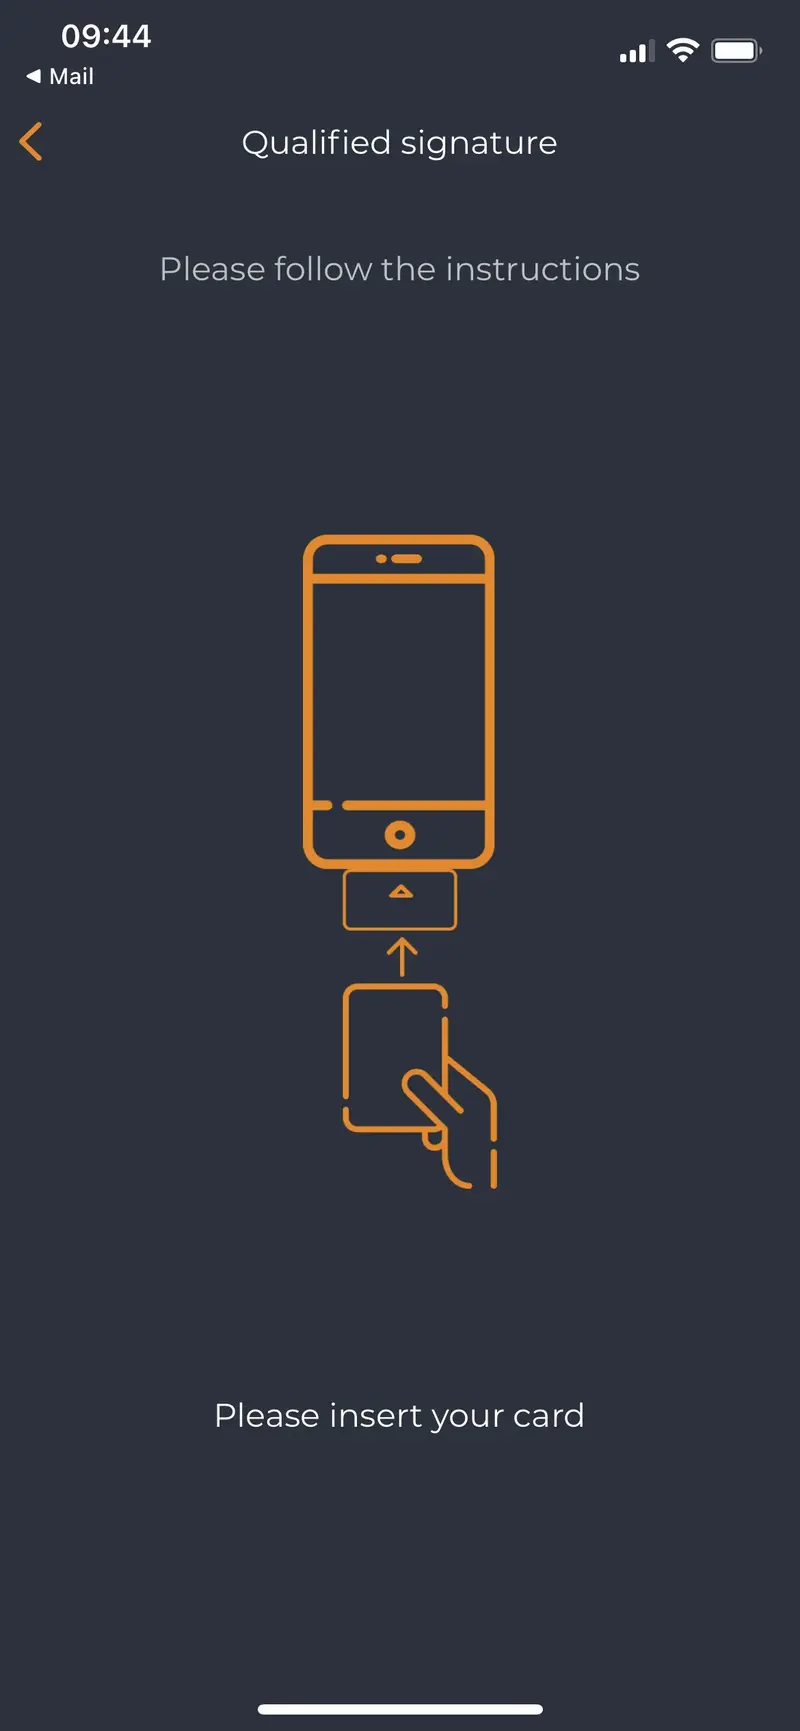
Once the card in inserted, the card is readed by OpenOTP Token application and user is prompted to provide the PIN code protecting the electronic ID card:
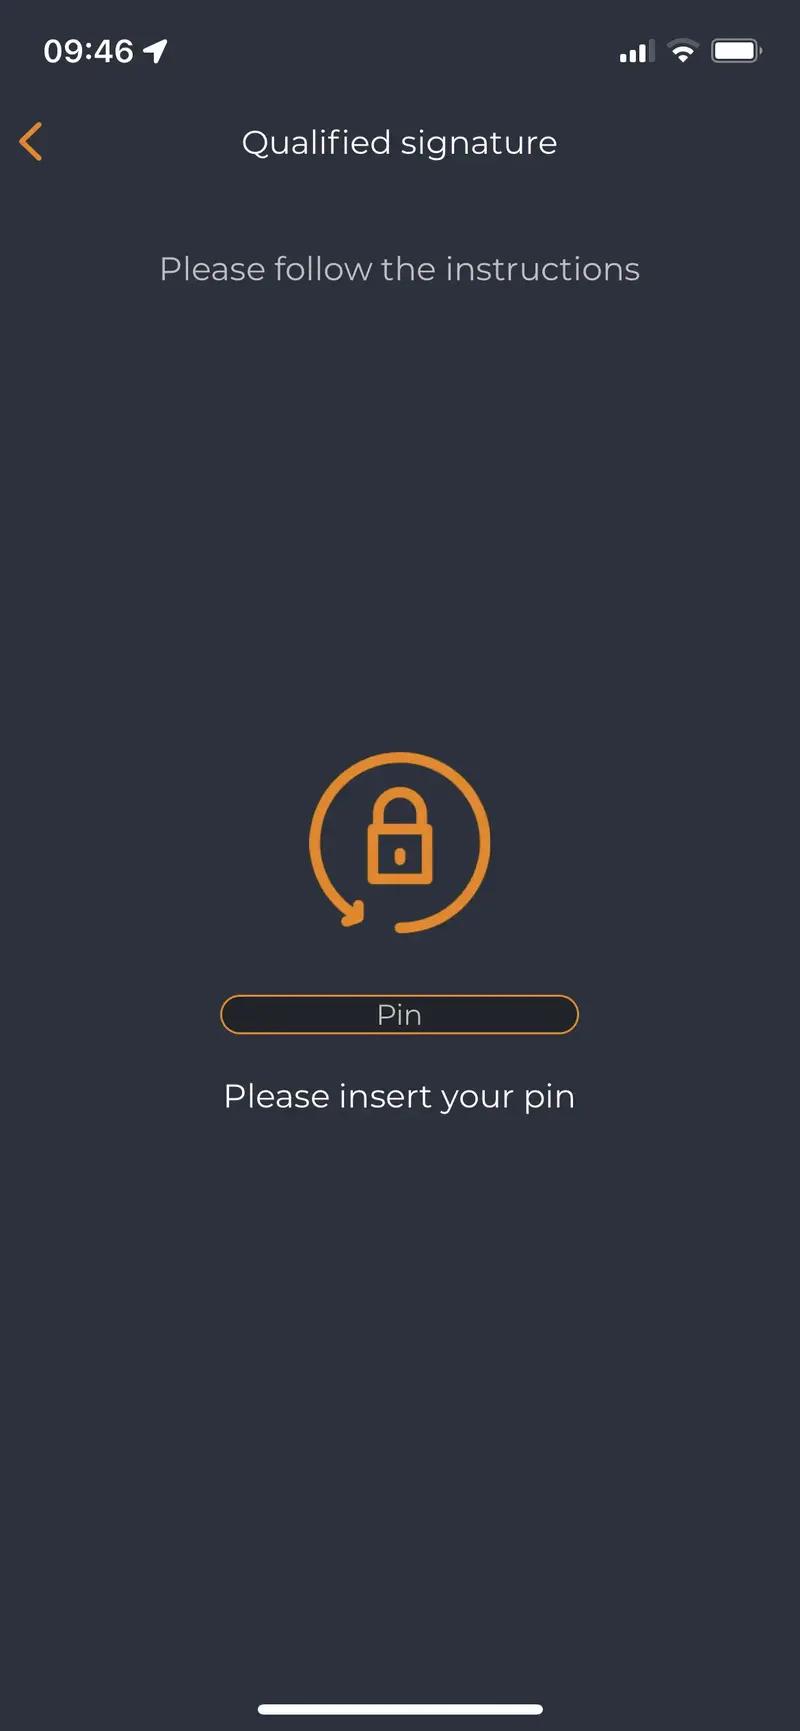
eID card is unlocked, signing certificate is going to be used to sign the document attached to the request. Once the document is signed from the mobile, the document is sent to OpenOTP backend for certificate revocation checks. The QSCD validity is checked by the OpenOTP backend with the revocation methods provided in the certificate used for the signature (OSCP/CRL checks). Once the validity checks has been passed successfully, the document is finalized and ready to be repatriated on the third party system. If the OCSP/CRL checks failed, the signed document is rejected and dropped and the transaction is terminiated on the backend.
Signature submitted to the backend :
The WebADM administrators have the control on which QSCD is allowed. This is done by trusting the CA certificate of the QSCD certificate issuer. From WebADM admin GUI, click Admin tab, then Trusted CA certificates:
If the CA that issued the QSCD certificate is not in the trusted list, then the signature process will fail. RCDevs microservices maintains the public CA certificates list which where each CA certificate can be installed manually or automatically fetched when a CA certificate has expired and needs to be renewed.
10. Integration examples
10.1 Postfix Milter
With that mail integration, RCDevs covers the corporate scenarios described in the part 2 of that documentation. External signatories can not be involved through this integration for security reasons.
User’s accounts must be activated in WebADM and must have a push token registered on their account.
If your mail domain is company.com, then the postfix server that will run the RCDevs scripts to trigger signature workflow can be configured with an MX domain in sign.company.com for example.
The postfix milter will parse the email addresses and the subject of email received on the sign.company.com MX domain. Based on information configured on the postfix server, the postfix Milter will detect the pattern added in the email address (in our example it is sign) which will indicate that it is a signature request and the correct user’s email is without the pattern configured in the milter configuration. Then it sends the signature request and the document to OpenOTP servers.
The workflow of that integration is the following:
Consider a main MX Domain as rcdevs.com. Postfix server is configured with RCDevs Milter with a 2nd MX domain : sign.rcdevs.com
-
Send an email to user@sign.rcdevs.com containing the document that needs to be signed
-
Email arrives at the postfix server,
-
Email parsed by RCDevs postfix milter in order to :
- Identify the sender;
- Identify the recipient;
- Identify the level of signature requested (advanced or qualified);
-
Signature request built (according to information retrieved in the email) by RCDevs postfix scripts and submitted to OpenOTP server.
-
OpenOTP server notifies the user by mail that a signature request is pending and the push request is submitted to the user’s phone. A QRcode of the transaction is attached to the mail sent in order to fetch the pending transaction in case the notification has not been received or is not available anymore on the mobile.
-
The user has now to press the push notification received or scan the QRCode attached to the email with OpenOTP Token application.
-
The signature request is now prompted on the user’s phone through OpenOTP Token.
-
User reviews the document he is going to sign from his mobile and once the document is reviewed, he can sign it.
-
Once the signature is done, the document is prepared by RCDevs microservices. Timestamping and Seals are applied to the document once signature has been done.
-
Once the document is signed, timestamped and sealead, it is sent to the original sender.
10.1.1 Submit a document for signature to yourself
Submit a document for signature to yourself is very simple once this integration is configured. The process is the same as explained before, but instead sending a signature request to someone else, you can just send the request to self@sign.rcdevs.com. Then the postfix milter will parse the mail request, identify the sender of that mail and submit the request to the sender (you).
10.1.2 Submit a document for signature to an internal collaborator
Submit a document for signature to a collaborator is very simple once this integration is configured.
The process is the same as explained before, but instead sending a signature request to yourself, you can just send the request to that user email address by using the sign MX domain configured. For e.g, I want to send a signature request to john.doe@rcdevs.com user. You just have to attach the document to your email and send the email to john.doe@sign.rcdevs.com. The email will be relayed to the postfix milter servers and be parsed. The postfix milter will prepare the signature request and submit it to OpenOTP. The signature workflow is started and sender and recipient(s) are notified. Once the signature process is done by the recipient, the signed document is sent back to the different signatories.
10.1.3 Level of signature requested
The level of the signature requested must be putted in the email subject field. You have the choice between :
- Standard,
- Advanced,
- Qualified
In advanced mode, local scope or global scope is under the control of the WebADM Administrator.
10.2 RCDevs Plugins
RCDevs is developing and providing multiple integration plugins for signature purposes for different products. We started with Nextcloud and Sharepoint. We will continue with Git, CRMs and more… Do not hesitate to share with us the signature plugins you would need in order to make developments move forward and prioritize the ones needed first.
10.2.1 Nextcloud
Nexcloud signature integration is covered by a plugin installable on Nextcloud servers. All Nextcloud servers part of the same cluster must have the plugin installed and configured. Have a look on the Nextcloud Integration documentation
10.2.2 Sharepoint
Plugin under development.
10.2.3 Signature portal
RCDevs is also developing an easy to use end-user web-application portal like other web applications provided by RCDevs and hosted on WebADM backend (selfdesk, selfreg…) but dedicated to elecronic signatures for your end-users. From that portal, corporate users will be able to send signature request to anybody part the company but also to external users involving YumiSign. That portal is not downloadable at the moment as it is under development.
10.3 Custom integrations
Custom integrations offer a very high flexibility in signature workflow and treatments. It is achieved through API calls and API piloting. Integration and configuration can be complex, do not hesitate to contact RCDevs Service team for that kind of integration.
10.4 SelfDesk Integration (Self Signature only)
Self-Service Desk application allow you to submit a document for signature to yourself. Have a look on the following Self-Service Desk documentation for more information.