YubiHSM Configuration (Hardware Security Module)
1. Product Documentation
This document describes how to configure correctly the Yubico YubiHSM and enable it through the WebADM setting, in order to provide both hardware level encryption and random seed generation (the strongest Enterprise security available) in your RCDevs product. WebADM only needs a subset of commands to work with the YubiHSM and the reader should notice that this document is not a guide describing all possible modes of operation provided by the device itself. You should directly contact Yubico for more details and all relevant technical documentation you may need for your own purpose and context of use.
When enabled, hardware security complements the WebADM software encryption transparently; very sensitive user data like Token seeds are encrypted with HSMs whereas other (less sensitive) data are encrypted using WebADM software encryption. This double encryption method has the advantage to provide the same level of efficiency and security as with usual expensive HSM modules.
WebADM HSM implementation supports several hardware modules in failover and load-balanced mode. Moreover, the addition or removal of an HSM module is hot-plug. Like with the software encryption, multiple HSM key handles can be used concurrently and the rollout of a new AES hardware master key is supported.
Note
HSM is supported in WebADM since version 1.3.0.
2. Product Overview
The Yubico YubiHSM provides a low-cost way to move out sensitive information and cryptographic operations away from a vulnerable computer environment without having to invest in expensive dedicated Hardware Security Modules (HSMs). Although the main application area is for securing Yubico OTP authentication operations, several generic cryptographic primitives allow for a wider range of applications. The hardware is a small USB device, entirely powered from the host computer.

No low-level drivers are needed as the YubiHSM implements the USB-CDC serial communication class. The YubiHSM is intended to operate in conjunction with a host application (WebADM in our case).
3. System Requirements
The YubiHSM actually can be configured with any terminal able to use a standard serial protocol. The following list contains all we needed to build the example :
- The HSM itself to configure.
- Linux CentOS 6.5 (default installation) running on a decent machine equipped with at least one USB port available.
- A USB A-A extension cable if access to the USB port is awkward.
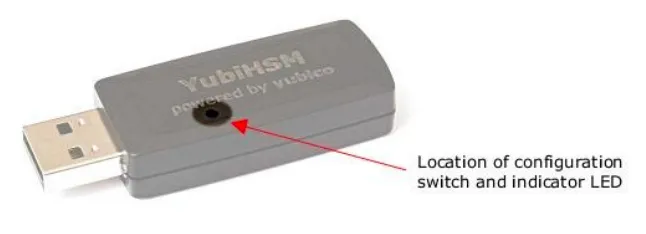
- A needle, a pen with a long tip, a straightened paperclip or equal to reach the switch (a distinct tactile “click” shall be noticed when the switch is found). The USB port must be of course both enabled and visible from the Linux box you’re connected to. If you plan to proceed using a virtualized machine, do not forget to map a virtual USB port to the corresponding physical one on the host running that virtual machine. Please refer to the documentation of the virtualization tool you use if you’re not aware of USB port mapping.
4. Setting up for HSM Mode of Operation
The YubiHSM emulates a USB CDC (Communication Device Class) device, thereby allowing simple integration with serial communication libraries and terminal programs. Both Linux and MacOSX systems provide default configuration and drivers for the CDC class, installing these as communication ports found under /dev/ttyxxx. At power-up, the YubiHSM enters the selected mode of operation if properly configured. By activation of the configuration mode switch, while the device is inserted, this is overridden and configuration mode is entered. While in configuration mode, the YubiHSM can be configured using any terminal program of choice (this document will describe how to proceed using the command screen).
4.1 Entering Configuration Mode
If the YubiHSM is unconfigured, it enters configuration mode automatically without having to activate the switch. Place the YubiHSM on the table and hold the key pressed while inserting the extension cable plug in the host USB port.

Keep the switch pushed while inserting the device into the host USB port and hold it activated until the LED by the switch starts to flash. You can then release the switch. If you successfully entered in configuration mode, the indicator LED should blink regularly (50-50%) at 0.8 Hz. If not, unplug the HSM and try to plug it while maintaining the switch pressed again. This procedure may seem a bit awkward, but remember that it is only performed during device configuration. One aspect of this is that it should be awkward to avoid unintentional configuration mode entry.
4.1.1 Connecting to the HSM using a Terminal
On the Linux system, the YubiHSM is connected to, open a shell with user root or a user having both read and write permissions on nodes attached to CDC serial devices (these nodes are typically created as /dev/ttyACMx and belong to a group named dialout ).
The first thing is to check that the kernel detected the HSM and created a corresponding device node. This can be done executing a simple ls command under the folder /dev/ as shown below.
[hsm@hsm ~]$ ls -l /dev/ttyASM*
crw-rw----. 1 root dialout 166, 0  2 juin  17:16 /dev/ttyACM0
Note
Note that in this example, the device node is /dev/ttyACM0 and is owned by root:dialout, but it can differ slightly according to the Linux distribution you’re currently running. In that case, you might have to adapt a bit all the steps previously described in order to find out the right node assigned to the HSM. A good way to find it is to launch ll -rt /dev/tty* | tail before and after connecting the HSM.
Once you identified which node corresponds to the device, you can connect to the HSM configuration interface using any tool able to display a terminal through a serial port. The command screen is generally provided in all Linux distributions and is even often already available from a default installation. Just use it, passing the device node path in parameter to launch the HSM configuration interface.
[hsm@hsm ~]$ screen /dev/ttyACM0
At this stage, you should see a screen containing nothing excepted a new prompt HSM>, indicating you’re talking to the HSM itself and able to configure it through an appropriate set of commands.
4.1.2 Configuring the HSM
The configuration procedure contains three steps:
- The main flags toggling.
- The password setting for the configuration mode.
- The loading of the keys.
Steps one and two are both described in the following paragraph while the third one will be covered in the next one.
4.1.2.1 Flags and Password Settings
The YubiHSM implements a set of internal commands in order to provide all cryptographic primitives a host could need to achieve its own higher level operations.
The device allows to enable/disable a subset of them to restrict the use in few particular contexts.
At the prompt, type hsm then the key [enter] to launch the toggle bit menu as shown below:
Enabled flags 7fffffff = YSM_AEAD_GENERATE,YSM_BUFFER_AEAD_GENERATE,YSM_RANDOM_AEAD_GENERATE,YSM_AEAD_DECRYPT_CMP,YSM_DB_YUBIKEY_AEAD_STORE,YSM_AEAD_YUBIKEY_OTP_DECODE,YSM_DB_YUBIKEY_OTP_VALIDATE,YSM_AES_ECB_BLOCK_ENCRYPT,YSM_AES_ECB_BLOCK_DECRYPT,YSM_AES_ECB_BLOCK_DECRYPT_CMP,YSM_HMAC_SHA1_GENERATE,YSM_TEMP_KEY_LOAD,YSM_USER_NONCE,YSM_BUFFER_LOAD

a:YSM_AEAD_GENERATE           b:YSM_BUFFER_AEAD_GENERATE
c:YSM_RANDOM_AEAD_GENERATE    d:YSM_AEAD_DECRYPT_CMP
e:YSM_DB_YUBIKEY_AEAD_STORE   f:YSM_AEAD_YUBIKEY_OTP_DECODE
g:YSM_DB_YUBIKEY_OTP_VALIDATE h:YSM_AES_ECB_BLOCK_ENCRYPT
i:YSM_AES_ECB_BLOCK_DECRYPT   j:YSM_AES_ECB_BLOCK_DECRYPT_CMP
k:YSM_HMAC_SHA1_GENERATE      l:YSM_TEMP_KEY_LOAD
m:YSM_USER_NONCE              n:YSM_BUFFER_LOAD
o:FLAG_DEBUG

Toggle bit (space = all, enter = exit)
You can see the list of commands able to be switched on/off, each of them preceded by a letter. The letter corresponds to the key you must press to toggle the flag.
It’s also possible to toggle the whole set of command at once using [space].
Press [space] key in order to disable all instructions (value is 00000000 when all flags are disabled).
Enabled flags 00000000 = None set

a:YSM_AEAD_GENERATE           b:YSM_BUFFER_AEAD_GENERATE
c:YSM_RANDOM_AEAD_GENERATE    d:YSM_AEAD_DECRYPT_CMP
e:YSM_DB_YUBIKEY_AEAD_STORE   f:YSM_AEAD_YUBIKEY_OTP_DECODE
g:YSM_DB_YUBIKEY_OTP_VALIDATE h:YSM_AES_ECB_BLOCK_ENCRYPT
i:YSM_AES_ECB_BLOCK_DECRYPT   j:YSM_AES_ECB_BLOCK_DECRYPT_CMP
k:YSM_HMAC_SHA1_GENERATE      l:YSM_TEMP_KEY_LOAD
m:YSM_USER_NONCE              n:YSM_BUFFER_LOAD
o:FLAG_DEBUG

Toggle bit (space = all, enter = exit)
Once all instruction flags are reset we must enable instructions WebADM requires. Press respectively key [h] and key [i] to enable instructions YSM_AES_ECB_BLOCK_ENCRYPT and YSM_AES_ECB_BLOCK_DECRYPT. At this stage, you must see the flags value set to 00006000.
Enabled flags 00006000 = YSM_AES_ECB_BLOCK_ENCRYPT,YSM_AES_ECB_BLOCK_DECRYPT

a:YSM_AEAD_GENERATE           b:YSM_BUFFER_AEAD_GENERATE
c:YSM_RANDOM_AEAD_GENERATE    d:YSM_AEAD_DECRYPT_CMP
e:YSM_DB_YUBIKEY_AEAD_STORE   f:YSM_AEAD_YUBIKEY_OTP_DECODE
g:YSM_DB_YUBIKEY_OTP_VALIDATE h:YSM_AES_ECB_BLOCK_ENCRYPT
i:YSM_AES_ECB_BLOCK_DECRYPT   j:YSM_AES_ECB_BLOCK_DECRYPT_CMP
k:YSM_HMAC_SHA1_GENERATE      l:YSM_TEMP_KEY_LOAD
m:YSM_USER_NONCE              n:YSM_BUFFER_LOAD
o:FLAG_DEBUG

Toggle bit (space = all, enter = exit)
Now, hit [enter] to leave the toggle flags menu.
Now, an optional configuration password can be set. Such password allows the configuration to be changed after exiting from configuration mode.
Enter g then [enter] to generate a random password.
Enter cfg password (g to generate) g
Once you typed [enter] you should get the generated password. Keep it stored securely for future reference.
The two next settings can be skipped as we won’t need any Yubikey public ids, neither AEADs in our context of use. Just hit [enter] twice, leaving them both untouched.
Enter cfg password (g to generate) 1639186da9279b584ace8ba445dedefa
Enter admin Yubikey public id 001/008 (enter when done)
Enter master key (g to generate)
The final step is to confirm the selected configuration and thereby erase any previously stored data.
Confirm current config being erased (type yes and hit [enter]).
Confirm current config being erased (type yes) yes - wait - done
The prompt is now indicating you some internal changes were applied, but they’re not committed yet. In order to proceed, just type keycommit then hit [enter].
The commitment should occur and the prompt be back to its initial value (HSM>) as illustrated.
HSM (keys changed)> keycommit - Done
HSM>
Both the flags and the password configuration are done at this stage. The next is to load one or more key into the device.
4.1.2.2 Loading Keys Into the Internal Key Store
WebADM performs AES encryption before storing sensitive data into directories and/or databases. The YubiHSM provides, of course, a way to store all the necessary AES keys and reference them later for each operation according to the need.
Typically, keys are stored with a unique id called key handle, allowing a request to reference a particular one at any time.
In practice, only one key is required to use the YubiHSM with WebADM, but several can be stored.
The command to load such key is keyload. Just type it then hit [enter].
HSM> keyload
The interface will then invite you to enter the set of keys as illustrated.
HSM> keyload - Load key data now using flags 00006000. Press ESC to quit
To load a key, just enter manually or paste in (recommended) the key entry, then press [enter]. A key entry always contains two fields separated by a comma. The first one is the key handle and second corresponds to the key itself (data).
Such entry looks like this:
00000005,46e62142239340ce3914bdc65cf087a3273373dab28e0d54e519f4802a17989d
Both fields are encoded in hexadecimal. The key handle must be 4 bytes long (8 hex digits) and the key data 32 bytes long (64 hex digits). In each YubiHSM it is possible to store up to 64 keys. In practice, we strongly recommend you to keep a file containing all your key entries and to copy/paste the keys you need each time you reconfigure one of your YubiHSM. This is undoubtedly the best way to proceed as if you plan to use several YubiHSM, they MUST BE configured EQUAL in order to maintain key consistency. If you do not have such a file already create, note you can generate these 32 bytes long keys in the right format (hexadecimal) using the following command in a shell:
[hsm@hsm ~]$ openssl rand -hex 32
8d410cfdef781ee52d047bddde781f599dc517e7cda169d14168abdfaf9a703d
Here’s an example of a file containing 5 entries:
KHANDLE  KEY
-------  ---
0000000E,8d410cfdef781ee52d047bddde781f599dc517e7cda169d14168abdfaf9a703d
0000000F,e6015d6fa60efb6cee1aef393ed9f750dc99b10da3b03a57f8f509ccc35e5536
00000010,b9938355702a4119fa4ae30b044e716f6c268da8301bece89aa8bf9b89bd7c05
00000011,5ad0f5bf3770ef1f3fc25d3128471582a4e84e846c0bc4340de9fb3fee905413
00000012,571942b0465b931681a2a2fa815feadbf255d6b4c57f045479f84e8943e00b95
You need to copy the key from the file, for example 0000000E,8d410cfdef781ee52d047bddde781f599dc517e7cda169d14168abdfaf9a703d, paste it in the terminal and hit [enter]:
HSM> keyload - Load key data now using flags 00006000. Press ESC to quit
0000000e - stored ok
After all your keys are stored, hit [esc] and you should get something like this:
HSM> keyload - Load key data now using flags 00006000. Press ESC to quit
0000000e - stored ok
0000000f - stored ok
00000010 - stored ok
00000011 - stored ok
00000012 - stored ok
Type keycommit + [enter] :
HSM (keys changed)> keycommit - Done
All is configured now. To quit the YubiHSM interface, just type exit then [enter].
The indicator LED of the YubiHSM is blinking differently (still 50-50% but at 3 Hz), indicating it left the configuration mode, and it’s ready to operate, waiting for commands.
You can now detach the screen from the serial device node ([ctrl]+[a] then [d]).
[hsm@hsm ~]$ screen /dev/ttyACM0
[detached]
5. Configuring WebADM for Hardware Encryption
There are only two settings to be configured in WebADM to enable hardware encryption with your YubiHSM. Edit the WebADM main configuration file /opt/webadm/conf/webadm.conf and configure the following settings:
- hsm_model: WebADM supports hardware security modules. When enabled, the hardware-based security complements the WebADM default software encryption: very sensitive user data like Token secrets or inventory data are transparently encrypted by the connected HSM(s) whereas other (less sensitive) data are encrypted using WebADM software encryption. WebADM currently supports Yubico’s YubiHSM. Several YubiHSM modules can be used concurrently (in failover and load-balanced mode). Moreover, the addition or removal of HSM modules is hot-plug.
- hsm_keyid: Like with the software encryption, multiple HSM key IDs (i.e. key handles) can be used concurrently and the rollout of a new AES hardware master key is supported. You can set several encryption key IDs for automatic key rollout. All the defined keys are used for decrypting data. And the first defined key is used to (re-)encrypt data.
Parameters look like this:
encrypt_hsm  Yes

hsm_model YubiHSM
hsm_keyid 14   # correspond to the key 0000000e in hexadecimal notation
You can also obtain information about your HSM with yubihsm:
[hsm@hsm ~]$ /opt/webadm/bin/yubihsm

YubiHSM Unlocker tool version 1.4.3 (382c1ecf4eb60dae767412e424d001cd87ea947e)

Found 1 HSM device:
1) YubiHSM N° 8D9626675057: UNLOCKED