Active Directory Synchronization Tool
1. Bundle Overview
In that documentation, we are going to explain the Active Directory synchronization tool provided by RCDevs and its usage scope.
SECURITY NOTE
This script is designed to securely synchronize specific account information from Active Directory (AD) to the RCDevs Directory. Only hashed passwords are transferred, ensuring the actual plain-text passwords remain inaccessible. The account information to be synchronized can be adjusted via a dedicated configuration file. All data is transmitted securely using HTTPS to a specialized environment explicitly trusted by the Active Directory server.
The script has been developed by RCDevs for the following use cases:
-
Synchronize an on-premises Active Directory (users and groups) to RCDevs LDAP directory server (on-premises or in the cloud), configured with an existing WebADM instance. The first use case of that script is to sync user and group objects, but also the LDAP structure (Organizational Units, Containers, Organizations, etc.) into RCDevs cloud deployments (shared or dedicated cloud).
-
It provides another alternative for running WebADM with Active Directory in read-only mode. Active Directory data is synced to the RCDevs Directory, and WebADM is, in that scenario, configured to directly work with RCDevs Directory on the AD synced data. In that scenario, you are less dependent on the availability and consistency of the SQL database(s). We will describe in the Active Directory Read-Only documentation how to perform that setup.
Once objects are synced, you can add or remove attributes on the synced LDAP objects. The extra data added afterward and not part of the synchronization configuration will not be overridden by next syncs and will stay persistent.
The user objects can be automatically licensed once synced. AD users’ passwords are also automatically synchronized. The synchronization will maintain the membership of users in groups, even if groups are not synced. In that case, unsynced groups (not existing in WebADM) will be ignored by web services and application flows. If groups need to be used for authentication policies or because you need to have them returned in RADIUS attributes for various purposes, they must be part of the synchronization.
Communications between the script and the WebADM servers are performed through HTTPS. The script uses the WebADM Manager APIs to proceed. The passwords are synced using the Active Directory hashed value (NTHASH). OpenLDAP supports NTHASH encryption with a specific module and is able to validate provided passwords during LDAP bind requests. This script must be executed with Domain Administrator permissions and on an Active Directory Domain Controller, as it uses MS Active Directory APIs.
The script begins by defining two functions: sync_ldap and call_webadm. These functions are used to synchronize LDAP objects and make web API calls to the WebADM server, respectively.
The script loads the configuration settings from the sync.json file, which should be present in the same directory as the script. It checks if the required PowerShell module DSInternals is installed and installs it if necessary.
The script sets up the backup path and retrieves the boot key for the Active Directory database.
It checks for an existing hashes.xml file, loads its content if present, or initializes an empty hash table if it doesn’t exist. The script maintains a hash file from the previous synchronization to check during the next synchronization operations if an object has been modified. In that case, it triggers a resync of that object; otherwise, it does not attempt to sync the object. At the first execution, that file does not exist and will be created. The script prepares some variables, such as the hasher for generating hashes and the basic authentication for WebADM API calls. It retrieves and stores the NTHASH password of users’ accounts from the exported Active Directory database to send it during object synchronization/creation. For better performance, do not remove or edit the hashes.xml file.
The script begins by processing user objects from Active Directory. For each user, it prepares the required attributes to be synchronized with WebADM and calls the sync_ldap function to perform the synchronization. After processing user objects, the script processes group objects in a similar manner.
Next, the script removes objects that were not encountered during the synchronization process. This helps to delete stale objects from WebADM that no longer exist in Active Directory.
Finally, the script removes the temporary backup folder created during the process. The script is location-independent and uses relative paths based on the script execution location, making it more portable and flexible, allowing it to be executed from any location on the file system.
Another file that comes in the bundle is schedule.ps1. It is a PowerShell script that creates a “task scheduler” job to automate the synchronization periodically.
In the following section, we will explain the configuration file named sync.json, which serves as the default configuration file for the synchronization process.
In order to use that script, you must have at least WebADM 2.3.4 version. The script has been tested on an up-to-date Windows Server 2019, in August 2023.
2. Configuration file sync.json
The bundle includes a sync.json file, which serves as a configuration file for mapping attributes retrieved from Active Directory to attributes targeted on OpenLDAP. Since Active Directory schemas can vary for each customer and not all attributes need to be synchronized from AD to OpenLDAP, we have prepared a list of attributes with minimal information required for successful operation. You’re welcome to add additional mappings if necessary, but please ensure that the targeted attribute can accept the syntax used in Active Directory.
Now, let’s describe the different settings. Below is the default file provided by RCDevs:
{
  "webadm": "customerid.openotp.com:443",
  "user": "sync_ldap_admin",
  "password": "password",
  "search_base": "CN=Users,DC=support,DC=rcdevs,DC=com",
  "user_attrs": {
    "cn" : "cn",
    "DisplayName" : "DisplayName",
    "GivenName" : "GivenName",
    "mail" : "mail",
    "SamAccountName" : "uid",
    "sn" : "sn",
    "telephoneNumber" : "mobile",
    "UserPrincipalName" : "uid",
    "userCertificate" : "userCertificate"
  },
  "group_attrs": {
    "cn" : "cn",
    "member" : "member"
  },
  "user_filter" : "enabled -eq $true",
  "group_filter": "*"
}
Here is another example which includes the posix attributes:
{
  "webadm": "customerid.openotp.com:443",
  "user": "sync_ldap_admin",
  "password": "password",
  "search_base": "CN=Users,DC=support,DC=rcdevs,DC=com",
  "user_attrs": {
    "cn" : "cn",
    "DisplayName" : "DisplayName",
    "gidNumber" : "gidNumber",
    "GivenName" : "GivenName",
    "homeDirectory" : "homeDirectory",
    "loginShell" : "loginShell",
    "mail" : "mail",
    "SamAccountName" : "uid",
    "sn" : "sn",
    "telephoneNumber" : "mobile",
    "uidNumber" : "uidNumber",
    "UserPrincipalName" : "uid",
    "userCertificate" : "userCertificate"
  },
  "group_attrs": {
    "cn" : "cn",
    "DisplayName" : "DisplayName",
    "gidNumber" : "gidNumber",
    "member" : "member"
  },
  "user_filter" : "enabled -eq $true",
  "group_filter": "*"
}
webadm: WebADM Server URL or OpenOTP cloud URL. By default, the listening port for WebADM manager API is 443 over TCP. The WebADM server must present a valid certificate trusted in your Active Directory/Microsoft infrastructure. Otherwise, you may have an error regarding SSL/TLS communications which can not be established. The Common Name value in the prompted certificate must match the WebADM URL used in sync.json file.user: This must be a super_admin user of your WebADM or a user allowed to use Manager APIs through an Administration Role. The second option is highly recommended for security reasons. Refer to WebADM Administration guide for more information regardingAdmin Rolesconfiguration. Inb that documentation, we are going to create a dedicatedadministrator roleuse for LDAP synchronization purpose only.password: Password of the account previously defined.search_base: This is a setting that defines which LDAP branch you want to sync on the remote LDAP through WebADM Manager API. In the previous example, DC=support,DC=rcdevs,DC=com is used, which is our LDAP treebase. This means the entire LDAP tree is going to be synced. If I want to target only a specific container/OrganizationalUnit, I can reconfigure it, for example, with: CN=Users,DC=support,DC=rcdevs,DC=com to sync only the content of CN=Users.user_attrs: This setting is an array of attribute mappings. The mapping works as follows: “source attribute” to “destination attribute”.
E.g: “UserPrincipalName” : “uid”
We pick up the UserPrincipalName value of an AD account to sync it in the uid attribute of the corresponding account in OpenLDAP. We are also doing the same with SAMAccountName. OpenLDAP accepts a list of uid values.
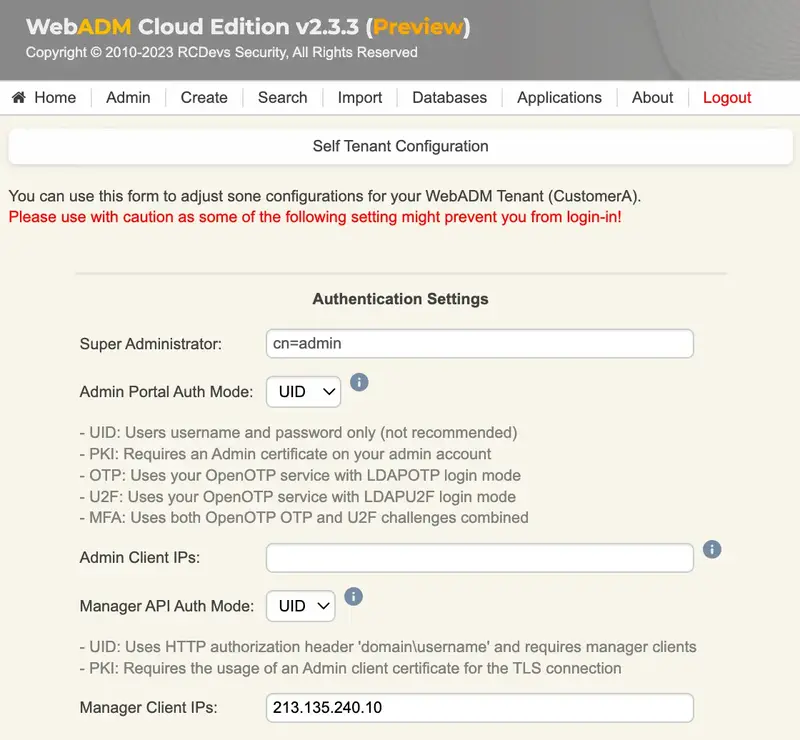
For WebADM to accept requests to its Manager APIs (which is what that script is doing), the IP address from where the requests are coming must be declared in the WebADM configuration:
-
For WebADM in a mutualized cloud environment, typically your public IP needs to be allowed in your tenant configuration. Your tenant configuration is accessible from WebADM GUI > Admin > Tenant Configurations
-
For Dedicated cloud instances, you need to provide and ask the RCDevs team to allow specific IP(s).
-
For on-premise WebADM, the declaration is configurable in webadm.conf and the IP will generally be the IP of the host where that script is executed (AD domain controller IP).
manager_auth UID
manager_clients "192.168.4.2"
If the IP addresses are not fixed, you will need to re-edit the configuration each time the IP changes; otherwise, the synchronization will fail. Please note that for dedicated cloud infrastructure under the control of RCDevs, we do not accept dynamic IPs if you intend to sync your AD to our cloud.
If you are not sure about which IP WebADM will see and needs to be allowed, perform an API call or run the script, check WebADM logs, and the disallowed IP will be shown.
The Manager Login method must be configured to UID in the first versions of that script.
3. WebADM LDAP Option Sets definition
To determine where you will synchronize the data on the remote LDAP, you need to create a WebADM LDAP Option Set from the WebADM GUI > Admin tab > LDAP Option Sets.
By default, the original LDAP tree will be replicated in the Container/OU you are targeting in the Option Set.
If in my sync.json file, I have defined the search_base setting as below :
"search_base": "DC=support,DC=rcdevs,DC=com",
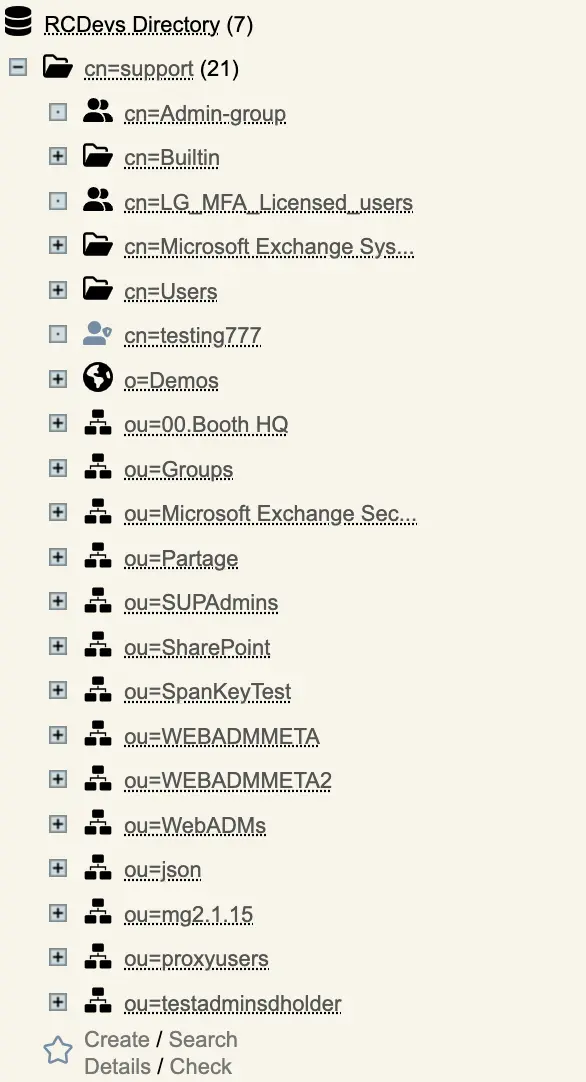
Then, the entire AD tree will be synchronized, and you can control where it is synced through the WebADM LDAP Option Sets configuration. In this documentation, I have created a Container object named “support” located at the root of the remote LDAP tree, and this is where I intend to synchronize my Active Directory data.
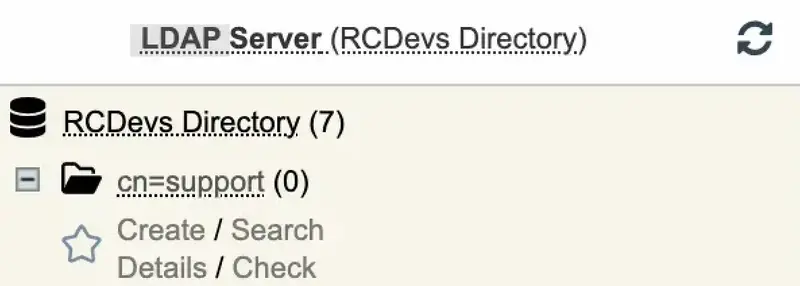
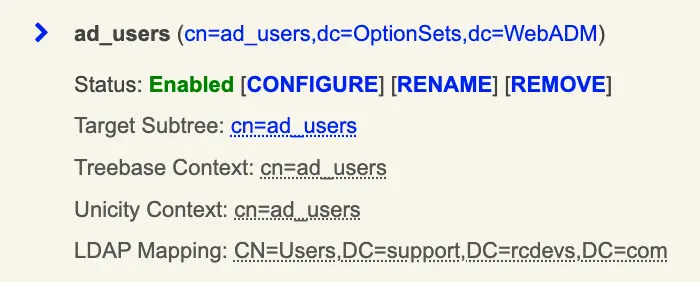
I defined my WebADM Option Sets like below:
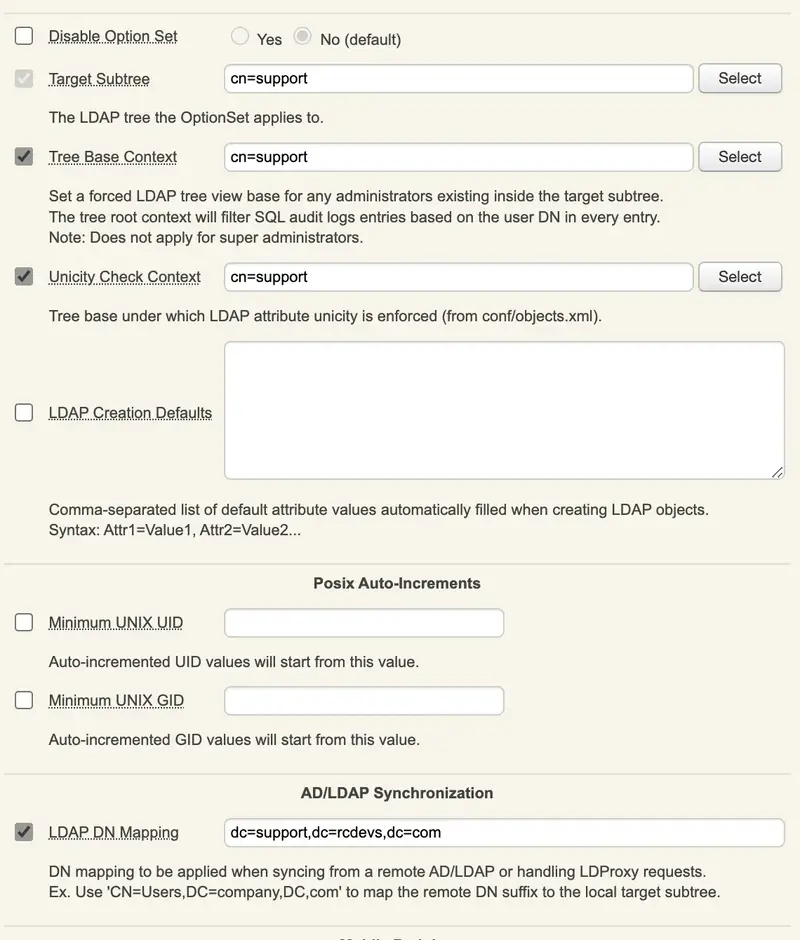
The LDAP DN Mapping setting indicates what should be synced to the Target Subtree. With this configuration, I will be synchronizing my entire Active Directory tree to cn=support.
You can create multiple WebADM LDAP Option Sets if you want to target different parts of the LDAP tree during the synchronization operations.
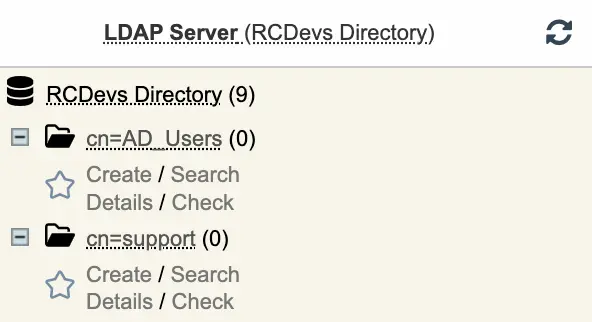
For example, if I want to sync my entire AD to cn=support, except for the CN=Users container of Active Directory, and I want CN=Users to be synced to another location, I can achieve this as follows:
-
Create another container where the
CN=Usersof my AD should be synced. In this example, let’s name itcn=AD_Users:
-
Configure another WebADM LDAP Option Sets as follows:
Note
If in the sync.json file, I configure the search base setting to sync the entire LDAP tree, but in my unique WebADM LDAP Option Set, I configure the LDAP DN Mapping setting to “CN=Users,DC=support,DC=rcdevs,DC=com”, only that specific part of the original LDAP tree will be synced to the targeted container, and the other data will be ignored and not be synced. You must have a matching WebADM LDAP Option Set for all data that is going to be synced!
4. Manager API user creation
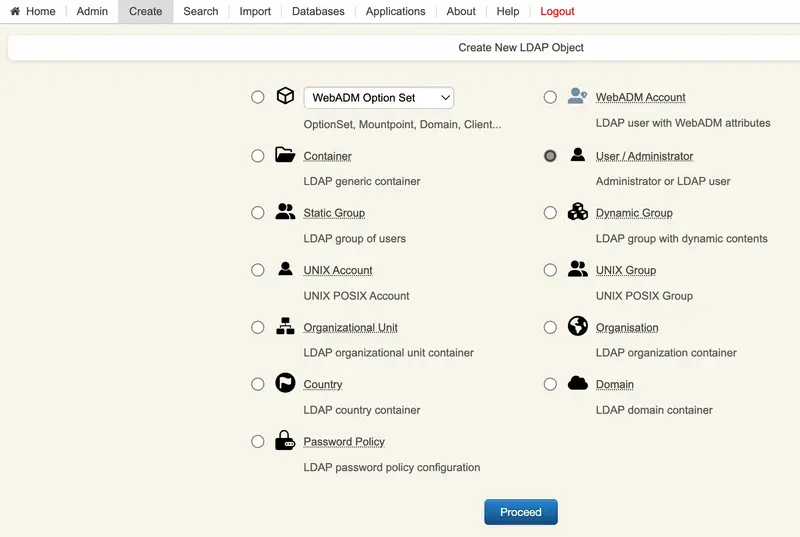
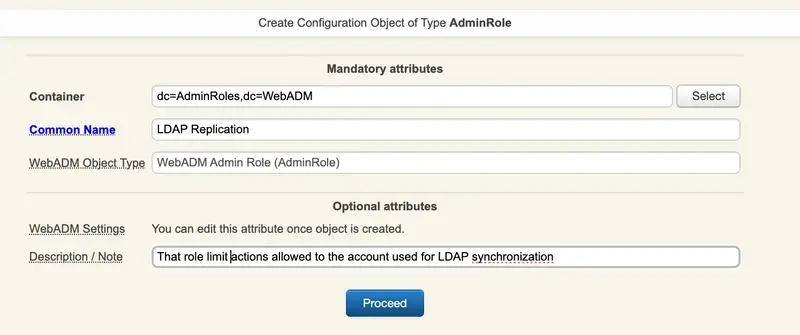
To synchronize LDAP objects from your Active Directory to your WebADM tenant, you need to use and configure an LDAP account for this purpose. This account does not need to have OpenOTP licensing. To create that account, access your WebADM admin portal and click on Create tab. You are then redirected to the Create LDAP object page. Choose the object type User/Administrator and click Proceed:
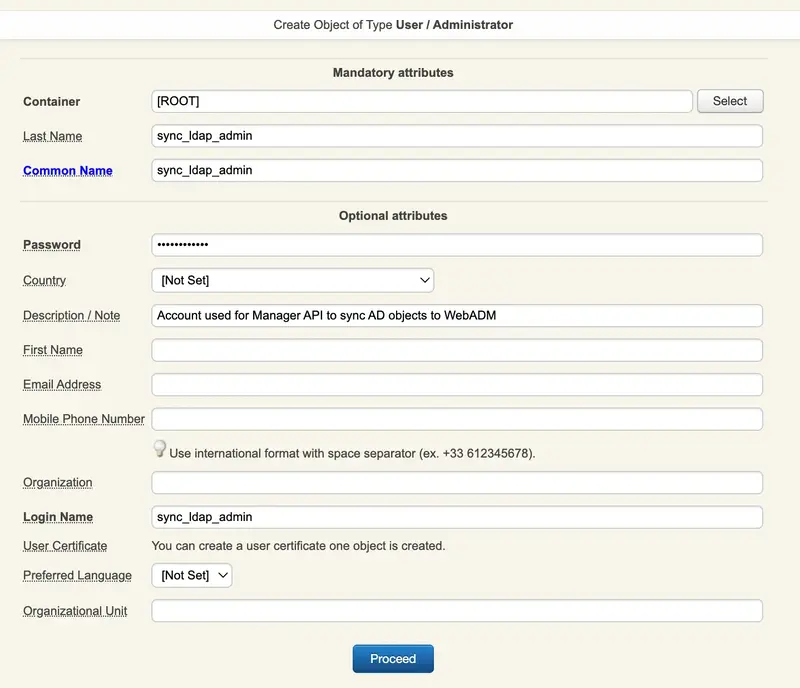
Fulfill the required information and click Proceed.
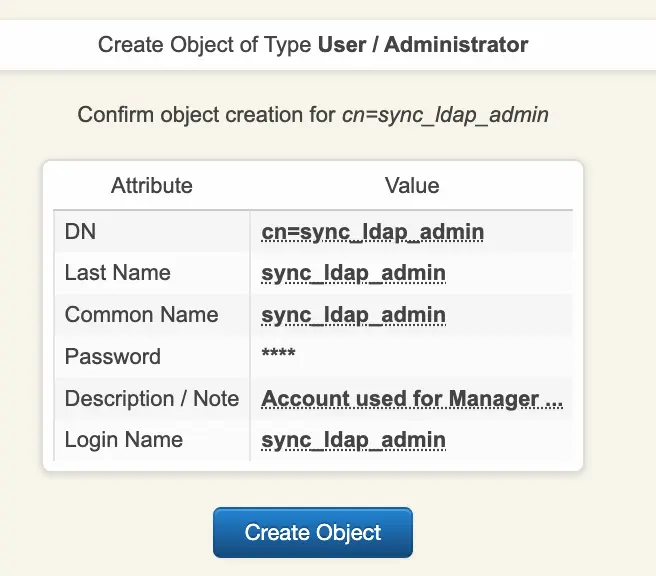
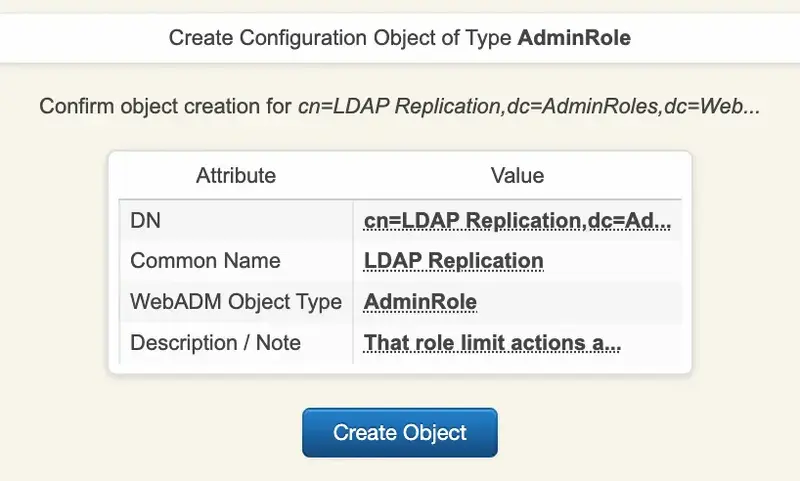
Click Create Object to create the account.
Your account is now ready to be assigned to an Administrator Role.
5. Administrator Role definition
As the account used for the LDAP synchronization is using WebADM Manager APIs, it is a best practice to dedicate an account to these operations and limit what that account is able to do by assigning him an Administrator Role.
To create an Administrator Role, login on WebADM Admin GUI, click Admin tab then click Administrator Roles. On the Registered Admin Roles page, click Add AdminRole button.
Click now on Proceed button, then Create Object.
Once the object is created, you can continue with its configuration.
The configuration of this AdminRole is very simple. The Allowed Interfaces should be limited to Manager which will limit the access to that account to the WebADM Manager API only and the Management Rights should be limited to Synchronize LDAP Objects. At the end your AdminRole should look like below:
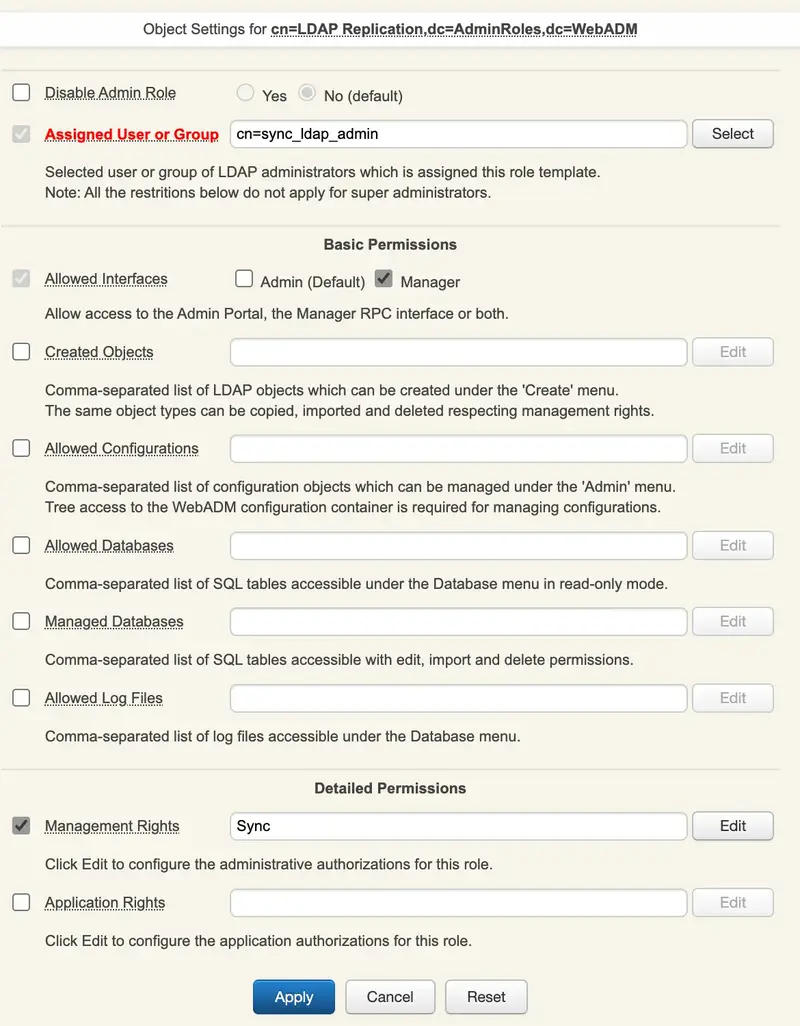
You can then click Apply to save your configuration.
6. Script execution
It is now time to execute the script. For the first execution, we advise you to run the script through PowerShell ISE started as an administrator. Next, in PowerShell ISE, open the sync.ps1 file.
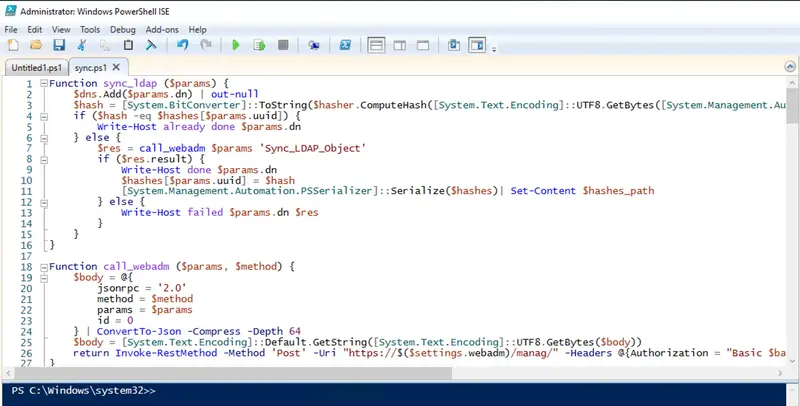
Then click the Play button. At the beginning of the execution, the script will prompt you to install the DSInternal module. You must install it so that the script can later access the AD backup that will be taken.
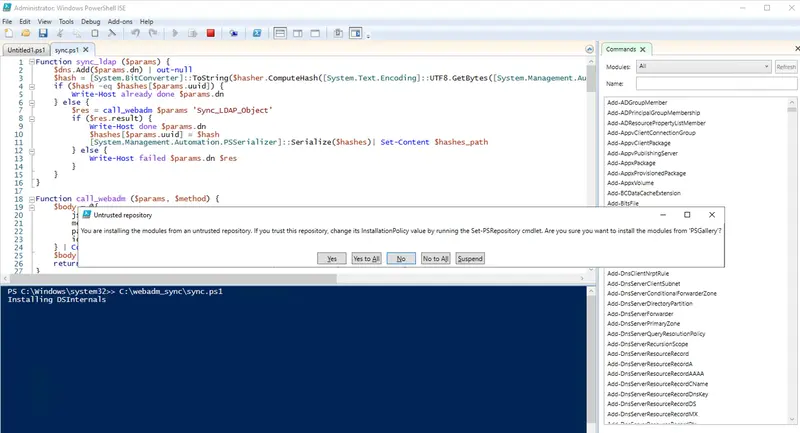
Once the module has been installed, the execution continues… :
PS C:\Windows\system32>> C:\webadm_sync\sync.ps1
Installing DSInternals
Taking backup of AD database, please wait, that operation will takes few minutes...
C:\Windows\system32\ntdsutil.exe: activate instance ntds
Active instance set to "ntds".
C:\Windows\system32\ntdsutil.exe: ifm
ifm: create full C:\webadm_sync/bkp
Creating snapshot...
Snapshot set {eefe9345-9629-48bd-83ac-123458d70275} generated successfully.
Snapshot {a3cec8e6-6513-4804-a1b3-03a0171fac63} mounted as C:\$SNAP_202308041203_VOLUMEC$\
Snapshot {a3cec8e6-6513-4804-a1b3-03a0171fac63} is already mounted.
Initiating DEFRAGMENTATION mode...
     Source Database: C:\$SNAP_202308041203_VOLUMEC$\Windows\NTDS\ntds.dit
     Target Database: C:\webadm_sync\bkp\Active Directory\ntds.dit

                  Defragmentation  Status (omplete)

          0    10   20   30   40   50   60   70   80   90  100
          |----|----|----|----|----|----|----|----|----|----|
          ...................................................

Copying registry files...
Copying C:\webadm_sync\bkp\registry\SYSTEM
Copying C:\webadm_sync\bkp\registry\SECURITY
Snapshot {a3cec8e6-6513-4804-a1b3-03a0171fac63} unmounted.
IFM media created successfully in C:\webadm_sync\bkp
ifm: quit
C:\Windows\system32\ntdsutil.exe: quit
So far, so good. Now it will begin by syncing users and then proceed to sync groups:
done CN=webmasters,CN=Users,DC=support,DC=rcdevs,DC=com
done CN=userÈ,CN=Users,DC=support,DC=rcdevs,DC=com
done CN=testover testover,CN=Users,DC=support,DC=rcdevs,DC=com
done CN=testover t. testover,CN=Users,DC=support,DC=rcdevs,DC=com
done CN=svc iis,CN=Users,DC=support,DC=rcdevs,DC=com
done CN=hotmail.com$,CN=Users,DC=support,DC=rcdevs,DC=com
done CN=proxy-webadm,CN=Users,DC=support,DC=rcdevs,DC=com
done CN=scriptusers7,CN=Users,DC=support,DC=rcdevs,DC=com
done CN=sshd,CN=Users,DC=support,DC=rcdevs,DC=com
done CN=testupn,CN=Users,DC=support,DC=rcdevs,DC=com
done CN=ff ff. ff,CN=Users,DC=support,DC=rcdevs,DC=com
done CN=Administrator,CN=Users,DC=support,DC=rcdevs,DC=com
done CN=testmigrationauto,CN=Users,DC=support,DC=rcdevs,DC=com
done CN=svc_pki,CN=Users,DC=support,DC=rcdevs,DC=com
done CN=scriptusers60,CN=Users,DC=support,DC=rcdevs,DC=com
done CN=scriptusers61,CN=Users,DC=support,DC=rcdevs,DC=com
done CN=scriptusers62,CN=Users,DC=support,DC=rcdevs,DC=com
done CN=scriptusers63,CN=Users,DC=support,DC=rcdevs,DC=com
done CN=scriptusers64,CN=Users,DC=support,DC=rcdevs,DC=com
done CN=scriptusers65,CN=Users,DC=support,DC=rcdevs,DC=com
done CN=scriptusers66,CN=Users,DC=support,DC=rcdevs,DC=com
done CN=test44,CN=Users,DC=support,DC=rcdevs,DC=com
done CN=scriptusers67,CN=Users,DC=support,DC=rcdevs,DC=com
done CN=scriptusers68,CN=Users,DC=support,DC=rcdevs,DC=com
done CN=scriptusers69,CN=Users,DC=support,DC=rcdevs,DC=com
done CN=scriptusers70,CN=Users,DC=support,DC=rcdevs,DC=com
done CN=scriptusers71,CN=Users,DC=support,DC=rcdevs,DC=com
done CN=scriptusers72,CN=Users,DC=support,DC=rcdevs,DC=com
done CN=scriptusers73,CN=Users,DC=support,DC=rcdevs,DC=com
done CN=scriptusers74,CN=Users,DC=support,DC=rcdevs,DC=com
done CN=scriptusers75,CN=Users,DC=support,DC=rcdevs,DC=com
done CN=scriptusers76,CN=Users,DC=support,DC=rcdevs,DC=com
done CN=scriptusers77,CN=Users,DC=support,DC=rcdevs,DC=com

### User objects sync done

done CN=rootgroup22221111,CN=Users,DC=support,DC=rcdevs,DC=com
done CN=WebAdmins,CN=Users,DC=support,DC=rcdevs,DC=com
done CN=DnsAdmins,CN=Users,DC=support,DC=rcdevs,DC=com
done CN=DnsUpdateProxy,CN=Users,DC=support,DC=rcdevs,DC=com
done CN=Domain Computers,CN=Users,DC=support,DC=rcdevs,DC=com
done CN=Cert Publishers,CN=Users,DC=support,DC=rcdevs,DC=com
done CN=Domain Users,CN=Users,DC=support,DC=rcdevs,DC=com
done CN=Domain Guests,CN=Users,DC=support,DC=rcdevs,DC=com
done CN=RAS and IAS Servers,CN=Users,DC=support,DC=rcdevs,DC=com
done CN=Domain Admins,CN=Users,DC=support,DC=rcdevs,DC=com
done CN=Schema Admins,CN=Users,DC=support,DC=rcdevs,DC=com
done CN=Enterprise Admins,CN=Users,DC=support,DC=rcdevs,DC=com
done CN=Group Policy Creator Owners,CN=Users,DC=support,DC=rcdevs,DC=com
done CN=Allowed RODC Password Replication Group,CN=Users,DC=support,DC=rcdevs,DC=com
done CN=Denied RODC Password Replication Group,CN=Users,DC=support,DC=rcdevs,DC=com
done CN=Enterprise Read-only Domain Controllers,CN=Users,DC=support,DC=rcdevs,DC=com
done CN=Cloneable Domain Controllers,CN=Users,DC=support,DC=rcdevs,DC=com
done CN=Protected Users,CN=Users,DC=support,DC=rcdevs,DC=com
done CN=ff-grp,CN=Users,DC=support,DC=rcdevs,DC=com
done CN=Enterprise Key Admins,CN=Users,DC=support,DC=rcdevs,DC=com
done CN=Key Admins,CN=Users,DC=support,DC=rcdevs,DC=com
done CN=Read-only Domain Controllers,CN=Users,DC=support,DC=rcdevs,DC=com
done CN=Domain Controllers,CN=Users,DC=support,DC=rcdevs,DC=com
done CN=rgherthe,CN=Users,DC=support,DC=rcdevs,DC=com
done CN=sudores8,CN=Users,DC=support,DC=rcdevs,DC=com
done CN=rgreg,CN=Users,DC=support,DC=rcdevs,DC=com
remove expired objects done

### Group objects sync done
You can now verify that the objects have been successfully created. If the script exited correctly, the bck/ folder created during the execution has been removed, and the hashes.xml file has been created.
From the WebADM GUI, you can review the synchronization logs to see what has been successfully created and why certain objects have not been created:
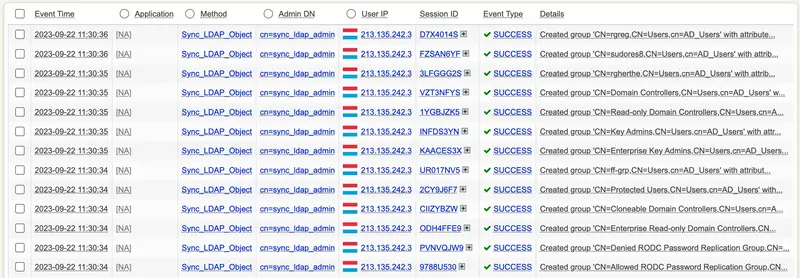

And if you click on the (+) beside the Session ID, you will access the details explaining why the operation failed:
[2023-08-04 12:04:48] [192.168.3.209:65304] [Manag:YRMLPT6M] Login success for 'cn=sync_ldap_admin' (cached other admin)
[2023-08-04 12:04:48] [192.168.3.209:65304] [Manag:YRMLPT6M] Called method Sync_LDAP_Object
[2023-08-04 12:04:48] [192.168.3.209:65304] [Manag:YRMLPT6M] Could not modify LDAP object 'CN=admin,OU=Users,OU=BENOIT,OU=WebADMs,cn=support' (attribute 'homeDirectory' not allowed)
Here, the issue is arising because the objects at their original location have the homeDirectory attribute, which is part of the posixAccount objectClass in Active Directory. However, there is a difference with the posixAccount objectClass in OpenLDAP. In AD, no attributes are mandatory, while for OpenLDAP, certain attributes are mandatory. The difference is illustrated below:
Active Directory
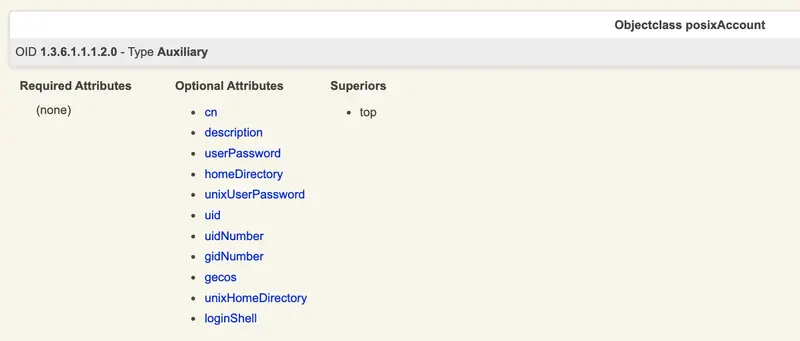
OpenLDAP
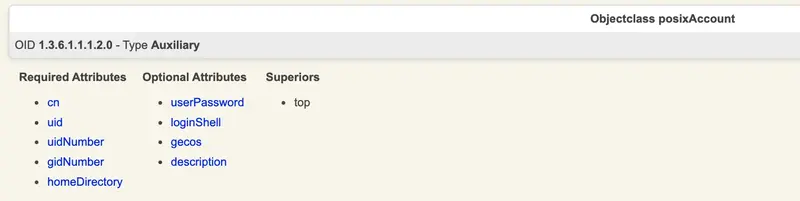
So, to accurately sync that object, I need to match the OpenLDAP schema requirements and then populate the missing required attributes for that object in Active Directory. Alternatively, I can remove the posixAccount attributes from the JSON configuration file.
Once I have confirmed that the synchronization is working correctly and made any necessary adjustments, I can proceed to automate the replication tasks using the Microsoft Task Scheduler.
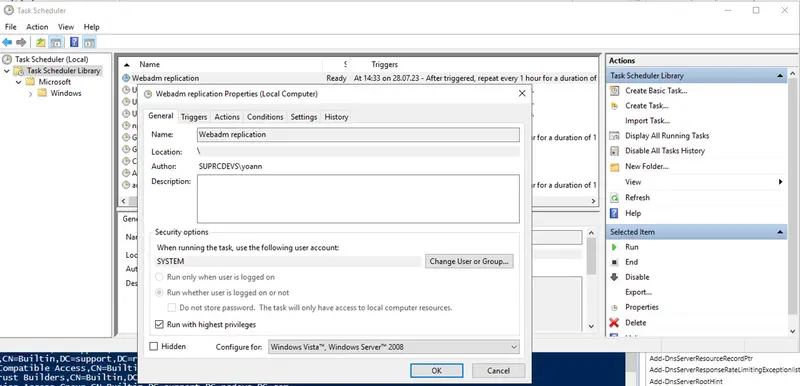
7. Task scheduler
Now, let’s proceed with configuring the job for automatic execution. To facilitate this process, RCDevs includes a script in the downloaded bundle that creates the scheduled job. This script is named schedule.ps1 and contains the following code:
$sync_path = Split-Path -Parent $MyInvocation.MyCommand.Definition
$now = Get-Date
$Trigger = New-ScheduledTaskTrigger -At $now -RepetitionInterval ([TimeSpan]::FromMinutes(60)) -Once
$User = "NT AUTHORITY\SYSTEM"
$Action = New-ScheduledTaskAction -Execute "PowerShell.exe" -Argument "$($sync_path)/sync.ps1"
Register-ScheduledTask -TaskName "Webadm replication" -Trigger $Trigger -User $User -Action $Action -RunLevel Highest -Force
-
$sync_path= Split-Path -Parent $MyInvocation.MyCommand.Definition- This line retrieves the directory path of the currently executing PowerShell script and stores it in the variable $sync_path.
-
$now= Get-Date- This line gets the current date and time and stores it in the variable $now.
-
$Trigger= New-ScheduledTaskTrigger -At $now -RepetitionInterval ([TimeSpan]::FromMinutes($hour)) -Once- This line creates a new task trigger using the current time ($now) as the start time. The task is set to repeat at intervals of 60 minutes. The -Once parameter indicates that the task should initially run only once.
-
$User= “NT AUTHORITY\SYSTEM”- This line sets the variable $User to the value “NT AUTHORITY\SYSTEM”, specifying that the task should run under the built-in SYSTEM user account with high privileges.
-
$Action= New-ScheduledTaskAction -Execute “PowerShell.exe” -Argument “$($sync_path)/sync.ps1”- This line creates a new scheduled task action that specifies the executable (PowerShell.exe) to run and provides the argument (-Argument) as the path to the PowerShell script “sync.ps1” located in the directory determined by $sync_path.
Register-ScheduledTask -TaskName "Webadm replication" -Trigger $Trigger -User $User -Action $Action -RunLevel Highest -Force
- This line registers the scheduled task with the following settings:
- Task name: “Webadm replication”
- Triggers: The trigger defined earlier ($Trigger) to start at the current time and repeat every hour.
- User: The SYSTEM user account ($User) is specified to run the task.
- Action: The PowerShell script action ($Action) is specified to be executed.
- RunLevel: The task is set to run with the highest privilege level (-RunLevel Highest).
- Force: The -Force parameter ensures that the task is registered even if it already exists.
For the Task Scheduler to function properly, it’s important that the folder containing the scripts and configuration files remains in its original location on the file system once it has been added to the Task Scheduler. To add the job to the scheduler, follow these steps:
- Open Powershell in RunAsAdministrator,
- Navigate to the folder location,
- Execute the script with the following command:
PS C:\> cd C:\webadm_sync\
PS C:\webadm_sync> ls


    Directory: C:\webadm_sync


Mode                LastWriteTime         Length Name
----                -------------         ------ ----
-a----         04.08.23     14:32          56000 hashes.xml
-a----         04.08.23     14:25            464 schedule.ps1
-a----         03.08.23     13:28            702 sync.json
-a----         04.08.23     11:56           6268 sync.ps1


PS C:\webadm_sync> .\schedule.ps1
This will initiate the process of adding the scheduled job to the Task Scheduler.
The job is now added to in the Task Scheduler Library:
You can run it manually to see if the job is well executed and then check the History tab of the job to see logs regarding that job.
