SpanKey is a centralized SSH key server for OpenSSH, which stores and maintains SSH public keys in a centralized LDAP directory (i.e. Active Directory). With SpanKey there is no need to distribute, manually expire or maintain the public keys on the servers. Instead, the SpanKey agent is deployed on the servers and is responsible for providing the users’ public keys on-demand. The SpanKey server provides per-host access control with “server tagging”, LDAP access groups, centralized management from the RCDevs WebADM console, shared accounts, privileged users (master keys), recovery keys… It supports public key expiration with automated workflows for SSH key renewal (via Self-Services). For information on SpanKey, please visit RCDevs Website. Additionally, you can also enable Multi-factor authentications (LDAP password, OTP and U2F validation are supported) after the SSH key validation process. The SSH key can also be configured on a smartcard device.
For this recipe, you will need to have WebADM installed and configured. Please, refer to WebADM Installation Guide and WebADM Manual before installing SpanKey server.
SpanKey server should be installed on the WebADM server.
2. Packages Installation
Note - System Requirements
Version 2.2.0 of SpanKey Client is designed to run on Linux x86_64 with GLIBC >= 2.12. The package itself is almost but not fully standalone. To run it properly you must have the package ’net-tools’ already installed on your machine, at least one WebADM server in version >=1.7.6 running OpenOTP and SpanKey server in version >=2.0.6 and at least OpenSSH 6.2 is needed.
2.1 RHEL & CentOS through RCDevs Repository
2.1.1 Add RCDevs Repository
On a RedHat, CentOS or Fedora system, you can use our repository, which simplifies updates. Add the repository:
You are now able to install RCDevs packages on your system.
2.1.2 SpanKey Server Installation
yum install spankey
After the Spankey server installation, you need to restart WebADM services:
/opt/webadm/bin/webadm restart
To enable SpanKey web service, you need to log in on the WebADM GUI. Under Applications tab, click Authentication in category box and you should find SSH Public Key Server (SpanKey). Click on REGISTER button.
2.1.3 SpanKey Client and NSCD Installation
The SpanKey client requires nscd and OpenSSH. NSCD is the Linux name service caching daemon which is required for caching NSS information on the Linux client. Without NSCD, any user or group ID resolution will trigger SpanKey NSS requests. Caching on the client side will prevent your servers from being overloaded with NSS requests.
Be aware that at least OpenSSH 6.2 is needed. (Added a sshd_config option AuthorizedKeysCommand to support fetching authorized_keys from a command in addition to (or instead of) from the filesystem.)
2.2 Debian & Ubuntu through RCDevs Repository
2.2.1 Add RCDevs Repository
On a Debian system, you can use our repository, which simplifies updates.
Add the repository:
You are now able to install RCDevs packages on your system with apt-get command.
2.2.2 SpanKey Server Installation
apt-get install spankey
After the Spankey server installation, you need to restart WebADM services:
/opt/webadm/bin/webadm restart
To enable SpanKey web service, you need to log in on the WebADM GUI. Under Applications tab, click Authentication in category box and you should find SSH Public Key Server (SpanKey). Click on REGISTER button.
2.2.3 SpanKey Client and NSCD Installation
apt-get install spankey-client nscd
The SpanKey client requires nscd and OpenSSH. NSCD is the Linux name service caching daemon which is required for caching NSS information on the Linux client. Without NSCD, any user or group ID resolution will trigger SpanKey NSS requests. Caching on the client side will prevent your servers from being overloaded with NSS requests.
Note
Be aware that at leat OpenSSH 6.2 is needed. (Added a sshd_config option AuthorizedKeysCommand to support fetching authorized_keys from a command in addition to (or instead of) from the filesystem.) With Ubuntu servers, depending on your OS setup, you may need to install libldap as well.
2.3 Installation Using the Self-Installer
You first need to download the Spankey software package. You can download the latest package on the RCDevs Website. Download and copy the SpanKey server self-installer package to your server. You can copy the package file to the server with WinSCP or SCP. Then connect via SSH to your server, uncompress and run the self-installer package with:
Follow the installer and don’t forget to install the NSCD package.
3. Configurations
3.1 SpanKey Server
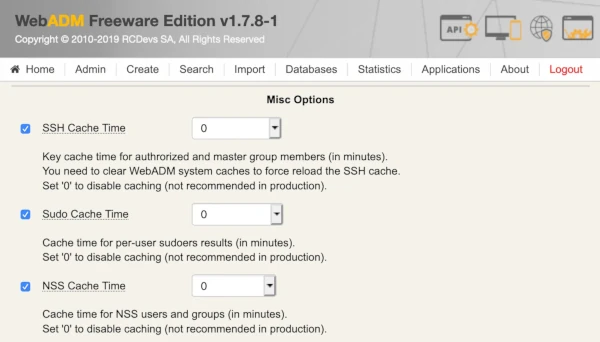
Once SpanKey server package is installed, you have to enable SpanKey service in WebADM. Go to the WebADM Administrator console, click on Applications tab > Authentication and click on Register button for SSH Public Key Server. The default configuration is ready and suited for most Linux environments, but for initial tests, it is recommended to click on CONFIGURE button and set the following options in SSH Public Key Server (SpanKey server):
This will disable server caching, generally helpful during configuration stage and tests.
Important note
For production server caching is highly recommended.
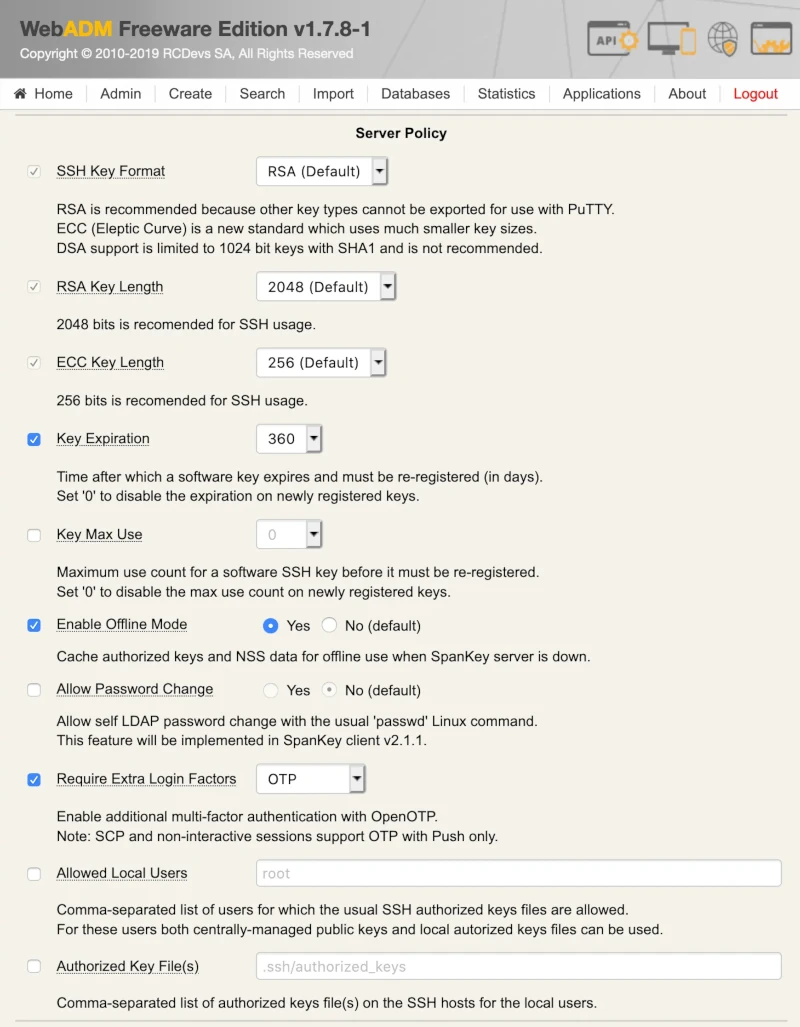
The SSH Key format can be defined here.
RSA Key Length can also be settled here.
The SSH Key Lifetime can be adjusted too.
Send Self-Registration: This option can be enabled if you want to have a new self-registration request when the SSH key has expired.
Enable Offline Mode: Offline mode can be enabled in case of the SpanKey server is unavailable.
Require Extra Login Factors: An OTP validation can be added during the authentication workflow.
Some other settings can be enabled on Spankey server:
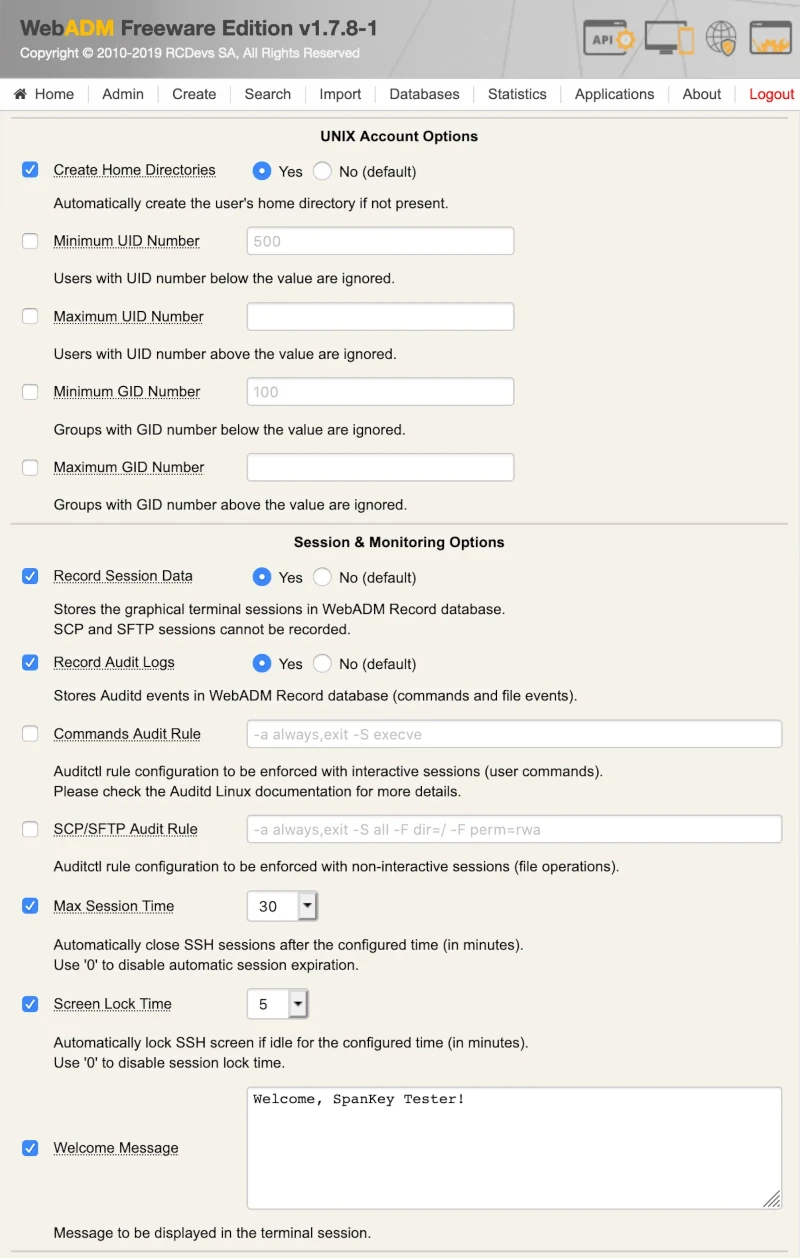
Create Home Directory: If enabled, the user home directory will be automatically created during the first login if not present.
Max Session Time: This setting can be settled if you want to define a maximum session time.
Record Session Data: This is a new feature of SpanKey! This setting allows you to record and store in SQL database, terminal sessions, SFTP sessions. Sessions are replayable video which can be found in Databases tab > Recorded Sessions under WebADM Admin Console.
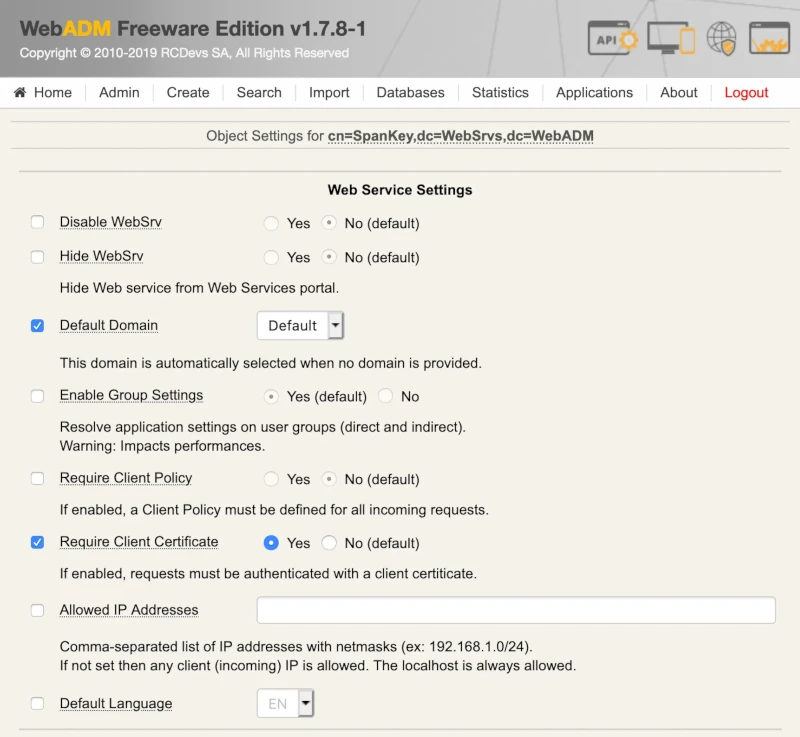
Under SSH Public Key Server configuration, you can find various configurations options to set access controls to your SSH key-based logins, such as Master Group, Backup Keys, Authorized Group, Tagging… Some of these settings are described in the chapter “Advanced Configuration”.
Important Note
Require client certificate for SpanKey client is highly recommended for production use!
Important Note
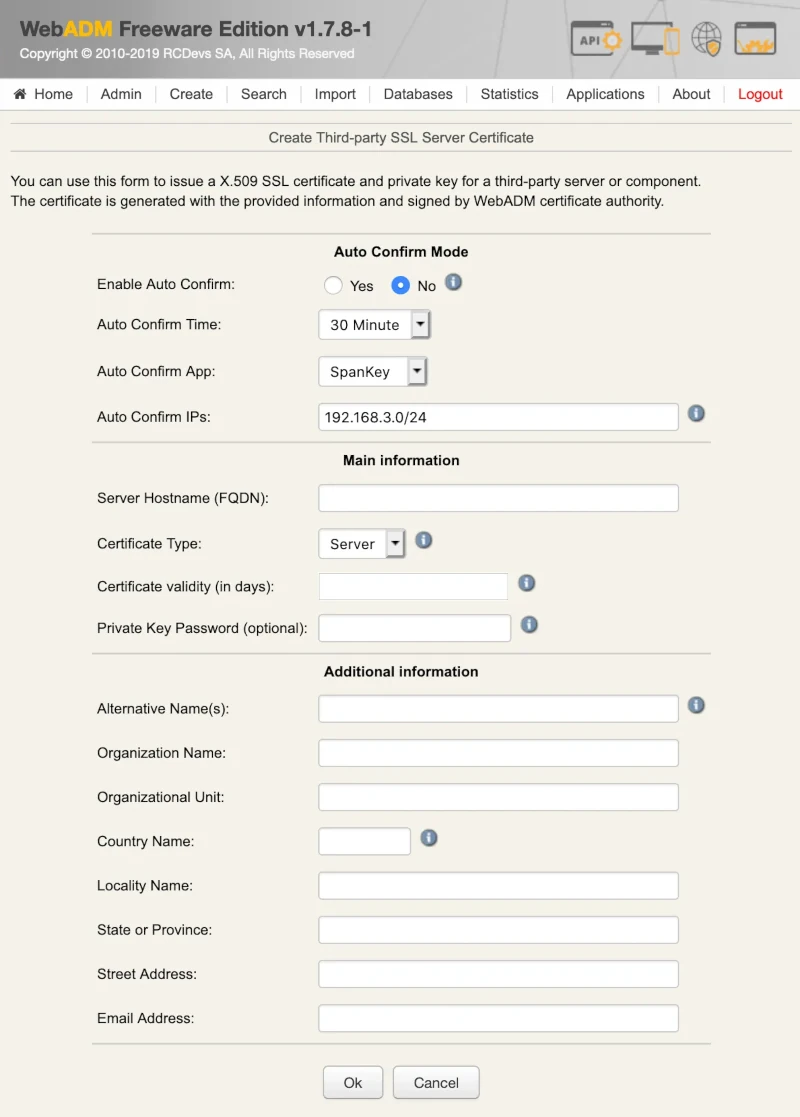
If you enable this option, every SpanKey client who actually works without a client certificate will stop working. To solve this, you can generate a client certificate through WebADM Admin GUI > Admin tab > Issue Server or Client SSL Certificate and import the generated certificate in /opt/spankey/conf/ folder of your SpanKey client.
3.2 SpanKey Client
The SpanKey client consists of two components activated at setup time.
SSH component - provides a user login with public keys stored within a directory server (Active Directory, OpenLDAP, Open Directory…).
NSS component - provides a native mapping of your directory users and groups to those in Linux.
3.2.1 SpanKey Client Setup Script
At the end of the installation of the SpanKey package, run the following command to launch setup wizard: /opt/spankey/bin/setup. The wizard will prompt you for the details similar to below:
root@ubuntu18-client:~# /opt/spankey/bin/setup
Setup has already been run for this installation. Overwrite (y/n)?: y
Overwriting...
Enter one of your running WebADM node IP or hostname []: 192.168.3.217
Do you want to enable SpanKey Client for OpenSSH server (y/n)? [N]: y
Do you want to enable SpanKey Client NSS plugin (y/n)? [Y]: y
Do you want to register SpanKey Client logrotate script (y/n)? [Y]: y
Do you want SpanKey Client to be automatically started at boot (y/n)? [Y]: y
Primary OpenOTP service URL is: 'https://192.168.3.217:8443/spankey/' Secondary OpenOTP service URL is: 'NONE' Enable SpanKey Client for OpenSSH server: 'YES' Enable SpanKey Client NSS plugin: 'YES' Register SpanKey Client logrotate script: 'YES' SpanKey Client must be automatically started at boot: 'YES'Do you confirm (y/n)?: y
Applying SpanKey Client settings from default configuration files... Ok
Retrieving WebADM CA certificate from host '192.168.3.217'... Ok
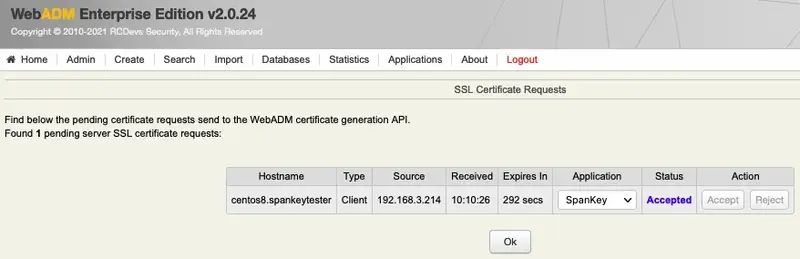
The setup needs now to request a signed 'SpanKey' client certificate.
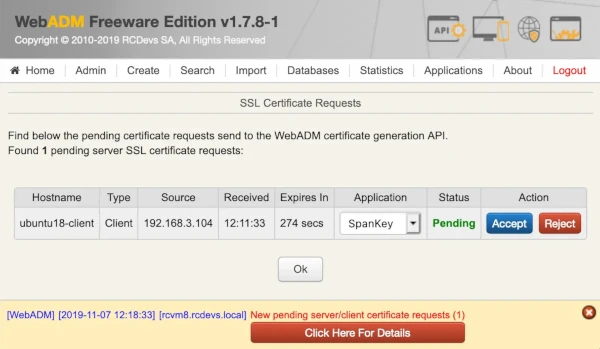
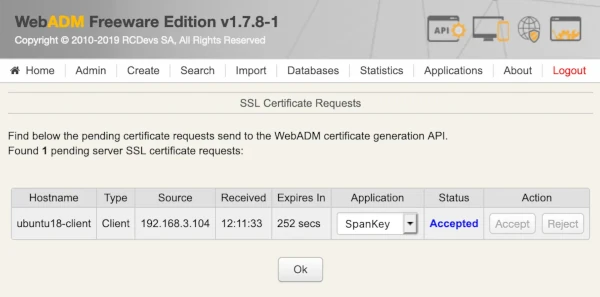
This request should show up as pending in your WebADM interface and an administrator must accept it.
Waiting for approbation...
At this step, you have to log in on the WebADM Administration GUI to approve the SSL certificate request.
Click on the red button at the end of the home page.
On the next screen, you can show the SSL certificate request is pending:
Click on the Accept button and the Spankey-client setup will continue.
Waiting for approbation... Ok
Updating entry 'client_id' in file '/opt/spankey/conf/spankey.conf'... Ok
Updating file '/etc/ssh/sshd_config'... Ok
Updating file '/etc/nsswitch.conf'... Ok
Updating file '/etc/pam.d/common-account'... Ok
Registering SpanKey Client service...
Registering SpanKey Client service... Ok
Adding logrotate script... Ok
SpanKey Client has successfully been setup.
IMPORTANT: Do not forget to perform the following actions before you exit this session:
- Start SpanKey (/opt/spankey/bin/spankey start) - Restart 'sshd' - Restart 'nscd'root@ubuntu18-client:~#
The configuration of the SpanKey client is done, you have to restart sshd, nscd and spankey-client:
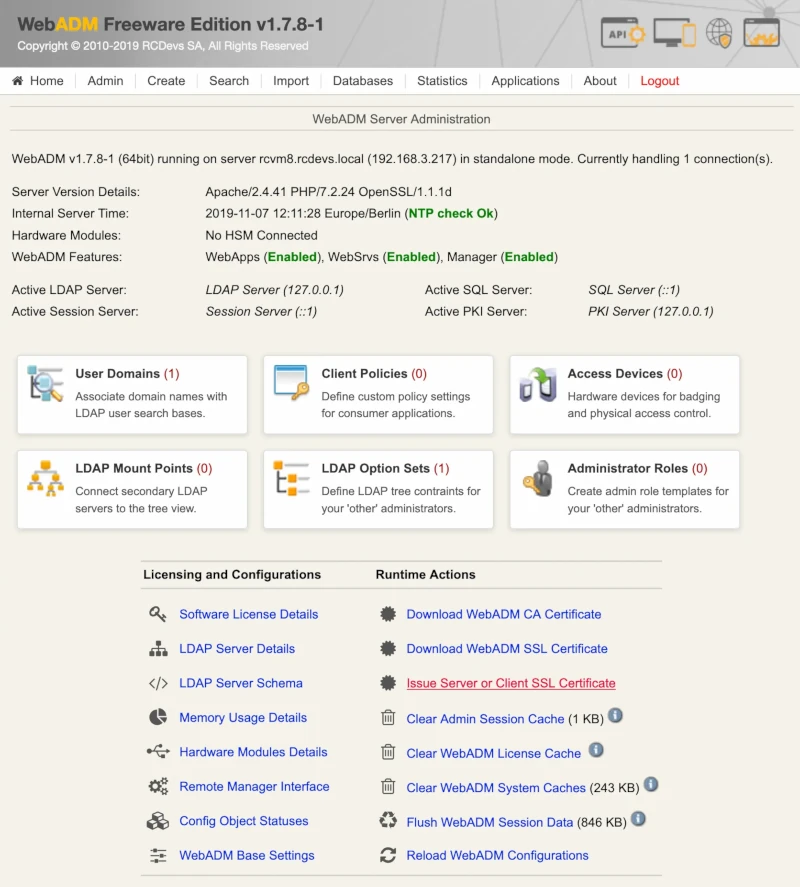
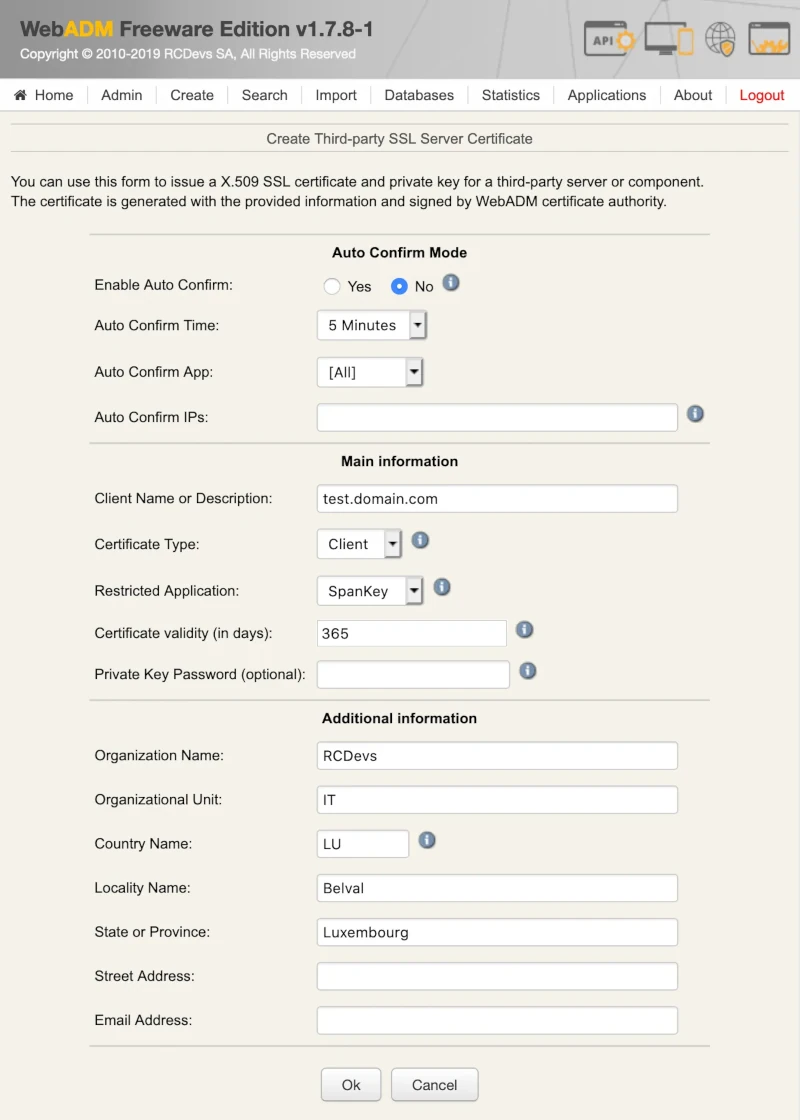
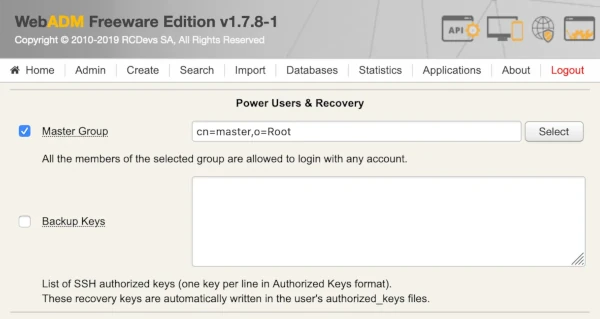
Since WebADM 1.7.1, a new feature is now available for the automatic certificate approval. This setting can be useful when you massively deploy SpanKey Client. To enable this feature, log in on the WebADM Admin GUI > Admin tab > Runtime Actions > Issue Server or Client SSL Certificate > Auto Confirm Mode.
In the Auto Confirm mode, you can specify the time, application and the clients IPs where auto confirms will work. On the previous screenshot, I have configured the auto confirm valid 30 minutes for every Spankey clients coming from the network 192.168.3.0/24. To enable the auto-confirm, switch the Enable Auto Confirm button to Yes. The auto confirm is now enabled.
The SpanKey client can now be installed silently. Once the package is installed, run the following command to run the SpanKey Client setup with your parameters.
192.168.3.117 is my WebADM/SpanKey server IP,
my_client_id is the client_id value configured in /otp/spankey/conf/spankey.conf
ENABLE_SSH__DEFAULT=Y is to enable SpanKey_client for OpenSSH (by default, this setting is set to No for other scenarios)
root@ubuntu18-client:~# /opt/spankey/bin/spankey stop
Stopping SpanKey Client.... Ok
root@ubuntu18-client:~# ENABLE_SSH__DEFAULT=Y ENABLE_SUDO__DEFAULT=Y /opt/spankey/bin/setup silent 192.168.3.217 my_client_id
Primary OpenOTP service URL is: 'https://192.168.3.217:8443/spankey/' Secondary OpenOTP service URL is: 'NONE' Enable SpanKey Client for OpenSSH server: 'YES' Enable SpanKey Client NSS plugin: 'YES' Register SpanKey Client logrotate script: 'YES' SpanKey Client must be automatically started at boot: 'YES'Applying SpanKey Client settings from default configuration files... Ok
Retrieving WebADM CA certificate from host '192.168.3.217'... Ok
The setup needs now to request a signed 'SpanKey' client certificate.
This request should show up as pending in your WebADM interface and an administrator must accept it.
Waiting for approbation... Ok
Updating entry 'client_id' in file '/opt/spankey/conf/spankey.conf'... Ok
Updating file '/etc/ssh/sshd_config'... Ok
Updating file '/etc/nsswitch.conf'... Ok
Updating file '/etc/pam.d/common-account'... Ok
Registering SpanKey Client service...
Registering SpanKey Client service... Ok
Adding logrotate script... Ok
SpanKey Client has successfully been setup.
IMPORTANT: Do not forget to perform the following actions before you exit this session:
- Start SpanKey (/opt/spankey/bin/spankey start) - Restart 'sshd' - Restart 'nscd'root@ubuntu18-client:~#
The configuration of the SpanKey client is done, you have to restart sshd, nscd and Spankey client:
SpanKey client is installed under /opt/spankey/ folder.
Find below the SpanKey client software installation file structure and important files.
/opt/spankey/bin/: Location for SpanKey service binaries and startup scripts.
spankey : SpanKey executable control script for starting and stopping the service process.
To start SpanKey from the command line, issue ./spankey start. To stop SpanKey, issue ./spankey stop.
setup: Initial SpanKey setup script run by the self-installer. The setup can be re-run manually at any time.
/opt/spankey/doc/: Location for spankey documentation resources.
/opt/spankey/conf/: Location for SpanKey configuration files.
spankey.conf: Main configuration file. Defines the basic SpanKey client parameters.
#-#-#-### SpanKey's main configuration file.##-#-#-### The entry below tells the daemon where the log file must be.# At the very early stage (when the daemon started but did not read yet this configuration file)# logs are sent to the standard output. Anyway, since the launcher script use a redirection, you won't even see them.# log_file /opt/spankey/logs/spankeyd.log
## When log level is set to 'Normal', all components will log both errors and warnings only.# 'Verbose' will make all components just log everything.# log_level Normal
###-#-#-##-#-#-### Where to produce the daemon's pid file.##pid_file /opt/spankey/temp/spankeyd.pid###-#-#-##-#-#-### The daemon needs this CA file to trust SpanKey servers it will talk to.# ca_file /opt/spankey/conf/ca.crt
###-#-#-##-#-#-### An optional client certificate and password spankeyd will use to communicate with SpanKey servers.# client_cert_file /opt/spankey/conf/spankey.pem
#client_cert_password PaSsWoRd###-#-#-##-#-#-### The section below contains a list of backend servers the daemon should connect to.# It must contains one or two target OTP server.# Any additional server in the list will just be ignored.# server_urls { url1 https://192.168.3.117:8443/spankey/
#url2 https://<server2>:8443/spankey/}###-#-#-##-#-#-### How spankeyd will relay request to the WebADM backend.# - "balanced" means the request will be balanced between server 1 and server 2 in a round-robin fashion.# - "ordered" means server 2 is kept as a hot spare in case the primary server stops answering requests properly.##server_policy BaLaNcEd###-#-#-##-#-#-### The default domain name to pass when the requester only provided a username.# It typically overrides the default domain in the SpanKey server configuration.##default_domain_name Default## To let backends know how to extract fields 'domain' and 'username' correctly from the username string the client entered.##domain_separator \\###-#-#-##-#-#-### A comma separated list of tags from which boolean expressions attached to policies will be checked on backends.# Further details about such boolean expressions on the servers side can be found at the following URL:## https://docs.rcdevs.com/howtos/spankey/spankey/##requested_tags TAG1,TAG2###-#-#-##-#-#-### User settings (better configure settings in client policies).# Fixed list of SpanKey policy settings to be passed via the SpanKey API.##user_settings SpanKey.KeyExpire=10###-#-#-##-#-#-### The client identifier to be sent to OpenOTP servers along authentication requests.# This allows to apply per client contextual policies on the WebADM server while running an authentication workflow.# client_id my_client_id
###-#-#-##-#-#-### The SOAP request TCP timeout is by default 30.# Just keep it as it unless you really understand all the possible consequences a change could have.##soap_timeout 30###-#-#-####-#-#-#
/opt/spankey/lib/: Location for SpanKey system libraries.
/opt/spankey/libexec/: Location for SpanKey system executables.
/opt/spankey/logs/: Location for log files produced by SpanKey client.
/opt/spankey/temp/: Location for SpanKey temporary data files. Under this directory, you will find service PID files.
4.1.2 SpanKey Client and Auditd
Since Spankey client v2.1.0 and SpanKey server v2.0.4-1, you can use Auditd with SpanKey. Auditd will allow you to record executed commands, SCP actions (copy, remote execution) in WebADM record database. To enable Auditd with SpanKey client, the auditd packages must be installed and running on the target machine.
If this is not installed yet, you can install it with these commands:
for CentOS/RHEL OS: yum install audit
for Debian OS: apt-get install auditd
If you install auditd after the installation of Spankey Client, you can copy the configuration file needed by auditd to activate audit for SpanKey Client. This file is available in /opt/spankey/lib/audisp_plugin.conf and must be copied in:
/etc/audisp/plugins.d/spankey.conf for Debian OS
/etc/audit/plugins.d/spankey.conf for CentOS/RHEL OS
By default, Auditd for SpanKey client is disabled. To enable it, after the Spankey client installation and configuration, edit the following file:
/etc/audisp/plugins.d/spankey.conf
# This file controls the configuration of the SpanKey Client plugin.# It simply takes events and forwards them to the SpanKey daemon.active = no
direction = out
path = /opt/spankey/libexec/audisp_plugin
type = always
#args = format = string
Change the active setting from no to yes:
# This file controls the configuration of the SpanKey Client plugin.# It simply takes events and forwards them to the SpanKey daemon.active = yes
direction = out
path = /opt/spankey/libexec/audisp_plugin
type = always
#args = format = string
To changes takes effect, a restart of spankey client is required. Logs are now sent to auditd and auditd forwards logs to SpanKey client daemon. The daemon will forward logs to SpanKey server.
systemctl restart spankey
Important Note
Be aware, if you enable Auditd with SpanKey then all Auditd rules that have been set before on that machine will be erased. Therefore, if you are using your own Auditd rules for monitoring your machine then you can not use SpanKey with the Record Audit Logs feature.
Please refer to step 4.2.7 Audit logs and SSH Sessions recording of this documentation to enable auditd logs on the SpanKey server side and to know how to consult recorded logs.
4.2 SpanKey Server
Below are described some of the most relevant SSH Public Key Server configuration options.
4.2.1 Master Group
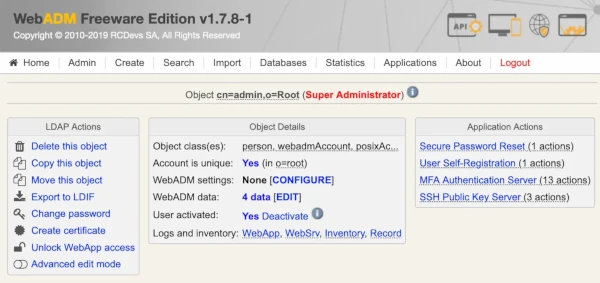
In SpanKey you can define master groups where the members of the group are considered as super users and can use their SSH key to access any other SpanKey account. A master group can be configured in SpanKey global configuration or in a client policy. To configure a master group, go on SpanKey global configuration or client policy and configure your Master Group.
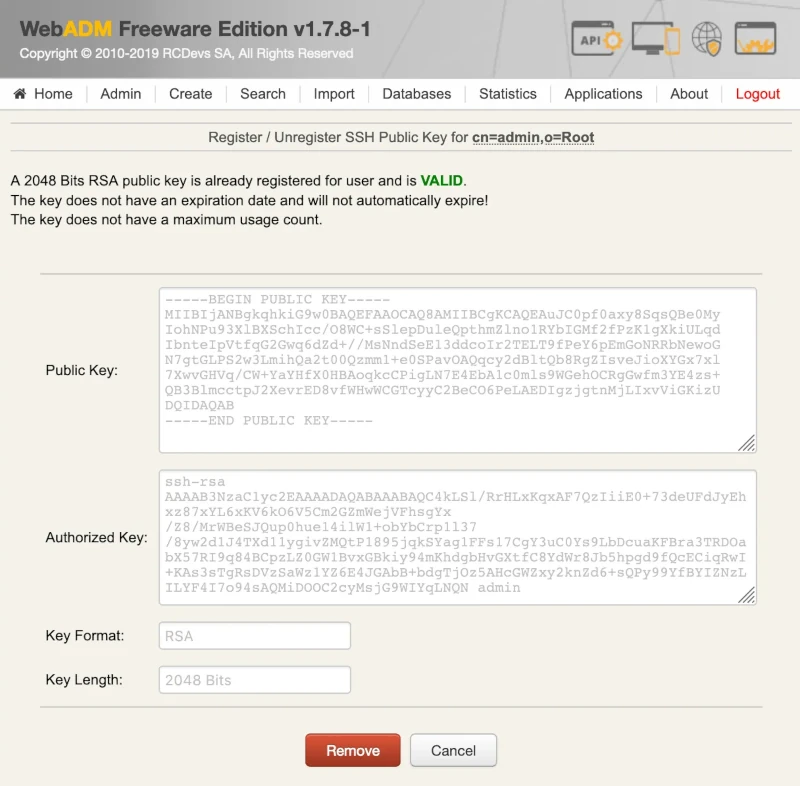
For example, my master group is cn=master,o=Root and the member of this group is my cn=admin,o=Root who has a public key enrolled on his account:
That means the admin account is able to log in on every account with his own private key. The public key of the admin account is added to every user account. If I call the authorized_key command for different users I should see the administrateur public key and the public key of the user:
Now, trying to log in with test-user and Yoann’s account with the admin’s private key:
$ ssh -i admin.pem test-user@192.168.3.104

Welcome, SpanKey Tester!

Session recording is enabled.
Audit logs recording is enabled.
Session lock idle time is 5 minutes.
Session's max duration is 30 minutes.

test-user@ubuntu18-client:~$ whoami
test-user
test-user@ubuntu18-client:~$ pwd
/home/test-user
test-user@ubuntu18-client:~$ exit
exit

>>>> Session's duration was aprox 11 seconds <<<<

Connection to 192.168.3.104 closed.
$
$ ssh -i admin.pem yoann@192.168.3.104

Welcome, SpanKey Tester!

Session recording is enabled.
Audit logs recording is enabled.
Session lock idle time is 5 minutes.
Session's max duration is 30 minutes.

yoann@ubuntu18-client:~$ whoami
yoann
yoann@ubuntu18-client:~$ pwd
/home/yoann
yoann@ubuntu18-client:~$ exit
exit

>>>> Session's duration was aprox 7 seconds <<<<

Connection to 192.168.3.104 closed.
$
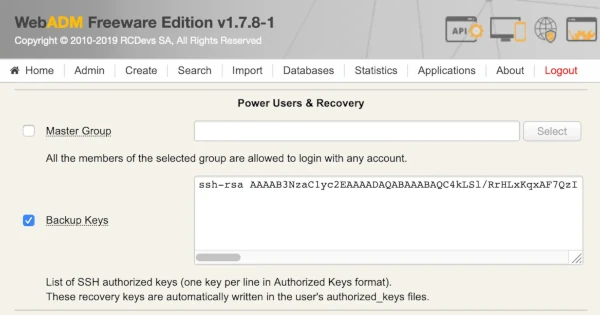
4.2.2 Backup/Recovery Keys
By default, the SpanKey agents will erase users’ authorized_keys file at runtime to prevent users from adding rogue public keys. If recovery keys are configured, then these keys are automatically written to the user’s authorized_keys file, for recovery purposes (to be used in the event where SpanKey client cannot communicate with the SpanKey server).
To configure a backup key, go on the WebADM Admin GUI, click on Applications tab, in Authentication category, you can find SSH Public Key Server, click on CONFIGURE button. You are now in SpanKey server configuration. Find the Power Users & Recovery section, check the box Backup Keys and put the public key to have an access on the target server even if SpanKey client or SpanKey server is down.
Put the public key in the authorized key format here:
That means the private key associated with this public key will be able to log in on the target server even if SpanKey server or SpanKey client is down.
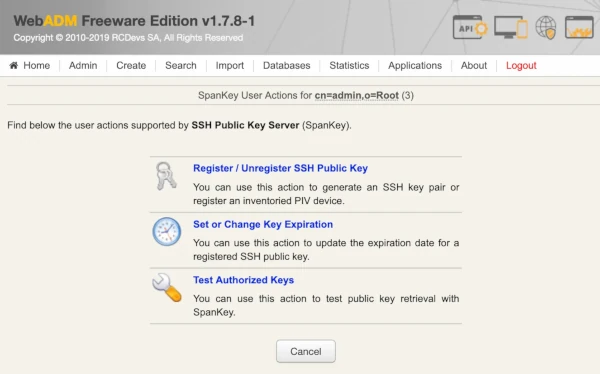
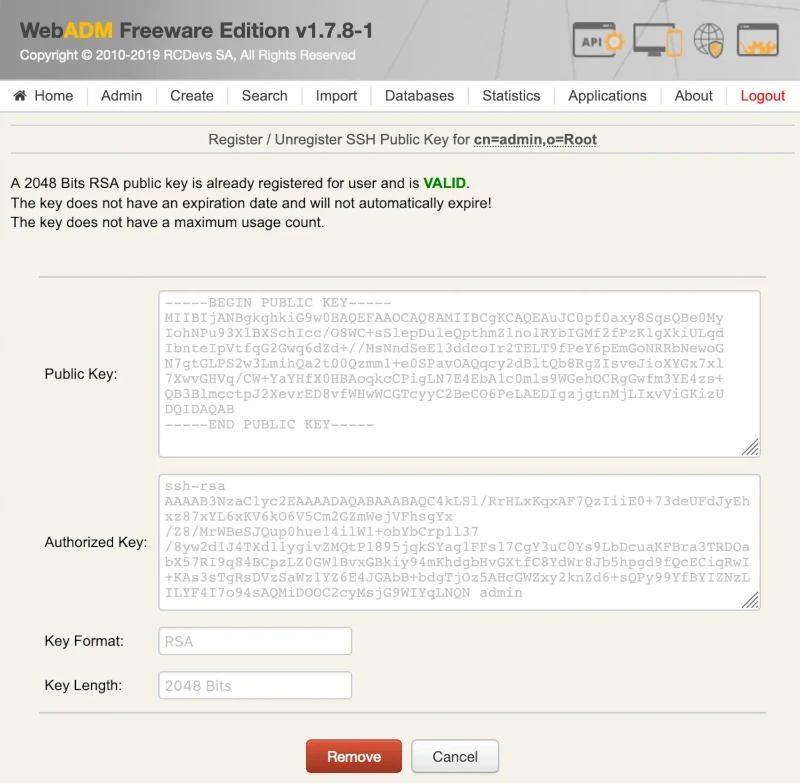
The public key can be found when you click on the user on the left tree, in Application Actions box, click on SSH Public Key Server and Register/Unregister SSH Public Key.
I can see the public key enrolled for this user in SSH key format and in authorized key format.
Now, we will do a test to see if the backup key is returned by the authorized key command for the yoann user on a SpanKey client:
As you can see, yoann user has his own public key returned by SpanKey server and the Admin recovery key previously configured.
$ ssh -i admin.pem yoann@192.168.3.104
Welcome to Ubuntu 18.04.1 LTS (GNU/Linux 4.15.0-33-generic x86_64)

 * Documentation:  https://help.ubuntu.com
 * Management:     https://landscape.canonical.com
 * Support:        https://ubuntu.com/advantage


 * Canonical Livepatch is available for installation.
   - Reduce system reboots and improve kernel security. Activate at:
     https://ubuntu.com/livepatch

320 packages can be updated.
0 updates are security updates.

*** System restart required ***
Last login: Thu Nov  7 12:50:10 2019 from 192.168.3.233
yoann@ubuntu18-client:~$ exit
logout
Connection to 192.168.3.104 closed.
$
Below are the logs from the SpanKey server side for the authorized key request:
[2019-11-07 13:02:19] [192.168.3.104] [SpanKey:DDVPRKKE] New spankeyAutorizedKeys SOAP request
[2019-11-07 13:02:19] [192.168.3.104] [SpanKey:DDVPRKKE] > Username: yoann
[2019-11-07 13:02:19] [192.168.3.104] [SpanKey:DDVPRKKE] > Client ID: my_client_id
[2019-11-07 13:02:19] [192.168.3.104] [SpanKey:DDVPRKKE] Registered spankeyAutorizedKeys request
[2019-11-07 13:02:19] [192.168.3.104] [SpanKey:DDVPRKKE] Resolved LDAP user: cn=yoann,o=Root (cached)
[2019-11-07 13:02:19] [192.168.3.104] [SpanKey:DDVPRKKE] Found user fullname: yoann
[2019-11-07 13:02:19] [192.168.3.104] [SpanKey:DDVPRKKE] Found 25 user settings: EnableLogin=Yes,X11Forwarding=Yes,PortForwarding=Yes,AgentForwarding=Yes,PTYAllocation=Yes,BackupKeys=[1 Items],AllowKeyFiles=No,KeyFiles=.ssh/authorized_keys,MinUID=500,MinGID=100,MailSubject=SSH Access Notification
[2019-11-07 13:02:19] [192.168.3.104] [SpanKey:DDVPRKKE] Found 1 user data: PublicKey
[2019-11-07 13:02:19] [192.168.3.104] [SpanKey:DDVPRKKE] Found 2048 bits RSA public key
[2019-11-07 13:02:19] [192.168.3.104] [SpanKey:DDVPRKKE] Returning 1 authorized public key
[2019-11-07 13:02:19] [192.168.3.104] [SpanKey:DDVPRKKE] Returning 1 backup public key
[2019-11-07 13:02:19] [192.168.3.104] [SpanKey:DDVPRKKE] Sent success response
4.2.3 Shared Account/Authorized Group
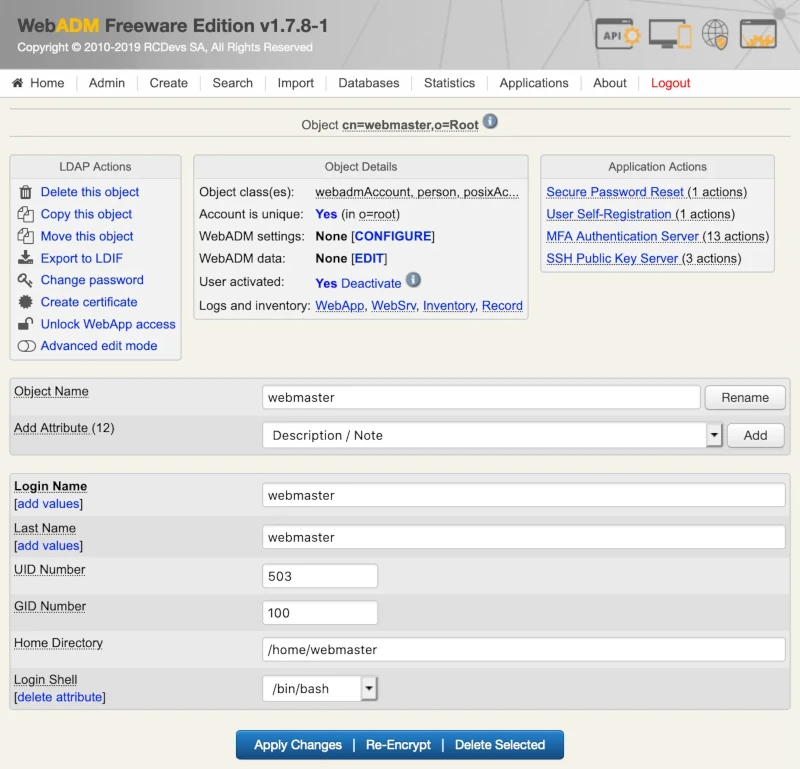
Authorized Groups operate on the principle of a shared account. Shared accounts are a common practice in Enterprise use of SSH. A shared account (i.e. ‘webmaster’ user) is a system account which is used concurrently by several administrators. In SpanKey you can transform any generic LDAP user into a shared SSH account simply by linking this account to a ‘shared access LDAP group’. Then all the members of that group can gain access to the shared account with their own SSH key.
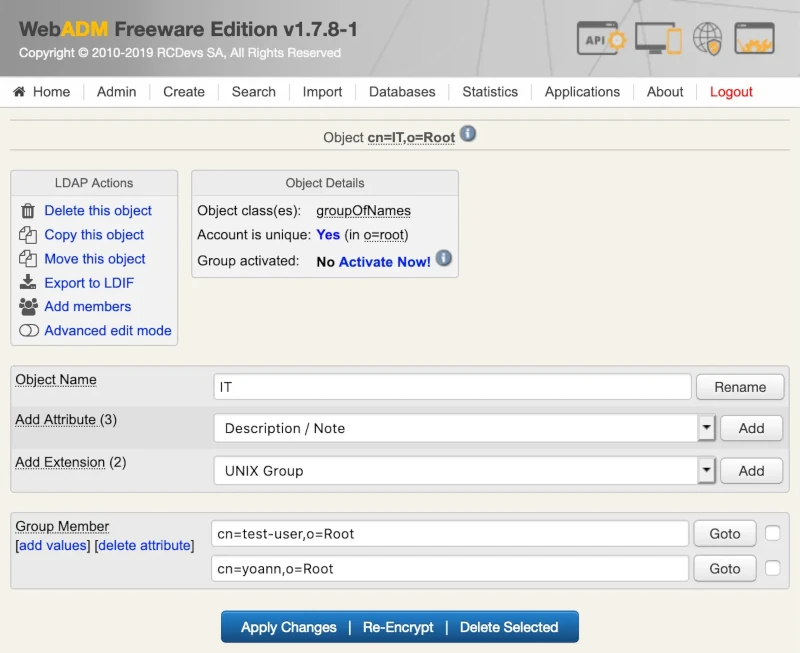
For example, my shared account is webmaster and I want to allow access to webmaster account by IT group members.
Member of this group are test-user and yoann accounts:
After that, I click on my webmaster account on the left tree. In Object Details box, I click on CONFIGURE button.
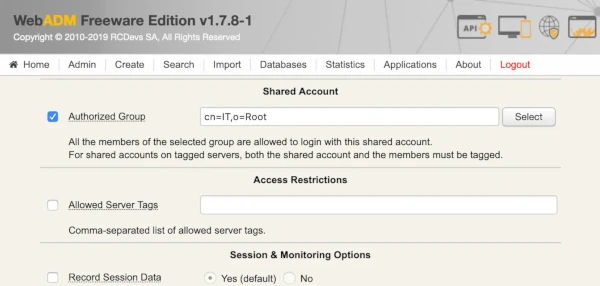
Choose SpanKey application and in Shared Account section, I configure my IT group like below:
Now, I’m able to log into my SpanKey_client with Yoann private key on the shared account webmaster:
$ ssh -i yoann.pem webmaster@192.168.3.104

Welcome, SpanKey Tester!

Session recording is enabled.
Audit logs recording is enabled.
Session lock idle time is 5 minutes.
Session's max duration is 30 minutes.

webmaster@ubuntu18-client:~$ whoami;pwd;exit
webmaster
/home/webmaster
exit

>>>> Session's duration was aprox 11 seconds <<<<

Connection to 192.168.3.104 closed.
$
Logs on the SpanKey server side:
 New spankeyNSSInfo SOAP request
[2019-11-07 15:15:55] [192.168.3.104] [SpanKey:VAWOC62C] > Database: user
[2019-11-07 15:15:55] [192.168.3.104] [SpanKey:VAWOC62C] > Name: webmaster
[2019-11-07 15:15:55] [192.168.3.104] [SpanKey:VAWOC62C] > Client ID: my_client_id
[2019-11-07 15:15:55] [192.168.3.104] [SpanKey:VAWOC62C] Registered spankeyNSSInfo request
[2019-11-07 15:15:55] [192.168.3.104] [SpanKey:VAWOC62C] Found posix user 'cn=webmaster,o=Root'
[2019-11-07 15:15:55] [192.168.3.104] [SpanKey:VAWOC62C] Sent success response
[2019-11-07 15:15:55] [192.168.3.104] [SpanKey:YFNR98A0] New spankeyAutorizedKeys SOAP request
[2019-11-07 15:15:55] [192.168.3.104] [SpanKey:YFNR98A0] > Username: webmaster
[2019-11-07 15:15:55] [192.168.3.104] [SpanKey:YFNR98A0] > Client ID: my_client_id
[2019-11-07 15:15:55] [192.168.3.104] [SpanKey:YFNR98A0] Registered spankeyAutorizedKeys request
[2019-11-07 15:15:55] [192.168.3.104] [SpanKey:YFNR98A0] Resolved LDAP user: cn=webmaster,o=Root
[2019-11-07 15:15:55] [192.168.3.104] [SpanKey:YFNR98A0] Found user fullname: webmaster
[2019-11-07 15:15:55] [192.168.3.104] [SpanKey:YFNR98A0] Found 25 user settings: EnableLogin=Yes,X11Forwarding=Yes,PortForwarding=Yes,AgentForwarding=Yes,PTYAllocation=Yes,AllowedGroup=cn=IT,o=Root,BackupKeys=[1 Items],AllowKeyFiles=No,KeyFiles=.ssh/authorized_keys,MinUID=500,MinGID=100,MailSubject=SSH Access Notification
[2019-11-07 15:15:55] [192.168.3.104] [SpanKey:YFNR98A0] Allowed group 'IT' with 2 member public keys
[2019-11-07 15:15:55] [192.168.3.104] [SpanKey:YFNR98A0] Returning 2 authorized public keys
[2019-11-07 15:15:55] [192.168.3.104] [SpanKey:YFNR98A0] Returning 1 backup public key
[2019-11-07 15:15:55] [192.168.3.104] [SpanKey:YFNR98A0] Sent success response
[2019-11-07 15:15:55] [192.168.3.104] [SpanKey:P38WICLQ] New spankeyNSSList SOAP request
[2019-11-07 15:15:55] [192.168.3.104] [SpanKey:P38WICLQ] > Database: group
[2019-11-07 15:15:55] [192.168.3.104] [SpanKey:P38WICLQ] > Client ID: my_client_id
[2019-11-07 15:15:55] [192.168.3.104] [SpanKey:P38WICLQ] Registered spankeyNSSList request
[2019-11-07 15:15:55] [192.168.3.104] [SpanKey:P38WICLQ] Could not find any NSS group
[2019-11-07 15:15:55] [192.168.3.104] [SpanKey:P38WICLQ] Sent success response
[2019-11-07 15:15:56] [192.168.3.104] [SpanKey:8NJGQVC2] New spankeySessionStart SOAP request
[2019-11-07 15:15:56] [192.168.3.104] [SpanKey:8NJGQVC2] > Username: webmaster
[2019-11-07 15:15:56] [192.168.3.104] [SpanKey:8NJGQVC2] > Identity: yoann
[2019-11-07 15:15:56] [192.168.3.104] [SpanKey:8NJGQVC2] > Server: ubuntu18-client
[2019-11-07 15:15:56] [192.168.3.104] [SpanKey:8NJGQVC2] > Command: /bin/bash
[2019-11-07 15:15:56] [192.168.3.104] [SpanKey:8NJGQVC2] > Terminal: Yes
[2019-11-07 15:15:56] [192.168.3.104] [SpanKey:8NJGQVC2] > Client ID: my_client_id
[2019-11-07 15:15:56] [192.168.3.104] [SpanKey:8NJGQVC2] > Source IP: 192.168.3.233
[2019-11-07 15:15:56] [192.168.3.104] [SpanKey:8NJGQVC2] Registered spankeySessionStart request
[2019-11-07 15:15:56] [192.168.3.104] [SpanKey:8NJGQVC2] Resolved LDAP user: cn=yoann,o=Root
[2019-11-07 15:15:56] [192.168.3.104] [SpanKey:8NJGQVC2] Resolved LDAP groups: it
[2019-11-07 15:15:56] [192.168.3.104] [SpanKey:8NJGQVC2] Started transaction lock for user
[2019-11-07 15:15:56] [192.168.3.104] [SpanKey:8NJGQVC2] Found user fullname: yoann
[2019-11-07 15:15:56] [192.168.3.104] [SpanKey:8NJGQVC2] Found 21 user settings: WelcomeText=Welcome, SpanKey Tester!,MaxSessionTime=30,LockSessionTime=5,RecordSessions=Yes,RecordAuditLogs=Yes,CreateHomedir=Yes,MailSubject=SSH Access Notification,TermAuditRule=-a always,exit -S execve,FileAuditRule=-a always,exit -S all -F dir=/ -F perm=rwa,EnableLogin=Yes
[2019-11-07 15:15:56] [192.168.3.104] [SpanKey:8NJGQVC2] Found 1 user data: LoginCount
[2019-11-07 15:15:56] [192.168.3.104] [SpanKey:8NJGQVC2] Updated user data
[2019-11-07 15:15:56] [192.168.3.104] [SpanKey:8NJGQVC2] Started interactive terminal session of ID xPSH6AylY58fEc6S on ubuntu18-client valid for 600 seconds
[2019-11-07 15:15:56] [192.168.3.104] [SpanKey:8NJGQVC2] Sent success response
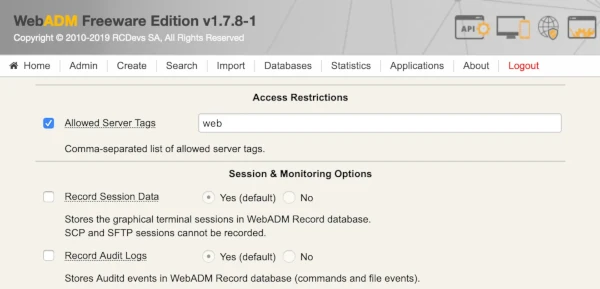
4.2.4 TAGs
All hosts managed by SpanKey Server can be tagged in the SpanKey client configuration.
For example, all web servers could be tagged with the acronym «WEB» in the configuration file of SpanKey client. Then you can add this Tag for all Webmaster accounts to ensure SSH access to every web server. To configure a Tag, click on a user account and in the section Object Details there is WebADM Settings. Click on the CONFIGURE button. Go on the SpanKey application and there are the options Allowed Server Tags.
TAGs can be configured on an LDAP account or an LDAP group. To set a tag on an account or a group, go on the WebADM Admin GUI, click on your account/group, in the Object Details box, you can find WebADM settings, click on CONFIGURE. In applications box on the left, select SpanKey. You are now in SpanKey configuration for your user or your group. In Access Restriction category, check the box Allowed Server Tags and configure your TAGs. On my side, I configured web TAG for my test-user.
Now, I just have to TAG my servers where SpanKey client is configured. TAG should be configured in /opt/spankey/conf/spankey.conf.
root@ubuntu18-client:~# vi /opt/spankey/conf/spankey.conf
#-#-#-### spankeyd's main configuration file.#...
#-#-#-### A comma separated list of tags from which boolean expressions attached to policies will be checked on backends.# Further details about such boolean expressions on the servers side can be found at the following URL:## https://docs.rcdevs.com/howtos/spankey/spankey/# requested_tags web
###-#-#-#...
###-#-#-#
Please, restart SpanKey Client after editing the configuration file.
root@ubuntu18-client:~# /opt/spankey/bin/spankey restart
Stopping SpanKey Client.... Ok
Starting SpanKey Client...
Starting daemon 'rcdevs-spankeyd'... Ok
root@ubuntu18-client:~#
After tagging my server, I perform a login with an account which has the same TAG configured.
$ ssh -i test-user.pem test-user@192.168.3.104

Welcome, SpanKey Tester!

Session recording is enabled.
Audit logs recording is enabled.
Session lock idle time is 5 minutes.
Session's max duration is 30 minutes.

test-user@ubuntu18-client:~$ whoami;pwd;exit
test-user
/home/test-user
exit

>>>> Session's duration was aprox 6 seconds <<<<

Connection to 192.168.3.104 closed.
$
See below the result of the authentication:
[2019-11-07 15:26:25] [192.168.3.104] [SpanKey:NE71POJT] New spankeyAutorizedKeys SOAP request
[2019-11-07 15:26:25] [192.168.3.104] [SpanKey:NE71POJT] > Username: test-user
[2019-11-07 15:26:25] [192.168.3.104] [SpanKey:NE71POJT] > Tags: web
[2019-11-07 15:26:25] [192.168.3.104] [SpanKey:NE71POJT] > Client ID: my_client_id
[2019-11-07 15:26:25] [192.168.3.104] [SpanKey:NE71POJT] Registered spankeyAutorizedKeys request
[2019-11-07 15:26:25] [192.168.3.104] [SpanKey:NE71POJT] Checking SpanKey built-in freeware license
[2019-11-07 15:26:25] [192.168.3.104] [SpanKey:NE71POJT] License Ok (1/5 client hosts)
[2019-11-07 15:26:25] [192.168.3.104] [SpanKey:NE71POJT] Resolved LDAP user: cn=test-user,o=Root
[2019-11-07 15:26:25] [192.168.3.104] [SpanKey:NE71POJT] Resolved LDAP groups: it
[2019-11-07 15:26:25] [192.168.3.104] [SpanKey:NE71POJT] Found user fullname: test-user
[2019-11-07 15:26:25] [192.168.3.104] [SpanKey:NE71POJT] Found 25 user settings: EnableLogin=Yes,X11Forwarding=Yes,PortForwarding=Yes,AgentForwarding=Yes,PTYAllocation=Yes,AllowedTags=[1 Items],BackupKeys=[1 Items],AllowKeyFiles=No,KeyFiles=.ssh/authorized_keys,MinUID=500,MinGID=100,MailSubject=SSH Access Notification
[2019-11-07 15:26:25] [192.168.3.104] [SpanKey:NE71POJT] Found 1 user tags: WEB
[2019-11-07 15:26:25] [192.168.3.104] [SpanKey:NE71POJT] Found 3 user data: PublicKey,KeyExpire,KeyState
[2019-11-07 15:26:25] [192.168.3.104] [SpanKey:NE71POJT] Found 4096 bits RSA public key
[2019-11-07 15:26:25] [192.168.3.104] [SpanKey:NE71POJT] Public key expires 2020-05-30 11:00:00 (205 days)
[2019-11-07 15:26:25] [192.168.3.104] [SpanKey:NE71POJT] Public key can be used 497 more times
[2019-11-07 15:26:25] [192.168.3.104] [SpanKey:NE71POJT] Validated authorization for server tag 'WEB'
[2019-11-07 15:26:25] [192.168.3.104] [SpanKey:NE71POJT] Returning 1 authorized public key
[2019-11-07 15:26:25] [192.168.3.104] [SpanKey:NE71POJT] Returning 1 backup public key
[2019-11-07 15:26:25] [192.168.3.104] [SpanKey:NE71POJT] Sent success response
[2019-11-07 15:26:25] [192.168.3.104] [SpanKey:7PGUMU19] New spankeySessionStart SOAP request
[2019-11-07 15:26:25] [192.168.3.104] [SpanKey:7PGUMU19] > Username: test-user
[2019-11-07 15:26:25] [192.168.3.104] [SpanKey:7PGUMU19] > Identity: test-user
[2019-11-07 15:26:25] [192.168.3.104] [SpanKey:7PGUMU19] > Server: ubuntu18-client
[2019-11-07 15:26:25] [192.168.3.104] [SpanKey:7PGUMU19] > Command: /bin/bash
[2019-11-07 15:26:25] [192.168.3.104] [SpanKey:7PGUMU19] > Terminal: Yes
[2019-11-07 15:26:25] [192.168.3.104] [SpanKey:7PGUMU19] > Client ID: my_client_id
[2019-11-07 15:26:25] [192.168.3.104] [SpanKey:7PGUMU19] > Source IP: 192.168.3.233
[2019-11-07 15:26:25] [192.168.3.104] [SpanKey:7PGUMU19] Registered spankeySessionStart request
[2019-11-07 15:26:25] [192.168.3.104] [SpanKey:7PGUMU19] Resolved LDAP user: cn=test-user,o=Root (cached)
[2019-11-07 15:26:25] [192.168.3.104] [SpanKey:7PGUMU19] Resolved LDAP groups: it
[2019-11-07 15:26:25] [192.168.3.104] [SpanKey:7PGUMU19] Started transaction lock for user
[2019-11-07 15:26:25] [192.168.3.104] [SpanKey:7PGUMU19] Found user fullname: test-user
[2019-11-07 15:26:25] [192.168.3.104] [SpanKey:7PGUMU19] Found 18 user settings: WelcomeText=Welcome, SpanKey Tester!,MaxSessionTime=30,LockSessionTime=5,RecordSessions=Yes,RecordAuditLogs=Yes,CreateHomedir=Yes,MailSubject=SSH Access Notification,TermAuditRule=-a always,exit -S execve,FileAuditRule=-a always,exit -S all -F dir=/ -F perm=rwa
[2019-11-07 15:26:25] [192.168.3.104] [SpanKey:7PGUMU19] Found 2 user data: LoginCount,KeyState
[2019-11-07 15:26:25] [192.168.3.104] [SpanKey:7PGUMU19] Updated user data
[2019-11-07 15:26:25] [192.168.3.104] [SpanKey:7PGUMU19] Started interactive terminal session of ID auUYDYJYqkLnHnzn on ubuntu18-client valid for 600 seconds
[2019-11-07 15:26:25] [192.168.3.104] [SpanKey:7PGUMU19] Sent success response
[2019-11-07 15:26:35] [192.168.3.104] [SpanKey:I8MNHORW] New spankeySessionUpdate SOAP request
[2019-11-07 15:26:35] [192.168.3.104] [SpanKey:I8MNHORW] > Session: auUYDYJYqkLnHnzn
[2019-11-07 15:26:35] [192.168.3.104] [SpanKey:I8MNHORW] > Stop: Flagged
[2019-11-07 15:26:35] [192.168.3.104] [SpanKey:I8MNHORW] > Data: 195 Bytes
[2019-11-07 15:26:35] [192.168.3.104] [SpanKey:I8MNHORW] > Logs: 1010 Bytes
[2019-11-07 15:26:35] [192.168.3.104] [SpanKey:7PGUMU19] Found terminal session started 2019-11-07 15:26:25
[2019-11-07 15:26:35] [192.168.3.104] [SpanKey:7PGUMU19] Sent success response
It works well for the test-user, I will try now an authentication with the account Yoann which doesn’t have the web TAG.
$ ssh -i yoann.pem yoann@192.168.3.104
See below the result of the authentication:
[2019-11-07 15:28:23] [192.168.3.104] [SpanKey:KC92H6FJ] New spankeyAutorizedKeys SOAP request
[2019-11-07 15:28:23] [192.168.3.104] [SpanKey:KC92H6FJ] > Username: yoann
[2019-11-07 15:28:23] [192.168.3.104] [SpanKey:KC92H6FJ] > Tags: web
[2019-11-07 15:28:23] [192.168.3.104] [SpanKey:KC92H6FJ] > Client ID: my_client_id
[2019-11-07 15:28:23] [192.168.3.104] [SpanKey:KC92H6FJ] Registered spankeyAutorizedKeys request
[2019-11-07 15:28:23] [192.168.3.104] [SpanKey:KC92H6FJ] Resolved LDAP user: cn=yoann,o=Root
[2019-11-07 15:28:23] [192.168.3.104] [SpanKey:KC92H6FJ] Resolved LDAP groups: it
[2019-11-07 15:28:23] [192.168.3.104] [SpanKey:KC92H6FJ] Found user fullname: yoann
[2019-11-07 15:28:23] [192.168.3.104] [SpanKey:KC92H6FJ] Found 25 user settings: EnableLogin=Yes,X11Forwarding=Yes,PortForwarding=Yes,AgentForwarding=Yes,PTYAllocation=Yes,BackupKeys=[1 Items],AllowKeyFiles=No,KeyFiles=.ssh/authorized_keys,MinUID=500,MinGID=100,MailSubject=SSH Access Notification
[2019-11-07 15:28:23] [192.168.3.104] [SpanKey:KC92H6FJ] Found 1 user data: PublicKey
[2019-11-07 15:28:23] [192.168.3.104] [SpanKey:KC92H6FJ] Found 2048 bits RSA public key
[2019-11-07 15:28:23] [192.168.3.104] [SpanKey:KC92H6FJ] Account is missing authorization for server tag 'WEB'
[2019-11-07 15:28:23] [192.168.3.104] [SpanKey:KC92H6FJ] No authorized public key found
[2019-11-07 15:28:24] [192.168.3.104] [SpanKey:KC92H6FJ] Sent failure response
As you can see, the authentication failed because the account is missing an authorization for server TAG web.
Several TAGs can be requested and expressions similar to boolean expressions can be built.
Found below, how to build TAGs expressions:
Request TAG1 AND TAG2:
TAG1,TAG2
Request TAG1 OR TAG2:
(TAG1|TAG2)
Request TAG1 AND TAG2 OR TAG3:
TAG1,(TAG2|TAG3)
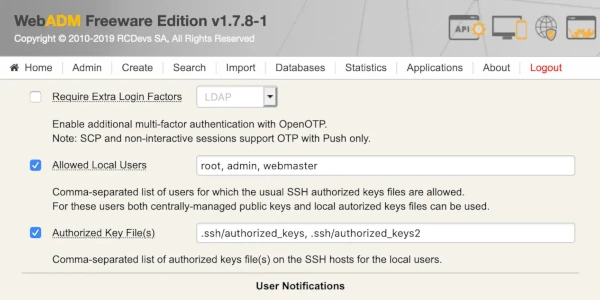
4.2.5 Allow local users and local Authorized Keys File(s) usage
The SpanKey server allows you to configure local users who will be able to use the local authorized keys file(s) configured. In the SpanKey server configuration, you will find the following setting under Server Policy:
Configure your users who are able to use the local authorized keys file(s) first and after that, configure the authorized keys file(s) that your users will be able to use for local login.
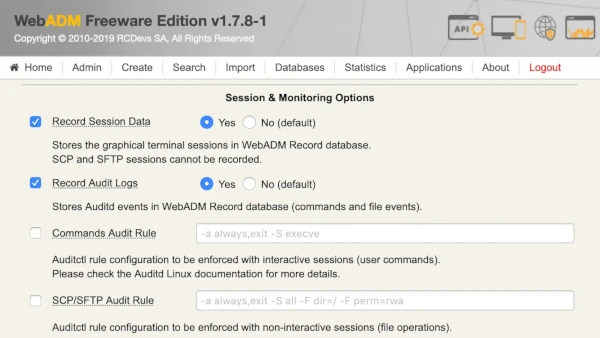
4.2.6 Audit logs and SSH Sessions recording
For security audit, Spankey provide 2 kinds of audit logs.
The first one is the graphical session recording. All SSH sessions can be recorded and that allow you to replay every SSH sessions at any moment through the WebADM Admin interface.
The Record Session Data setting must be enabled for session recording.
Another kind of audit is the Record Audit Logs. The setting will allow you to store audit event (commands and file events) in the WebADM Record databases.
These 2 settings can be enabled under SpanKey Server configuration:
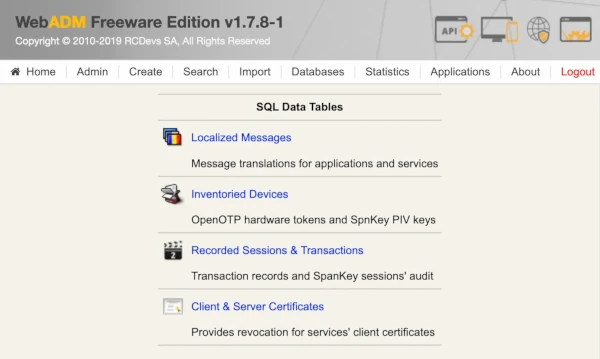
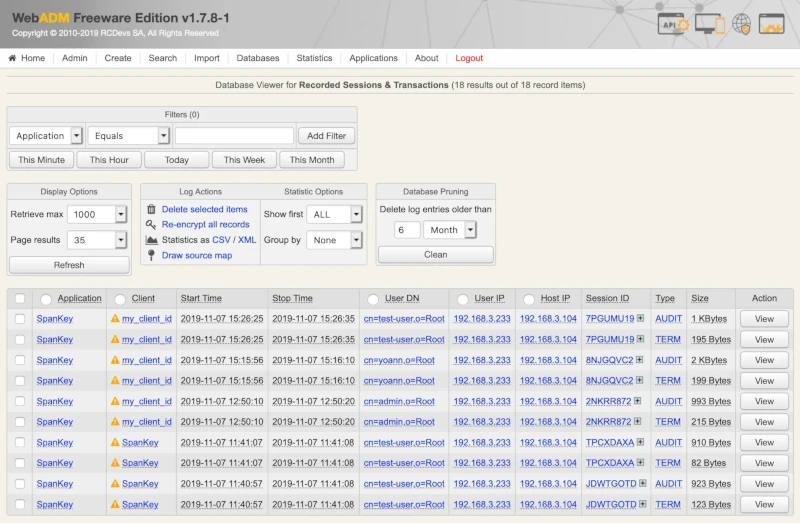
Recorded sessions and audit logs can be replayed under WebADM Admin GUI > Databases > Recorded Sessions
Under the Recorded Sessions databases, 2 types of record are available:
TERM : This is a graphical session record
AUDIT : This is the command and file events record
Click on view button to see the recorded sessions/logs
Other information like client, Session duration, User DN, User IP, Host IP and Session ID are also useful here.
This is an example of auditd logs available through WebADM Admin GUI under databases > Recorded Sessions. Click on View button on an AUDIT log type to consult auditd logs:
[2019-11-07 15:26:25] [3385] Executed command '/bin/bash' (pid 82610) in '/home/test-user' as 500:100
[2019-11-07 15:26:25] [3385] > Event 'execve' returned success with code 0
[2019-11-07 15:26:25] [3386] Executed command 'groups' (pid 82618) in '/home/test-user' as 500:100
[2019-11-07 15:26:25] [3386] > Event 'execve' returned success with code 0
[2019-11-07 15:26:25] [3387] Executed command '/bin/sh /usr/bin/lesspipe' (pid 82620) in '/home/test-user' as 500:100
[2019-11-07 15:26:25] [3387] > Event 'execve' returned success with code 0
[2019-11-07 15:26:25] [3388] Executed command 'basename /usr/bin/lesspipe' (pid 82621) in '/home/test-user' as 500:100
[2019-11-07 15:26:25] [3388] > Event 'execve' returned success with code 0
[2019-11-07 15:26:25] [3389] Executed command 'dirname /usr/bin/lesspipe' (pid 82623) in '/home/test-user' as 500:100
[2019-11-07 15:26:25] [3389] > Event 'execve' returned success with code 0
[2019-11-07 15:26:25] [3390] Executed command 'dircolors -b' (pid 82625) in '/home/test-user' as 500:100
[2019-11-07 15:26:25] [3390] > Event 'execve' returned success with code 0
[2019-11-07 15:26:32] [3391] Executed command 'whoami' (pid 82628) in '/home/test-user' as 500:100
[2019-11-07 15:26:32] [3391] > Event 'execve' returned success with code 0
4.2.7 Sudoers Policy Plugin
Since SpanKey Client for Linux v2.2.0 and SpanKey Server v2.0.5-1, you can use Sudo Commands with SpanKey. There is an advanced section that you may use in WebADM to apply the full syntax of the sudoers file (global options, global aliases and rules). Then, the rules coming from Spankey policies (global, user, and client policy) will be appended. So the priority order of the rules are:
Client policy
User policy
Global policy
Rules from the advanced section
Run the following command sudo -V to check if SpanKey sudoers policy plugin has been successfully loaded:
$ ssh -i centos7 centos7@192.168.3.120

Welcome to SpanKey SSH Server.
This is a demonstration by RCDEVS SA.

Session recording is enabled.
Audit logs recording is enabled.
Session lock idle time is 10 minutes.
Session's max duration is 30 minutes.

[centos7@centos7-client ~]$ sudo -V
Sudo version 1.8.23

SpanKey sudoers policy plugin version 2.3.0
Copyright 2010-2019 RCDevs SA, All rights reserved.

Sudoers file grammar version 46
Sudoers I/O plugin version 2.3.0
[centos7@centos7-client ~]$ exit
exit

>>>> Session's duration was aprox 6 seconds <<<<

Connection to 192.168.3.120 closed.
$
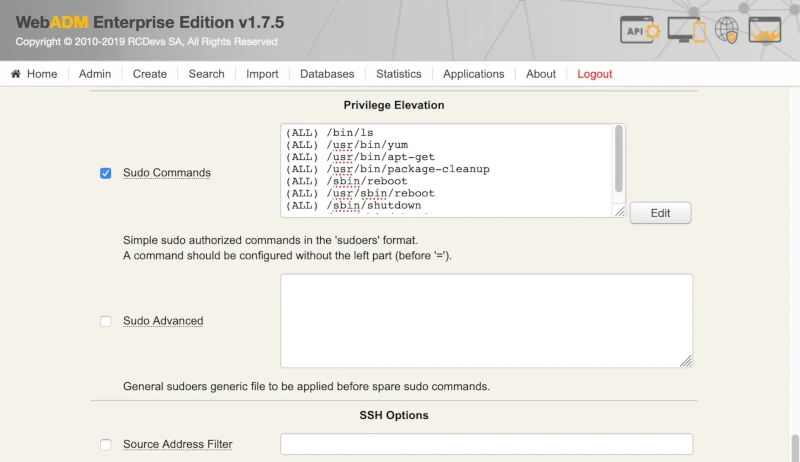
Authorized sudo commands can be set in WebADM GUI> Applications > SSH Public Key Server (SpanKey) v2.0.5-1> Configure> Privilege Elevation:
Run the following command sudo -l to check the rights and the set of rules:
$ ssh -i centos7 centos7@192.168.3.120

Welcome to SpanKey SSH Server.
This is a demonstration by RCDEVS SA.

Session recording is enabled.
Audit logs recording is enabled.
Session lock idle time is 10 minutes.
Session's max duration is 30 minutes.

[centos7@centos7-client ~]$ sudo -l
User centos7 may run the following commands on centos7-client:
    (ALL) /bin/ls
    (ALL) /usr/bin/yum
    (ALL) /usr/bin/apt-get
    (ALL) /usr/bin/package-cleanup
    (ALL) /sbin/reboot
    (ALL) /usr/sbin/reboot
    (ALL) /sbin/shutdown
    (ALL) /usr/sbin/shutdown
[centos7@centos7-client ~]$ exit
exit

>>>> Session's duration was aprox 4 seconds <<<<

Connection to 192.168.3.120 closed.
$
4.2.8 Change Password Remotely
In a Spankey installation, Users can now change their LDAP account password with the passwd command when the option is enabled in Spankey Server configuration. The setting is named Allow Password Change and must be set to Yes to benefit that feature from Spankey Clients :
ubuntu20.04:~$ passwd

Changing password for Spankey_user.
Old password:*******
New password: ********
Retype new password: ********

passwd: Password changed.
The new password provided must meet the LDAP password policies. No other password policies are applied.
4.3 OpenSSH
The SpanKey client setup script asks us during the setup if we want to enable SpanKey for OpenSSH and we reply Yes to this question.
This action involves changing /etc/ssh/sshd_config configuration file. The script edit the following parameters:
Depending on the SSHd version, you might need to use AuthorizedKeysCommandRunAs instead of AuthorizedKeysCommandUser.
Restart SSHd if you change the configuration.
service sshd restart
4.4 NSS Provider
4.4.1 RHEL & CentOS
The SpanKey client setup script asks us during the setup if we want to enable SpanKey for NSCD and we reply Yes to this question.
This action involves changing /etc/nsswitch.conf configuration file.
To check if your LDAP users are well returned on your spankey_client, you can use the following command:
getent passwd
This command should return all LDAP accounts allowed for this host. An LDAP account can be returned only if the account is extended to UNIX. Please refer to step 5.0 Users/Groups Management to know how to activate/extend an LDAP account for SpanKey usage.
[root@webadm temp]# getent passwd#### The following accounts are local accounts root:x:0:0:root:/root:/bin/bash
bin:x:1:1:bin:/bin:/sbin/nologin
daemon:x:2:2:daemon:/sbin:/sbin/nologin
adm:x:3:4:adm:/var/adm:/sbin/nologin
lp:x:4:7:lp:/var/spool/lpd:/sbin/nologin
sync:x:5:0:sync:/sbin:/bin/sync
shutdown:x:6:0:shutdown:/sbin:/sbin/shutdown
halt:x:7:0:halt:/sbin:/sbin/halt
mail:x:8:12:mail:/var/spool/mail:/sbin/nologin
operator:x:11:0:operator:/root:/sbin/nologin
games:x:12:100:games:/usr/games:/sbin/nologin
ftp:x:14:50:FTP User:/var/ftp:/sbin/nologin
nobody:x:99:99:Nobody:/:/sbin/nologin
dbus:x:81:81:System message bus:/:/sbin/nologin
polkitd:x:999:998:User for polkitd:/:/sbin/nologin
avahi:x:70:70:Avahi mDNS/DNS-SD Stack:/var/run/avahi-daemon:/sbin/nologin
avahi-autoipd:x:170:170:Avahi IPv4LL Stack:/var/lib/avahi-autoipd:/sbin/nologin
postfix:x:89:89::/var/spool/postfix:/sbin/nologin
sshd:x:74:74:Privilege-separated SSH:/var/empty/sshd:/sbin/nologin
admin:x:1000:1000:admin:/home/admin:/bin/bash
nscd:x:28:28:NSCD Daemon:/:/sbin/nologin
systemd-bus-proxy:x:998:996:systemd Bus Proxy:/:/sbin/nologin
systemd-network:x:192:192:systemd Network Management:/:/sbin/nologin
tss:x:59:59:Account used by the trousers package to sandbox the tcsd daemon:/dev/null:/sbin/nologin
webadm:x:997:995::/opt/webadm:/bin/bash
mysql:x:27:27:MariaDB Server:/var/lib/mysql:/sbin/nologin
ntp:x:38:38::/etc/ntp:/sbin/nologin
tcpdump:x:72:72::/:/sbin/nologin
radiusd:x:95:95:radiusd user:/var/lib/radiusd:/sbin/nologin
spankey:x:996:1001:SpanKey Client System User:/opt/spankey:/sbin/nologin
#### The following accounts are LDAP accountsAdministrateur:x:1111:111::/home/administrateur:/bin/bash
quick:x:500:100::/home/quick:/bin/bash
yoann:x:1010:100::/home/yoann:/bin/bash
test-user:x:500:100::/home/test-user:/bin/bash
Note
« getent passwd » command may take few seconds to yield results.
After the getent passwd command, you should have the following result in /opt/webadm/logs/webadm.log (server side) if the command has worked successfully:
To check if your LDAP groups are well returned on your spankey client machine, you can use the following command:
getent group
Note that only activated LDAP groups will be returned with this command. Please refer to step 5.0 Users/Groups Management to know how to activate/extend an LDAP group for SpanKey usage.
[root@we2yo tmp]# getent group#### The following groups are local groupsroot:x:0:
bin:x:1:
daemon:x:2:
sys:x:3:
adm:x:4:
tty:x:5:
disk:x:6:
lp:x:7:
mem:x:8:
kmem:x:9:
wheel:x:10:
cdrom:x:11:
mail:x:12:postfix
man:x:15:
dialout:x:18:webadm
floppy:x:19:
games:x:20:
tape:x:30:
video:x:39:
ftp:x:50:
lock:x:54:
audio:x:63:
nobody:x:99:
users:x:100:
avahi-autoipd:x:170:
utmp:x:22:
utempter:x:35:
ssh_keys:x:999:
input:x:998:
systemd-journal:x:190:
systemd-bus-proxy:x:997:
systemd-network:x:996:
dbus:x:81:
polkitd:x:995:
dip:x:40:
tss:x:59:
postdrop:x:90:
postfix:x:89:
chrony:x:994:
sshd:x:74:
mysql:x:993:
webadm:x:1000:
ldap:x:55:
slocate:x:21:
nscd:x:28:
tcpdump:x:72:
cgred:x:992:
docker:x:991:
radiusd:x:990:
toto:x:1003:
apache:x:48:
stapusr:x:156:
stapsys:x:157:
stapdev:x:158:
#### The following groups are LDAP groupsAdministrateurs de l’entreprise:x:100:Administrateur
Admins du domaine:x:101:Administrateur,yoann,vagrant
ITWeb:x:103:vagrant
Invités du domaine:x:110:
testgroup:x:100:testadfs,vagrant
webadm admins:x:102:yoann
yotesting:x:10000:
After the getent group command, you should have the following result in /opt/webadm/logs/webadm.log (server side) if the command has worked successfully:
[2019-04-15 14:49:33][192.168.3.178][SpanKey:GMXOP188] New spankeyNSSList SOAP request
[2019-04-15 14:49:33][192.168.3.178][SpanKey:GMXOP188] > Database: group
[2019-04-15 14:49:33][192.168.3.178][SpanKey:GMXOP188] > Client ID: my_client_id
[2019-04-15 14:49:33][192.168.3.178][SpanKey:GMXOP188] Registered spankeyNSSList request
[2019-04-15 14:49:33][192.168.3.178][SpanKey:GMXOP188] Found 7 NSS groups
[2019-04-15 14:49:33][192.168.3.178][SpanKey:GMXOP188] Sent success response
4.4.4 Name Service Cache Daemon (NSCD)
In Linux, user and group information is often cached by NSCD (Name Service Cache Daemon). This can result in failed SpanKey login right after the installation or after creating a new user since the user is not available in the cache yet.
To resolve this issue, you can wait for the cache to be refreshed on its own, or flush the NSCD cache on your server.
To clear NSCD cache files, invalidate the passwd and group cache:
Be aware, there are limitations on cache timeouts with how NSCD works with nss_ldap and nss-pam-ldapd. This can result in failed SpanKey login.
To resolve this issue, activate the paranoia and set the restart-interval in the following NSCD configuration file /etc/nscd.conf.
4.5.2 SpanKey Client
Install the SpanKey Client.
[root@centos8 ~]# yum install spankey_client-2.2.3-1.x86_64.rpmLast metadata expiration check: 0:15:33 ago on Mon 11 Oct 2021 10:24:45 AM CEST.
Dependencies resolved.
==================================================================================================== Package Architecture Version Repository Size
====================================================================================================Upgrading:
spankey_client x86_64 2.2.3-1 @commandline 3.2 M
Transaction Summary
====================================================================================================Upgrade 1 Package
Total size: 3.2 M
Is this ok [y/N]: y
Downloading Packages:
Running transaction check
Transaction check succeeded.
Running transaction test
Transaction test succeeded.
Running transaction
Preparing : 1/1
Running scriptlet: spankey_client-2.2.3-1.x86_64 1/2
Upgrading : spankey_client-2.2.3-1.x86_64 1/2
Running scriptlet: spankey_client-2.2.3-1.x86_64 1/2
A pre-upgrade instance of the daemon is still running. Do not forget to restart it if you wish all changes to apply...
Running scriptlet: spankey_client-2.2.0-1.x86_64 2/2
Cleanup : spankey_client-2.2.0-1.x86_64 2/2
warning: file /opt/spankey/lib/libxml2.so.2.9.9: remove failed: No such file or directory
warning: file /opt/spankey/lib/libspankey.so.1.0.20: remove failed: No such file or directory
warning: file /opt/spankey/lib/libnss_spankey.so.2.3.0: remove failed: No such file or directory
Running scriptlet: spankey_client-2.2.0-1.x86_64 2/2
Verifying : spankey_client-2.2.3-1.x86_64 1/2
Verifying : spankey_client-2.2.0-1.x86_64 2/2
Installed products updated.
Upgraded:
spankey_client-2.2.3-1.x86_64
Complete!
[root@centos8 ~]# reboot
Run the following command to launch setup wizard: /opt/spankey/bin/setup. Enable the SpanKey Client for OpenSSH server and the NSS plugin.
[root@centos8 ~]# /opt/spankey/bin/setupSetup has already been run for this installation. Overwrite (y/n)?: y
Overwriting...
Enter one of your running WebADM node IP or hostname []: 192.168.4.149
Do you want to enable SpanKey Client for OpenSSH server (y/n)? [N]: y
Do you want to enable SpanKey Client NSS plugin (y/n)? [Y]: y
Do you want to register SpanKey Client logrotate script (y/n)? [Y]: y
Do you want SpanKey Client to be automatically started at boot (y/n)? [Y]: y
Primary OpenOTP service URL is: 'https://192.168.4.149:8443/spankey/' Secondary OpenOTP service URL is: 'NONE' Enable SpanKey Client for OpenSSH server: 'YES' Enable SpanKey Client NSS plugin: 'YES' Register SpanKey Client logrotate script: 'YES' SpanKey Client must be automatically started at boot: 'YES'Do you confirm (y/n)?: y
Applying SpanKey Client settings from default configuration files... Ok
Retrieving WebADM CA certificate from host '192.168.4.149'... Ok
The setup needs now to request a signed 'SpanKey' client certificate.
This request should show up as pending in your WebADM interface and an administrator must accept it.
Waiting for approbation...
At this step, you have to log in on the WebADM Administration GUI to approve the SSL certificate request.
Waiting for approbation... Ok
Updating entry 'client_id' in file '/opt/spankey/conf/spankey.conf'... Ok
Updating file '/etc/ssh/sshd_config'... Ok
Updating file '/etc/nsswitch.conf'... Ok
Updating file '/etc/pam.d/system-auth'... Ok
Updating file '/etc/pam.d/password-auth'... Ok
Registering SpanKey Client service...
Registering SpanKey Client service... Ok
Adding logrotate script... Ok
SpanKey Client has successfully been setup.
IMPORTANT: Do not forget to perform the following actions before you exit this session:
- Start SpanKey (/opt/spankey/bin/spankey start) - Restart 'sshd' - Restart 'nscd'[root@centos8 ~]# reboot
Verify that the SpanKey Client is running.
[root@centos8 ~]# systemctl status spankey● spankey.service - SpanKey Client
Loaded: loaded (/usr/lib/systemd/system/spankey.service; enabled; vendor preset: disabled) Active: active (running) since Mon 2021-10-11 10:52:31 CEST; 3min 2s ago
Process: 1188 ExecStart=/opt/spankey/bin/spankey start (code=exited, status=0/SUCCESS) Main PID: 1274(rcdevs-spankeyd) Tasks: 15(limit: 11284) Memory: 14.0M
CGroup: /system.slice/spankey.service
├─1274 /opt/spankey/libexec/rcdevs-spankeyd
└─1275 spankeyd-worker
Oct 11 10:52:26 centos8.spankeytester systemd[1]: Starting SpanKey Client...
Oct 11 10:52:29 centos8.spankeytester spankey[1188]: Starting SpanKey Client...
Oct 11 10:52:31 centos8.spankeytester spankey[1188]: Starting daemon 'rcdevs-spankeyd'... Ok
Oct 11 10:52:31 centos8.spankeytester systemd[1]: Started SpanKey Client.
[root@centos8 ~]# /opt/spankey/bin/spankey statusSpanKey Client is running with PID 1275 1274.
Verify that the nsswitch configuration file has been modified by adding spankey.
[root@centos8 ~]# cat /etc/nsswitch.conf# Generated by authselect on Thu Apr 8 15:07:44 2021# Do not modify this file manually.# If you want to make changes to nsswitch.conf please modify# /etc/authselect/user-nsswitch.conf and run 'authselect apply-changes'.## Note that your changes may not be applied as they may be# overwritten by selected profile. Maps set in the authselect# profile takes always precedence and overwrites the same maps# set in the user file. Only maps that are not set by the profile# are applied from the user file.## For example, if the profile sets:# passwd: sss files# and /etc/authselect/user-nsswitch.conf contains:# passwd: files# hosts: files dns# the resulting generated nsswitch.conf will be:# passwd: sss files # from profile# hosts: files dns # from user filepasswd: spankey sss files systemd
group: spankey sss files systemd
netgroup: sss files
automount: sss files
services: sss files
# Included from /etc/authselect/user-nsswitch.conf## /etc/nsswitch.conf## An example Name Service Switch config file. This file should be# sorted with the most-used services at the beginning.## The entry '[NOTFOUND=return]' means that the search for an# entry should stop if the search in the previous entry turned# up nothing. Note that if the search failed due to some other reason# (like no NIS server responding) then the search continues with the# next entry.## Valid entries include:## nisplus Use NIS+ (NIS version 3)# nis Use NIS (NIS version 2), also called YP# dns Use DNS (Domain Name Service)# files Use the local files in /etc# db Use the pre-processed /var/db files# compat Use /etc files plus *_compat pseudo-databases# hesiod Use Hesiod (DNS) for user lookups# sss Use sssd (System Security Services Daemon)# [NOTFOUND=return] Stop searching if not found so far## 'sssd' performs its own 'files'-based caching, so it should# generally come before 'files'.# To use 'db', install the nss_db package, and put the 'db' in front# of 'files' for entries you want to be looked up first in the# databases, like this:## passwd: db files# shadow: db files# group: db filesshadow: files sss
hosts: files dns myhostname
bootparams: files
ethers: files
netmasks: files
networks: files
protocols: files
rpc: files
publickey: files
aliases: files
Finally, do a test SpanKey login.
[spankey_tester@spankeytester ~]$ ssh -i templates/LO_u1/keys/CentOS8_em2u2vmk CentOS8_em2u2vmk@192.168.4.136

Session recording is enabled.
Audit logs recording is enabled.
Session lock is disabled.
Session's max duration is unlimited.

Mon Oct 11 12:04:45 CEST 2021
CentOS Linux release 8.4.2105
12:04:45 up 3 min,  3 users,  load average: 0.54, 0.94, 0.45
OpenSSL 1.1.1g FIPS  21 Apr 2020
OpenSSH_8.0p1, OpenSSL 1.1.1g FIPS  21 Apr 2020
Sudo version 1.9.5p2

SpanKey sudoers policy plugin version 2.3.3
Copyright 2010-2021 RCDevs SA, All rights reserved.

Sudoers file grammar version 48
Sudoers I/O plugin version 2.3.3
Sudoers audit plugin version 2.3.3
User centos8_em2u2vmk may run the following commands on centos8:
(ALL) /bin/ls
-rw-------. 1 root root 2.2K Oct 11 11:48 /root/.bash_history
bash-4.4$ exit
exit

>>>> Session's duration was aprox 2 seconds <<<<
Connection to 192.168.4.136 closed.
5. Users/Groups Management
5.1 Users Management (Activation)
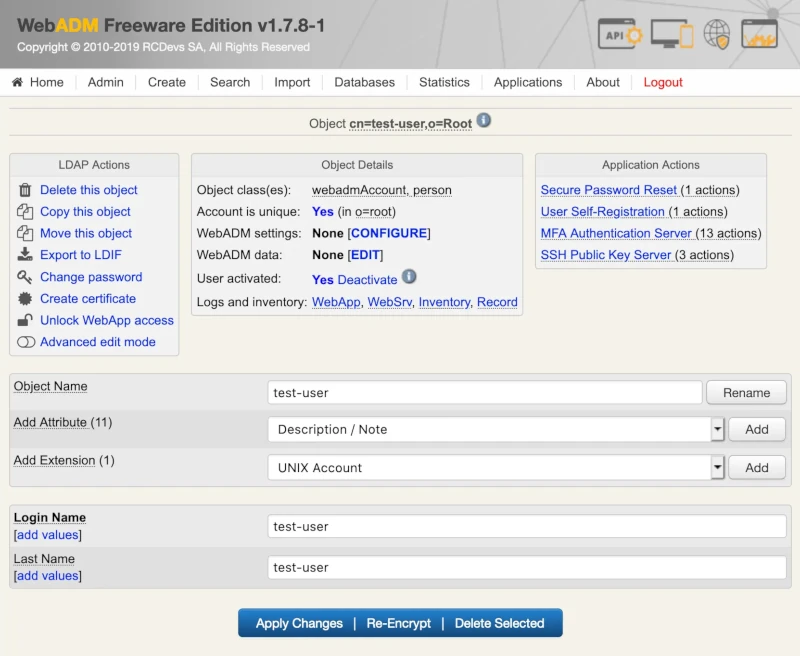
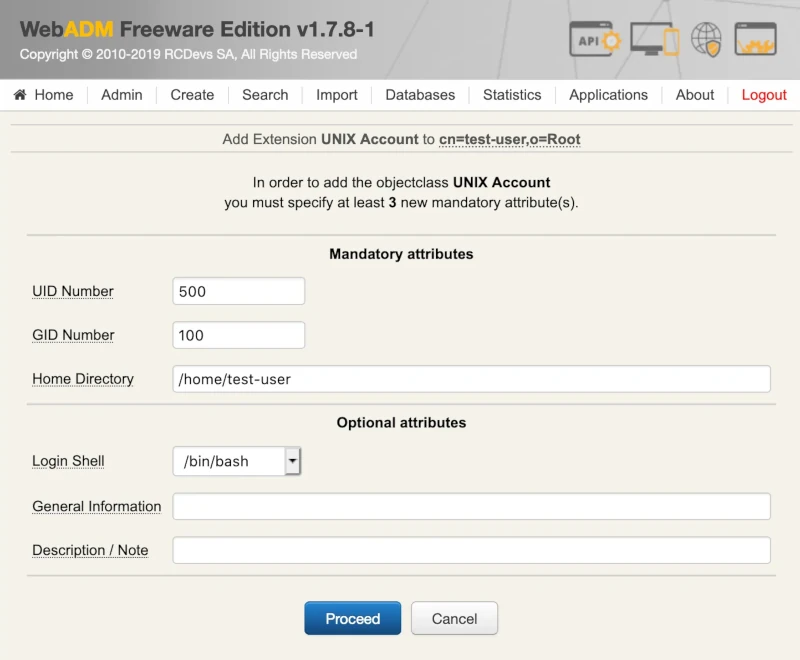
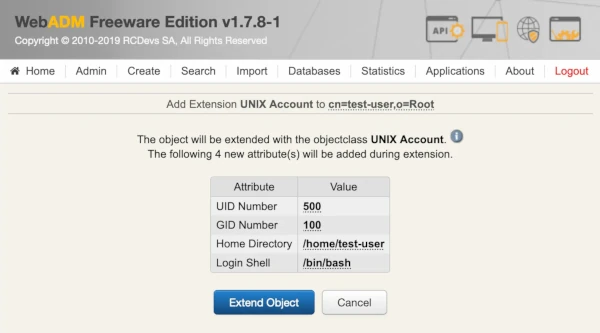
To enable your LDAP users to be propagated as Linux accounts, and to work with the SpanKey, they must be extended with “Unix Account” object class. This is done in the WebADM graphical interface (can be done as a batch jobs as well) as follows:
Choose LDAP account that you like to extend.
Make sure the account is a WebADM account. If not, you must first extend the account with WebADM object class.
Choose WebADM Account in Add Selector. Click Add.
Choose UNIX Account in the Add Extension selector. Click Add.
Enter the following information and click Proceed. Click on Extend Object.
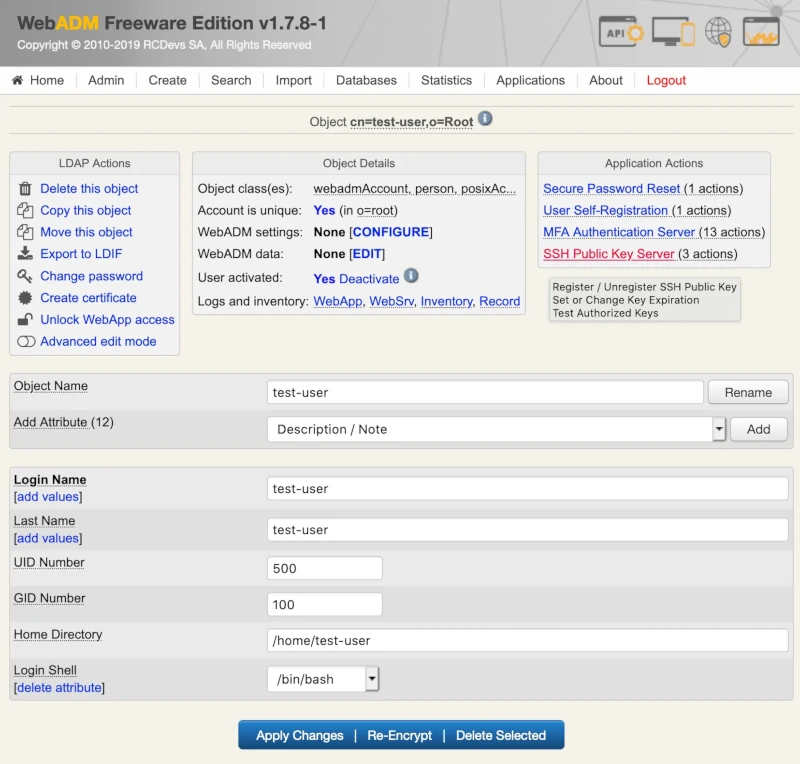
Now, the LDAP Account is extended for UNIX Authentication.
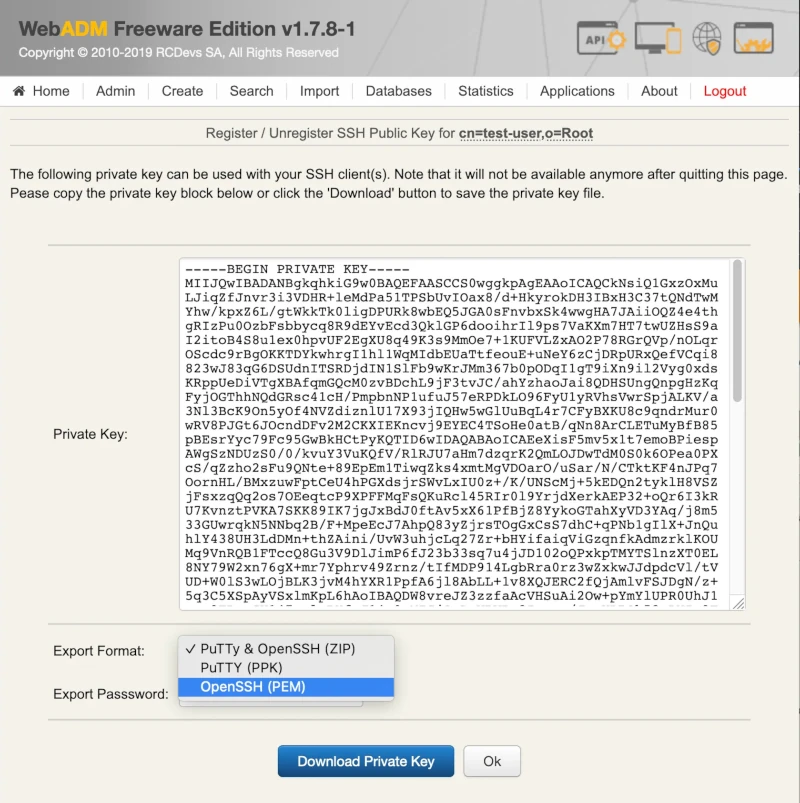
Within the extended LDAP object, click on SSH Public Key Server (Actions box) to generate an SSH Private Key for the user:
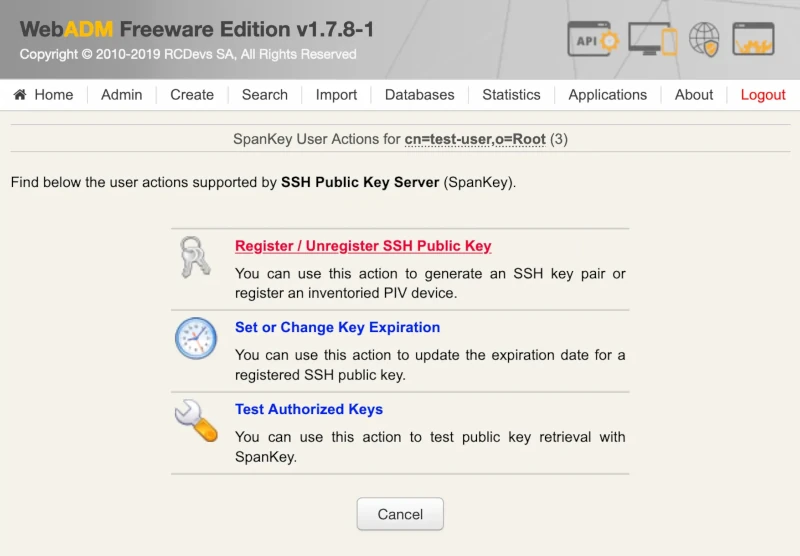
In Application Action box, click on SSH Public Key Server (3 actions), and select the first item Register / Unregister SSH Public Key.
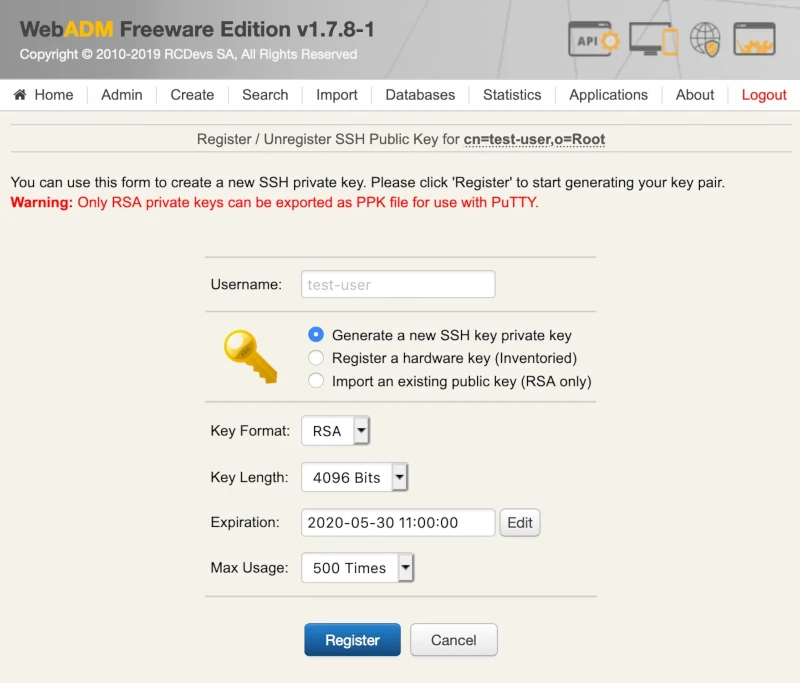
Configure your preferred Key Format and Key Length.
Configure key expiration (optional).
Click on Register.
Your Public and Private Key are now generated by SpanKey server. Choose the format of the Private Key (OpenSSH or Putty) and click on Download Private Key button.
Note
Register or Unregister of SSH Key can also be done through WebADM User Self-Services UI.
Now you can use the generated private key with your LDAP account, through SSH client or Putty and on any server where SpanKey Client is installed on. Without needing to deploy the user’s public keys in authorized_keys files.
To test, connect with your private key on a server managed by SpanKey client, like below:
$ chmod 400 test-user.pem
$ ssh -i test-user.pem test-user@192.168.3.104

Welcome to SpanKey SSH Server.
This is a demonstration by RCDEVS SA.

Session recording is enabled.
Audit logs recording is enabled.
Session lock idle time is 5 minutes.
Session's max duration is 30 minutes.

test-user@ubuntu18-client:~$ exit
exit

>>>> Session's duration was aprox 8 seconds <<<<

Connection to 192.168.3.104 closed.
$
5.2 Groups Management (Activation)
To enable your LDAP groups to be propagated as Linux groups, and to work with the SpanKey, it must be extended with “Unix Group” object class. This is done in the WebADM graphical interface (can be done as a batch jobs as well) as follows:
Choose LDAP group that you like to extend.
Choose UNIX Group in the Add Extension selector. Click Add.
Enter the required information and click Proceed. Click on Extend Object.
Now, the LDAP group is extended for UNIX usage.
5.3 Active Directory Permissions
If you are working with Active Directory and during the UNIX extension you have a failure, it’s probably due to rights permissions. That means your super_admin doesn’t have enough rights to add the UNIX class to the user and/or to write values on UNIX attributes. To fix it, login on the Active Directory server and run the following command through Powershell:
Note that cn=users,dc=test,dc=local is the user search base defined in WebADM Local Domain, TEST is my NetBIOS domain name and webadmadmin is my super_admin account.
For writting on AD administrators, rights previously settled are not enough because AdminSDHolder overwrites these rights every hour. So we need also to apply these rules on AdminSDHolder object and wait one hour that it’s applied on all admin users and groups of the domain: